工具篇--SpringCloud--openFeign--Feign.builder()自定义客户端
文章目录
前言
提示:本文springboot 版本 :2.7.16,spring-cloud-starter-openfeign 版本:3.1.5
在项目中有时候我们既需要和本身集群内的微服务进行调用,也会和外部第三方的服务进行服务调用;在我们自身微服务调用时我们通常已经定义了 RequestInterceptor 并通过@Component 交由Spring 进行管理(在此拦截器中可能对header 进行了操作),此时当我们在这个服务中又调用了第三方服务(在此拦截器中也需要对header 进行了特殊操作),此时就有可能造成多个 RequestInterceptor 冲突,此时我们可以考虑通过-Feign.builder()自定义客户端;
一、自定义客户端:
1.1 定义外部接口类:
public interface SyncFeign3Service {
    @GetMapping("/get")
    Map search(@RequestParam("wd") String wd);

    @PostMapping("/get")
    Map getData(@RequestBody Map<String, Object> map, @RequestHeader("token") String token);
}
这个接口和我们平常写的业务接口类没有任何区别;
1.2 接口代理类生成:
import com.example.springmvctest.feign.api.SyncFeign3Service;
import feign.Contract;
import feign.Feign;
import feign.Logger;
import feign.codec.Decoder;
import feign.codec.Encoder;
import feign.slf4j.Slf4jLogger;
import lombok.Getter;
import org.springframework.beans.factory.annotation.Autowired;
import org.springframework.cloud.openfeign.FeignClientsConfiguration;
import org.springframework.context.annotation.Configuration;
import org.springframework.context.annotation.Import;

@Getter
@Configuration
@Import(FeignClientsConfiguration.class)
public class CustomerFeign {


    private SyncFeign3Service fooClient;


    @Autowired
    public CustomerFeign(Encoder encoder, Decoder decoder, Contract contract) {
//        List<RequestInterceptor> requestInterceptors = new ArrayList<>();
//        requestInterceptors.add(new MyInterceptor3());
        Logger slf4jLogger = new Slf4jLogger(SyncFeign3Service.class);
        this.fooClient = Feign.builder()
                .encoder(encoder)
                .decoder(decoder)
                .contract(contract)
                .requestInterceptor(new MyInterceptor3())
//                .requestInterceptors(requestInterceptors)
                .logger(slf4jLogger)
                .logLevel(Logger.Level.FULL)
                .target(SyncFeign3Service.class, "http://localhost:8081/test");

    }
}
- @Configuration 标注可以被spring 管理;
- FeignClientsConfiguration 导入该类获取到已经在容器中存在的 encoder,decoder,contract 的bean
- 最后通过Feign.builder() 构建客户端;
- requestInterceptor 可以单个添加拦截,requestInterceptors 可以匹配添加拦截;
- logger 用来定义日志的实现类,logLevel 定义feign日志级别;
- target 通过target 方法生成代理对象 并赋值给 接口对象,SyncFeign3Service ;
1.3 方法的远程调用:
@RestController
@RequestMapping("/test/feign")
class FooController {

    @Autowired
    private CustomerFeign fooClient;

    @GetMapping("/getData3")
    public Map getData() {
        Map<String,Object> map = new HashMap<>();
        map.put("name","lis");
        map.put("age",18);
        return fooClient.getFooClient().getData(map,"1234556");
    }
}
在控制器中注入 接口代理类,进而完成方法的调用;如果想要看下其具体的实现可以继续向下阅读;
二、Feign.builder()自定义客户端原理:
省流总结 :Feign.builder() 自定义客户端 最后也是通过 Feign 类中的 Builder类 target 方法为其生成代理对象;

我们通过Feign.builder()自定义的客户端 最终也是调用了Builder类 target 方法 ,而链式调用设置encoder,decoder,contract ,也是参考的 FeignClientFactoryBean 中 getTarget() 方法;
我们知道 openfeign 是个rpc 框架,本身实现是用了jdk 的动态代理 来为接口生成代理对象,最终业务的实现是交由代理对象 去创建http 请求,向远程服务发起调用;而在openfeign·中用来生成feign 接口的动态代理类就是FeignClientFactoryBean ,每个feign 接口都会生成一个FeignClientFactoryBean 的bean 对象,他们通过在feign 接口中定义的contextId 进行区分;
2.1 FeignClientFactoryBean
因为 FeignClientFactoryBean 实现 了FactoryBean 接口,最终spring 在获取 FeignClientFactoryBean 的bean 时,会调用getObject() 方法获取最终的bean:
public Object getObject() {
    return this.getTarget();
}
调用了本身类中的getTarget 方法:
 <T> T getTarget() {
 		// 获取spring 容器中的 FeignContext bean
        FeignContext context = this.beanFactory != null ? (FeignContext)this.beanFactory.getBean(FeignContext.class) : (FeignContext)this.applicationContext.getBean(FeignContext.class);
        // 重要方法 创建feign 客户端 并对其编码,解码,连接超时等进行配置
    Feign.Builder builder = this.feign(context);
    // 获取feign 接口中的url,如果 url 不以http 开头,则说明要通过微服务的名字 去具体的nacos/Eureka 去拿到一个url
    if (!StringUtils.hasText(this.url)) {
        if (LOG.isInfoEnabled()) {
            LOG.info("For '" + this.name + "' URL not provided. Will try picking an instance via load-balancing.");
        }

        if (!this.name.startsWith("http")) {
            this.url = "http://" + this.name;
        } else {
            this.url = this.name;
        }

        this.url = this.url + this.cleanPath();
        return this.loadBalance(builder, context, new Target.HardCodedTarget(this.type, this.name, this.url));
    } else {
        if (StringUtils.hasText(this.url) && !this.url.startsWith("http")) {
            this.url = "http://" + this.url;
        }

        String url = this.url + this.cleanPath();
        Client client = (Client)this.getOptional(context, Client.class);
        if (client != null) {
            if (client instanceof FeignBlockingLoadBalancerClient) {
                client = ((FeignBlockingLoadBalancerClient)client).getDelegate();
            }

            if (client instanceof RetryableFeignBlockingLoadBalancerClient) {
                client = ((RetryableFeignBlockingLoadBalancerClient)client).getDelegate();
            }

            builder.client(client);
        }

        this.applyBuildCustomizers(context, builder);
        Targeter targeter = (Targeter)this.get(context, Targeter.class);
        // 通过 Feign 类中的 Builder类 target 方法为其生成代理对象
        return targeter.target(this, builder, context, new Target.HardCodedTarget(this.type, this.name, url));
    }
}
上面代码中有两处比较重要的地方法, this.feign(context) 获取 Feign.builder() 客户端的配置,targeter.target 方法生成代理对象;所以我们自定义的-Feign.builder() 客户端也只需要 完成这两个动作就可以;下面具体看下客户端的配置和代理类生成的逻辑;
2.2 客户端的配置设置:
protected Feign.Builder feign(FeignContext context) {
	// log 日志实现类的获取
 FeignLoggerFactory loggerFactory = (FeignLoggerFactory)this.get(context, FeignLoggerFactory.class);
    Logger logger = loggerFactory.create(this.type);
    // 链式调用 设置 编解码 ,contract 协议
    Feign.Builder builder = ((Feign.Builder)this.get(context, Feign.Builder.class)).logger(logger).encoder((Encoder)this.get(context, Encoder.class)).decoder((Decoder)this.get(context, Decoder.class)).contract((Contract)this.get(context, Contract.class));
    // 设置 系统默认的配置文件,客户端自定义的配置文件
    this.configureFeign(context, builder);
    return builder;
}
上面代码 主要是构建了Feign.Builder 对象,并通过 configureFeign 方法解析配置设置超时时间,拦截器等;
protected void configureFeign(FeignContext context, Feign.Builder builder) {
 FeignClientProperties properties = this.beanFactory != null ? (FeignClientProperties)this.beanFactory.getBean(FeignClientProperties.class) : (FeignClientProperties)this.applicationContext.getBean(FeignClientProperties.class);
   FeignClientConfigurer feignClientConfigurer = (FeignClientConfigurer)this.getOptional(context, FeignClientConfigurer.class);
   this.setInheritParentContext(feignClientConfigurer.inheritParentConfiguration());
   if (properties != null && this.inheritParentContext) {
       if (properties.isDefaultToProperties()) {
       		// feign 客户端定义的配置类解析
           this.configureUsingConfiguration(context, builder);
           // 系统默认的配置解析
           this.configureUsingProperties((FeignClientProperties.FeignClientConfiguration)properties.getConfig().get(properties.getDefaultConfig()), builder);
           // 配置的客户端解析
           this.configureUsingProperties((FeignClientProperties.FeignClientConfiguration)properties.getConfig().get(this.contextId), builder);
       } else {
           this.configureUsingProperties((FeignClientProperties.FeignClientConfiguration)properties.getConfig().get(properties.getDefaultConfig()), builder);
           this.configureUsingProperties((FeignClientProperties.FeignClientConfiguration)properties.getConfig().get(this.contextId), builder);
           this.configureUsingConfiguration(context, builder);
       }
   } else {
       this.configureUsingConfiguration(context, builder);
   }

}
这里进行简单的说明:
-
configureUsingConfiguration 解析通过 @FeignClient 配置的configuration 的配置类;
-
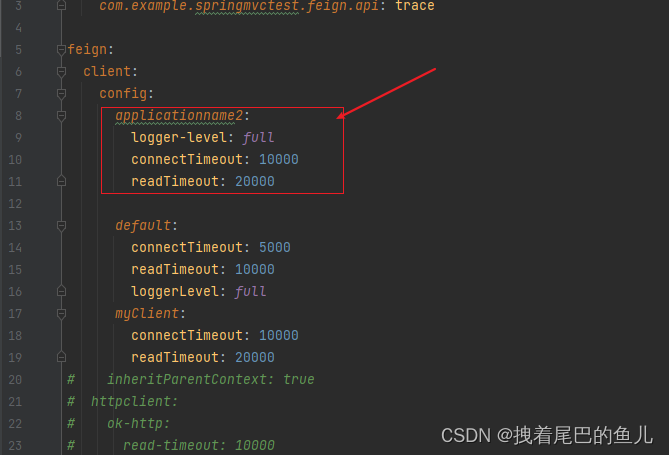
configureUsingProperties:解析feign 默认的配置 比如 default 配置:

-
configureUsingProperties:最后一个解析通过配置文件定义给某个客户端的配置,这里的applicationname2 对应某个@FeignClient 定义的contextId 或者 name


2.3 代理类的生成:
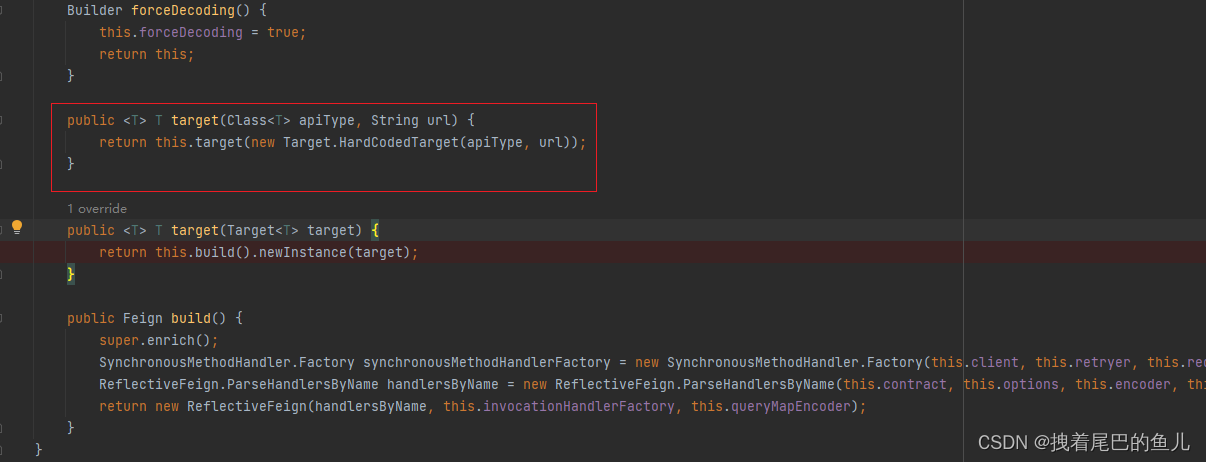
最终通过Feign 下的 Builder 类中的 target 方法生成代理对象:这里只展示部分代码
public <T> T target(Target<T> target) {
	return this.build().newInstance(target);
}

public Feign build() {
    super.enrich();
    SynchronousMethodHandler.Factory synchronousMethodHandlerFactory = new SynchronousMethodHandler.Factory(this.client, this.retryer, this.requestInterceptors, this.responseInterceptor, this.logger, this.logLevel, this.dismiss404, this.closeAfterDecode, this.propagationPolicy, this.forceDecoding);
    ReflectiveFeign.ParseHandlersByName handlersByName = new ReflectiveFeign.ParseHandlersByName(this.contract, this.options, this.encoder, this.decoder, this.queryMapEncoder, this.errorDecoder, synchronousMethodHandlerFactory);
    return new ReflectiveFeign(handlersByName, this.invocationHandlerFactory, this.queryMapEncoder);
}
- .build() 方法对代理类的一些属性进行配置 其中SynchronousMethodHandler 在我们需要调用远程服务时会 通过 invoke 方法组装http 请求 并最终发起http 请求访问;
- newInstance(target) 生成代理对象并返回;
总结
本文通过Feign.builder() 自定义Feign 客户端,做到每个feign 客户端自身完全隔离。
本文来自互联网用户投稿,该文观点仅代表作者本人,不代表本站立场。本站仅提供信息存储空间服务,不拥有所有权,不承担相关法律责任。 如若内容造成侵权/违法违规/事实不符,请联系我的编程经验分享网邮箱:veading@qq.com进行投诉反馈,一经查实,立即删除!