Start 方法源码深究——模板方法设计模式
目录

一. 🦁 前言
先来了解一下线程启动到生命结束的大致过程:
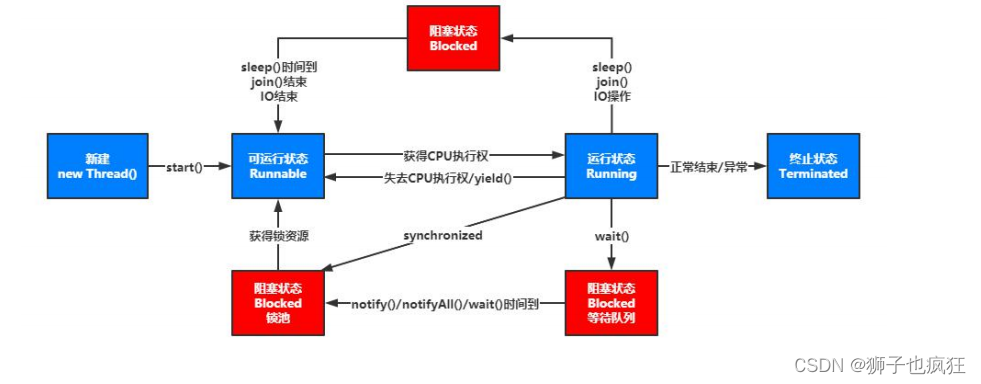
1.1 New状态
当我们用关键字 new 创建一个 Thread 对象时 ,此时它并不处于执行状态 ,因为没有调用 start 方法启动该线程 ,此时线程的状态为 new 状态 ,它只是 Thread 对象的状态(相当于new 了一个Thread对象),因为在没有 start() 之前 ,该线程根本不存在 ,new 状态时通过 start 方法进入 Runnable 状态。
1.2 Runnable
线程对象进入 Runnable 状态必须调用 start 方法 ,此时才真正地在 JVM 进程中创建 了一个线程。
线程一经启动就会立即得到执行吗?
答案是否定的 ,线程的运行与否和进程一 样都要听令于 CPU 的调度 ,所以我们把这个中间状态称为可执行状态(Runnable) ,也就是 说它具备执行的资格 ,但是并没有真正的执行起来而是在等待 CPU 的调度。
由于存在 Running 状态 ,所以不会直接进入 Blocked 状态和 Terminated 状态 ,即使是在线程的执行逻辑中调用 wait、 sleep 或者其他block 的 IO 操作等 ,也必须先获得 CPU 的调度执行权才可以 ,严格来讲 ,Runnable 的线程只能意外终止或者进入 Running 状态。
1.3 Runing
一旦 CPU 通过轮询或其他方式从任务可执行队列中选中了线程 ,那么此时它才能真正 地执行 run 方法里的逻辑代码。在该状态中 ,线程的状态可以发生如下的状态转换。
- 直接进入 Terminated 状态 ,比如调用 JDK 已经不推荐使用的 stop 方法或者意外死亡;
- 进入 Blocked 状态 ,比如调用 sleep 或者 wait 方法而加入了 waitSet 中;
- 进行某个阻塞的 IO 操作 ,比如因网络数据的读写而进入了 Blocked ;
- 获取某个锁资源 ,从而加入到该锁的阻塞队列中而进入了 Blocked ;
- 由于 CPU 的调度器轮询使该线程放弃执行 ,进入 Runnable 状态;
- 线程主动调用 yield 方法 ,放弃 CPU 执行权 ,进入 Runnable;
1.4 Block状态
上面已经介绍了线程进入 Blocked 状态的原因 ,这里不在赘述。线程在 Blocked 状态 中可以切换至如下几个状态。
- 直接进入 Terminated 状态 ,比如调用 JDK 已经不推荐使用的 stop 方法或者意外死 亡;
- 线程阻塞的操作结束 ,比如读取了想要的数据字节进入到 Runnable;
- 线程完成了指定时间的休眠 ,进入到了 Runnable ;
- wait 中的线程被其他线程 notify/notifyall 唤醒 ,进入 Runnable ;
- 线程获取到了某个锁资源 ,进入 Runnable;
- 线程在阻塞过程中被打断 ,比如其他线程调用了 interrupt 方法 ,进入 Runnable。
1.5 Terminated状态
Terminated 是一个线程的最终状态 ,在该状态中线程将不会切换到其他任何状态 ,线程进入 Terminated ,意味着该线程的生命周期都结束了 ,下面这些情况会使线程进入 Terminated 状态。
- 线程运行正常结束 ,结束生命周期;
- 线程运行出错 ,意外结束;
- JVM Crash,导致所有的线程都结束。
二. 🦁 线程 start 方法源码剖析
    /**
     * 2.1 Causes this thread to begin execution; the Java Virtual Machine
     * calls the {@code run} method of this thread.
     * <p>
     * 2.2 The result is that two threads are running concurrently: the
     * current thread (which returns from the call to the
     * {@code start} method) and the other thread (which executes its
     * {@code run} method).
     * <p>
     * 2.3 It is never legal to start a thread more than once.
     * In particular, a thread may not be restarted once it has completed
     * execution.
     *
     * @throws     IllegalThreadStateException  if the thread was already started.
     * @see        #run()
     * @see        #stop()
     */
    public synchronized void start() {
        /**
         * This method is not invoked for the main method thread or "system"
         * group threads created/set up by the VM. Any new functionality added
         * to this method in the future may have to also be added to the VM.
         *
         * A zero status value corresponds to state "NEW".
         */
        if (threadStatus != 0)
            throw new IllegalThreadStateException();

        /* Notify the group that this thread is about to be started
         * so that it can be added to the group's list of threads
         * and the group's unstarted count can be decremented. */
        group.add(this);

        boolean started = false;
        try {
            start0();
            started = true;
        } finally {
            try {
                if (!started) {
                    group.threadStartFailed(this);
                }
            } catch (Throwable ignore) {
                /* do nothing. If start0 threw a Throwable then
                  it will be passed up the call stack */
            }
        }
    }

    private native void start0();
所谓源码之下无秘密,源码的注释里面已经跟我们解释了start()方法的作用以及相关要点,我们根据上面标注的序号,一个一个来看:
2.1 虚拟机调用run方法执行线程
当调用start()后,JVM虚拟机则会调用run()方法,线程开始进入可执行状态。
2.2 最少有两个线程在执行
在main方法中,新起的线程其实都是主线程下开辟的子线程,子线程在执行时,主线程一定也会执行,他俩交替并行执行。则此时则一共有两条线程在执行(只有一条子线程的情况下)。
2. 3 不可以重复执行
子线程在调用过程中,不允许被重复执行两次,即不能重复调用两次start()。
即使子线程结束后,也是不能重新被调用的,否则会抛出线程不合法异常(IllegalThreadStateException)。
2.4 start方法体
我们现在来看一下start方法体里面的流程:
- 状态检验
这里会给我们来个状态检验,检验线程是否是初次执行,如果是初始执行的,则threadStatus = 0,表示NEW新建状态,否则,抛出IllegalThreadStateException();
 if (threadStatus != 0)
            throw new IllegalThreadStateException();
实践一下:启动一个start(),打断点调试:


如果再调用一次start()

结果如下:

此时threadStatus = 5,再执行则会抛出异常了。

- 添加线程进线程组
group.add(this);
- 调用c++的native方法,执行run()
 boolean started = false;
        try {
            start0();
            started = true;
        } finally {
            try {
                if (!started) {
                    group.threadStartFailed(this);
                }
            } catch (Throwable ignore) {
                /* do nothing. If start0 threw a Throwable then
                  it will be passed up the call stack */
            }
        }
    }
这里调用c++的native方法,执行run(),如果启动失败,则从线程组中移除当前线程。
所以这里其实就是为了执行run(),但是我们前面写的时候是直接调用了start()方法,为什么会这样呢?
这里就涉及到一个叫 模板方法的 设计模式。
三. 🦁 模板方法设计模式
3.1 基本概念
定义了一个操作算法的框架,将一些步骤延迟到子类中执行。使得子类可以不改变一
个算法的结构即可重定义该算法的某些步骤。还可以通过子类来决定父类算法中某个步骤是
否执行,实现子类对父类的反向控制。
比如启动线程 start 的行为由 JVM 虚拟机来决定,但是该线程做什么事情就不由它来 决定了。对外提供了 run 方法,内部就是你自己线程的执行逻辑。
3.2 自定义一个场景实现模板方法模式
拿做西红柿炒蛋的例子来说明,同样的步骤其实不同的人做出来的饭是不一样的。就拿自己
和五星级大厨来比较吧。比如就做个西红柿鸡蛋,我们可以简单地定义一下步骤:
- 第一步:放油
- 第二步:放鸡蛋
- 第三步:放西红柿
如果按照模板方法的思路去构建,我们需要剥离出两个角色:
- 模板方法:父类,定义一系列方法,提供骨架;
- 具体类:实现模板方法类提供的骨架。根据自己的个性化需求重写模板方法
/**
 * 模板方法类
 */
public abstract class Cook {
    abstract void oil();        //放油
    abstract void egg();        //打鸡蛋
    abstract void tomato();     //放西红柿

    // 封装具体的行为:做饭
    public final void cook(){
        oil();
        egg();
        tomato();
    }
}
- 继承模板方法类
public class MyCooking extends Cook{
    @Override
    void oil() {
        System.out.println("我:"+"适量油!");
    }

    @Override
    void egg() {
        System.out.println("我:"+"搅拌适量鸡蛋!");
    }

    @Override
    void tomato() {
        System.out.println("我:"+"放西红柿!");
    }
}
public class Chef extends Cook{
    @Override
    void oil() {
        System.out.println("大厨:"+"适量油!");
    }

    @Override
    void egg() {
        System.out.println("大厨:"+"搅拌适量鸡蛋!");
    }

    @Override
    void tomato() {
        System.out.println("大厨:"+"放西红柿!");
    }
}
- 实现:
public class Test {
    public static void main(String[] args) {
        new MyCooking().cook();
        new Chef().cook();
        System.out.println("我和大厨做得一样好吃!");
    }
}

3.3 钩子函数
这里就实现了模板设计模式,但是似乎还没做到通过子类来决定父类算法中某个步骤是 否执行,实现子类对父类的反向控制,这里我们需要通过钩子函数去实现:
- 我们在模板方法里面添加一个钩子函数,让他决定炒菜过程中是否要放油:
/**
 * 模板方法类
 */
public abstract class Cook {
    abstract void oil();        //放油
    abstract void egg();        //打鸡蛋
    abstract void tomato();     //放西红柿

    boolean isOil(){
        return true;
    }

    // 封装具体的行为:做饭
    public final void cook(){
        if (isOil())
            oil();
        egg();
        tomato();
    }
}
- 在其中一个实现类中,重写isOil():
public class MyCooking extends Cook{

    private boolean isAddOilFlag = true;

    @Override
    boolean isOil() {
        return this.isAddOilFlag;
    }

    @Override
    void oil() {
        System.out.println("我:"+"适量油!");
    }

    @Override
    void egg() {
        System.out.println("我:"+"搅拌适量鸡蛋!");
    }

    @Override
    void tomato() {
        System.out.println("我:"+"放西红柿!");
        System.out.println("没放油,菜糊啦!!!");
    }
}
- 测试结果:


🦁 其它优质专栏推荐 🦁
🌟《Java核心系列(修炼内功,无上心法)》: 主要是JDK源码的核心讲解,几乎每篇文章都过万字,让你详细掌握每一个知识点!
🌟 《springBoot 源码剥析核心系列》:一些场景的Springboot源码剥析以及常用Springboot相关知识点解读
欢迎加入狮子的社区:『Lion-编程进阶之路』,日常收录优质好文
更多文章可持续关注上方🦁的博客,2023咱们顶峰相见!
本文来自互联网用户投稿,该文观点仅代表作者本人,不代表本站立场。本站仅提供信息存储空间服务,不拥有所有权,不承担相关法律责任。 如若内容造成侵权/违法违规/事实不符,请联系我的编程经验分享网邮箱:veading@qq.com进行投诉反馈,一经查实,立即删除!