Docker单机部署OceanBase
2023-12-17 04:50:16
文章目录
说明
机器软硬件要求
- 机器有足够的资源可以执行至少 2 个物理核心和 4GB 内存(官方推荐8g及以上)但是4g内存拿来学习使用也是可以,官方提供的试用的服务就是4g内存
- Docker环境
- 推荐使用1panel进行服务器的可视化管理和维护
指导文档
本次部署环境说明
- 系统:armbian( debian-11.7)
- cpu:Cortex-A55 4c
- 内存:4G
- 硬盘容量:32G
OceanBase单机部署(Docker)
一:拉取 OceanBase 数据库相关镜像
- 拉取 OceanBase 数据库最新镜像,默认安装最新版,可在OceanBase镜像地址进行版本选择
docker pull oceanbase/oceanbase-ce
二:启动 OceanBase 数据库实例
- 启动 OceanBase 实例时,执行以下命令:
#根据当前容器部署最大规格实例
docker run -p 2881:2881 --name obstandalone -e MINI_MODE=0 -d oceanbase/oceanbase-ce
#部署 mini 的独立实例
docker run -p 2881:2881 --name obstandalone -e MINI_MODE=1 -d oceanbase/oceanbase-ce
-
挂载数据卷版本
docker run -d -p 2881:2881 -v $PWD/ob:/root/ob -v $PWD/obd:/root/.obd --name oceanbase oceanbase/oceanbase-ce- 注意:docker 镜像将数据保存到 /root/ob 目录默认。应同时绑定 /root/ob 和 /root/.obd。如果只绑定 /root/ob 目录,则无法启动新的 docker 镜像,因为 docker 镜像 oceanbase-ce 使用 obd 来管理数据库集群,而新的 docker 容器中没有关于数据库集群的信息
-
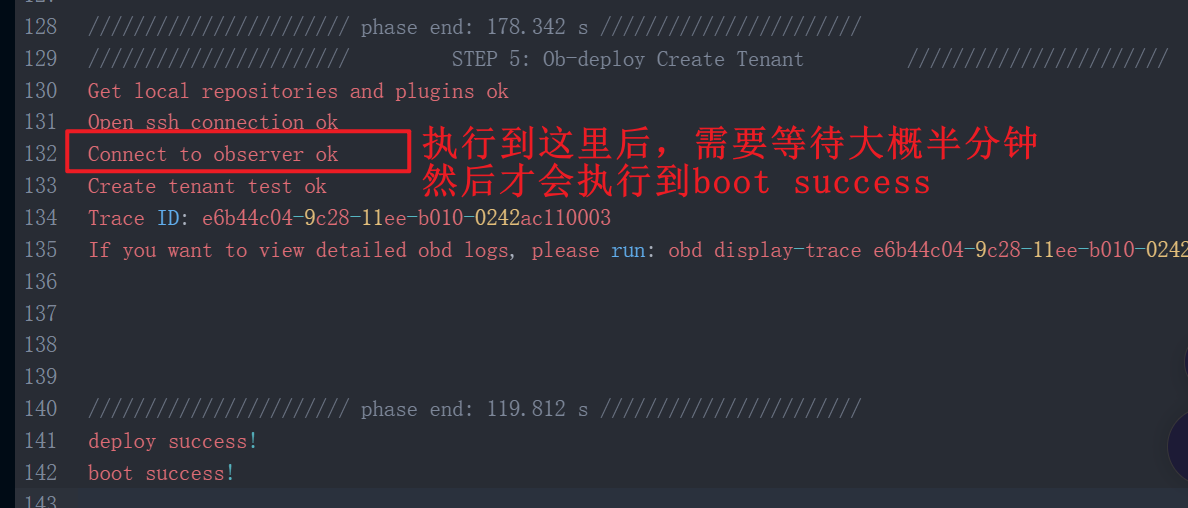
启动预计需要 2~5 分钟。执行以下命令,如果返回 boot success!,则表示启动成功。
- 需要耐心等待,因为初始化需要很多操作,需要一些时间,cpu干到100%是正常的现象
- 着急的话建议执行命令,参考下面提供的完整日志信息进行查看
root@armbian:~# docker logs obstandalone | tail -1
boot success!

完整启动日志展示
///         STEP 1: Config Generation         ///
oceanbase-ce docker in mini mode
/// phase end: 0.155 s ///
///         STEP 2: Ob-deploy mirror clone         ///
name: ob-configserver
version: 1.0.0
release:2.el7
arch: aarch64
md5: 35c121739b84e26b57dae1276ce33ba1186411e3
add /root/pkg/ob-configserver-1.0.0-2.el7.aarch64.rpm to local mirror
name: obagent
version: 4.2.1
release:100000092023101717.el7
arch: aarch64
md5: 4c0f5de0abc7c633454642540cb458b7a855aed2
add /root/pkg/obagent-4.2.1-100000092023101717.el7.aarch64.rpm to local mirror
name: oceanbase-ce
version: 4.2.1.2
release:102000042023120514.el7
arch: aarch64
md5: 080bd5dac6f6253fd2682331be3f1353856fd240
add /root/pkg/oceanbase-ce-4.2.1.2-102000042023120514.el7.aarch64.rpm to local mirror
name: oceanbase-ce-libs
version: 4.2.1.2
release:102000042023120514.el7
arch: aarch64
md5: f1db7c86312516a4d6bb4672dc1b4848a070b315
add /root/pkg/oceanbase-ce-libs-4.2.1.2-102000042023120514.el7.aarch64.rpm to local mirror
Trace ID: 90abbfc4-9c21-11ee-a331-0242ac110003
If you want to view detailed obd logs, please run: obd display-trace 90abbfc4-9c21-11ee-a331-0242ac110003
+-----------------------------------------------------------------------------------------------------------+
|                                             local Package List                                            |
+-------------------+---------+------------------------+---------+------------------------------------------+
| name              | version | release                | arch    | md5                                      |
+-------------------+---------+------------------------+---------+------------------------------------------+
| ob-configserver   | 1.0.0   | 2.el7                  | aarch64 | 35c121739b84e26b57dae1276ce33ba1186411e3 |
| obagent           | 4.2.1   | 100000092023101717.el7 | aarch64 | 4c0f5de0abc7c633454642540cb458b7a855aed2 |
| oceanbase-ce      | 4.2.1.2 | 102000042023120514.el7 | aarch64 | 080bd5dac6f6253fd2682331be3f1353856fd240 |
| oceanbase-ce-libs | 4.2.1.2 | 102000042023120514.el7 | aarch64 | f1db7c86312516a4d6bb4672dc1b4848a070b315 |
+-------------------+---------+------------------------+---------+------------------------------------------+
Trace ID: 929fccc6-9c21-11ee-83e5-0242ac110003
If you want to view detailed obd logs, please run: obd display-trace 929fccc6-9c21-11ee-83e5-0242ac110003
/// phase end: 6.511 s ///
///         STEP 3: Ob-deploy deploy         ///
Local deploy is empty
Trace ID: 944ce3f6-9c21-11ee-9cd1-0242ac110003
If you want to view detailed obd logs, please run: obd display-trace 944ce3f6-9c21-11ee-9cd1-0242ac110003
///         STEP 4: Ob-deploy autodeploy         ///
Dev Mode: ON
Trace ID: 9603be54-9c21-11ee-b213-0242ac110003
If you want to view detailed obd logs, please run: obd display-trace 9603be54-9c21-11ee-b213-0242ac110003
[WARN] Use centos 7 remote mirror repository for anolis 8.8
Package oceanbase-ce-4.2.1.2-102000042023120514.el7 is available.
[WARN] Use centos 7 remote mirror repository for anolis 8.8
Package obagent-4.2.1-100000092023101717.el7 is available.
install oceanbase-ce-4.2.1.2 for local ok
install obagent-4.2.1 for local ok
Cluster param config check ok
Open ssh connection ok
Generate observer configuration ok
Generate obagent configuration ok
[WARN] Use centos 7 remote mirror repository for anolis 8.8
[WARN] Use centos 7 remote mirror repository for anolis 8.8
+--------------------------------------------------------------------------------------------+
|                                          Packages                                          |
+--------------+---------+------------------------+------------------------------------------+
| Repository   | Version | Release                | Md5                                      |
+--------------+---------+------------------------+------------------------------------------+
| oceanbase-ce | 4.2.1.2 | 102000042023120514.el7 | 080bd5dac6f6253fd2682331be3f1353856fd240 |
| obagent      | 4.2.1   | 100000092023101717.el7 | 4c0f5de0abc7c633454642540cb458b7a855aed2 |
+--------------+---------+------------------------+------------------------------------------+
Repository integrity check ok
Parameter check ok
Cluster status check ok
Initializes observer work home ok
Initializes obagent work home ok
Remote oceanbase-ce-4.2.1.2-102000042023120514.el7-080bd5dac6f6253fd2682331be3f1353856fd240 repository install ok
Remote oceanbase-ce-4.2.1.2-102000042023120514.el7-080bd5dac6f6253fd2682331be3f1353856fd240 repository lib check !!
Remote obagent-4.2.1-100000092023101717.el7-4c0f5de0abc7c633454642540cb458b7a855aed2 repository install ok
Remote obagent-4.2.1-100000092023101717.el7-4c0f5de0abc7c633454642540cb458b7a855aed2 repository lib check ok
Try to get lib-repository
[WARN] Use centos 7 remote mirror repository for anolis 8.8
Package oceanbase-ce-libs-4.2.1.2-102000042023120514.el7 is available.
install oceanbase-ce-libs-4.2.1.2 for local ok
Remote oceanbase-ce-libs-4.2.1.2-102000042023120514.el7-f1db7c86312516a4d6bb4672dc1b4848a070b315 repository install ok
Remote oceanbase-ce-4.2.1.2-102000042023120514.el7-080bd5dac6f6253fd2682331be3f1353856fd240 repository lib check ok
obcluster deployed
Get local repositories ok
Search plugins ok
Open ssh connection ok
Load cluster param plugin ok
Check before start observer ok
[WARN] OBD-1011: (172.17.0.3) The recommended value of fs.aio-max-nr is 1048576 (Current value: 65536)
[WARN] OBD-1007: (172.17.0.3) The recommended number of stack size is unlimited (Current value: 8192)
[WARN] OBD-1017: (172.17.0.3) The value of the "vm.max_map_count" must be within [327600, 1310720] (Current value: 262144, Recommended value: 655360)
[WARN] OBD-2000: (172.17.0.3) not enough memory. (Free: 192.7M, Buff/Cache: 3.0G, Need: 6.0G)
[WARN] OBD-1012: (172.17.0.3) clog and data use the same disk (/)

Check before start obagent ok
Start observer ok
observer program health check ok
Connect to observer ok
Initialize oceanbase-ce ok
Start obagent ok
obagent program health check ok
Connect to Obagent ok
Wait for observer init ok
+----------------------------------------------+
|                   observer                   |
+------------+---------+------+-------+--------+
| ip         | version | port | zone  | status |
+------------+---------+------+-------+--------+
| 172.17.0.3 | 4.2.1.2 | 2881 | zone1 | ACTIVE |
+------------+---------+------+-------+--------+
obclient -h172.17.0.3 -P2881 -uroot -Doceanbase -A

+---------------------------------------------------------------+
|                            obagent                            |
+------------+--------------------+--------------------+--------+
| ip         | mgragent_http_port | monagent_http_port | status |
+------------+--------------------+--------------------+--------+
| 172.17.0.3 | 8089               | 8088               | active |
+------------+--------------------+--------------------+--------+
obcluster running
Trace ID: 97a8f238-9c21-11ee-b805-0242ac110003
If you want to view detailed obd logs, please run: obd display-trace 97a8f238-9c21-11ee-b805-0242ac110003
/// phase end: 180.265 s ///
///         STEP 5: Ob-deploy Create Tenant         ///
Get local repositories and plugins ok
Open ssh connection ok
Connect to observer ok
Create tenant test ok
Trace ID: 02cee2b6-9c22-11ee-a370-0242ac110003
If you want to view detailed obd logs, please run: obd display-trace 02cee2b6-9c22-11ee-a370-0242ac110003
/// phase end: 122.693 s ///
deploy success!
boot success!
三:连接实例
- oceanbase-ce 镜像安装了 OceanBase 数据库客户端 OBClient,并提供了默认连接脚本 ob-mysql
# 可以通过 root 用户连接到 oceanbase,无需密码 docker exec -it obstandalone ob-mysql sys # 使用 root 用户登录集群的 sys 租户 docker exec -it obstandalone ob-mysql root # 使用 root 用户登录集群的 test 租户 docker exec -it obstandalone ob-mysql test # 使用 test 用户登录集群的 test 租户 - 使用您本机的 OBClient 或者 MySQL 客户端连接实例
obclient -uroot@sys -h127.1 -P2881 - 连接成功
root@armbian:~# mysql -uroot -h127.1 -P2881
Welcome to the MariaDB monitor.  Commands end with ; or \g.
Your MySQL connection id is 3221487879
Server version: 5.7.25 OceanBase_CE 4.2.1.2 (r102000042023120514-ccdde7d34de421336c5362483d64bf2b73348bd4) (Built Dec  5 2023 14:34:15)

Copyright (c) 2000, 2018, Oracle, MariaDB Corporation Ab and others.

Type 'help;' or '\h' for help. Type '\c' to clear the current input statement.

MySQL [(none)]> show databases;
+--------------------+
| Database           |
+--------------------+
| information_schema |
| LBACSYS            |
| mysql              |
| oceanbase          |
| ORAAUDITOR         |
| SYS                |
| test               |
+--------------------+
7 rows in set (0.028 sec)
遇到报错:没有mysql客户端
- 根据提示执行命令安装即可!
root@armbian:~# mysql -uroot -h127.1 -P2881
Command 'mysql' not found, but can be installed with:
apt install mariadb-client-core-10.5
root@armbian:~# apt install mariadb-client-core-10.5
四:挂载数据卷
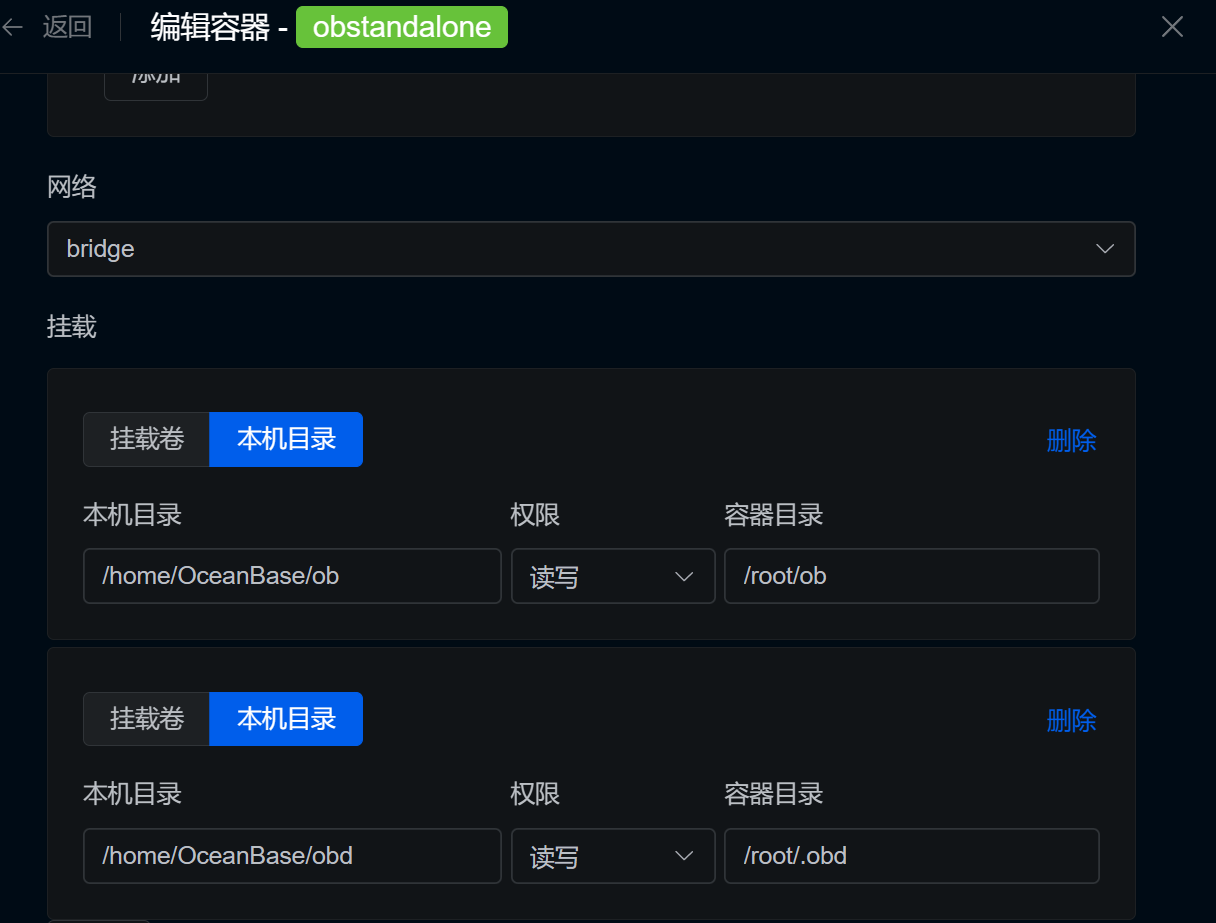
- 如果想持久化容器的数据,可以在 docker 命令中使用 parameter 将数据保存在主机 os 中
- 这里使用1panel提供的可视化管理进行操作
- 本地创建挂载的目录
/home/OceanBase/ob和/home/OceanBase/bos/home/OceanBase |--ob |--obs - 挂载数据卷

- 然后确定重启镜像,可在1pane容器的日志中查看启动状态

文章来源:https://blog.csdn.net/yang2330648064/article/details/135039328
本文来自互联网用户投稿,该文观点仅代表作者本人,不代表本站立场。本站仅提供信息存储空间服务,不拥有所有权,不承担相关法律责任。 如若内容造成侵权/违法违规/事实不符,请联系我的编程经验分享网邮箱:veading@qq.com进行投诉反馈,一经查实,立即删除!
本文来自互联网用户投稿,该文观点仅代表作者本人,不代表本站立场。本站仅提供信息存储空间服务,不拥有所有权,不承担相关法律责任。 如若内容造成侵权/违法违规/事实不符,请联系我的编程经验分享网邮箱:veading@qq.com进行投诉反馈,一经查实,立即删除!