Gerrit的使用
项目存储配置
为了能够模拟开发人员和审核人员两个角色,需要有1台服务器模拟操作提交和审核
登陆linux服务器账户,并生成id_rsa.pub
添加git配置
Git配置一般存储的是name 和 email地址
这里的email地址需要和gerrit系统的账号的email地址一致,否则提交会报错,需要注意的是,提交应该是commit时,当前的log就不会更改了,即如果填错了邮箱且commit后才想起来更改,那么push的时候将会提示邮箱不正确。
添加git用户名和密码
git config --system | global |? local? user.name "你的用户名"//gerrit1
git config --system | global |? local? user.email "你的邮箱"//公司邮箱
查看git用户名和密码
git config --system |global | local?? user.name | user.eamil
生成id_rsa.pub
ssh-keygen -r rsa -C "xxxx@xxx.com"
Gerrit系统添加用户
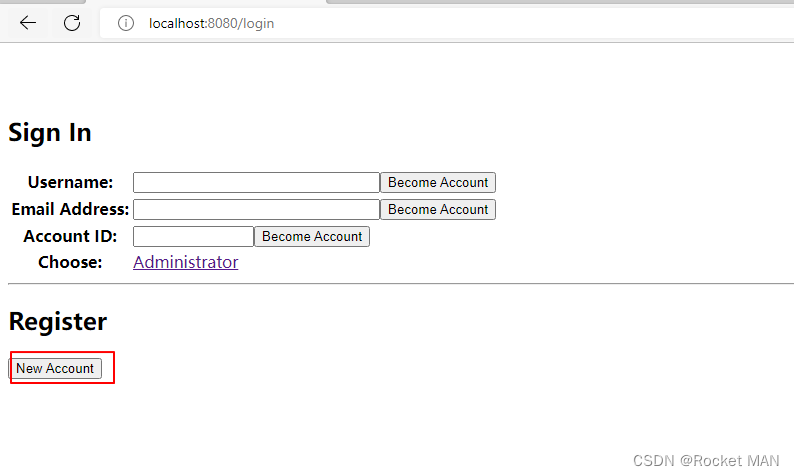
点击Administrator>Switch Account

点击new Account
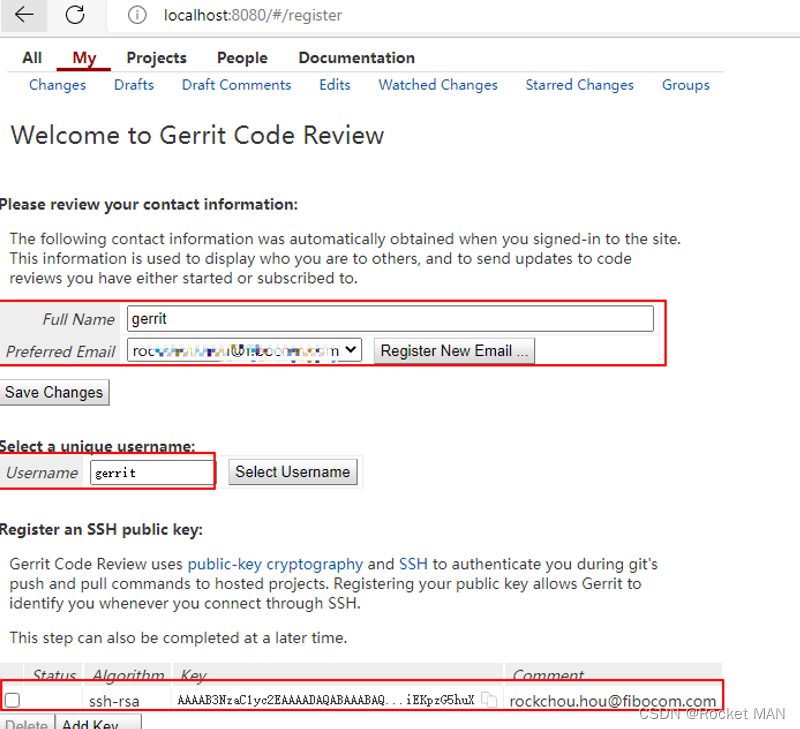
分别填写Full Name 、Preferred Email、Username 、SSH public key
其中gerrit的ssh填写gerrit的id_rsa.pub

添加用户gerrit
配置FullName/Username/SSH Public Key
用同样的方法,设置develop1 develop2 manager1等账户
更新密码
访问http://localhost:8080/#/settings/http-password,点击Generate Password

gerrit密码:95jPTIRru+2wXyblqnKttzzRw7lvSrZHSBUNh0v3Sw
创建组
访问http://localhost:8080/#/admin/create-group/

创建项目
切换到Administrator
访问http://localhost:8080/#/admin/create-project/
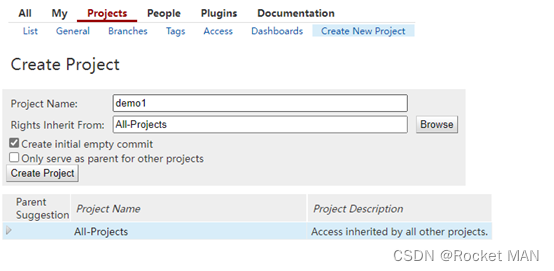
项目操作
拉取项目
再次切换到gerrit账户,访问http://localhost:8080/#/admin/projects/demo1
点击Clone with commit-msg hook 、http
复制git地址,将4ccb944fba9b换成gerrit服务器的IP,如下
git clone http://gerrit@xx.xx.xx.xx:8080/a/demo1 && (cd demo1 && curl -Lo `git rev-parse --git-dir`/hooks/commit-msg http://gerrit@10.10.140.72:8080/tools/hooks/commit-msg; chmod +x `git rev-parse --git-dir`/hooks/commit-msg)登录linux服务器,执行上述命令拉取项目,这里需要输入gerrit客户端的gerrit账号的密码,95jPTIRru+2wXyblqnKttzzRw7lvSrZHSBUNh0v3Sw
创建文件
cd demo1;touch 1.txt
添加新文件到仓库
git add .
提交到库
git commit -m “first”
push至版本库
git push origin HEAD:refs/for/master
这里需要输入登录gerrit的账户名和密码95jPTIRru+2wXyblqnKttzzRw7lvSrZHSBUNh0v3Sw
(Gerrit2 的密码2RupnNn48jolPWdWFAuW7Qb8vQBnNHIHZGezIXB/PA)

这里的email地址需要和gerrit系统的账号的email地址一致,否则提交会报错,需要注意的是,提交应该是commit时,当前的log就不会更改了,即如果填错了邮箱且commit后才想起来更改,那么push的时候将会提示邮箱不正确。
错误一The following addresses are currently registered:

?
分析原因:根据这个错误提示,似乎是说该邮箱已经注册了,不能再次注册
解决方法:
修改222上的user.email ??git config --global user.email "mr.rocket@foxmail.com"
修改gerrit账号的email mr.rocket@foxmail.com
修改gerrit账号的email rockchou.hou@fibocom.com
修改222上的user.email?? git config --global user.email "rockchou.hou@fibocom.com"
再次执行提交 ??git push origin HEAD:refs/for/master
访问http://localhost:8080/1就可以看到当前提交的内容
Change界面各模块简介
流程审批
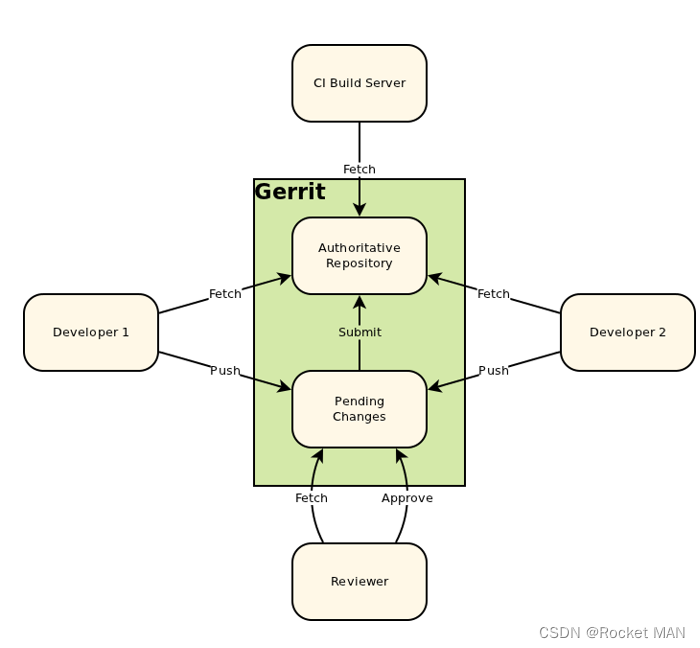
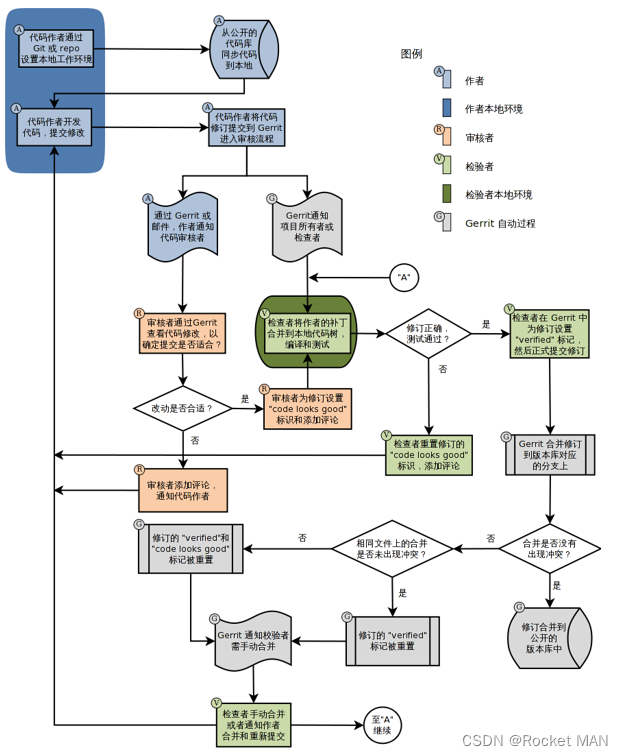
看这里->Gerrit工作流程及使用手册-编码规范 (uml.org.cn)
在change界面,也可以看到提交的变更列表,第一次提交将会到Outgoing reviews


一个例子
gerrit账号将变更push到gerrit
在服务器上将修改的代码提交到refs/for/master

添加审核人admin manager
打开http://localhost:8080/#/c/386/,当前状态是Needs Code-Review Label
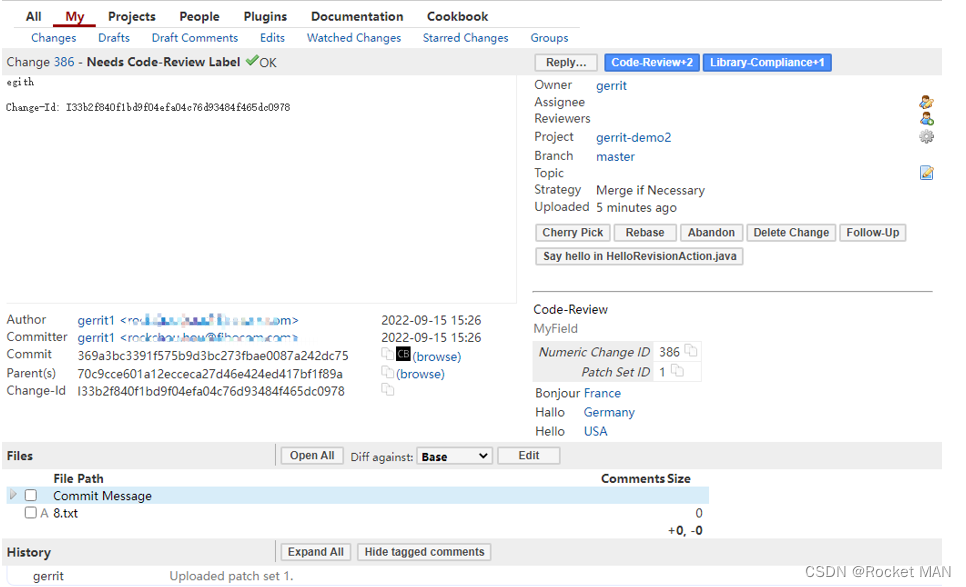
审核人审核
审核人有两个,admin、manager
Gerrit将Code-review 置为-2,MyField置为 -1
Gerrit账户将code-review置为-2,状态将会更改为Blocked
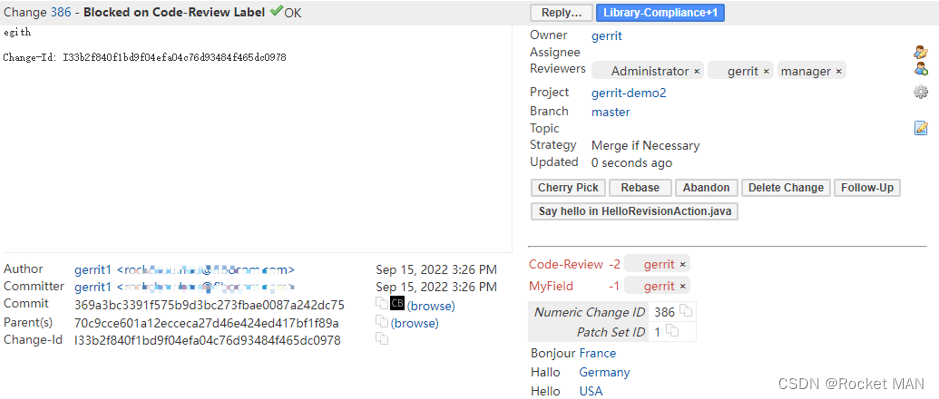
admin Code-review置为+2, MyField置为 +1
此时,admin将code-review置为+2,状态不会更改,仍然是Blocked
gerrit将code-review置为-1
此时状态直接变更为Ready to Submit
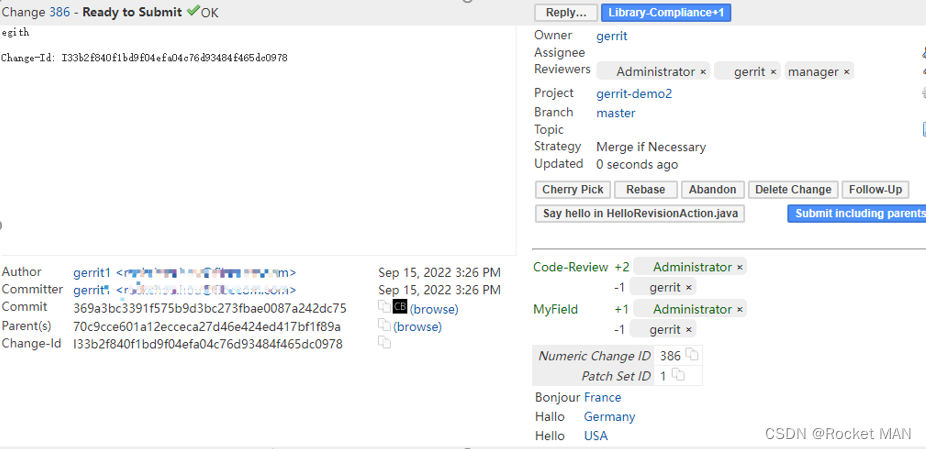
结论一:只要有一个-2,状态就位code-review
结论二:如果有一个+2,且没有-2,状态就位
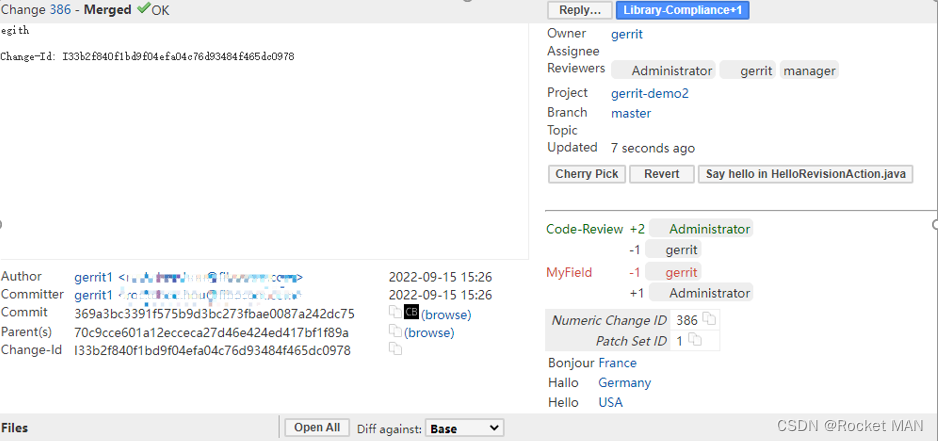
提交submit
点击submit including parents

状态更改为merge
?
Gerrit插件
Gerrit支持插件扩展,编译插件的方法主要有两种,一是在Gerrit框架源码内编译,二是单独编译。开发插件也有两种方式,一是利用maven自动生成符合gerrit插件框架要求的代码结构,二是直接在其官方例子cookbook插件上开发
源码编译
源码编译有两种方式,一种是buzel工具编译,一种是maven工具编译。
怎么选择使用哪种编译工具呢?我们可以获取源码,如果源码根目录有BUILD文件,那么就可以使用buzel工具编译,如果源码根目录有pom.xml文件那么就可以使用maven编译。
下载源码
源码下载地址:gerrit Git repositories - Git at Google (googlesource.com)
这里我们以上面提到的cookbook演示,cookbook下载地址:e6d7594621d87859a0e6af361cac1fc3173c3588 - plugins/cookbook-plugin - Git at Google (googlesource.com)
Buzel编译
下载buzel编译工具
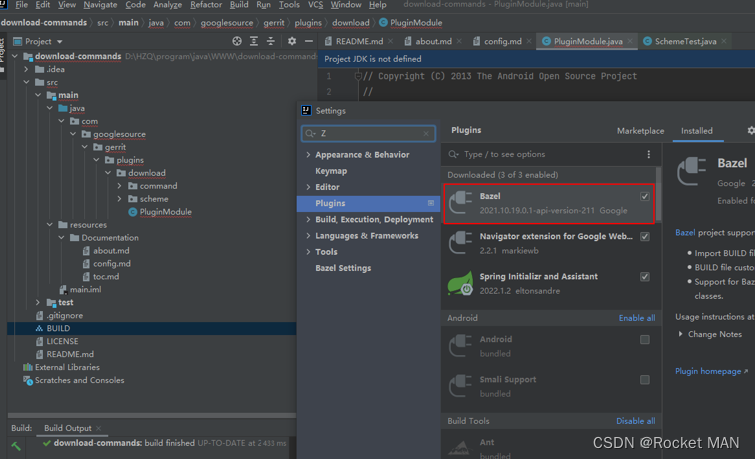
下载了buzel后,左右栏目根目录下的BUILD文件就有了标识
使用buzel编译【待补充】
Maven编译
执行mvn install
问题一:执行mvn install报错Blocked mirror for repositories
原因:是最新版本(我的版本是3.81)的maven block掉了所有HTTP协议的repositories,仅支持https
解决方案:降低maven到3.6.1
maven报错Blocked mirror for repositories解决方案 - ArielMeng - 博客园 (cnblogs.com)
3.6.1下载地址:apache-maven-3.6.1-bin.zip_免费高速下载|百度网盘-分享无限制 (baidu.com)

问题二:Failed to transfer file http://repo1.maven.org/maven2/... with status code 501

?
访问http://repo1.maven.org/maven2返回501,是镜像地址出了问题
原因:
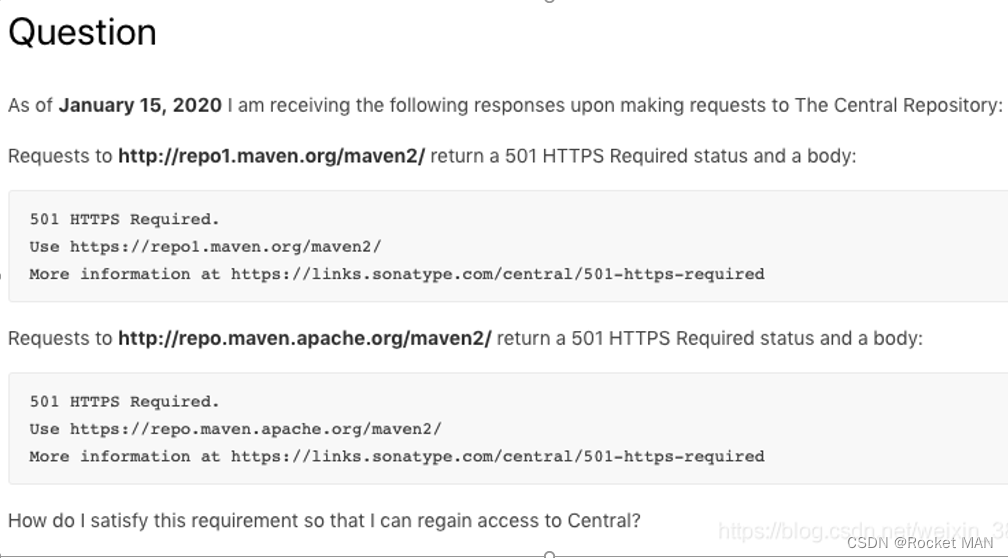
2020年1月15日起,中央存储库不再支持通过纯HTTP进行的不安全通信,并且要求对存储库的所有请求都通过HTTPS进行加密。
关于maven打包时的报错: Return code is: 501 , ReasonPhrase:HTTPS Required._我想吃猪蹄的博客-CSDN博客
解决方案:将http://repo1.maven.org/maven2改为Central Repository:
问题三:修改setting.xml文件不生效
Setting文件可以管理镜像地址
解决方案:
- 检查配置的是否是当时使用的mvn版本的setting.xml文件
- 检查maven安装目录中的setting.xml中的mirror镜像的mirrorOf配置的是否是“*” ,这个值表示匹配所有的镜像库,相当于会屏蔽掉配置的其他的镜像库。
- 检查pom.xml中是否有配置repository,pom里的镜像权重大于setting.xml的
解决Maven修改setting.conf配置添加修改镜像库不生效的问题_疯狂的暴走蜗牛的博客-CSDN博客
问题四:https://repo2.maven.org/maven2下载缓慢
解决方案:
删除掉pom.xml里的repository,在maven安装目录的conf/setting.xml里新增阿里云镜像
| <!-- 阿里云仓库 --> ?????? <mirror> ????????????? <id>alimaven</id> ????????????? <mirrorOf>central</mirrorOf> ????????????? <name>aliyun maven</name> ????????????? <url>https://maven.aliyun.com/nexus/content/repositories/central/</url> ?????? </mirror> ?????? <mirror> ????????????? <id>nexus-aliyun</id> ????????????? <mirrorOf>central</mirrorOf> ????????????? <name>Nexus aliyun</name> ????????????? <url>http://maven.aliyun.com/nexus/content/groups/public</url> ?????? </mirror> |
?
问题五:Failure to find …jar:2.14-SNAPSHOT in Central Repository:

解决方案:
这个时候我们可以去Central Repository:仓库查询是否存在指定版本的jar包
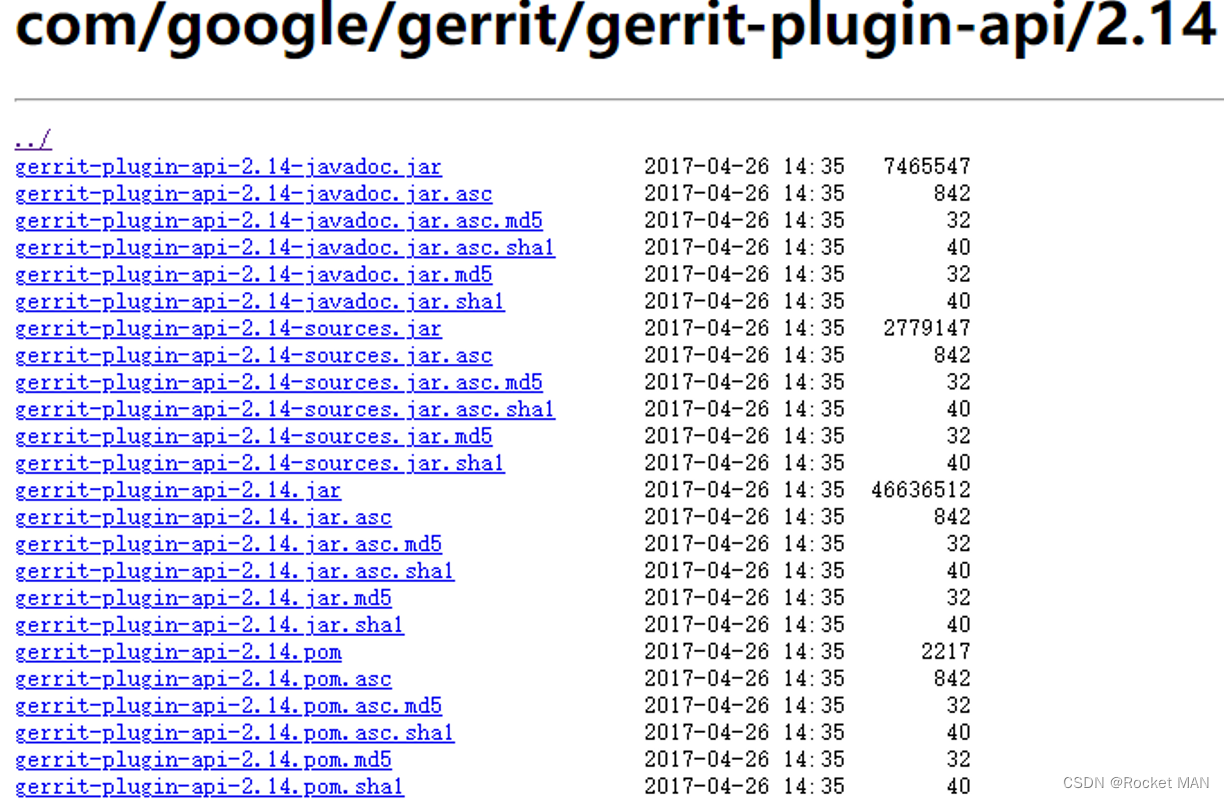
可以看到gerrit-plugin-api-2.14不存在SNAPSHOT版本,删掉pom文件中versions里面的SNAPSHOT,再次执行mvn install
?
问题五:pluginprovider\HelloSshPluginProvider.java:[71,12] 错误: 找不到符号

原因:java文件后缀不正确,更改为java
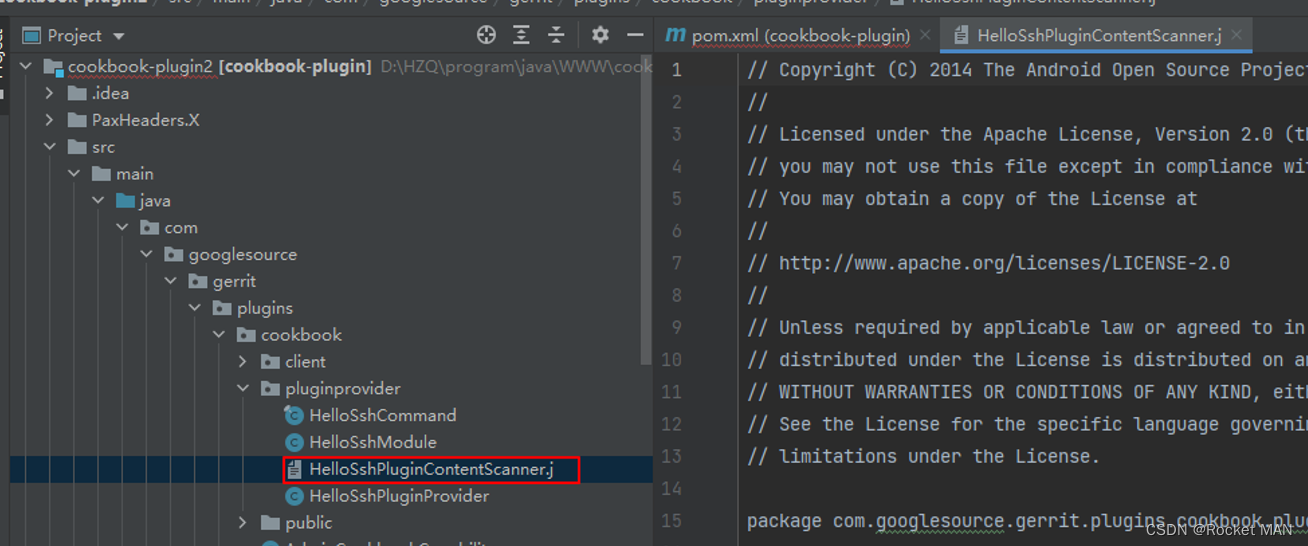
再次执行编译,成功!

右击pom.xml->Maven->Reload project加载插件

关于MANIFEST.MF文件参数的说明
一、关于插件jar的META-INF/MANIFEST.MF文件:这个文件的主要作用是记录一些有关这个jar的属性,以便被识别、引用或加载,也可以理解为是这个jar的配置文件。
这里举些例子:
Manifest-Version: 1.0----配置版本号。如果日后要做升级兼容的话,可以利用这个属性。
Gerrit-ApiType: plugin----指定Gerrit插件类型为plugin。Gerrit插件类型有两种:plugin和extension
Gerrit-ApiVersion: 2.13.7----指定该插件匹配的Gerrit平台版本,如果指定版本不一致的话,插件很有可能不能用。
Implementation-Title: Cookbook plugin ----实现Titile
Implementation-Version: 2.13.7----实现的版本号,也就是该插件的版本号,一般和要适应的Gerrit平台的版本号一致。
Archiver-Version: Plexus Archiver----
Built-By: czq? ----打包作者
Gerrit-PluginName: cookbook----插件名称
Gerrit-Module: com.googlesource.gerrit.plugins.cookbook.Module----Gerrit加载插件时,会根据这个指定去加载相应的Module类。该类主要实现前后台业务逻辑。
Gerrit-HttpModule: com.googlesource.gerrit.plugins.cookbook.HttpModule ----Gerrit加载插件时,会根据这个指定去加载相应的HttpModule类。该类主要实现Http接口业务逻辑。
Gerrit-SshModule: com.googlesource.gerrit.plugins.cookbook.SshModule ----Gerrit加载插件时,会根据这个指定去加载相应的HttpModule类。该类主要实现SSH接口业务逻辑。
Implementation-Vendor: Gerrit Code Review----开发商
Created-By: Apache Maven 3.5.0----编译打包工具
Build-Jdk: 1.8.0_101----编译的JDK版本
Implementation-URL: https://gerrit-review.googlesource.com/#/admin/projects/plugins/cookbook-plugin? ----代码实现URL
Cookbook源码结构解析
Pom文件
| <manifestEntries> ????????????? <Gerrit-PluginName>cookbook</Gerrit-PluginName> ???????????? ?<Gerrit-Module>com.googlesource.gerrit.plugins.cookbook.Module</Gerrit-Module> ????????????? <Gerrit-HttpModule>com.googlesource.gerrit.plugins.cookbook.HttpModule</Gerrit-HttpModule> ????????????? <Gerrit-SshModule>com.googlesource.gerrit.plugins.cookbook.SshModule</Gerrit-SshModule> ????????????? <Implementation-Vendor>Gerrit Code Review</Implementation-Vendor> ? ? ? ? <Implementation-URL>https://gerrit-review.googlesource.com/#/admin/projects/plugins/cookbook-plugin</Implementation-URL> ????????????? <Implementation-Title>Cookbook plugin</Implementation-Title> ????????????? <Implementation-Version>${project.version}</Implementation-Version> ????????????? <Gerrit-ApiType>${Gerrit-ApiType}</Gerrit-ApiType> ????????????? <Gerrit-ApiVersion>${Gerrit-ApiVersion}</Gerrit-ApiVersion> </manifestEntries>???????? |
Gerrit-PluginName
Gerrit-PluginName除了可以在pom中配置,还可以在class中配置
| public class MyClass { ? private final String pluginName; ? @Inject ? public MyClass(@PluginName String pluginName) { ??? this.pluginName = pluginName; ? } ? [...] } |
下面三个文件都有Gerrit-PluginName

HelloSshCommand.java
哪里调用这个文件的?HelloSshModule.java

HelloSshPluginContentScanner
哪里调用HelloSshPluginContentScanner?
答:HelloSshPluginProvider
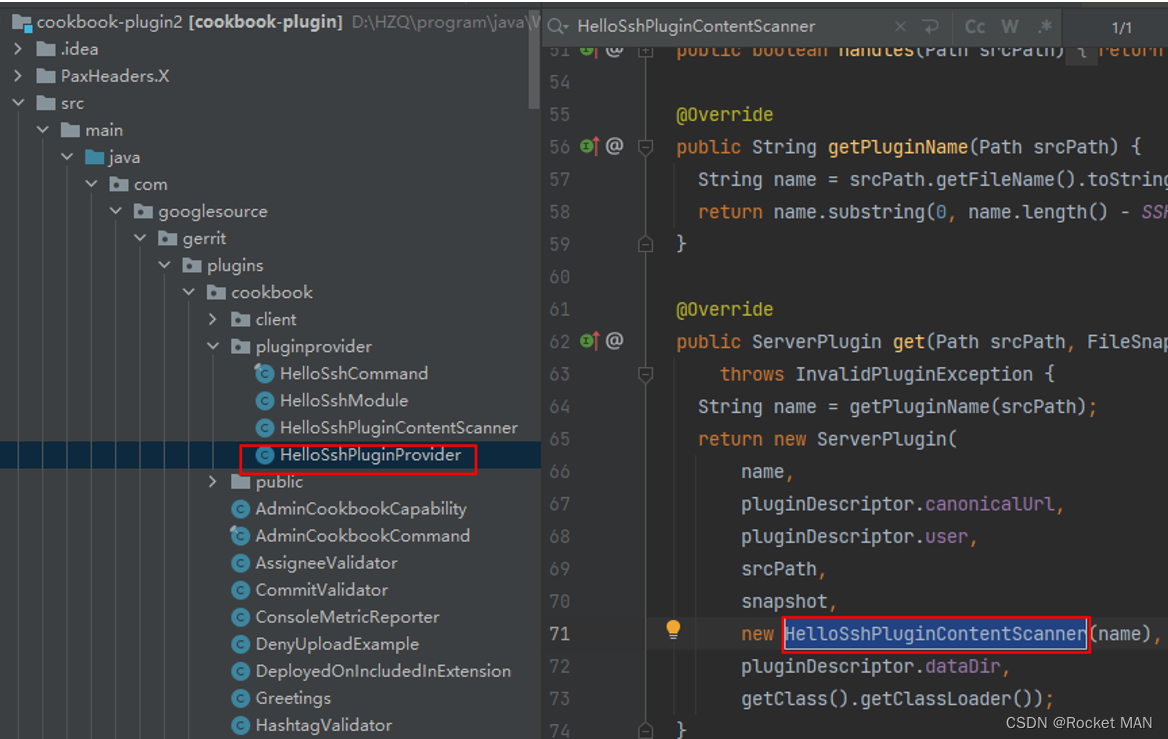
HelloSshPluginProvider
哪里调用HelloSshPluginProvider?答

HelloLink
Projects | localhost Code Review
Change If1a288cf: Edit Project Config | localhost Code Review

UI Extension
CookBook Index

 ?
?
http://localhost:8080/#/x/cookbook
Say Hello

Cook Change Screen Regex
如果我们希望替换某个路径
![]()

http://localhost:8080/#/x/cookbook/c/
或访问http://localhost:8080/#/c/ 会跳转到上面的链接
奇怪的是,目前只有admin账号会出现跳转
TODO: implement this screen

Foods Prefrences
有时候,我们希望在setting界面新增一个选项,例如新增Fook Prefrerences
?

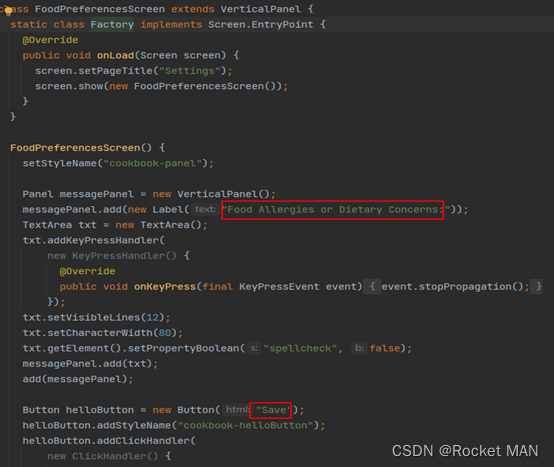
Change界面
CHANGE_SCREEN_HEADER 状态右侧标题栏

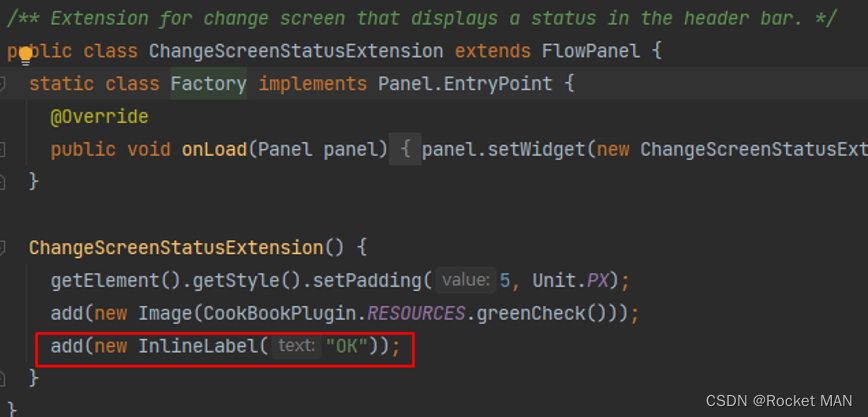
显示OK
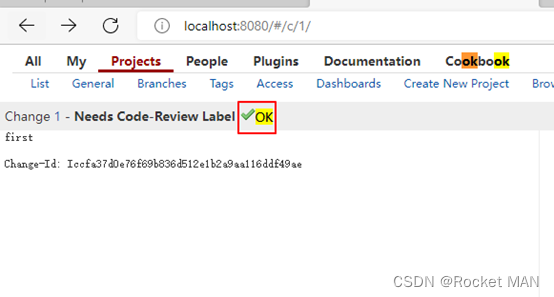
CHANGE_SCREEN_HEADER_RIGHT_OF_BUTTONS ?标题栏reply按钮右侧
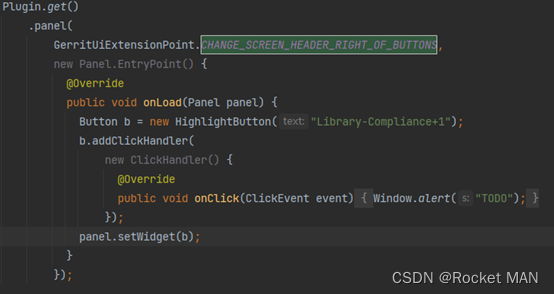
显示 Library-complicate+1? TODO

CHANGE_SCREEN_HEADER_RIGHT_OF_POP_DOWNS? 标题栏最右侧


?CHANGE_SCREEN_BELOW_CHANGE_INFO_BLOCK 更改信息块下方


Setting
PREFERENCES_SCREEN_BOTTOM? setting-preferences界面

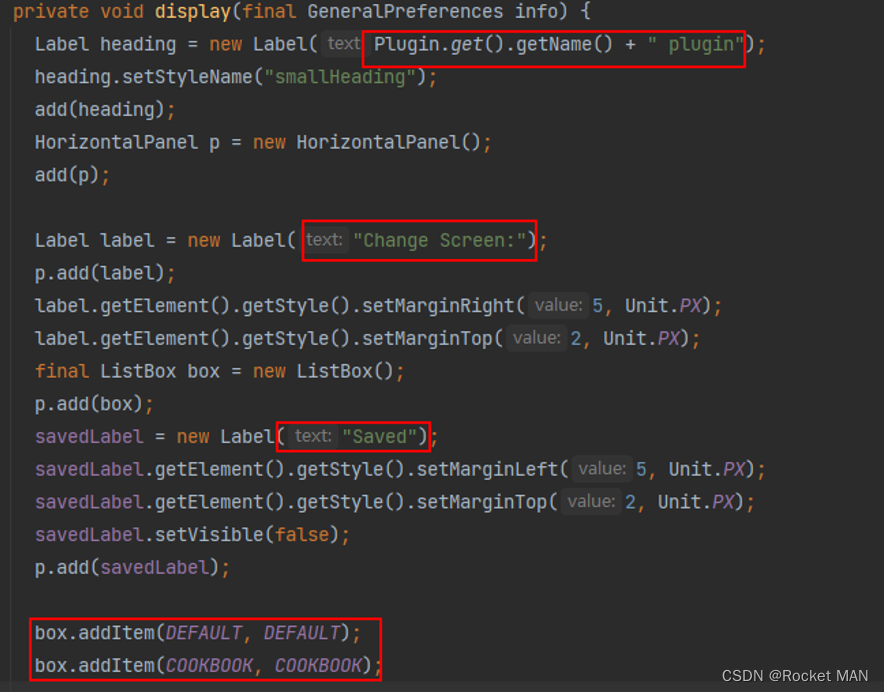

PROFILE_SCREEN_BOTTOM


UIAction
HelloRevisionAction
Change If1a288cf: Edit Project Config | localhost Code Review

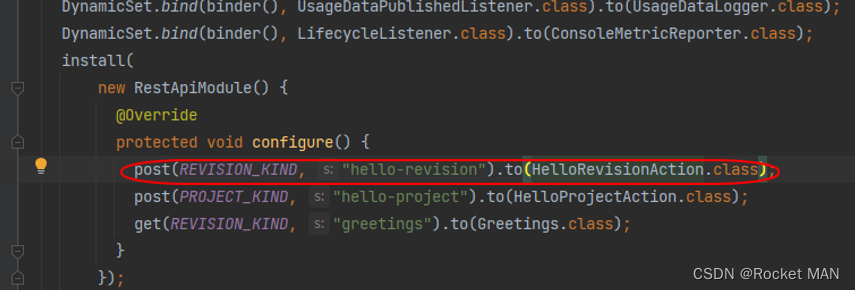
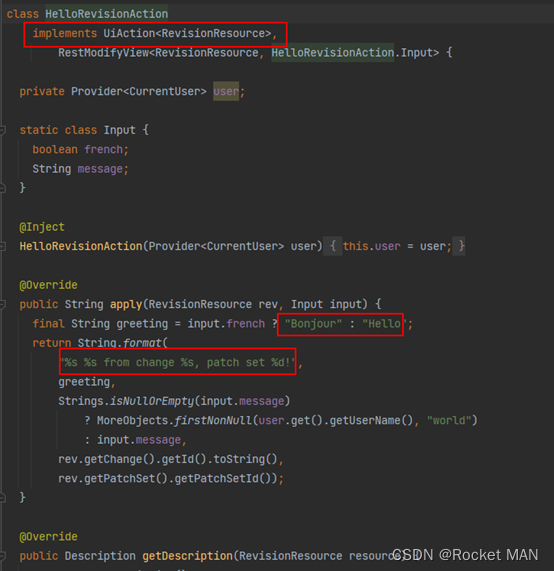
结合JS
?UiAction 可以与 JavaScript API 结合使用。这将在激活按钮附近显示一个小弹出窗口,以收集用户的额外输入
新建hello.js
Gerrit.install(plugin => {
? const endpoint = 'change-metadata-item';
? plugin.hook(endpoint).onAttached(element => {
??? const el = element.appendChild(document.createElement('div'));
??? el.textContent = 'Ah, there it is. Lovely.';
??? el.style = 'background: pink; line-height: 4em; text-align: center;';
? });
});
JS 模块必须公开为 WebUiPlugin 并绑定为 HTTP 模块:
public class HttpModule extends HttpPluginModule {
  @Override
  protected void configureServlets() {
    DynamicSet.bind(binder(), WebUiPlugin.class)
        .toInstance(new JavaScriptPlugin("hello.js"));
  }
}
上面的HTTP模块必须在pom.xml中声明
<manifestEntries>
  <Gerrit-HttpModule>com.googlesource.gerrit.plugins.cookbook.HttpModule</Gerrit-HttpModule>
</manifestEntries>
Module引入js
通过gerrit-module引入Module文件
<build>
  <plugins>
    <plugin>
      <configuration>
        <archive>
          <manifestEntries>
            <Gerrit-PluginName>cookbook</Gerrit-PluginName>
            <Gerrit-Module>com.googlesource.gerrit.plugins.cookbook.Module</Gerrit-Module>
           </manifestEntries>
        </archive>
      </configuration>
    </plugin>
<build>
Module.java中,绑定hello-project.js

Hello-project.js


Greatings.js? 前端请求后端

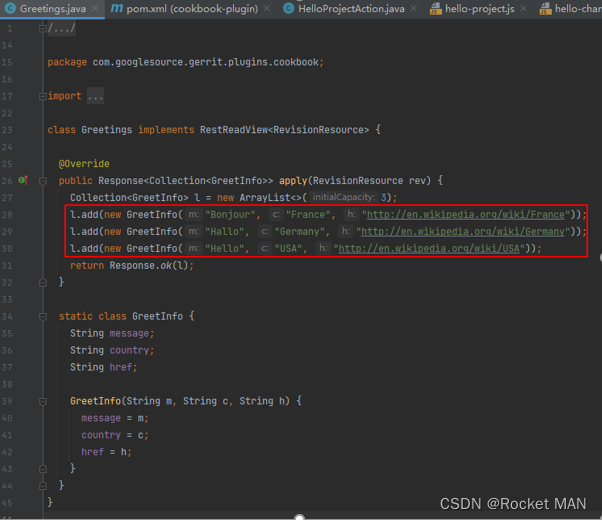
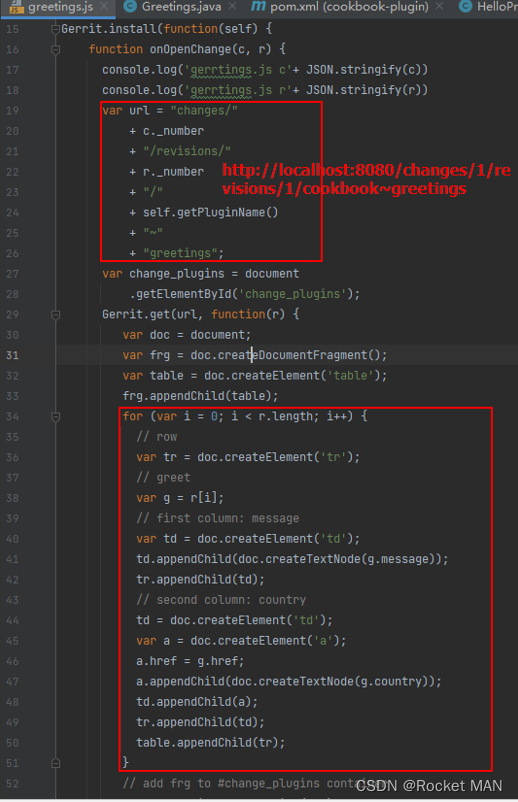
其中第一个红框拼接出了http://localhost:8080/changes/1/revisions/1/cookbook~greetings,她将会返回一个json文件

插件的部署
参见
Gerrit Code Review - Plugin Development ~ Gerrit 代码审查 - 插件开发 (int.com)
?
拥有Administrator权限的账号添加id_rsa.pub
Gerrit系统admin账号拥有管理员权限ssh-keygen –t rsa –C “xxxx.xxx@xxxx.com”
cat ~/.ssh/id_rsa.pub
复制id_rsa.pub的值给gerrit系统的admin账户的SSH public key
Js文件的部署【未成功】
本地编写简单脚本,上传到挂载目录
Gerrit.install(plugin => {

? // Your code here.

?? alert("Hello Worldf);

});
打开容器的一个控制台,执行下面的命令
ssh -p 29418 admin@localhost gerrit plugin install -n helloworld.js /var/gerrit/review_site/helloWorld.js此时,gerrit的plugins目录就有了helloworld.js
刷新浏览器,报错

添加Review Labels
什么是Review Lables

如图右侧的Code-Review就是默认的Review Lable。
?
添加自定义Review Lables
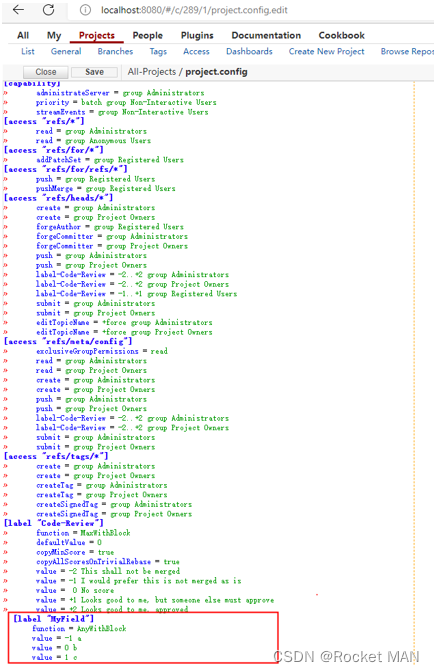
打开Projects->All-project->Edit Config,在最后面添加下面代码,点击save
| ? [label "MyField"] ?????? function = AnyWithBlock ?????? value = -1 a ?????? value = 0 b ?????? value = 1 c |
如下:
?
关于function,function用于评估标签的多个投票的函数的名称。仅当默认提交规则用于标签时,才会应用此功能。如果编写自定义提交规则(并且不调用默认规则),则函数名称将被忽略,并可能被视为可选。
有效值为:
- MaxWithBlock(默认值)尽可能低的负值(如果存在)会阻止提交,而需要尽可能高的正值才能启用提交。必须至少有一个正值,否则将永远不会启用提交。若要允许阻止提交,请确保定义了负值。
- AnyWithBlock尽可能低的负值(如果存在)将阻止提交,任何其他值都会启用提交。若要允许阻止提交,请确保定义了负值。
- MaxNoBlock启用提交需要尽可能高的正值,但尽可能低的负值不会阻止更改。
- NoBlock/NoOp标签纯粹是信息性的,在确定更改是否可提交时不考虑值。
关于自定义标签更多信息,请参考Gerrit Code Review - Review Labels (storage.googleapis.com)
将变更保存到git
按照上面保存后,那么在changes列表中将会看到一条
![]()
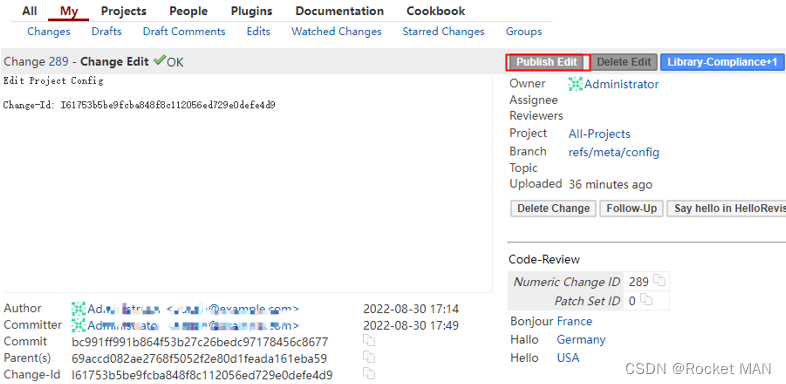
?点击进入后,点击Publish Edit
点击Relpy,Code-review选择+2,点击Pos。
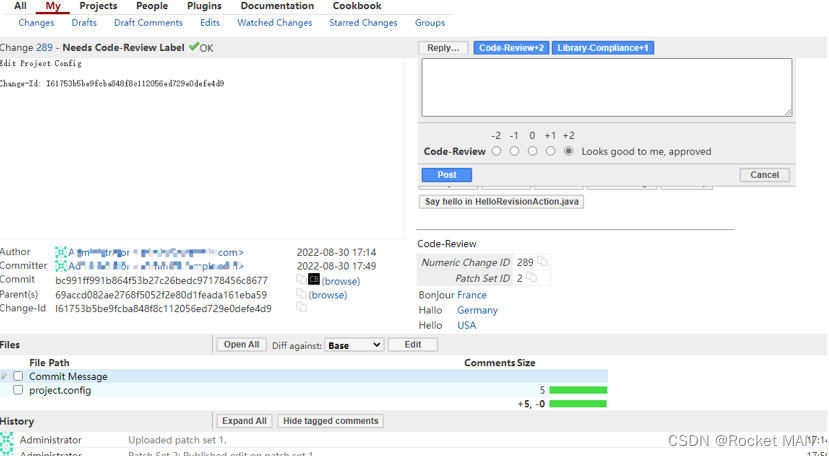
状态更改为Ready to submit

添加字段权限
上面的字段暂时还不能使用,需要添加字段权限
打开Projects->List,选择All-Projects->Access->Edit,找到Reference:refs/heads/*,添加Label MyField,权限和Label Code-Review一致。

?点击Save Changes
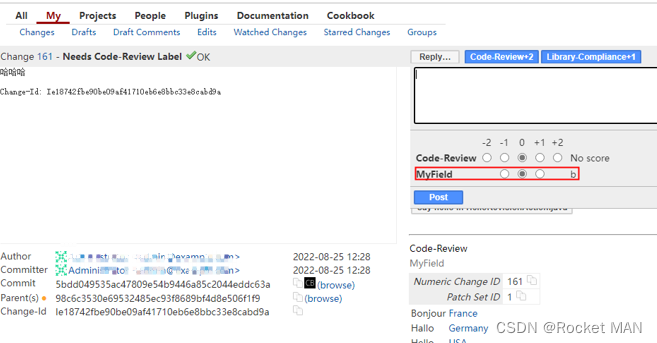
此时切换到其他其他change,就可以看到我们添加的字段了
Gerrit命令行
Gerrit Code Review - Command Line Tools (openafs.org)
下载
ssh -p 29418 admin@xx.xx.xx.xx?gerrit query --format=json status:merged before:2022-09-05 after:2022-01-20 --patch-sets --files --all-approvals | grep -wE "(lastUpdated|project|email|status
?
异常一:Connection timed out
一般原因是当前主机的秘钥与gerrit上该账号的公钥对不上
数据库
在etc/gerrit.conf的database记录着gerrit的数据库信息

可以看到数据库是h2类型,位置为/var/gerrit/db/ReviewDB
关于database其他字段信息,请看Gerrit Code Review - Configuration (mit.edu)
数据库操作
暂停gerrit
~/bin/gerrit.sh stop
初始化 数据库
java -jar ~/bin/gerrit.war init
java -jar bin/gerrit.war gsql
Gerrit+apache+H2数据库简单安装配置及建库流程 - 江召伟 - 博客园 (cnblogs.com)
Gerrit API 又名Endpoints
Cmd中如何发送api请求 get/put/post/delete
https://gerrit-review.googlesource.com/Documentation/dev-rest-api.html
rest-api之changes

Gerrit Code Review - /changes/ REST API (googlesource.com)
获取所有changes
请求http://localhost:8080/changes/

获取草稿
curl http://localhost:8080/changes/I2d107cafc22d69f573a745b43d0f93a93aa5bece/comments

获取草稿(无法获取)
curl http://localhost:8080/changes/I2d107cafc22d69f573a745b43d0f93a93aa5bece/drafts
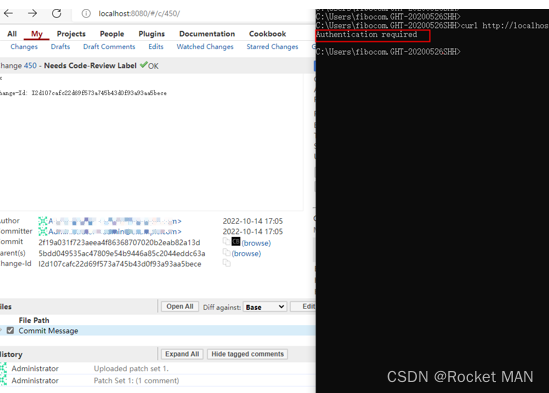
添加机器人评论(无法添加)
如何获取revision id
get revisions by change_jd from gerrit api - Stack Overflow
其中的revisionid就是commitId
发送机器人评论的API
https://gerrit-review.googlesource.com/Documentation/rest-api-changes.html#set-review
username: admin
password: r5jWaCZF36NvwagRyuvyhfmDEVK0b9e5faM+Qd8e/A
报错:Authentication required

关于robot comment的更多信息
https://storage.googleapis.com/gerrit-talks/summit/2016/robot-comments.pdf
?
后端-添加评论-代码分析
数据库映射
Comment.java
?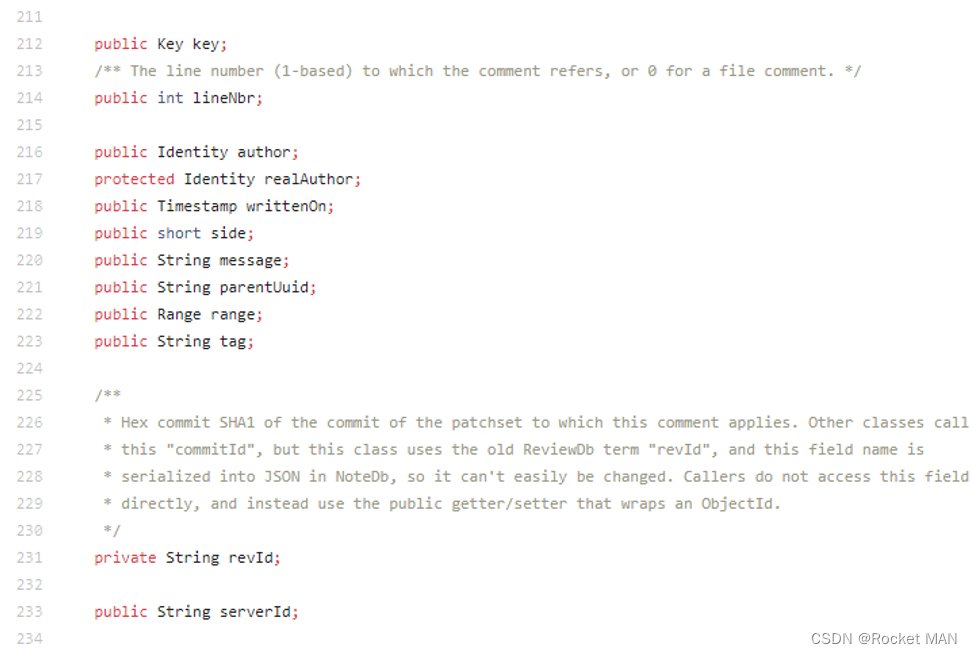
HumanComment.java
https://opendev.org/opendev/gerrit/src/commit/bdcba6961d39d073a62aa60193c4fe5f61021a26/java/com/google/gerrit/entities/HumanComment.java
HumanComment extends Comment
更新评论
CreateDraftComment.java

CommentsUtil.java

ChangeUpdate.java

?
这里可以看到,更新comment执行的的put.add(),但是put是一个List数组,似乎并没有操作数据库
其中checkState方法、add方法,verifyComment方法都没无法跳转。
?
checkState方法来源于import static com.google.common.base.Preconditions.checkState
发现com.google.common是一个空路径,不明白原因是什么
待整理
Gerrit框架相关
Gerrit插件开发之读取etc下的配置文件
https://blog.csdn.net/czq7511/article/details/74356870

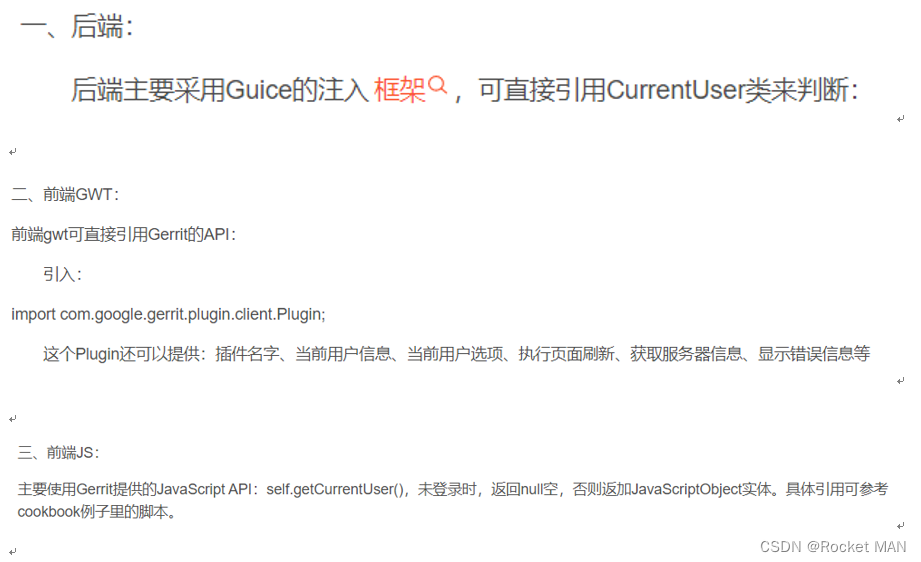
Gerrit插件开发之判断用户是否已登录的方法
Gerrit插件开发之判断用户是否已登录的方法-CSDN博客
?
Gerrit endPoint使用指南
引入polyfills?
webcomponentsjs (v2.8.0) - webcomponents.js | BootCDN - Bootstrap 中文网开源项目免费 CDN 加速服务
?
本文来自互联网用户投稿,该文观点仅代表作者本人,不代表本站立场。本站仅提供信息存储空间服务,不拥有所有权,不承担相关法律责任。 如若内容造成侵权/违法违规/事实不符,请联系我的编程经验分享网邮箱:veading@qq.com进行投诉反馈,一经查实,立即删除!