玩转MYSQL|详细分析mysql-MGR集群搭建
?
目录
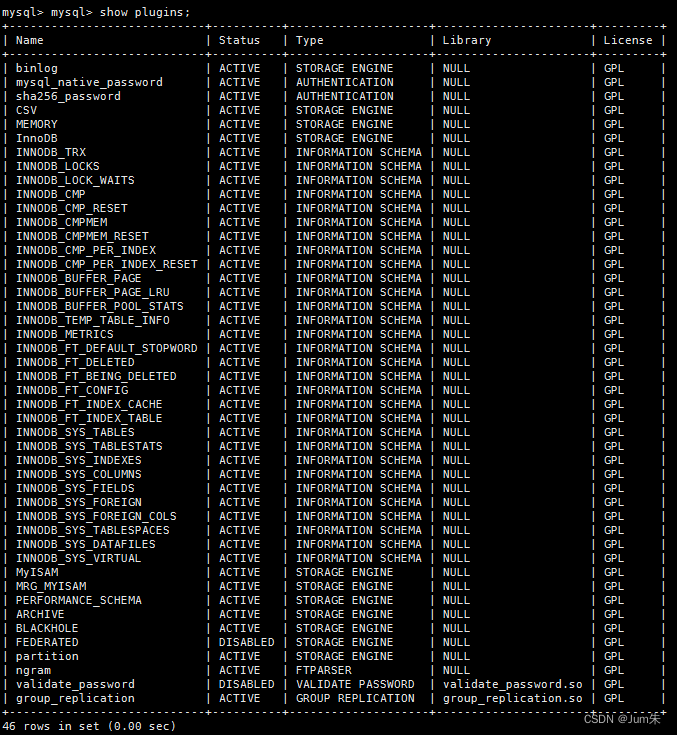
3.1.3 在mysql服务器host68.cn上安装group replication插件
3.1.4 启动服务器host68.cn上mysql的group replication
3.2.1 修改/etc/my.cnf 配置文件,方法和之前相同
1、简介
MySQL Group Replication(简称MGR)是MySQL官方于2016年12月推出的一个全新的高可用与高扩展的解决方案。MySQL组复制提供了高可用、高扩展、高可靠的MySQL集群服务。
- 高一致性,基于原生复制及paxos协议的组复制技术,并以插件的方式提供,提供一致数据安全保证;
- 高容错性,只要不是大多数节点坏掉就可以继续工作,有自动检测机制,当不同节点产生资源争用冲突时,不会出现错误,按照先到者优先原则进行处理,并且内置了自动化脑裂防护机制;
- 高扩展性,节点的新增和移除都是自动的,新节点加入后,会自动从其他节点上同步状态,直到新节点和其他节点保持一致,如果某节点被移除了,其他节点自动更新组信息,自动维护新的组信息;
- 高灵活性,有单主模式和多主模式,单主模式下,会自动选主,所有更新操作都在主上进行;多主模式下,所有server都可以同时处理更新操作。

2、环境准备
2.1 数据库服务器规划
| ip地址 | 主机名 | 数据库 | 端口号 | server Id |
|---|---|---|---|---|
| 10.10.10.68 | host68 | mysql-5.7.20 | 3306 | 100 |
| 10.10.10.69 | host69 | mysql-5.7.20 | 3306 | 101 |
| 10.10.10.70 | host70 | mysql-5.7.20 | 3306 | 102 |
2.2 安装mysql5.7.20
在这里就不详细介绍。
2.3 设置hostname和ip映射
10.10.10.68 host68.cn
10.10.10.69 host69.cn
10.10.10.70 host70.cn
注意;在三台数据库服务器上都设置。
3、创建复制环境
3.1 服务器host68.cn
3.1.1 配置/etc/my.cnf
vim /etc/my.cnf

[mysqld]

# Group Replication
server_id = 100  #服务ID
gtid_mode = ON  #全局事务
enforce_gtid_consistency = ON  #强制GTID的一致性
master_info_repository = TABLE  #将master.info元数据保存在系统表中
relay_log_info_repository = TABLE  #将relay.info元数据保存在系统表中
binlog_checksum = NONE  #禁用二进制日志事件校验
log_slave_updates = ON  #级联复制
log_bin = binlog   #开启二进制日志记录
binlog_format= ROW  #以行的格式记录

transaction_write_set_extraction = XXHASH64 #使用哈希算法将其编码为散列
loose-group_replication_group_name = 'ce9be252-2b71-11e6-b8f4-00212844f856' #加入的组名
loose-group_replication_start_on_boot = off #不自动启用组复制集群
loose-group_replication_local_address = 'host68.cn:33061' #以本机端口33061接受来自组中成员的传入连接
loose-group_replication_group_seeds =' xuhost.cn:33061, xueghostn:33062, xuegodhost33063' #组中成员访问表
loose-group_replication_bootstrap_group = off #不启用引导组
重启mysql服务
3.1.2 服务器host68.cn上建立复制账号:
mysql> set SQL_LOG_BIN=0;   #停掉日志记录
mysql> grant replication slave on *.* to repl@'10.10.10.%' identified by '123456';
mysql> flush privileges;
mysql> set SQL_LOG_BIN=1;  #开启日志记录
mysql> change master to master_user='repl',master_password='123456'  for channel 'group_replication_recovery';  #构建group replication集群
3.1.3 在mysql服务器host68.cn上安装group replication插件
-- 安装插件
mysql> install PLUGIN group_replication SONAME 'group_replication.so';
-- 查看group replication组件
mysql> show plugins。

3.1.4 启动服务器host68.cn上mysql的group replication
-- 设置group_replication_bootstrap_group为ON是为了标示以后加入集群的服务器以这台服务器为基准,以后加入的就不需要设置。
mysql> set global group_replication_bootstrap_group=ON;
-- 作为首个节点启动mgr集群
mysql> start group_replication;
mysql> set global group_replication_bootstrap_group=OFF;
3.1.5 查看mgr的状态
-- 查询表performance_schema.replication_group_members
mysql> select * from performance_schema.replication_group_members;
3.1.6 测试服务器host68.cn上的mysql
mysql> create database test;
Query OK, 1 row affected (0.01 sec)

mysql> use test;
Database changed
mysql> create table t1 (id int primary key,name varchar(20));  #注意创建主键
Query OK, 0 rows affected (0.01 sec)

mysql> insert into t1 values (1,'man');
Query OK, 1 row affected (0.01 sec)

mysql> select * from t1;
+----+------+
| id  | name |
+----+------+
|  1 | man   |
+----+------+
1 row in set (0.00 sec)

mysql> show binlog events;
+---------------+-----+----------------+-----------+-------------+-------------------------------------------------------------------+
| Log_name      | Pos | Event_type     | Server_id | End_log_pos | Info                                                              |
+---------------+-----+----------------+-----------+-------------+-------------------------------------------------------------------+
| binlog.000001 |   4 | Format_desc    |       181 |         123 | Server ver: 5.7.17-log, Binlog ver: 4                             |
| binlog.000001 | 123 | Previous_gtids |       181 |         150 |                                                                   |
| binlog.000001 | 150 | Gtid           |       181 |         211 | SET @@SESSION.GTID_NEXT= 'ce9be252-2b71-11e6-b8f4-00212844f856:1' |
| binlog.000001 | 211 | Query          |       181 |         270 | BEGIN                                                             |
| binlog.000001 | 270 | View_change    |       181 |         369 | view_id=14916679781649312:1                                       |
| binlog.000001 | 369 | Query          |       181 |         434 | COMMIT                                                            |
| binlog.000001 | 434 | Gtid           |       181 |         495 | SET @@SESSION.GTID_NEXT= 'ce9be252-2b71-11e6-b8f4-00212844f856:2' |
| binlog.000001 | 495 | Query          |       181 |         585 | create database test                                              |
| binlog.000001 | 585 | Gtid           |       181 |         646 | SET @@SESSION.GTID_NEXT= 'ce9be252-2b71-11e6-b8f4-00212844f856:3' |
| binlog.000001 | 646 | Query          |       181 |         769 | use `test`; create table t1(c1 int primary key, c2 text not null) |
| binlog.000001 | 769 | Gtid           |       181 |         830 | SET @@SESSION.GTID_NEXT= 'ce9be252-2b71-11e6-b8f4-00212844f856:4' |
| binlog.000001 | 830 | Query          |       181 |         898 | BEGIN                                                             |
| binlog.000001 | 898 | Table_map      |       181 |         941 | table_id: 219 (test.t1)                                           |
| binlog.000001 | 941 | Write_rows     |       181 |         983 | table_id: 219 flags: STMT_END_F                                   |
| binlog.000001 | 983 | Xid            |       181 |        1010 | COMMIT /* xid=40 */                                               |
+---------------+-----+----------------+-----------+-------------+-------------------------------------------------------------------+
15 rows in set (0.00 sec)
3.2 复制组添加新实例host69.cn
3.2.1 修改/etc/my.cnf 配置文件,方法和之前相同
[mysqld]

# Group Replication
server_id = 101   #注意服务ID不一样
gtid_mode = ON
enforce_gtid_consistency = ON
master_info_repository = TABLE
relay_log_info_repository = TABLE
binlog_checksum = NONE
log_slave_updates = ON
log_bin = binlog
binlog_format= ROW

transaction_write_set_extraction = XXHASH64
loose-group_replication_group_name = 'ce9be252-2b71-11e6-b8f4-00212844f856'
loose-group_replication_start_on_boot = off
loose-group_replication_local_address = 'host69.cn:33062'
loose-group_replication_group_seeds = 'xuhost.cn:33061, xueghostn:33062, xuegodhost33063'
loose-group_replication_bootstrap_group = off

#重启mysql服务
3.2.2 用户授权
mysql> set SQL_LOG_BIN=0;   #停掉日志记录
mysql> grant replication slave on *.* to repl@'10.10.10.%' identified by '123456';
mysql> flush privileges;
mysql> set SQL_LOG_BIN=1;  #开启日志记录
mysql> change master to master_user='repl',master_password='123456'  for channel 'group_replication_recovery';  #构建group replication集群

-- 安装group replication插件
mysql> install PLUGIN group_replication SONAME 'group_replication.so';
Query OK, 0 rows affected (0.00 sec)
3.2.3 把实例添回到之前的复制组
mysql> set global group_replication_allow_local_disjoint_gtids_join=ON;
Query OK, 0 rows affected (0.00 sec)

mysql> start group_replication;
Query OK, 0 rows affected (6.65 sec)
3.2.4 在host68.cn上查看复制组状态
mysql> select * from performance_schema.replication_group_members;
3.2.5 在新回的实例上查看数据库发现test库和t1表已经同步
mysql> show databases;
+--------------------+
| Database           |
+--------------------+
| information_schema |
| mysql              |
| performance_schema |
| sys                |
| test               |
+--------------------+
5 rows in set (0.00 sec)

mysql> use test;
Reading table information for completion of table and column names
You can turn off this feature to get a quicker startup with -A

Database changed
mysql> show tables;
+----------------+
| Tables_in_test |
+----------------+
| t1             |
+----------------+
1 row in set (0.00 sec)

mysql> select * from t1;
+----+------+
| id  | name |
+----+------+
|  1 | man |
+----+------+
1 row in set (0.00 sec)
3.3 以同样方法添加host70.cn
#详细步骤请参考3.2, 这里只给出配置文件/etc/my.cnf:
[mysqld]

# Group Replication
server_id = 102  #注意服务id不一样
gtid_mode = ON
enforce_gtid_consistency = ON
master_info_repository = TABLE
relay_log_info_repository = TABLE
binlog_checksum = NONE
log_slave_updates = ON
log_bin = binlog
binlog_format= ROW

transaction_write_set_extraction = XXHASH64
loose-group_replication_group_name = 'ce9be252-2b71-11e6-b8f4-00212844f856'
loose-group_replication_start_on_boot = off
loose-group_replication_local_address = 'host70.cn:33063'
loose-group_replication_group_seeds ='xuhost.cn:33061, xueghostn:33062, xuegodhost33063'
loose-group_replication_bootstrap_group = off

#重启mysql服务 然后参照第二个节点步骤操作加入组复制。
3.4 查看复制组状态
mysql> select * from performance_schema.replication_group_members;
以上单master节点的集群就搭建完毕!
查看集群参数设置列表show variables like 'group_replication%';
multi-primary模式(多主master模式):
1、该模式启用需设置两个参数
group_replication_single_primary_mode=0 #这个参数很好理解,就是关闭单master模式
group_replication_enforce_update_everywhere_checks=1 #这个参数设置多主模式下各个节点严格一致性检查
2、 默认启动的都是单master模式,其他节点都设置了read_only、super_read_only这两个参数,需要修改这两个配置
3、 完成上面的配置后就可以执行多点写入了,多点写入会存在冲突检查,这耗损性能挺大的,官方建议采用网络分区功能,在程序端把相同的业务定位到同一节点,尽量减少冲突发生几率。
由单主模式修改为多主模式方法
在原来单主模式的主节点执行操作如下:
stop GROUP_REPLICATION;
set global group_replication_single_primary_mode=off;
set global group_replication_enforce_update_everywhere_checks=ON;
SET GLOBAL group_replication_bootstrap_group=ON;
START GROUP_REPLICATION;
SET GLOBAL group_replication_bootstrap_group=OFF;
而对于其他的节点,执行下面的操作即可。
stop GROUP_REPLICATION;
set global group_replication_allow_local_disjoint_gtids_join=ON;(即使含有组中不存在的事务,也允许当前server加入组)
set global group_replication_single_primary_mode=off;
set global group_replication_enforce_update_everywhere_checks=ON;
start group_replication;
直接搭建多主master模式
#my.cnf配置文件:
# Group Replication
server_id = 100  #服务ID
gtid_mode = ON  #全局事务
enforce_gtid_consistency = ON  #强制GTID的一致性
master_info_repository = TABLE  #将master.info元数据保存在系统表中
relay_log_info_repository = TABLE  #将relay.info元数据保存在系统表中
binlog_checksum = NONE  #禁用二进制日志事件校验
log_slave_updates = ON  #级联复制
log_bin = binlog   #开启二进制日志记录
binlog_format= ROW  #以行的格式记录

transaction_write_set_extraction = XXHASH64 #使用哈希算法将其编码为散列
loose-group_replication_group_name = 'ce9be252-2b71-11e6-b8f4-00212844f856' #加入的组名
loose-group_replication_start_on_boot = off #不自动启用组复制集群
loose-group_replication_local_address = 'host68.cn:33061' #以本机端口33061接受来自组中成员的传入连接
loose-group_replication_group_seeds = 'host.cn:33061,hostn:33062,host33063' #组中成员访问表
loose-group_replication_bootstrap_group = off  #不启用引导组
group_replication_single_primary_mode = off  #关闭单master模式
group_replication_enforce_update_everywhere_checks = ON  #多主一致性检查
本文来自互联网用户投稿,该文观点仅代表作者本人,不代表本站立场。本站仅提供信息存储空间服务,不拥有所有权,不承担相关法律责任。 如若内容造成侵权/违法违规/事实不符,请联系我的编程经验分享网邮箱:veading@qq.com进行投诉反馈,一经查实,立即删除!