windows搭建redis服务
2023-12-14 10:36:41
windows搭建redis服务
下载软件
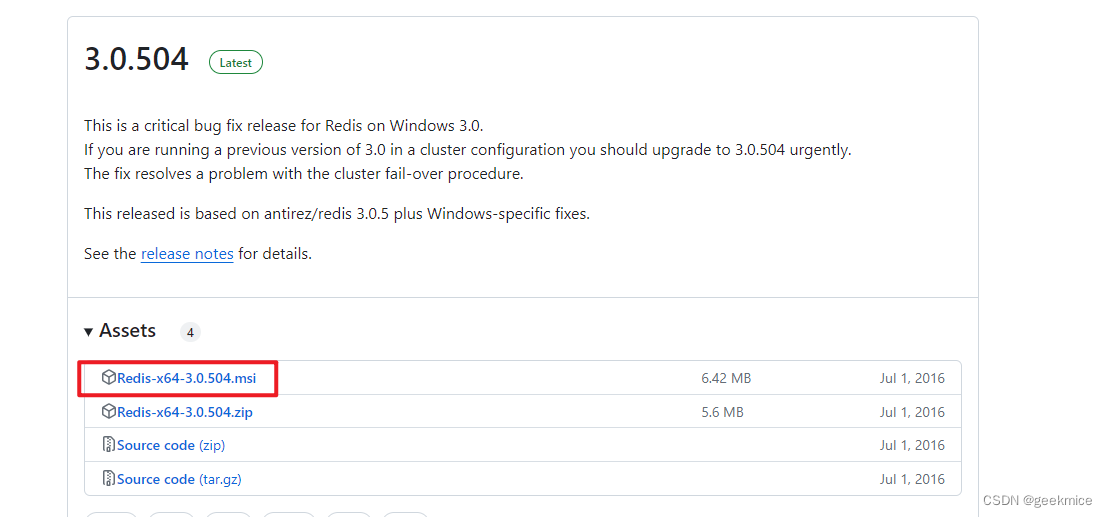
1、下载链接 https://github.com/microsoftarchive/redis/releases

安装教程,查看是否生效
1、安装包如图所示 Redis-x64-3.0.504.msi

2、双击 msi 安装包
双击 msi 安装程序,打开安装向导,点击 next
3、接受终端用户协议
接受终端用户协议,点击 next
4、选择安装路径
选择安装路径,并勾选将安装路径添加的系统 PATH 环境变量
5、设置服务端口
设置 Redis 服务端口,默认 6379,点击 next
6、设置最大内存限制
设置最大内存限制,点击 next
7、完成安装
点击 install 完成安装
8、验证 Redis
打开"任务管理器",可以看到服务列表下启动了 Redis 服务

9、命令行操作
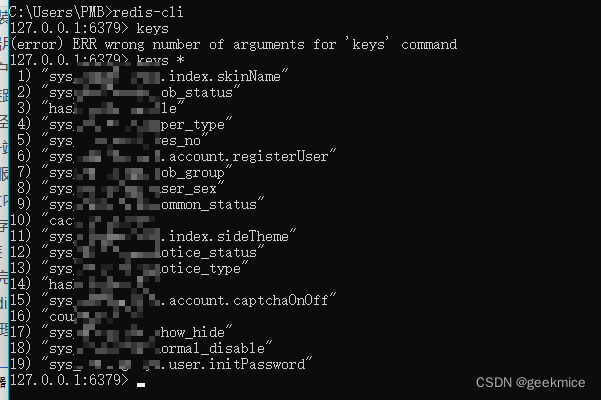
打开 cmd 窗口,输入 redis-cli 连接 redis服务,并做简单验证

SpringBoot中集成Redis服务,实现入门基本操作
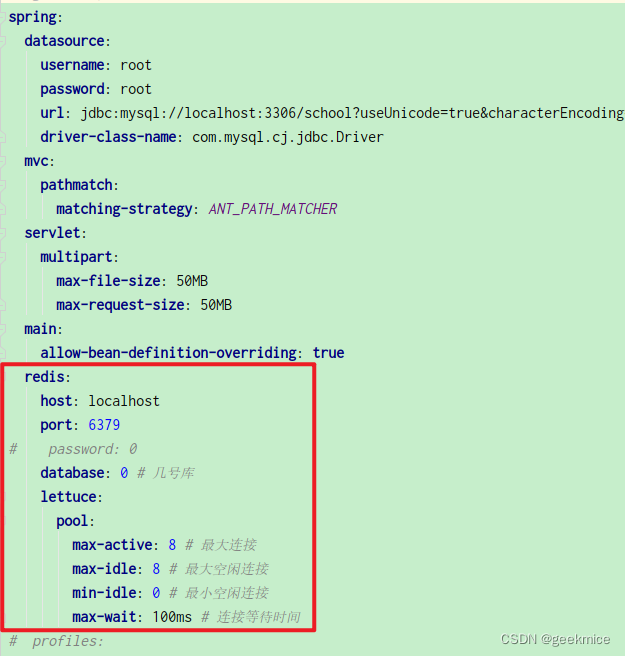
yml配置基本信息
  redis:
    host: localhost
    port: 6379
#    password: 0
    database: 0 # 几号库
    lettuce:
      pool:
        max-active: 8 # 最大连接
        max-idle: 8 # 最大空闲连接
        min-idle: 0 # 最小空闲连接
        max-wait: 100ms # 连接等待时间

spring对应redis缓存情况依赖
 <!--redis与pool2搭配使用-->
        <dependency>
            <groupId>org.springframework.boot</groupId>
            <artifactId>spring-boot-starter-data-redis</artifactId>
        </dependency>
        <dependency>
            <groupId>org.apache.commons</groupId>
            <artifactId>commons-pool2</artifactId>
        </dependency>
单元测试
字符串类型
// 添加操作
client.opsForValue().set(key, "v1", DateConstant.TIME_OF_DAY, TimeUnit.SECONDS );
// 获取操作
String getValue = client.opsForValue().get(key);
// 累加
client.opsForValue().increment(counter);
// 减一
client.opsForValue().decrement(counter);
// 存储list<map>
String multiMapStr = JSON.toJSONString(multiMapList);
client.opsForValue().set("str:multiusers", multiMapStr, DateConstant.TIME_OF_DAY, TimeUnit.SECONDS);
hash类型
// 添加单个字段元素
client.opsForHash().put("hash:user:single","name","pmb");
// 添加一个map
client.opsForHash().putAll("hash:user:all", handleMap);
// 返回key集合
Set<Object> keyList = client.opsForHash().keys("hash:user:all");
// 返回value集合
List<Object> valueList = client.opsForHash().values("hash:user:all");
list类型
// 右侧添加元素
client.opsForList().rightPush(key, "16607024161");
// 右侧删除元素
client.opsForList().rightPop(key);
// 元素个数
client.opsForList().size(key);
// 根据指定下标查找元素
client.opsForList().index(key, 0);
// 获取某个范围元素
client.opsForList().range(key, 0, size - 1);
// 实现栈 先进后出
client.opsForList().leftPush(key,"1");
client.opsForList().leftPush(key,"2");
client.opsForList().leftPush(key,"3");
client.opsForList().leftPop(key);
client.opsForList().leftPop(key);
client.opsForList().leftPop(key);
// 实现队列 先进先出
client.opsForList().leftPush(key,"one");
client.opsForList().leftPush(key,"two");
client.opsForList().rightPop(key);
client.opsForList().rightPop(key);
set类型
// 添加元素
client.opsForSet().add(key, "1","2","3");
// 返回所有元素
Set<String> members = client.opsForSet().members(key);
// 某个元素是否存在
Boolean member = client.opsForSet().isMember(key, "2");

client.opsForSet().add(intersection, "1","2");
// 交集
Set<String> intersectList = client.opsForSet().intersect(key, intersection);
// 并集
Set<String> unionList = client.opsForSet().union(key, intersection);
// 差集
Set<String> differenceList = client.opsForSet().difference(key, intersection);
zset类型
// 顺序添加
client.opsForZSet().add(key, "one", 1);
// 返回所有元素
Set<String> range = client.opsForZSet().range(key, 0, size - 1);
// 根据score返回用户
Set<String> userList = client.opsForZSet().rangeByScore(key, 1, 60);
// 删除指定用户
client.opsForZSet().remove(key, "two");
// 获取指定score区间的用户个数
Long count = client.opsForZSet().count(key, 1, 20);
// 返回倒序的用户信息
Set<String> InvertedOrder = client.opsForZSet().reverseRange(key, 0, -1);
//
Set<ZSetOperations.TypedTuple<String>> allLis = client.opsForZSet().rangeWithScores(key, 0, -1);
案例说明
package com.geekmice.springbootselfexercise.cache;

import com.geekmice.springbootselfexercise.SpringBootSelfExerciseApplication;
import com.geekmice.springbootselfexercise.constant.DateConstant;
import com.google.common.collect.Maps;
import lombok.extern.slf4j.Slf4j;
import org.junit.Assert;
import org.junit.Test;
import org.junit.runner.RunWith;
import org.springframework.beans.factory.annotation.Autowired;
import org.springframework.boot.test.context.SpringBootTest;
import org.springframework.data.redis.core.RedisTemplate;
import org.springframework.test.context.junit4.SpringRunner;

import java.util.List;
import java.util.Map;
import java.util.Objects;
import java.util.Set;
import java.util.concurrent.TimeUnit;

/**
 * @BelongsProject: spring-boot-self-exercise
 * @BelongsPackage: com.geekmice.springbootselfexercise.cache
 * @Author: xxx
 * @CreateTime: 2023-12-09  03:04
 * @Description: 字符串操作缓存
 * @Version: 1.0
 */
@Slf4j
@SpringBootTest(classes = SpringBootSelfExerciseApplication.class)
@RunWith(SpringRunner.class)
public class CacheTest {

    @Autowired
    private RedisTemplate<String,String> client;

    /**
     * 字符串类型缓存操作
     */
    @Test
    public void handleStrTest(){
        String key = "k1";
        String currentNum;
        // 用法1:key是否存在
        Boolean value = client.hasKey(key);
        log.info("[{}]是否存在[{}]" , key,value);
        // 用法2:添加元素
        client.opsForValue().set(key, "v1", DateConstant.TIME_OF_DAY, TimeUnit.SECONDS );
        // 用法3:获取元素
        String getValue = client.opsForValue().get(key);
        log.info("getValue : [{}]" , getValue);
        // 用法4:计数
        String counter ="counter:key";
        client.opsForValue().set(counter, "0", DateConstant.TIME_OF_DAY, TimeUnit.SECONDS);
        client.opsForValue().increment(counter);
        client.opsForValue().increment(counter);
        currentNum = client.opsForValue().get(counter);
        log.info("currentNum : [{}]" , currentNum);
        client.opsForValue().decrement(counter);
        currentNum = client.opsForValue().get(counter);
        log.info("currentNum : [{}]" , currentNum);

        if(Objects.nonNull(value)){
            Assert.assertTrue(value);
        }
    }

}
文章来源:https://blog.csdn.net/greek7777/article/details/134895047
本文来自互联网用户投稿,该文观点仅代表作者本人,不代表本站立场。本站仅提供信息存储空间服务,不拥有所有权,不承担相关法律责任。 如若内容造成侵权/违法违规/事实不符,请联系我的编程经验分享网邮箱:veading@qq.com进行投诉反馈,一经查实,立即删除!
本文来自互联网用户投稿,该文观点仅代表作者本人,不代表本站立场。本站仅提供信息存储空间服务,不拥有所有权,不承担相关法律责任。 如若内容造成侵权/违法违规/事实不符,请联系我的编程经验分享网邮箱:veading@qq.com进行投诉反馈,一经查实,立即删除!