Hadoop(2):常见的MapReduce[在Ubuntu中运行!]
1 以词频统计为例子介绍 mapreduce怎么写出来的
弄清楚MapReduce的各个过程:

将文件输入后,返回的<k1,v1>代表的含义是:k1表示偏移量,即v1的第一个字母在文件中的索引(从0开始数的);v1表示对应的一整行的值
map阶段:将每一行的内容按照空格进行分割后作为k2,将v2的值写为1后输出
reduce阶段:将相同的k2合并后,输出
1.1?创建Mapper、Reducer、Driver类
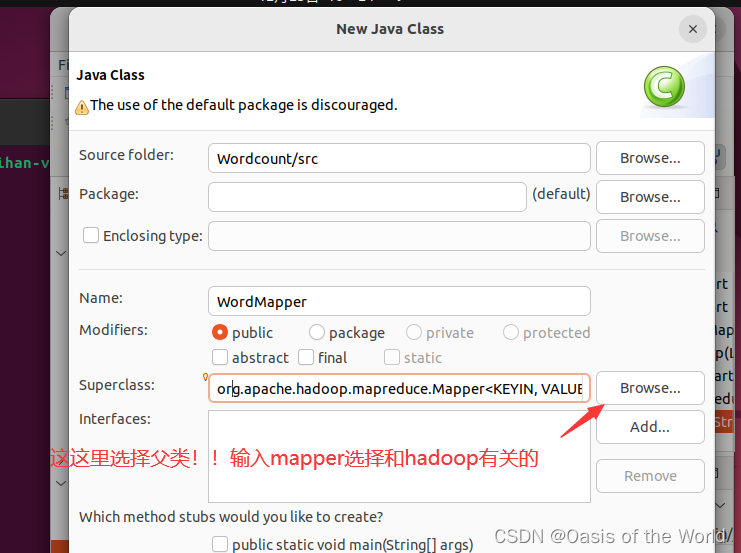
创建这三种类用的是一种方法,用Mapper举例如下:
注意选择父类
1.2?map阶段代码书写
(1)mapper源码
本来可以按住ctrl键后,点击open 后查看mapper源代码,但是在虚拟机里一直调不出来。所以从网上搜索出具体代码如下:
/**
 * Licensed to the Apache Software Foundation (ASF) under one
 * or more contributor license agreements.  See the NOTICE file
 * distributed with this work for additional information
 * regarding copyright ownership.  The ASF licenses this file
 * to you under the Apache License, Version 2.0 (the
 * "License"); you may not use this file except in compliance
 * with the License.  You may obtain a copy of the License at
 *
 *     http://www.apache.org/licenses/LICENSE-2.0
 *
 * Unless required by applicable law or agreed to in writing, software
 * distributed under the License is distributed on an "AS IS" BASIS,
 * WITHOUT WARRANTIES OR CONDITIONS OF ANY KIND, either express or implied.
 * See the License for the specific language governing permissions and
 * limitations under the License.
 */

package org.apache.hadoop.mapreduce;

import java.io.IOException;

import org.apache.hadoop.classification.InterfaceAudience;
import org.apache.hadoop.classification.InterfaceStability;
import org.apache.hadoop.conf.Configuration;
import org.apache.hadoop.io.RawComparator;
import org.apache.hadoop.io.compress.CompressionCodec;
import org.apache.hadoop.mapreduce.task.MapContextImpl;

@InterfaceAudience.Public
@InterfaceStability.Stable
public class Mapper<KEYIN, VALUEIN, KEYOUT, VALUEOUT> {

  /**
   * The <code>Context</code> passed on to the {@link Mapper} implementations.
   */
  public abstract class Context
    implements MapContext<KEYIN,VALUEIN,KEYOUT,VALUEOUT> {
  }

  /**
   * Called once at the beginning of the task.
   */
  protected void setup(Context context
                       ) throws IOException, InterruptedException {
    // NOTHING
  }

  /**
   * Called once for each key/value pair in the input split. Most applications
   * should override this, but the default is the identity function.
   */
  @SuppressWarnings("unchecked")
  protected void map(KEYIN key, VALUEIN value,
                     Context context) throws IOException, InterruptedException {
    context.write((KEYOUT) key, (VALUEOUT) value);
  }

  /**
   * Called once at the end of the task.
   */
  protected void cleanup(Context context
                         ) throws IOException, InterruptedException {
    // NOTHING
  }

  /**
   * Expert users can override this method for more complete control over the
   * execution of the Mapper.
   * @param context
   * @throws IOException
   */
  public void run(Context context) throws IOException, InterruptedException {
    setup(context);
    try {
      while (context.nextKeyValue()) {
        map(context.getCurrentKey(), context.getCurrentValue(), context);
      }
    } finally {
      cleanup(context);
    }
  }
}
(2)修改的注意事项
注意我们需要修改的只是map方法?
1. Mapper组件开发方式:自定义一个类,继承Mapper
2. Mapper组件的作用是定义每一个MapTask具体要怎么处理数据。
 例如一个文件,256MB,会生成2个MapTask(每个切片大小,默认是128MB,
 所以MapTask的多少有处理的数据大小来决定)。即2个MapTask处理逻辑是一样的,
 只是每个MapTask处理的数据不一样。
3. 下面是Mapper类中的4个泛型含义:
	 a.泛型一:KEYIN:LongWritable,对应的Mapper的输入key。输入key是每行的行首偏移量
	 b.泛型二: VALUEIN:Text,对应的Mapper的输入Value。输入value是每行的内容
	 c.泛型三:KEYOUT:对应的Mapper的输出key,根据业务来定义
	 d.泛型四:VALUEOUT:对应的Mapper的输出value,根据业务来定义
4. 注意:初学时,KEYIN和VALUEIN写死(LongWritable,Text)。KEYOUT和VALUEOUT不固定,根据业务来定
5. Writable机制是Hadoop自身的序列化机制,常用的类型:
	a. LongWritable
	b. Text(String)
	c. IntWritable
	d. NullWritable
6. 定义MapTask的任务逻辑是通过重写map()方法来实现的。
读取一行数据就会调用一次此方法,同时会把输入key和输入value进行传递
7. 在实际开发中,最重要的是拿到输入value(每行内容)
8. 输出方法:通过context.write(输出key,输出value)
9. 开发一个MapReduce程序(job),Mapper可以单独存储,
 此时,最后的输出的结果文件内容就是Mapper的输出。
10. Reducer组件不能单独存在,因为Reducer要依赖于Mapper的输出。
 当引入了Reducer之后,最后输出的结果文件的结果就是Reducer的输出。
(3)具体实例
重写map方法:输入map后 按住"alt"加"?"?后,就可以自动补全代码!
然后进行编写:
import java.io.IOException;
import org.apache.hadoop.io.IntWritable;
import org.apache.hadoop.io.LongWritable;
import org.apache.hadoop.io.Text;
import org.apache.hadoop.mapreduce.Mapper;

public class WordMapper extends Mapper<LongWritable, Text, Text, IntWritable> {
	@Override
	protected void map(LongWritable key, Text value, Mapper<LongWritable, Text,  Text,IntWritable>.Context context)
			throws IOException, InterruptedException {
		//将value转换成字符串,再将其转化成字符串数组
		String line = value.toString(); //hello word
		String[] wordarr = line.split(" ");
		for (String word:wordarr) {
			context.write(new Text(word), new IntWritable(1));
		}
	}}
?1.3? reducer阶段代码的书写
(1)reducer源码
和mapper差不多
(2)修改时的注意事项
1. Reducer组件用于接收Mapper组件的输出
2. reduce的输入key,value需要和mapper的输出key,value类型保持一致
3. reduce的输出key,value类型,根据具体业务决定
4. reduce收到map的输出,会按相同的key做聚合,
形成:key Iterable 形式然后通过reduce方法进行传递
5. reduce方法中的Iterable是一次性的,即遍历一次之后,再遍历,里面就没有数据了。
所以,在某些业务场景,会涉及到多次操作此迭代器,处理的方法是
:①先创建一个List  ②把Iterable装到List ③多次去使用List即可
(3)具体案例
注意:IntWriter是一个迭代器!context负责输出!
import java.io.IOException;
import org.apache.hadoop.mapreduce.Reducer;
import org.apache.hadoop.examples.SecondarySort.Reduce;
import org.apache.hadoop.io.IntWritable;
import org.apache.hadoop.io.LongWritable;
import org.apache.hadoop.io.Text;


public class WordReducer extends Reducer<Text, IntWritable, Text, IntWritable> {
	@Override
	protected void reduce(Text key, Iterable<IntWritable> values,
			Reducer<Text, IntWritable, Text, IntWritable>.Context context) throws IOException, InterruptedException {
		int total =0;
		for (IntWritable value:values) {
			total = total + value.get();
		    }
		context.write(key, new IntWritable(total));
	}
1.4?主函数代码的书写
【1】还未进行reducer阶段时
(1)主函数也就是驱动函数一般包含以下几个阶段:
注意:实例化job、设置输入文件地址、输出文件地址。这三个代码是固定的!!!每次都这样哦
import java.io.IOException;
public class WordDriver {
	public static void main(String[] args) throws Exception {
		//1.实例化job
		Configuration conf = new Configuration();
        String[] otherArgs = (new GenericOptionsParser(conf, args)).getRemainingArgs();
        if(otherArgs.length < 2) {
            System.err.println("Usage: wordcount <in> [<in>...] <out>");
            System.exit(2);
        }
        Job job = Job.getInstance(conf, "word count");
		//2.关联class文件
		job.setJarByClass(WordDriver.class);
		job.setMapperClass(WordMapper.class);

		//3.设置"mapper"的输出数据类型
		job.setOutputKeyClass(Text.class);
		job.setOutputValueClass(IntWritable.class);

		//4.设置reducer的是输出数据类型

		//5.设置输入文件路径
		 for(int i = 0; i < otherArgs.length - 1; ++i) {
	            FileInputFormat.addInputPath(job, new Path(otherArgs[i]));
	        }
		//6.设置输出文件路径
		 FileOutputFormat.setOutputPath(job, new Path(otherArgs[otherArgs.length - 1]));
		//7.提交job文件!
		 System.exit(job.waitForCompletion(true)?0:1);

	}

}
输出的结果为:
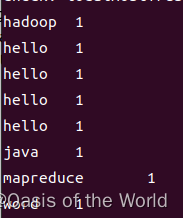
!!!!!!!!就是我们map阶段应该产生的结果!!!
【2】进行reducer阶段后
import java.io.IOException;
public class WordDriver {
	public static void main(String[] args) throws Exception {
		//1.实例化job
		Configuration conf = new Configuration();
        String[] otherArgs = (new GenericOptionsParser(conf, args)).getRemainingArgs();
        if(otherArgs.length < 2) {
            System.err.println("Usage: wordcount <in> [<in>...] <out>");
            System.exit(2);
        }
        Job job = Job.getInstance(conf, "word count");
		//2.关联class文件
		job.setJarByClass(WordDriver.class);
		job.setMapperClass(WordMapper.class);
		job.setReducerClass(WordReducer.class);

		//3.设置"mapper"的输出数据类型
		job.setOutputKeyClass(Text.class);
		job.setOutputValueClass(IntWritable.class);

		//4.设置reducer的是输出数据类型
		job.setOutputKeyClass(Text.class);
		job.setOutputValueClass(IntWritable.class);

		//5.设置输入文件路径
		 for(int i = 0; i < otherArgs.length - 1; ++i) {
	            FileInputFormat.addInputPath(job, new Path(otherArgs[i]));
	        }
		//6.设置输出文件路径
		 FileOutputFormat.setOutputPath(job, new Path(otherArgs[otherArgs.length - 1]));
		//7.提交job文件!
		 System.exit(job.waitForCompletion(true)?0:1);

	}

}
1.5?在Ubuntu上运行
1.5.1 编译打包程序
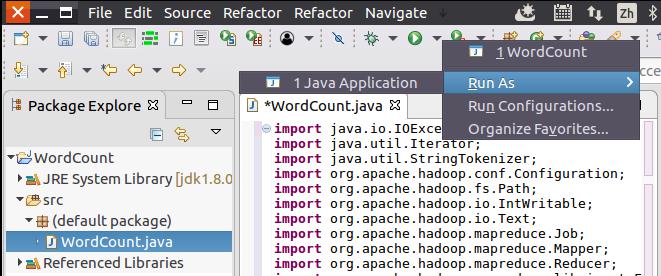
现在就可以编译上面编写的代码。可以直接点击Eclipse工作界面上部的运行程序的快捷按钮,当把鼠标移动到该按钮上时,在弹出的菜单中选择“Run as”,继续在弹出来的菜单中选择“Java Application”,如下图所示。
然后,会弹出如下图所示界面。

点击界面右下角的“OK”按钮,开始运行程序。程序运行结束后,会在底部的“Console”面板中显示运行结果信息(如下图所示)。

下面就可以把Java应用程序打包生成JAR包,部署到Hadoop平台上运行。现在可以把词频统计程序放在“/usr/local/hadoop/myapp”目录下。如果该目录不存在,可以使用如下命令创建:
cd /usr/local/hadoop
mkdir myapp
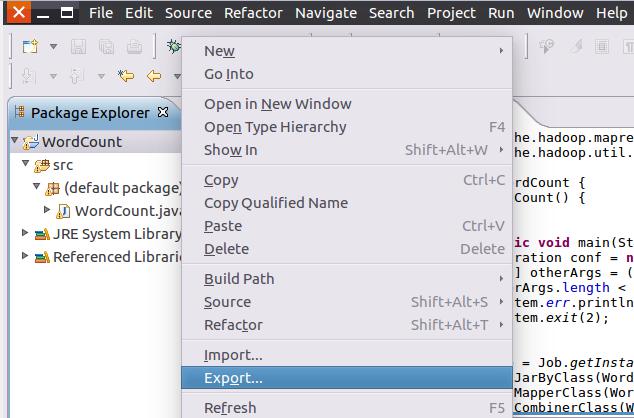
首先,请在Eclipse工作界面左侧的“Package Explorer”面板中,在工程名称“WordCount”上点击鼠标右键,在弹出的菜单中选择“Export”,如下图所示。
然后,会弹出如下图所示界面。
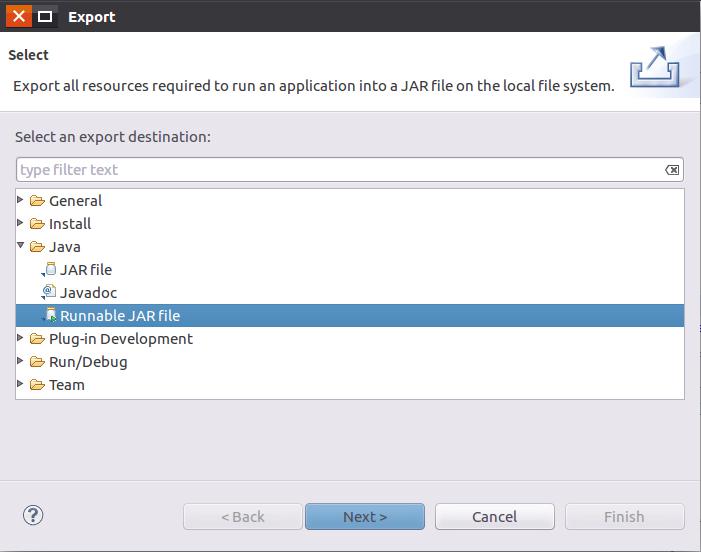
在该界面中,选择“Runnable JAR file”,然后,点击“Next>”按钮,弹出如下图所示界面。

在该界面中,“Launch configuration”用于设置生成的JAR包被部署启动时运行的主类,需要在下拉列表中选择刚才配置的类“WordCount-WordCount”。在“Export destination”中需要设置JAR包要输出保存到哪个目录,比如,这里设置为“/usr/local/hadoop/myapp/WordCount.jar”。在“Library handling”下面选择“Extract required libraries into generated JAR”。然后,点击“Finish”按钮,会出现如下图所示界面。
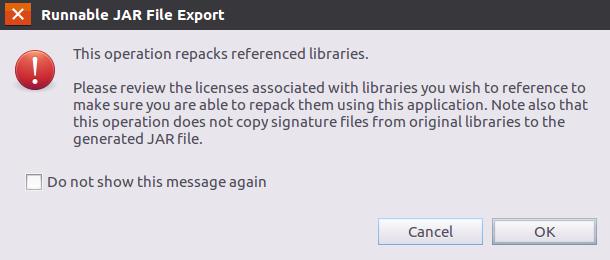
可以忽略该界面的信息,直接点击界面右下角的“OK”按钮,启动打包过程。打包过程结束后,会出现一个警告信息界面,如下图所示。

可以忽略该界面的信息,直接点击界面右下角的“OK”按钮。至此,已经顺利把WordCount工程打包生成了WordCount.jar。可以到Linux系统中查看一下生成的WordCount.jar文件,可以在Linux的终端中执行如下命令:
cd /usr/local/hadoop/myapp
ls
1.5.2 运行程序
在运行程序之前,需要启动Hadoop,命令如下:
cd /usr/local/hadoop
./sbin/start-dfs.sh
在启动Hadoop之后,需要首先删除HDFS中与当前Linux用户hadoop对应的input和output目录(即HDFS中的“/user/hadoop/input”和“/user/hadoop/output”目录),这样确保后面程序运行不会出现问题,具体命令如下:
cd /usr/local/hadoop
./bin/hdfs dfs -rm -r input
./bin/hdfs dfs -rm -r output
然后,再在HDFS中新建与当前Linux用户hadoop对应的input目录,即“/user/hadoop/input”目录,具体命令如下:
cd /usr/local/hadoop
./bin/hdfs dfs -mkdir input
然后,把之前在中在Linux本地文件系统中新建的文件wordfile1.txt(假设这个文件位于“/usr/local/hadoop”目录下,并且里面包含了一些英文语句),上传到HDFS中的“/user/hadoop/input”目录下,命令如下:
cd /usr/local/hadoop
./bin/hdfs dfs -put ./wordfile1.txt input
如果HDFS中已经存在目录“/user/hadoop/output”,则使用如下命令删除该目录:
cd /usr/local/hadoop
./bin/hdfs dfs -rm -r /user/hadoop/output
现在,就可以在Linux系统中,使用hadoop jar命令运行程序,命令如下:
cd /usr/local/hadoop
./bin/hadoop jar ./myapp/WordDriver.jar input output
上面命令执行以后,当运行顺利结束时,屏幕上会显示类似如下的信息:

词频统计结果已经被写入了HDFS的“/user/hadoop/output”目录中,可以执行如下命令查看词频统计结果:
cd /usr/local/hadoop
./bin/hdfs dfs -cat output/*
上面命令执行后,会在屏幕上显示如下词频统计结果:
Hadoop  2
I   2
Spark   2
fast    1
good    1
is  2
love    2
至此,词频统计程序顺利运行结束。需要注意的是,如果要再次运行WordCount.jar,需要首先删除HDFS中的output目录,否则会报错。
最后关闭hadoop程序:
cd /usr/local/hadoop
./sbin/stop-dfs.sh本文来自互联网用户投稿,该文观点仅代表作者本人,不代表本站立场。本站仅提供信息存储空间服务,不拥有所有权,不承担相关法律责任。 如若内容造成侵权/违法违规/事实不符,请联系我的编程经验分享网邮箱:veading@qq.com进行投诉反馈,一经查实,立即删除!