antv - G6 绘制1:N N:1 跨节点的graph
2023-12-13 19:59:33
文章目录
项目背景: https://www.yuque.com/kaishuimeiyouchuntian/oe1nen/og8aawmq96a9mc11
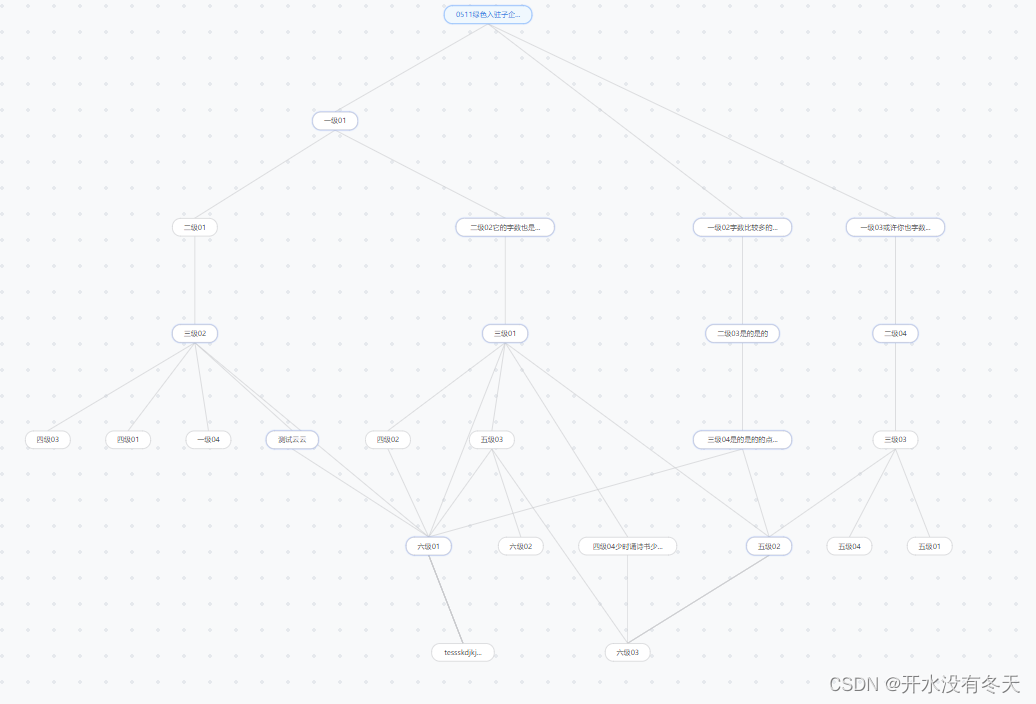
hover时候,当前节点高亮,且直接相连的线和节点也高亮展示(展示直接关系)
内置的高亮节点(插件:activate-relations)
节点的label超过10个字的时候,文本溢出,且hover有tooltip;小于10个字,没有tooltip
tooltip的shouldBegin设置是否显示tooltip
tootip
const tooltip = new G6.Tooltip({
  getContent(e){
    console.log('插件方式添加tooltip-e:',e)
    if(e.item.getType() == 'node'){
      // 获取节点信息
      console.log('获取 model:',e.item.getModel())
    }else {
      console.log('source和target:',e.item.getSource(), e.item.getTarget())
      console.log('source的model:',e.item.getSource()) // 获取source节点Node(内容为:{_cfg:{model:{节点基本信息}}})
      console.log('source的name:',e.item.getSource().getModel()) // 获取到source节点Node后,然后获取节点基本信息(label、id、type等等)
    }

    let label = e.item._cfg.model.labelAllText||''
    if(label.length>GRAPH_NODE_LABEL_LENGTH){
      // 在这做判断限制没用,需要在shouldBegin里面设置。
    }
    return e.item._cfg.model.labelAllText||''

  },
  itemTypes: ['node','edge',],
  /**
   * 字符长度大于10的时候,显示tooltip;否则不显示tooltip
   */
  shouldBegin: (e) => {
    const target = e.target;
    console.log(e);
    // console.log(e.target);
    // console.log(target.get('name'))
    let label = e.item._cfg.model.labelAllText||''
    if(label.length>GRAPH_NODE_LABEL_LENGTH){
      return true
    }
    return false
  }
})
使用插件
const tooltip = new G6.Tooltip({})

// tooltip类名为:g6-component-tooltip
modes里面添加tooltip
modes: {
  default: [
    'drag-canvas',
    'zoom-canvas',
    'drag-node', // TODO-mock
    'activate-relations',
    // 'click-select',
    {
      type: 'tooltip',
      formatText (model) {
        if(model.labelAllText.length>GRAPH_NODE_LABEL_LENGTH){
          return model.labelAllText
        }
        return null

      },
      offset: 30,
       // 也可以是 shouldBegin
      shouldBegin:(e)=>{
        return false // 不渲染tooltip  返回true或者false
      }
    },
  ],
},

// tooltip类名为: g6-tooltip g6-node-tooltip
fitView
fitView: true,
fitViewPadding: [ 55,10,10,10],
fitViewPadding生效依赖于fitView
fitCenter: true, // 居中
- fitCenter是graph居中,那么根节点不在中间,所以用
focusItem。 - 根节点:rootId,居中,但是上面会很空,所以居
中上位置。用this.graph.translate(0, -(heightNum / 2 - 60))
if (this.rootId) {
  setTimeout(() => {
    this.showGraph = true
    this.graph.focusItem(this.rootId, false)
    let dom = document.getElementById('deviceTopoGraph')
    try {
      let height = window.getComputedStyle(dom).height
      let heightNum = height.replace('px', '')
      // console.log('高度值:',heightNum)
      // console.log('dom元素:', window.getComputedStyle(dom))
      // console.log('dom元素:', window.getComputedStyle(dom).height)
      // console.log('dom元素:', document.getElementById('deviceTopoGraph').style)
      // console.log('dom元素:', document.getElementById('deviceTopoGraph').style.height)
      this.graph.translate(0, -(heightNum / 2 - 60))
    } catch (err) {

    }

  }, 100)
} else {
  this.showGraph = true
}
设置最大和最小的缩放比
太小了图都看不清楚,所以没必要缩的太小:
this.graph.setMinZoom(0.1)

console.log('最小缩放比例:', this.graph.getMinZoom())
console.log('最小缩放比例:', this.graph.getMaxZoom())
节点宽自适应
v.size = [this.$common.getStrWidth(v.label), 30] // rect
export const getStrWidth = (str) => {
  let len = 0
  for (let i = 0; i < str.length; i++) {
    if (str.charCodeAt(i) > 255) {
      len += 2
      // len +=12
    } else {
      len += 0.8
      // len+=7
    }
  }
  let strWidth = Math.ceil(len) * 6 + 40
  // let strWidth = Math.ceil(len) + 40
  // 也可以处理成有一个最小宽度的。
  strWidth = strWidth < 60 ? 60 : strWidth // circle
  return strWidth

}
自定义line的时候,没有圆角,自己设置
https://blog.csdn.net/weixin_42995876/article/details/134929261
const LINE_VERTICES = 50
G6.registerEdge('custom-line-2', {
  draw (cfg, group) {
    const startPoint = cfg.startPoint
    const endPoint = cfg.endPoint

    /**
     * 根据计算判断拐点偏移量是正还是负
     * @type {number}
     */
    let offsetX = 0
    let offsetY = 6
    let sweepFlag = 1 // 值只有1和0,2的时候就属于是直线,不需要这个弧线的传参数...
    if (startPoint.x > endPoint.x) {
      offsetX = 6
      sweepFlag = 0
    } else if (startPoint.x < endPoint.x) {
      offsetX = -6
      sweepFlag = 1
    } else {
      // 如果start和end是垂直的,那么不需要圆弧角了。
      sweepFlag = 2
    }
    let path = []
    // 可以直接判断,插入参数,暂时先这样,不调整了。
    if (sweepFlag == 2) {
      path = [
        ['M', startPoint.x, startPoint.y], // 起点
        ['L', startPoint.x, LINE_VERTICES + startPoint.y], // 固定值处拐点(第一个拐点)
        ['L', endPoint.x + offsetX, LINE_VERTICES + startPoint.y], // 固定值处拐点
        // ['A',12, 12, 0 ,0, sweepFlag,  endPoint.x ,LINE_VERTICES + startPoint.y+offsetY], // 不需要圆弧
        ['L', endPoint.x, LINE_VERTICES + startPoint.y + offsetY], // 固定值处拐点
        ['L', endPoint.x, endPoint.y], // 终点
      ]
    } else {
      path = [
        ['M', startPoint.x, startPoint.y], // 起点
        ['L', startPoint.x, LINE_VERTICES + startPoint.y], // 固定值处拐点(第一个拐点)
        ['L', endPoint.x + offsetX, LINE_VERTICES + startPoint.y], // 固定值处拐点
        ['A', 6, 6, 0, 0, sweepFlag, endPoint.x, LINE_VERTICES + startPoint.y + offsetY], // 圆弧角
        ['L', endPoint.x, LINE_VERTICES + startPoint.y + offsetY], // 固定值处拐点
        ['L', endPoint.x, endPoint.y], // 终点
      ]
    }
    const shape = group.addShape('path', {
      attrs: {
        stroke: '#C8C9CC',
        path: path,
        radius: 9,
      },
      // 在 G6 3.3 及之后的版本中,必须指定 name,可以是任意字符串,但需要在同一个自定义元素类型中保持唯一性
      name: 'path-shape',
    })
    return shape
  },
})
文章来源:https://blog.csdn.net/weixin_42995876/article/details/134978448
本文来自互联网用户投稿,该文观点仅代表作者本人,不代表本站立场。本站仅提供信息存储空间服务,不拥有所有权,不承担相关法律责任。 如若内容造成侵权/违法违规/事实不符,请联系我的编程经验分享网邮箱:veading@qq.com进行投诉反馈,一经查实,立即删除!
本文来自互联网用户投稿,该文观点仅代表作者本人,不代表本站立场。本站仅提供信息存储空间服务,不拥有所有权,不承担相关法律责任。 如若内容造成侵权/违法违规/事实不符,请联系我的编程经验分享网邮箱:veading@qq.com进行投诉反馈,一经查实,立即删除!