web服务器之——基于虚拟目录和用户控制的web网站
2023-12-18 08:40:49
目录
一、虚拟目录
虚拟目录的作用:
????????为了便于对网站资源进行灵活管理,还可以把这些文件存放在本地计算机的其它文件夹中或者其它计算机的共享文件夹中,然后再把这个文件夹映射到网站主目录中的一个文件夹上,这个文件夹被称为“虚拟目录”。
????????每个虚拟目录都有一个别名,这样用户就可以通过这个虚拟目录的别名来访问与之对应的真实文件夹中的资源了。虚拟目录的好处是在不需要改变别名的情况下,可以随时改变其对应的文件夹。
二、搭建基于虚拟目录的web网站? ? ? ? ? ?
1、www服务器配置
2、搭建静态网站
设置防火墙状态
[root@localhost html]# systemctl stop firewalld
注:临时生效命令?默认防火墙建立22端口连接
关闭文件访问权限——SeLinux
[root@localhost html]# setenforce 0
注:临时生效命令
3、编辑网页资源文件
[root@localhost ~]# vim /etc/httpd/conf.d/virtual.conf<VirtualHost 192.168.17.171:80>
? ? ? ServerName 192.168.17.171
? ? ? DocumentRoot /www/ip
</VirtualHost>
<Directory /www>
? ? ? AllowOverride none
? ? ? Require all granted
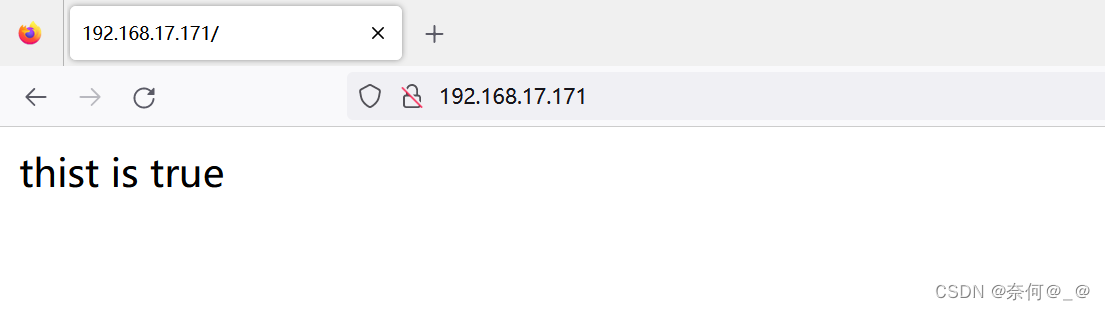
</Directory>[root@localhost ~]# mkdir /www/ip/
[root@localhost ~]# echo thist is true > /www/ip/index.html
[root@localhost ~]# systemctl restart httpd
4、设置虚拟目录
[root@localhost ~]# vim /etc/httpd/conf.d/virtual.conf<VirtualHost 192.168.17.171:80>
? ? ? ServerName 192.168.17.171
? ? ? DocumentRoot /www/ip
? ? ? ?#子界面/virtual/index.html
? ? ? Alias /1 /virtual
? ? ? ?# /www/ip/1 ---> /virtual
</VirtualHost>
<Directory /www>
? ? ? AllowOverride none
? ? ? Require all granted
</Directory>
?
<Directory /virtual>
? ? ? AllowOverride none
? ? ? Require all granted
</Directory>
5、向虚拟目录中写入资源
[root@localhost ~]# mkdir /virtual
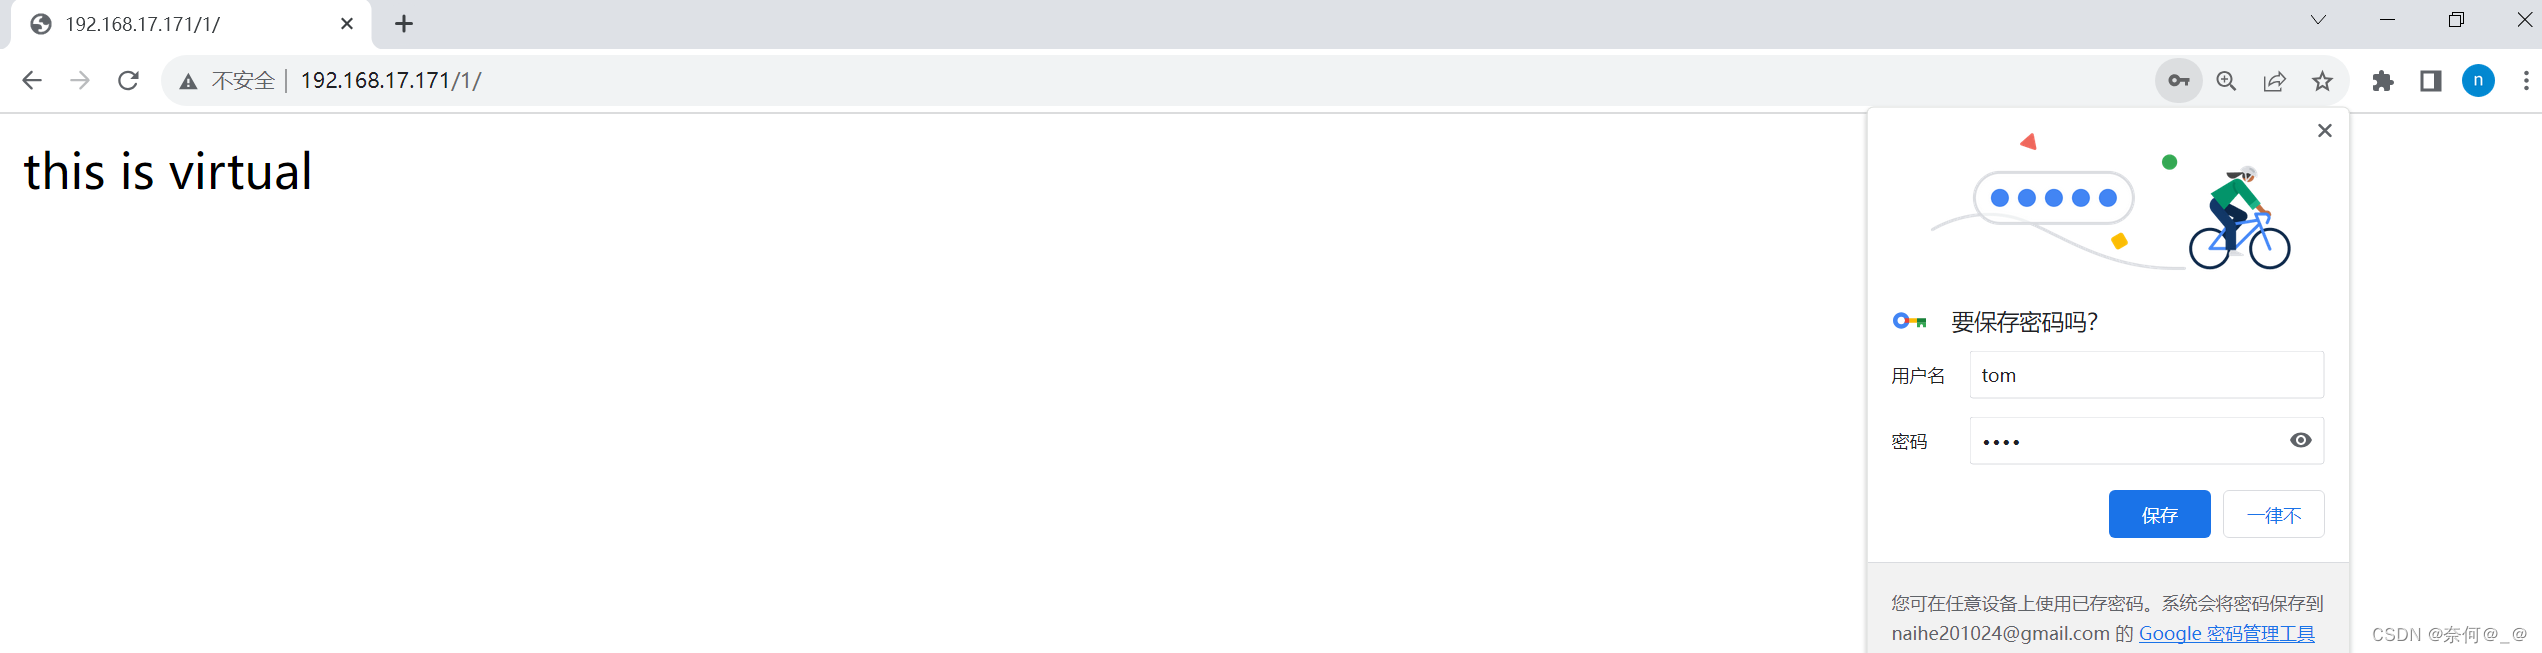
[root@localhost ~]# echo this is virtual > /virtual/index.html6、重启httpd
[root@localhost ~]# systemctl restart httpd查看:

三、搭建基于用户控制的web网站?
?1、www服务器配置
2、搭建静态网站
设置防火墙状态
[root@localhost html]# systemctl stop firewalld
注:临时生效命令?默认防火墙建立22端口连接
关闭文件访问权限——SeLinux
[root@localhost html]# setenforce 0
注:临时生效命令
3、编辑网页资源文件
[root@localhost ~]# vim /etc/httpd/conf.d/userdir.conf<VirtualHost 192.168.17.171:80>
? ? ? ServerName 192.168.17.171
? ? ? DocumentRoot /www/ip
? ? ? ?#子界面/virtual/index.html
? ? ? Alias /1 /virtual
? ? ? ?# /www/ip/1 ---> /virtual
</VirtualHost>
<Directory /www>
? ? ? AllowOverride none
? ? ? Require all granted
</Directory>
?
<Directory /virtual>
? ? ? AllowOverride none
? ? ? AuthType Basic ? #认证类型 —— 基本认证
? ? ? AuthName "please login ......" ? # 认证民称——提示信息
? ? ? AuthUserfile /etc/httpd/users ? #用户认证文件
? ? ? Require user tom
</Directory>| AuthType Basic | 基本认证类型(账号) |
|---|---|
| AuthName “Please login:” | 提示信息,双引号必须有,可以更换为其它提示信息 |
| AuthUserFile /etc/httpd/mymima | 用户认证文件的用户名和密码指定的文件所在位置 |
| Require user xiaoming xiaohong | 指定这两个用户可以访问该服务器 |
4、创建管理用户
[root@localhost ~]# htpasswd -c /etc/httpd/users tom(-c表示创建)
输入密码
再次添加不需要-c
[root@localhost ~]# htpasswd /etc/httpd/users zhangsan
输入密码
添加成功:

5、重启httpd
[root@localhost ~]# systemctl restart httpd6、查看
在浏览器中输入:http://192.168.17.171/1
【登录成功后实际上访问的是/etc/httpd/users/index.html的内容】


用户访问自己主界面
<IfModule mod_userdir.c>
? UserDir public_html 开启用户主目录
</IfModule>
<Directory /home/zhangsan/public_html>
? Authtype Basic
? AuthName "......"
? AuthUserFile /etc/httpd/userfile
? Require user zhangsan
</Directory>
#htpasswd -c /etc/httpd/userfile zhangsan
#useradd zhangsan (必须创建用户身份)
#mkdir /home/zhangsan/public_html
#chmod o+rx /home/zhangsan
#echo this is zhangsan > /home/zhangan/public_html/index.html
#systemctl restart httpd
测试:
http://www.ha1.com/~zhangsan/
三、搭建基于主机访问控制的web网站?
?1、www服务器配置
2、搭建静态网站
设置防火墙状态
[root@localhost html]# systemctl stop firewalld
注:临时生效命令?默认防火墙建立22端口连接
关闭文件访问权限——SeLinux
[root@localhost html]# setenforce 0
注:临时生效命令
3、编辑网页资源文件
[root@localhost ~]#vim /etc/httpd/conf.d/serverdir.conf<VirtualHost 192.168.17.171:80>
? ? ? ServerName 192.168.17.171
? ? ? DocumentRoot /www/ip
? ? ? ?#子界面/virtual/index.html
? ? ? Alias /1 /virtual
? ? ? ?# /www/ip/1 ---> /virtual
</VirtualHost>
<Directory /www>
? ? ? AllowOverride none
? ? ? <Requireall>
? ? ? ? ? ? ? Require all granted
? ? ? ? ? ? ? Require not ip 192.168.17.171 ?#禁止192.168.17.171访问服务器
? ? ? </Requireall>
</Directory>
4、重启httpd
[root@localhost ~]# systemctl restart httpd5、测试
[root@localhost ~]# curl 192.168.17.171
此时出现的是Redhat访问官网欢迎界面
而客户端此时可以访问:
域名访问控制
只需将其中IP改为host即可,其余规则相同
<VirtualHost 192.168.17.171:80>
 ? ? ?  ServerName 192.168.17.171
 ? ? ?  DocumentRoot /www/ip
 ? ? ? ?#子界面/virtual/index.html
 ? ? ?  Alias /1  /virtual
 ? ? ? ?#  /www/ip/1 ---> /virtual
</VirtualHost>
<Directory /www>
 ? ? ?  AllowOverride none
 ? ? ?  <Requireall>
 ? ? ? ? ? ? ?  Require all granted
 ? ? ? ? ? ? ?  Require not hosts 192.168.17.171 ?#禁止192.168.17.171访问服务器
 ? ? ?  </Requireall>
</Directory>
文章来源:https://blog.csdn.net/weixin_51525416/article/details/135023651
本文来自互联网用户投稿,该文观点仅代表作者本人,不代表本站立场。本站仅提供信息存储空间服务,不拥有所有权,不承担相关法律责任。 如若内容造成侵权/违法违规/事实不符,请联系我的编程经验分享网邮箱:veading@qq.com进行投诉反馈,一经查实,立即删除!
本文来自互联网用户投稿,该文观点仅代表作者本人,不代表本站立场。本站仅提供信息存储空间服务,不拥有所有权,不承担相关法律责任。 如若内容造成侵权/违法违规/事实不符,请联系我的编程经验分享网邮箱:veading@qq.com进行投诉反馈,一经查实,立即删除!