debain12.0系统安装cuda和cudnn,并且可以调用算力
2023-12-20 11:43:13
1.硬件和软件说明
显卡:4060Ti
cuda:cuda11.7
cudnn:cudnn8.5.0
NVIDIA驱动:535.146.02
Anaconda3软件:2023.09版
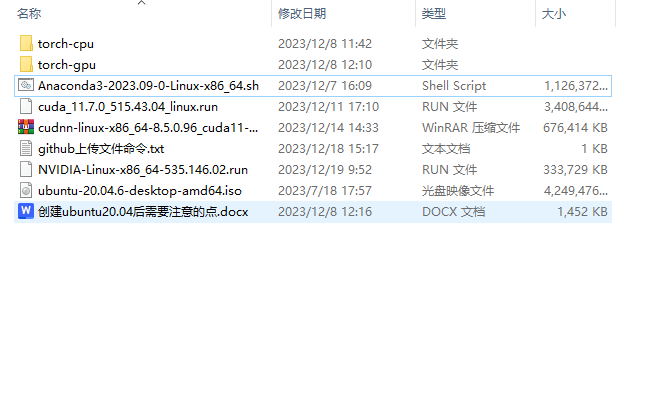
所有软件均可在网络上下载,如下图

2.查看系统:
cat /etc/debian_version
3.换阿里源:
nano /etc/apt/sources.list
阿里源放里头
deb https://mirrors.aliyun.com/debian/ bookworm main non-free non-free-firmware contrib
deb-src https://mirrors.aliyun.com/debian/ bookworm main non-free non-free-firmware contrib
deb https://mirrors.aliyun.com/debian-security/ bookworm-security main
deb-src https://mirrors.aliyun.com/debian-security/ bookworm-security main
deb https://mirrors.aliyun.com/debian/ bookworm-updates main non-free non-free-firmware contrib
deb-src https://mirrors.aliyun.com/debian/ bookworm-updates main non-free non-free-firmware contrib
deb https://mirrors.aliyun.com/debian/ bookworm-backports main non-free non-free-firmware contrib
deb-src https://mirrors.aliyun.com/debian/ bookworm-backports main non-free non-free-firmware contrib
更新源
apt-get update
apt-get upgrade
4.安装英伟达驱动:
sudo apt install gcc
sudo apt install g++
sudo apt install cmake
sudo apt install pkg-config
sudo apt install linux-headers*

chmod +x NVIDIA-Linux-x86_64-535.146.02.run
bash NVIDIA-Linux-x86_64-535.146.02.run
nvidia-smi
5.挂载硬盘才能进去外置硬盘:
apt install ntfs-3g
cd /dev/
lsblk
mount -t ntfs /dev/sdb1 /mnt/
cd mnt
cp -r Langchain-Chatchat /home/otx #将硬盘文件夹复制到系统
6.安装cuda:
sh cuda_11.7.0_515.43.04_linux.run --override
配置环境路径
nano ~/.bashrc
export CUDA_HOME=$CUDA_HOME:/usr/local/cuda-11.7
export PATH=$PATH:/usr/local/cuda-11.7/bin
export LD_LIBRARY_PATH=$LD_LIBRARY_PATH:/usr/local/cuda-11.7/lib64
source ~/.bashrc
nvcc -V
nvidia-smi
7.安装cudnn
tar -xvf cudnn-linux-x86_64-8.5.0.96_cuda11-archive.tar.xz  #解压文件
cd cudnn-linux-x86_64-8.5.0.96_cuda11-archive
sudo cp lib/* /usr/local/cuda-11.7/lib64/                 #复制文件
sudo cp include/* /usr/local/cuda-11.7/include/
sudo chmod a+r /usr/local/cuda-11.7/lib64/*              #赋予权限
sudo chmod a+r /usr/local/cuda-11.7/include/*
8.安装anaconda3
bash  Anaconda3-2023.09-0-Linux-x86_64.sh
nano ~/.bashrc
export PATH=$PATH:/home/kuuocss/anaconda3/bin #在最后加入
source ~/.bashrc  #生效
conda info #检查
conda config --set auto_activate_base false #激活配置
source activate base#(进入环境)
conda deactivate#(退出环境)
conda create -n chat python=3.10#(创建虚拟环境)
9.注意问题
1.重启电脑后会因为内核主动升级问题,nvidia-smi命令会失效,解决方法是重启电脑时使用旧版本内核启动方式启动。
2.sh cuda_11.7.0_515.43.04_linux.run --override命令安装cuda时–override命令会让你避免安装不上,同时不要连带安装驱动,因为驱动太大下载不下来会导致失败
3.使用以下命令去测试算力能否调用
import torch
print(torch.cuda.is_available())
显示True时算力可调用
文章来源:https://blog.csdn.net/liaoqingjian/article/details/135100467
本文来自互联网用户投稿,该文观点仅代表作者本人,不代表本站立场。本站仅提供信息存储空间服务,不拥有所有权,不承担相关法律责任。 如若内容造成侵权/违法违规/事实不符,请联系我的编程经验分享网邮箱:veading@qq.com进行投诉反馈,一经查实,立即删除!
本文来自互联网用户投稿,该文观点仅代表作者本人,不代表本站立场。本站仅提供信息存储空间服务,不拥有所有权,不承担相关法律责任。 如若内容造成侵权/违法违规/事实不符,请联系我的编程经验分享网邮箱:veading@qq.com进行投诉反馈,一经查实,立即删除!