Lua快速入门教程
文章目录
内容来源菜鸟教程,主要列举一些重要部分和c语言有歧义的部分
https://www.runoob.com/lua/lua-file-io.html
1、Linux安装Lua
1、下载
wget http://www.lua.org/ftp/lua-5.3.0.tar.gz

2、解压
tar zxf lua-5.3.0.tar.gz

3、进入目录
cd lua-5.3.0

4、编译
make linux test

5、拷贝到系统位置
make install
2、测试使用
vi test.lua
print(“hello world”)
保存内容
运行lua脚本
lua test.lua
3、首行加入,直接可以运行
#!/usr/local/bin/lua
2、语法练习
1、… 拼接字符串,可以利用nil来删除表中的值
tal = {ke1 = "val1",ke2 = "val2","val3"}
for k,v in pairs(tal) do
    print(k .. "-" .. v)
end

tal.ke1 = nil

for k,v in pairs(tal) do
    print(k,v)
end
2、lua中数字字符串会默认转换成数字进行操作符运算
tal = {}

tal["key"] = "val"
key = 10
tal[key]  = 10
tal[key] = tal[key] + 22
for k,y in pairs(tal) do
    print(k,y)
end
3、 lua中表中数组下标是从1开始
-- lua中表中数组下标是从1开始
tal = {"key1","key2","key3"}
for key,val in pairs(tal) do
    print("key",key)
end
4、在 Lua 中,函数是被看作是"第一类值(First-Class Value)",函数可以存在变量里
function fun(n)
    if n == 0 then
        return 1
    else
        return n*fun(n-1)
    end
end
print(fun(5))
fun2 = fun
print(fun2(5))
5、function 可以以匿名函数(anonymous function)的方式通过参数传递:
function fun2(tal,fun)
    for key,val in pairs(tal) do
        print(fun(key,val))
    end
end

tal = {key1 = "val1",key2 = "val2",key3 = "val3"}
fun2(tal,
function(key,val)
    return key.."="..val
end
)
2.1、变量
1、Lua 变量有三种类型:全局变量、局部变量、表中的域。
a = 5       -- 全局变量
local b = 5 -- 局部变量

function joke()
    c = 5   -- 全局变量
    local d = 6 -- 局部变量
end

joke()
print(c,d)  --> 5 nil

do
    local a = 6 -- 局部变量
    b = 6   -- 对局部变量重新赋值
    print(a,b); --> 6 6
end

print(a,b)  --> 5 6
2、赋值语句
a,b = "hello",111
print(a,b)

-- 可以利用这种方式对变量进行交换操作
a,b = 111,222
print(a,b)

a,b = b,a
print(a,b)
3、当变量个数和值的个数不一致时,Lua会一直以变量个数为基础采取以下策略:
a. 变量个数 > 值的个数 按变量个数补足nil
b. 变量个数 < 值的个数 多余的值会被忽略
a, b, c = 0, 1
print(a,b,c)    --> 0   1   nil

a, b = a+1, b+1, b+2    -- value of b+2 is ignored
print(a,b)          --> 1   2

a, b, c = 0
print(a,b,c)        --> 0   nil   nil
2.2、循环
这里只是列举出与c语言不一样的地方
重复执行循环,直到 指定的条件为真时为止
--[ 变量定义 --]
a = 10
--[ 执行循环 --]
repeat
   print("a的值为:", a)
   a = a + 1
until( a > 15 )
Lua 语言中的 goto 语句允许将控制流程无条件地转到被标记的语句处。
local i = 0
::s1:: do
    print(i)
    i = i+1
end

if i == 1 then
    goto s1
end
2.3、函数
可变参数
function add(...)
    local s = 0
    for i, v in ipairs{...} do   --> {...} 表示一个由所有变长参数构成的数组
        s = s + v
    end
    return s
end
print(add(1,2,3,4,5))
Lua 中我们可以将函数作为参数传递给函数
myprint = function (param)
    print("##",param,"##")
end

function add(x,y,myp)
    myp(x+y)
end

add(10,20,myprint)
将可变参数赋值给一个变量
我们也可以通过 select(“#”,…) 来获取可变参数的数量
function average(...)
    local arg = {...} -- arg为一个表,可变参
    local result = 0
    for key,val in ipairs(arg) do
        result = result + val
    end
    print("总长度为:",#arg)
    return result/#arg
end

print(average(1,2,3,4,56))
2.4、数组
多维数组
多维数组即数组中包含数组或一维数组的索引键对应一个数组。
以下是一个三行三列的阵列多维数组:
-- 初始化数组
array = {}
for i=1,3 do
   array[i] = {}
      for j=1,3 do
         array[i][j] = i*j
      end
end

-- 访问数组
for i=1,3 do
   for j=1,3 do
      print(array[i][j])
   end
end
不同索引键的三行三列阵列多维数组:
-- 初始化数组
array = {}
maxRows = 3
maxColumns = 3
for row=1,maxRows do
   for col=1,maxColumns do
      array[row*maxColumns +col] = row*col
   end
end

-- 访问数组
for row=1,maxRows do
   for col=1,maxColumns do
      print(array[row*maxColumns +col])
   end
end
2.5、迭代器
多状态的迭代器
local tab = {"c","c++"}

function element(collection)
    local index = 0
    local count = #collection
    -- 闭包函数
    return function ()
        index = index +1
        if(index<=count) then
            return collection[index]
        end
    end
end

for e in element(tab) do
    print(e)
end
2.6、Table操作
Table 连接
fruits = {"banana","orange","apple"}
-- 返回 table 连接后的字符串
print("连接后的字符串 ",table.concat(fruits))

-- 指定连接字符
print("连接后的字符串 ",table.concat(fruits,", "))

-- 指定索引来连接 table
print("连接后的字符串 ",table.concat(fruits,", ", 2,3))
连接后的字符串 bananaorangeapple
连接后的字符串 banana, orange, apple
连接后的字符串 orange, apple
插入和移除
fruits = {"banana","orange","apple"}

-- 在末尾插入
table.insert(fruits,"mango")
print("索引为 4 的元素为 ",fruits[4])

-- 在索引为 2 的键处插入
table.insert(fruits,2,"grapes")
print("索引为 2 的元素为 ",fruits[2])

print("最后一个元素为 ",fruits[5])
table.remove(fruits)
print("移除后最后一个元素为 ",fruits[5])
索引为 4 的元素为 mango
索引为 2 的元素为 grapes
最后一个元素为 mango
移除后最后一个元素为 nil
Table 排序
fruits = {"banana","orange","apple","grapes"}
print("排序前")
for k,v in ipairs(fruits) do
        print(k,v)
end

table.sort(fruits)
print("排序后")
for k,v in ipairs(fruits) do
        print(k,v)
end
排序前
1 banana
2 orange
3 apple
4 grapes
排序后
1 apple
2 banana
3 grapes
4 orange
2.7、Lua 模块与包
模块类似一个封装库,从5.1开始,lua中加入了标准的模块管理机制,可以将一个公共的代码,放入到一个文件中,以API的形式提供,lua使用,变量,函数组成的table表,创建一个模块很简单,就是创建一个table表,将需要导入的数据放入到table表中,然后将其返回
module = {}

module.constant = "这是一个常量"

-- 定义一个函数

function module.func1()
    io.write("这是一个函数")
end

local function func2()
    print("这是一个私有函数")
end

function module.func3()
    func2()
end

return module
使用模块
require 函数
Lua提供了一个名为require的函数用来加载模块。要加载一个模块,只需要简单地调用就可以了。例如:
require(“<模块名>”)或者require “<模块名>”
-- 调用模块
-- 执行 require 后会返回一个由模块常量或函数组成的 table,并且还会定义一个包含该 table 的全局变量。
require("module")

print(module.constant)
module.func3()
或者给加载的模块定义一个别名变量,方便调用:
-- test_module2.lua 文件
-- module 模块为上文提到到 module.lua
-- 别名变量 m
local m = require("module")

print(m.constant)

m.func3()
2.8、加载机制
对于自定义的模块,模块文件不是放在哪个文件目录都行,函数 require 有它自己的文件路径加载策略,它会尝试从 Lua 文件或 C 程序库中加载模块。
require 用于搜索 Lua 文件的路径是存放在全局变量 package.path 中,当 Lua 启动后,会以环境变量 LUA_PATH 的值来初始这个环境变量。如果没有找到该环境变量,则使用一个编译时定义的默认路径来初始化。
当然,如果没有 LUA_PATH 这个环境变量,也可以自定义设置,在当前用户根目录下打开 .profile 文件(没有则创建,打开 .bashrc 文件也可以),例如把 “~/lua/” 路径加入 LUA_PATH 环境变量里:
#LUA_PATH
export LUA_PATH="~/lua/?.lua;;"
文件路径以 “;” 号分隔,最后的 2 个 “;;” 表示新加的路径后面加上原来的默认路径。
接着,更新环境变量参数,使之立即生效。
source ~/.profile
这时假设 package.path 的值是:
/Users/dengjoe/lua/?.lua;./?.lua;/usr/local/share/lua/5.1/?.lua;/usr/local/share/lua/5.1/?/init.lua;/usr/local/lib/lua/5.1/?.lua;/usr/local/lib/lua/5.1/?/init.lua
那么调用 require(“module”) 时就会尝试打开以下文件目录去搜索目标。
/Users/dengjoe/lua/module.lua;
./module.lua
/usr/local/share/lua/5.1/module.lua
/usr/local/share/lua/5.1/module/init.lua
/usr/local/lib/lua/5.1/module.lua
/usr/local/lib/lua/5.1/module/init.lua
如果找过目标文件,则会调用 package.loadfile 来加载模块。否则,就会去找 C 程序库。
搜索的文件路径是从全局变量 package.cpath 获取,而这个变量则是通过环境变量 LUA_CPATH 来初始。
搜索的策略跟上面的一样,只不过现在换成搜索的是 so 或 dll 类型的文件。如果找得到,那么 require 就会通过 package.loadlib 来加载它。
2.9、Lua 元表(Metatable)
元表其实就是一张普通的表,只是在这张表上添加了许多操作
元方法使用
__index方法,当调用表不存在的索引时,会返回这个方法返回的值
t = {a=1}

mt = {
    __add = function (a,b)
        return a.a+b
    end,
    __index = function (a,b)
        return 12
    end,
    __newindex = function (t,k,v)
        -- 当有新的方法数添加进来时,会调用这个方法
        rawset(t,k,v)
    end,
}

setmetatable(t,mt)

print(t+1)
2.91、面向对象
-- lua中实现面向对象的功能
bag = {}
bagmt = {
    put = function (t,item)
        table.insert(t.items,item)
    end,
    take = function (t)
        return table.remove(t.items,item)
    end,
    list = function (t)
        return table.concat(t.items,",")
    end,
    clear = function (t)
        t.items = {}
    end,
}

-- bagmt元表里面有4个函数
-- 每次调用bag.new的时候会创建一个t,然后将bagmt设置为t的元表
-- 使用b:put先去bag中查找,发现这个下标不存在,就去元表中查找
bagmt["__index"] = bagmt
function bag.new()
    local t = {
        items = {}
    }
    setmetatable(t,bagmt)
    return t
end

local b = bag.new()
b:put("123")
b:put("456")
b:put("789")
print(b:list())
b:take()
print("--分割线--")
print(b:list())
3、Lua 协同程序(coroutine)
协同程序与线程非常类似,拥有独立的堆栈,和独立的局部变量,独立的指令和指针,又共享全局变量,协同程序可以理解为一种特殊的线程,可以暂停和恢复其执行,从而允许非抢占式的多任务处理。
同程序由 coroutine 模块提供支持。
使用协同程序,你可以在函数中使用 coroutine.create 创建一个新的协同程序对象,并使用 coroutine.resume 启动它的执行。协同程序可以通过调用 coroutine.yield 来主动暂停自己的执行,并将控制权交还给调用者。
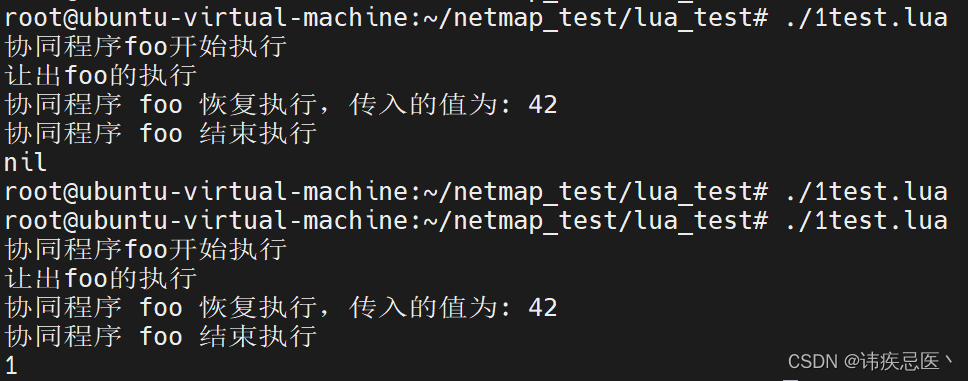
function foo()
    print("协同程序foo开始执行")
    local value = coroutine.yield("让出foo的执行")
    print("协同程序 foo 恢复执行,传入的值为: " .. tostring(value))
    print("协同程序 foo 结束执行")
    return 1
end

-- 创建协同程序
local co = coroutine.create(foo)

-- 启动协同程序
local status,result = coroutine.resume(co)
print(result)

-- 恢复协同程序的执行,并传入一个值
status, result = coroutine.resume(co, 42)
print(result) -- 输出: 协同程序 foo 恢复执行,传入的值为: 42
以上实例中,我们定义了一个名为 foo 的函数作为协同程序。在函数中,我们使用 coroutine.yield 暂停了协同程序的执行,并返回了一个值
。在主程序中,我们使用 coroutine.create 创建了一个协同程序对象,并使用 coroutine.resume 启动了它的执行。
在第一次调用 coroutine.resume 后,协同程序执行到 coroutine.yield 处暂停,并将值返回给主程序。然后,我们再次调用 coroutine.resume,并传入一个值作为协同程序恢复执行时的参数。执行以上代码输出结果为:

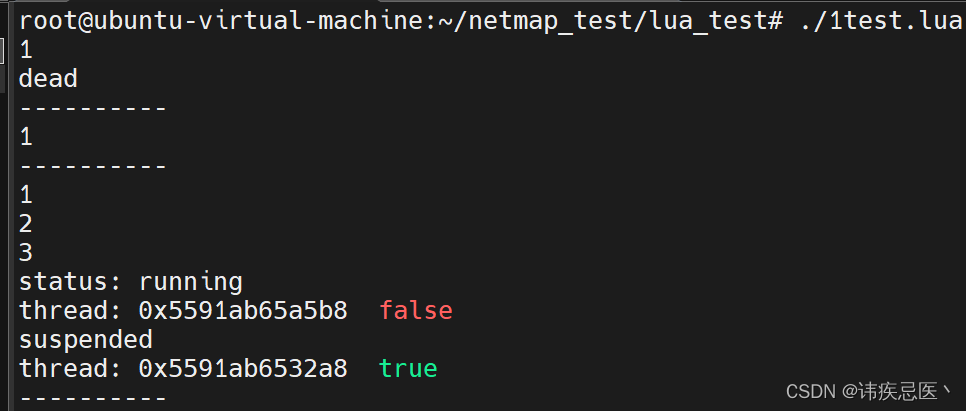
同程序的状态可以通过 coroutine.status 函数获取,通过检查状态可以确定协同程序的执行情况(如运行中、已挂起、已结束等)。
-- 创建了一个新的协同程序对象 co,其中协同程序函数打印传入的参数 i
co = coroutine.create(
    function(i)
        print(i);
    end
)
-- 使用 coroutine.resume 启动协同程序 co 的执行,并传入参数 1。协同程序开始执行,打印输出为 1
coroutine.resume(co, 1) -- 1

-- 通过 coroutine.status 检查协同程序 co 的状态,输出为 dead,表示协同程序已经执行完毕
print(coroutine.status(co)) -- dead
print("----------")

-- 使用 coroutine.wrap 创建了一个协同程序包装器,将协同程序函数转换为一个可直接调用的函数对象
co = coroutine.wrap(
    function(i)
        print(i);
    end
)

co(1)

print("----------")
-- 创建了另一个协同程序对象 co2,其中的协同程序函数通过循环打印数字 1 到 10,在循环到 3 的时候输出当前协同程序的状态和正在运行的线程
co2 = coroutine.create(
    function()
        for i=1,10 do
            print(i)
            if i == 3 then
                print(coroutine.status(co2))    --running
                print(coroutine.running())      --thread:XXXXXX
            end
            coroutine.yield()
        end
    end
)

-- 连续调用 coroutine.resume 启动协同程序 co2 的执行
coroutine.resume(co2) --1
coroutine.resume(co2) --2
coroutine.resume(co2) --3

-- 通过 coroutine.status 检查协同程序 co2 的状态,输出为 suspended,表示协同程序暂停执行
print(coroutine.status(co2))    -- suspended
print(coroutine.running())
print("----------")

更详细的实例:
function foo (a)
    print("foo 函数输出", a)
    return coroutine.yield(2 * a) -- 返回  2*a 的值
end

co = coroutine.create(function (a , b)
print("第一次协同程序执行输出", a, b) -- co-body 1 10
local r = foo(a + 1)
print("第二次协同程序执行输出", r)
local r, s = coroutine.yield(a + b, a - b) -- a,b的值为第一次调用协同程序时传入
print("第三次协同程序执行输出", r, s)
return b, "结束协同程序" -- b的值为第二次调用协同程序时传入
end)

print("main", coroutine.resume(co, 1, 10)) -- true, 4
print("--分割线----")
print("main", coroutine.resume(co, "r")) -- true 11 -9
print("---分割线---")
print("main", coroutine.resume(co, "x", "y")) -- true 10 end
print("---分割线---")
print("main", coroutine.resume(co, "x", "y")) -- cannot resume dead coroutine
print("---分割线---")
生产者消费者模型
-- 生产者消费者模型
-- 1、创建携程
-- 2、调用receive函数,激活协程
-- 2、协程生成一个数据,然后让出协程,将这个数据抛出去
-- 3、receive激活携程这里收到抛出的数据,然后打印出来

local newProductor

function productor()
     local i = 0
     while true do
          i = i + 1
          send(i)     -- 将生产的物品发送给消费者
     end
end

function consumer()
     while true do
          local i = receive()     -- 从生产者那里得到物品
          print(i)
     end
end

function receive()
     local status, value = coroutine.resume(newProductor)
     return value
end

function send(x)
     coroutine.yield(x)     -- x表示需要发送的值,值返回以后,就挂起该协同程序
end

-- 启动程序
newProductor = coroutine.create(productor)
consumer()
线程和协同程序区别
1、线程与协同程序的主要区别在于,一个具有多个线程的程序可以同时运行几个线程,而协同程序却需要彼此协作的运行。
2、在任一指定时刻只有一个协同程序在运行,并且这个正在运行的协同程序只有在明确的被要求挂起的时候才会被挂起。
4、文件IO操作
4.1、简单模式
简单模式使用标准的 I/O 或使用一个当前输入文件和一个当前输出文件。
-- 以只读方式打开文件
file = io.open("test.lua", "r")

-- 设置默认输入文件为 test.lua
io.input(file)

-- 输出文件第一行
print(io.read())

-- 关闭打开的文件
io.close(file)

-- 以附加的方式打开只写文件
file = io.open("test.lua", "a")

-- 设置默认输出文件为 test.lua
io.output(file)

-- 在文件最后一行添加 Lua 注释
io.write("--  test.lua 文件末尾注释")

-- 关闭打开的文件
io.close(file)

4.2、完全模式
通常我们需要在同一时间处理多个文件。我们需要使用 file:function_name 来代替 io.function_name 方法。以下实例演示了如何同时处理同一个文件
-- 以只读方式打开文件
file = io.open("test.lua", "r")

-- 输出文件第一行
print(file:read())

-- 关闭打开的文件
file:close()

-- 以附加的方式打开只写文件
file = io.open("test.lua", "a")

-- 在文件最后一行添加 Lua 注释
file:write("--test")

-- 关闭打开的文件
file:close()
5、错误处理
我们可以使用两个函数:assert 和 error 来处理错误。实例如下:
local function add(a,b)
   assert(type(a) == "number", "a 不是一个数字")
   assert(type(b) == "number", "b 不是一个数字")
   return a+b
end
add(10)
error函数
error (message [, level])

功能:终止正在执行的函数,并返回message的内容作为错误信息(error函数永远都不会返回)
通常情况下,error会附加一些错误位置的信息到message头部。

Level参数指示获得错误的位置:
Level=1[默认]:为调用error位置(文件+行号)
Level=2:指出哪个调用error的函数的函数
Level=0:不添加错误位置信息
本文来自互联网用户投稿,该文观点仅代表作者本人,不代表本站立场。本站仅提供信息存储空间服务,不拥有所有权,不承担相关法律责任。 如若内容造成侵权/违法违规/事实不符,请联系我的编程经验分享网邮箱:veading@qq.com进行投诉反馈,一经查实,立即删除!