Nginx快速入门:nginx实现正向代理|反向代理和正向代理的区别(八)
0. 引言
我们之前讲解的一直是nginx的反向代理配置,关于正向代理的实现一直没有涉及,但在实际生产中正向代理也有非常广泛的应用场景,因此,今天我们将针对正向代理来深入学习。
1. 相关概念
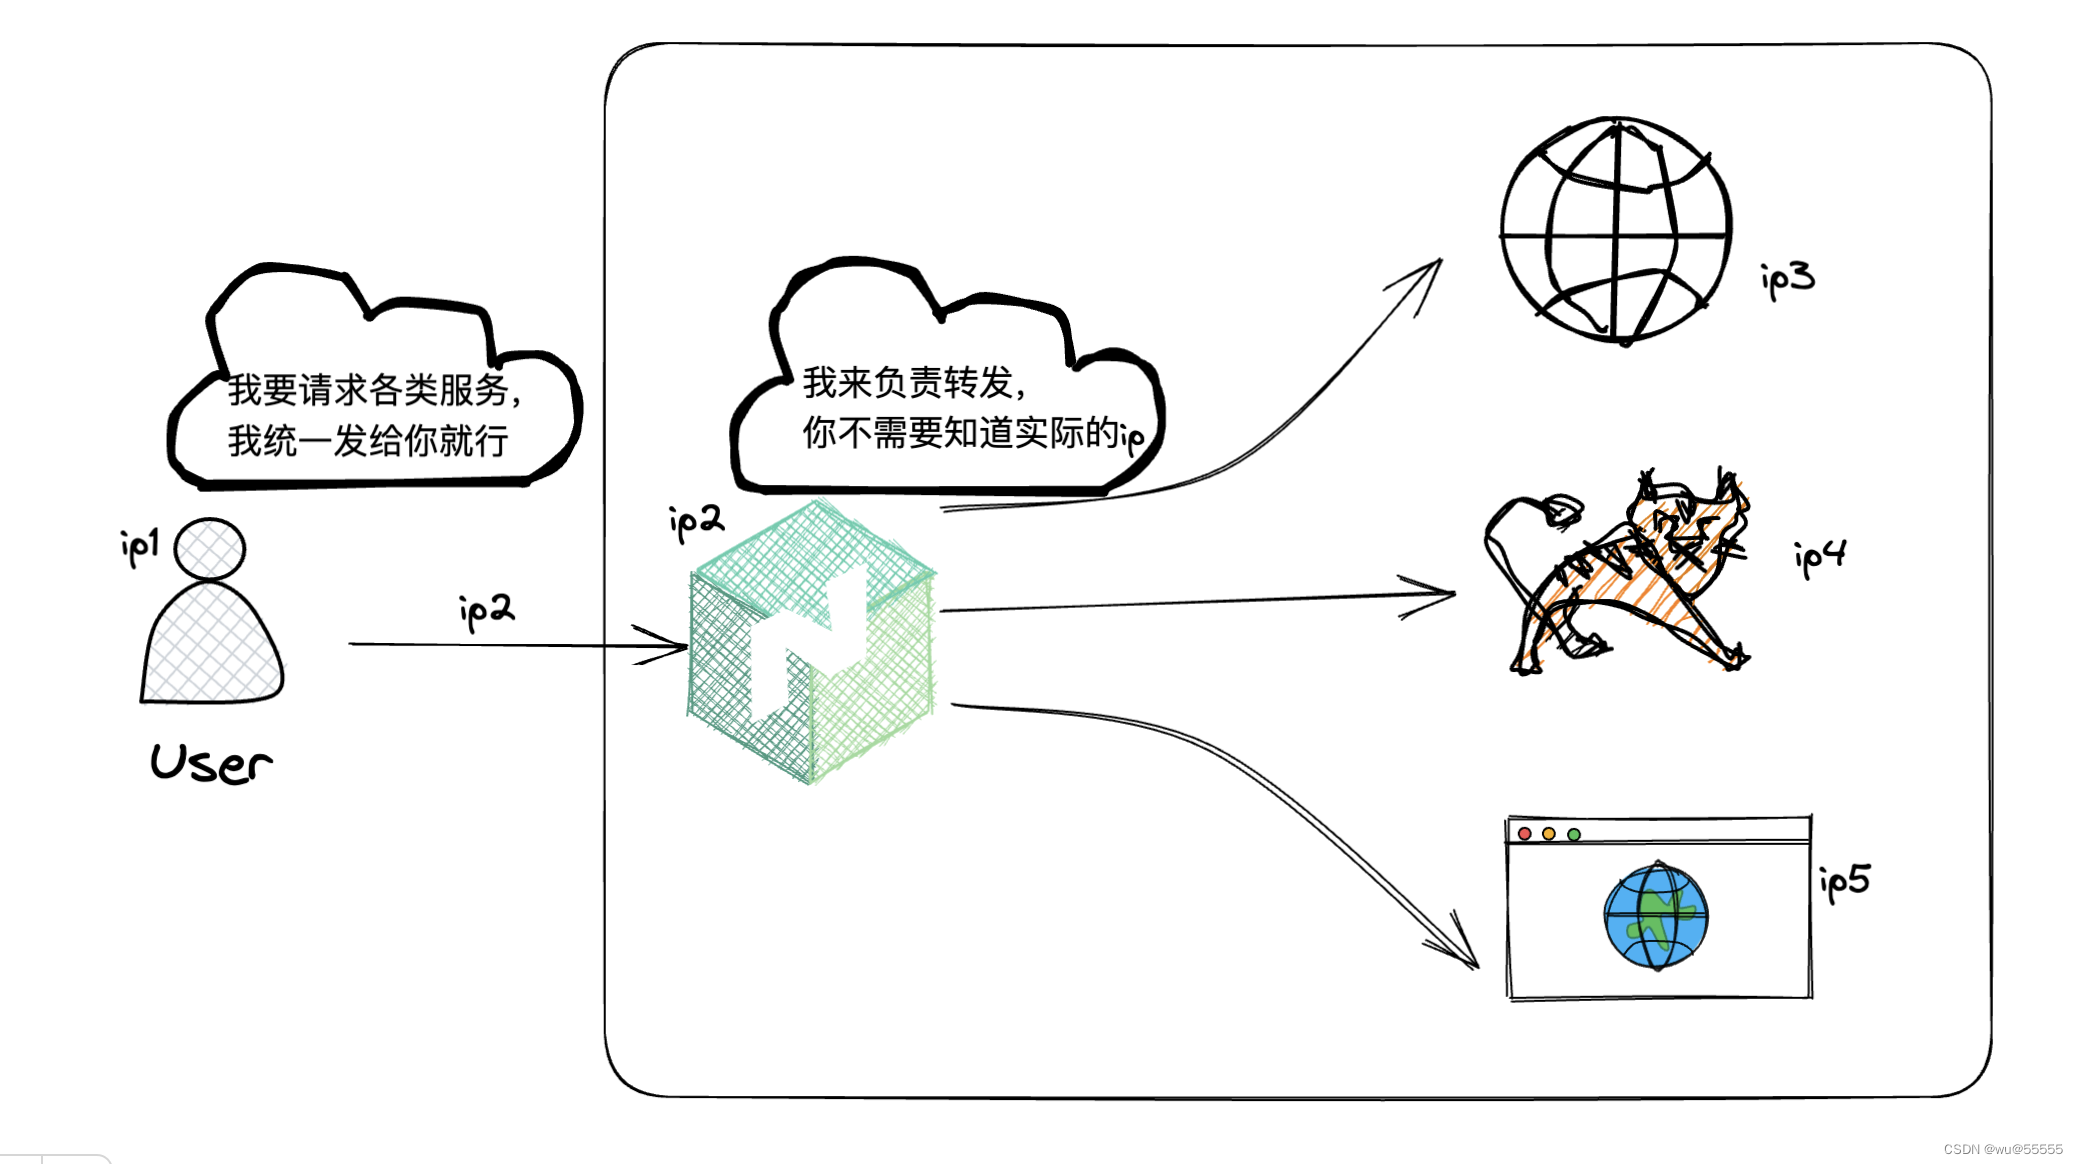
1.1 什么是反向代理
所谓反向代理,就是用一个代理服务器,来接收客户端的各种请求,而客户端并不知道各类后台实际服务的地址,统一通过代理服务器来实现转发,这样的核心目的是为了保护后台服务对客户端不可见。我们之前演示的配置都基于反向代理的模式,实现各类服务的转发。
这样对于客户端来说,不需要知道各种后台服务,只需要向代理服务器发送请求即可,由代理服务器发出请求。
一般来说反向代理中代理服务器和后台服务是一伙儿的,绑定在一起。
一句话:客户端不知道自己实际请求的到底是谁
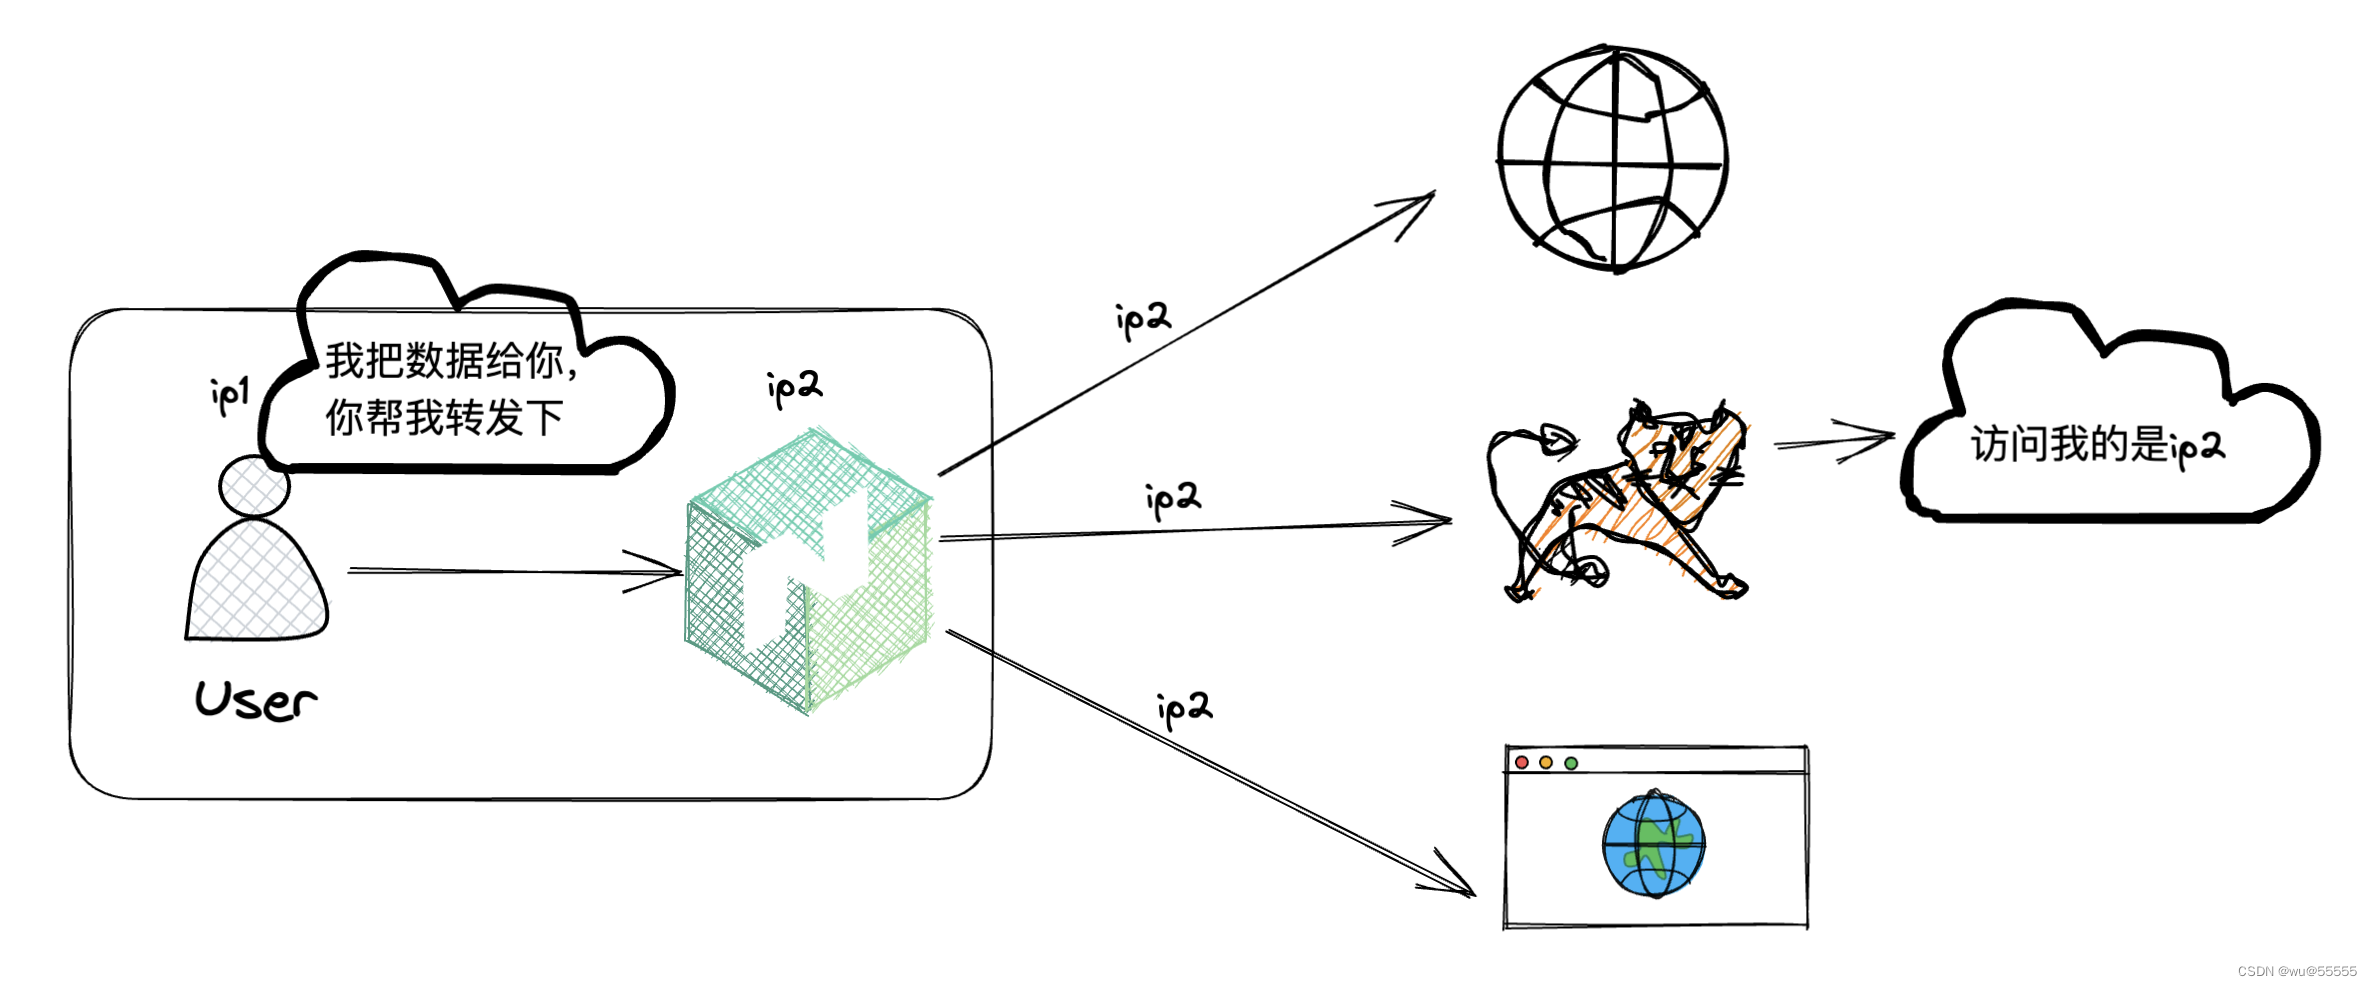
1.2 什么是正向代理
正向代理与反向代理相反,目的是为了隐藏客户端,也就是请求的发起者,让服务提供者感知到的是一个代理服务器,这样可以保护客户端的安全。一些对安全性要求较高的企业,可以基于正向代理实现安全隔离环境。
同时正向代理,也可以帮我们实现一种特殊的主备机制,这也是我们后续主要演示的。
一句话:服务器不知道实际请求自己的到底是谁
1.3 正向代理的应用场景
- 1、安全隔离
客户端服务器无法访问外网或者针对部分网络有限制,可以使用代理服务器进行访问
- 2、隐藏客户端ip
某些情况,客户端为了安全考虑,不想暴露自己的真实ip,就可以通过代理服务器来访问
- 3、加快访问速度
可以在代理服务器上部署缓存,比如利用nginx缓存静态资源等,这样可以加快客户端对于部分自资源的访问速度
2. Nginx正向代理实现步骤
1、配置nginx,设置转发通过 $scheme://$http_host$request_uri;三个参数来拼接转发地址。注意一定要声明DNS服务器,否则会报错502
server {
    listen 80;
    resolver 223.5.5.5 8.8.8.8; # 指定DNS服务器IP地址
    location / {
       proxy_set_header HOST $host;
       proxy_http_version 1.1;
       proxy_pass $scheme://$http_host$request_uri;
    }
}
上述配置仅能实现转发http的请求,如果实际要请求的地址是https的就不能实现了,会报错400
,这是因为正向代理转发默认不支持https的,我们需要安装ngx_http_proxy_connect_module插件来实现,该插件是国人开发的,非官方支持,所以会出现部分版本不支持,具体下文说明。
github地址:https://github.com/chobits/ngx_http_proxy_connect_module
2、如果是用yum安装的nginx,则下载一个与当前nginx同版本的nginx源码包,保证nginx安装目录下有configure文件,如果之前是编译安装的则不用了
cd /data
wget http://nginx.org/download/nginx-1.18.0.tar.gz
# 解压
tar -zxvf nginx-1.18.0.tar.gz
3、下载ngx_http_proxy_connect_module插件
yum install git
cd /data
git clone
# 访问github慢的,就使用这里的gitee地址
https://gitee.com/web_design_of_web_frontend/ngx_http_proxy_connect_module.git
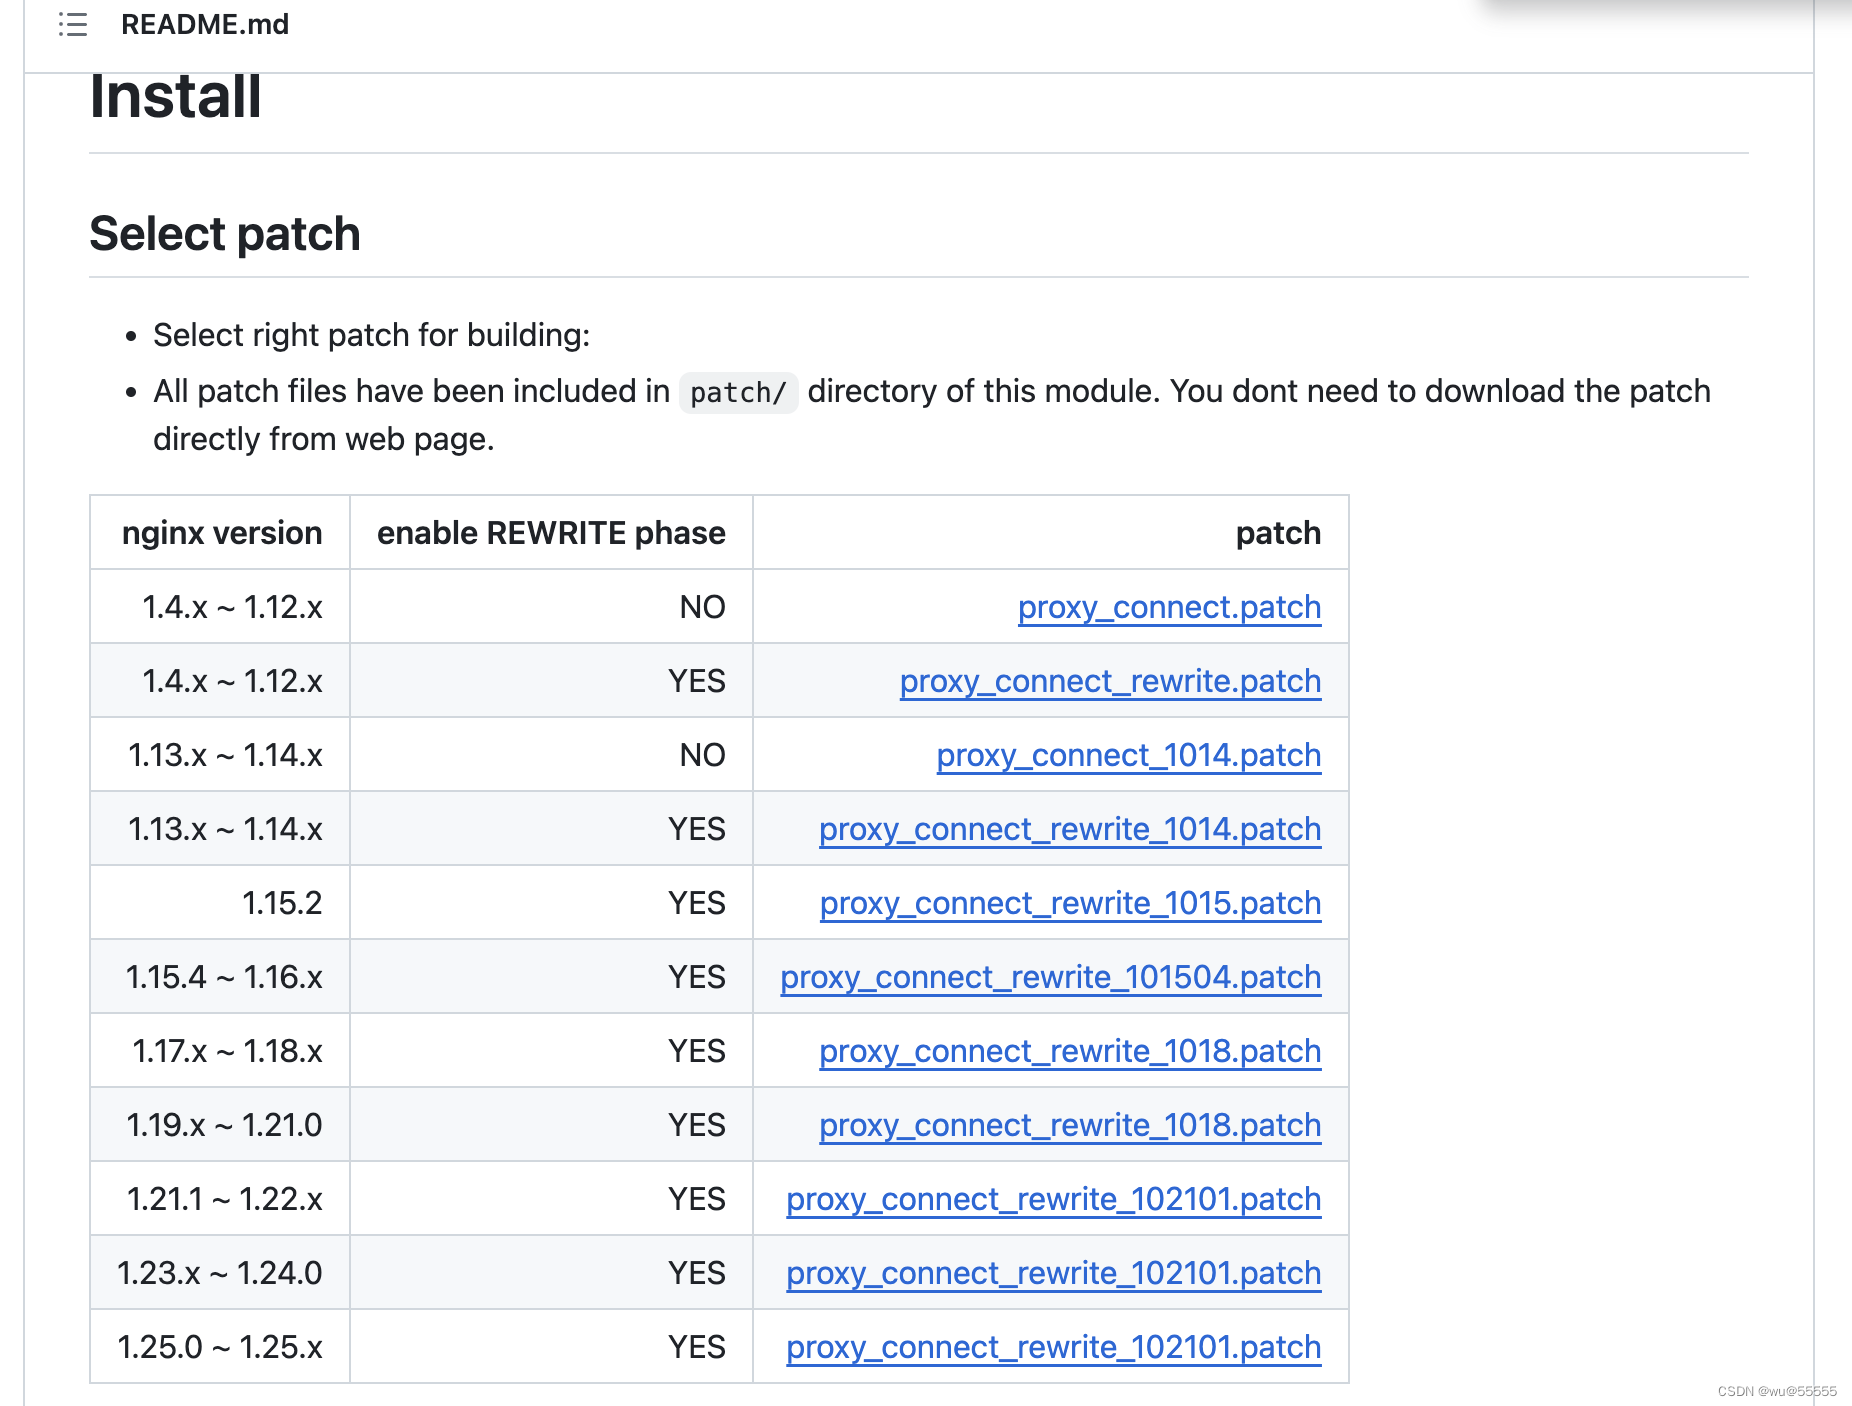
4、安装patch工具,如下图选择对应版本的patch文件
yum install patch
# 进入下载的nginx目录
cd /data/nginx-1.18.0
# 注意这里选择你上述下载ngx_http_proxy_connect_module插件的位置
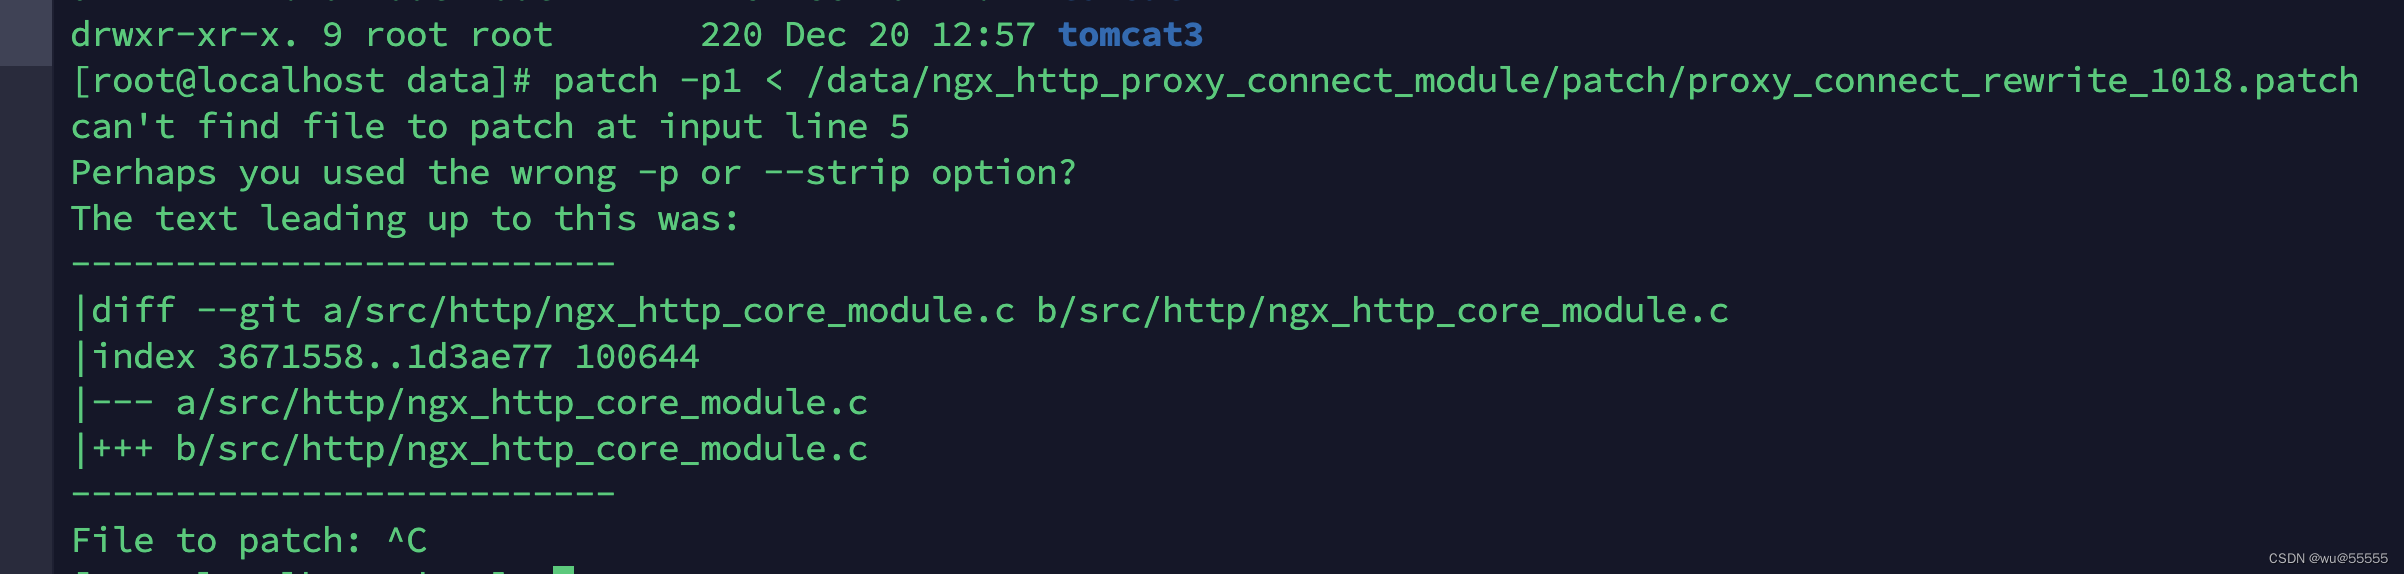
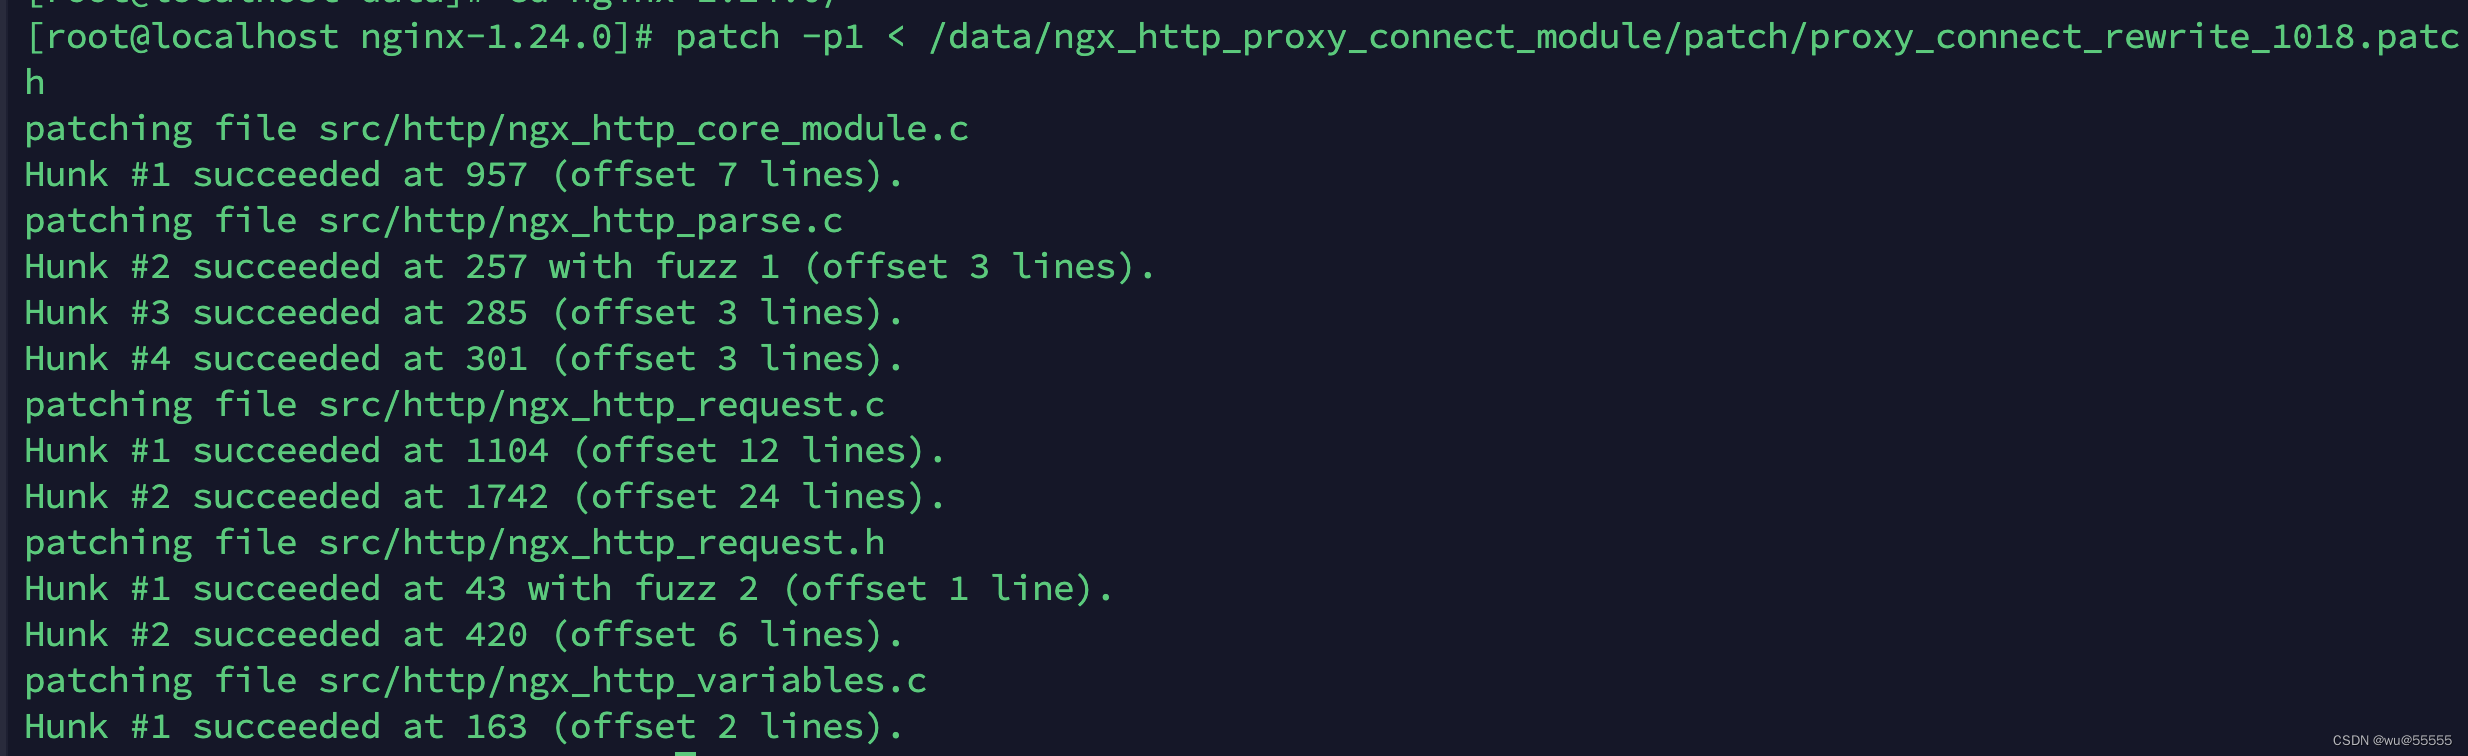
patch -p1 < /data/ngx_http_proxy_connect_module/patch/proxy_connect_rewrite_1018.patch
如下图为作者声明的nginx版本与patch版本的对应关系,选择对应版本执行,如我这里是nginx1.18,则用proxy_connect_rewrite_1018.patch
如果你是安装的1.24,则应该执行
patch -p1 < /data/ngx_http_proxy_connect_module/patch/proxy_connect_rewrite_102101.patch
5、如果出现src/http/ngx_http_core_module.c文件找不到的情况,这是因为没有到nginx源码包的路径下执行导致的,进入该目录再执行patch指令即可。
正常执行显示如下:
6、添加上ngx_http_proxy_connect_module插件
# 进入下载的源码包路径
cd /data/nginx-1.18.0
# 配置nginx相关设置,这里指定了nginx安装目录,执行文件路径、配置文件、日志路径等
# 同时因为要配置https,所以添加了http_ssl_module模块
./configure --with-http_ssl_module --add-module=/data/ngx_http_proxy_connect_module
注:如果之前安装了nginx,请提前关闭nginx服务
nginx -s stop
并且想要保留之前添加的模块,那么就在安装前通过nginx -V查看,并在执行configure指令时将其通过--with添加上

于是变成了执行
./configure --add-module=/data/ngx_http_proxy_connect_module --prefix=/etc/nginx --sbin-path=/usr/sbin/nginx --modules-path=/usr/lib64/nginx/modules --conf-path=/etc/nginx/nginx.conf --error-log-path=/var/log/nginx/error.log --http-log-path=/var/log/nginx/access.log --pid-path=/var/run/nginx.pid --lock-path=/var/run/nginx.lock --http-client-body-temp-path=/var/cache/nginx/client_temp --http-proxy-temp-path=/var/cache/nginx/proxy_temp --http-fastcgi-temp-path=/var/cache/nginx/fastcgi_temp --http-uwsgi-temp-path=/var/cache/nginx/uwsgi_temp --http-scgi-temp-path=/var/cache/nginx/scgi_temp --user=nginx --group=nginx --with-compat --with-file-aio --with-threads --with-http_addition_module --with-http_auth_request_module --with-http_dav_module --with-http_flv_module --with-http_gunzip_module --with-http_gzip_static_module --with-http_mp4_module --with-http_random_index_module --with-http_realip_module --with-http_secure_link_module --with-http_slice_module --with-http_ssl_module --with-http_stub_status_module --with-http_sub_module --with-http_v2_module --with-mail --with-mail_ssl_module --with-stream --with-stream_realip_module --with-stream_ssl_module --with-stream_ssl_preread_module --with-cc-opt='-O2 -g -pipe -Wall -Wp,-D_FORTIFY_SOURCE=2 -fexceptions -fstack-protector-strong --param=ssp-buffer-size=4 -grecord-gcc-switches -fPIC' --with-ld-opt='-Wl,-z,relro -Wl,-z,now -pie'
执行结果:

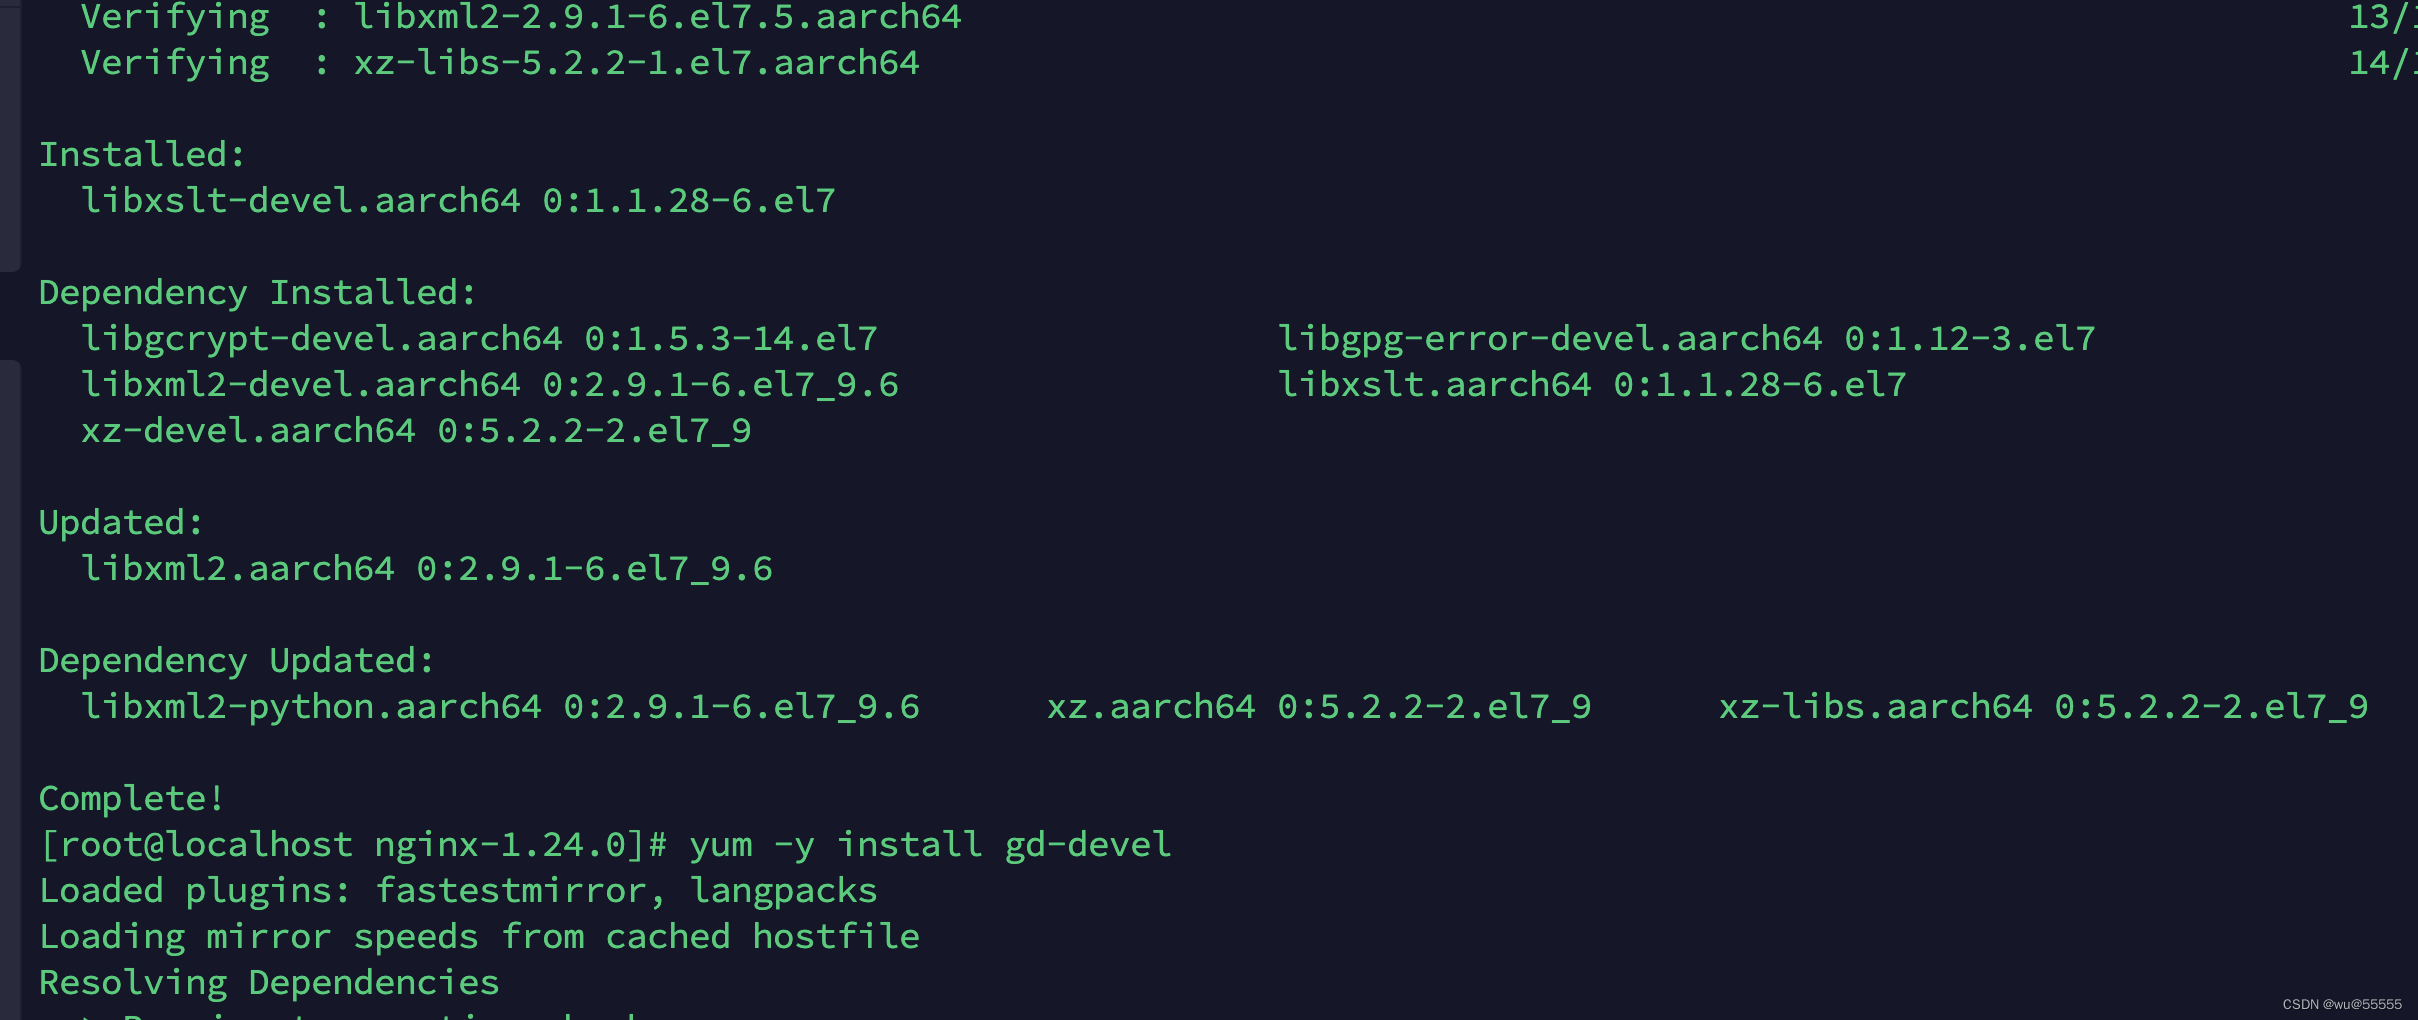
如果出现./configure: error: C compiler cc is not found,需要先安装相关依赖环境,然后再重新添加插件,以下列举了基本所需的环境,可以都安装看看:
yum -y install libxml2 libxml2-dev libxslt-devel
yum -y install gd-devel
yum -y install perl-devel perl-ExtUtils-Embed
yum -y install GeoIP GeoIP-devel GeoIP-data
yum -y install pcre-devel
yum -y install openssl openssl-devel
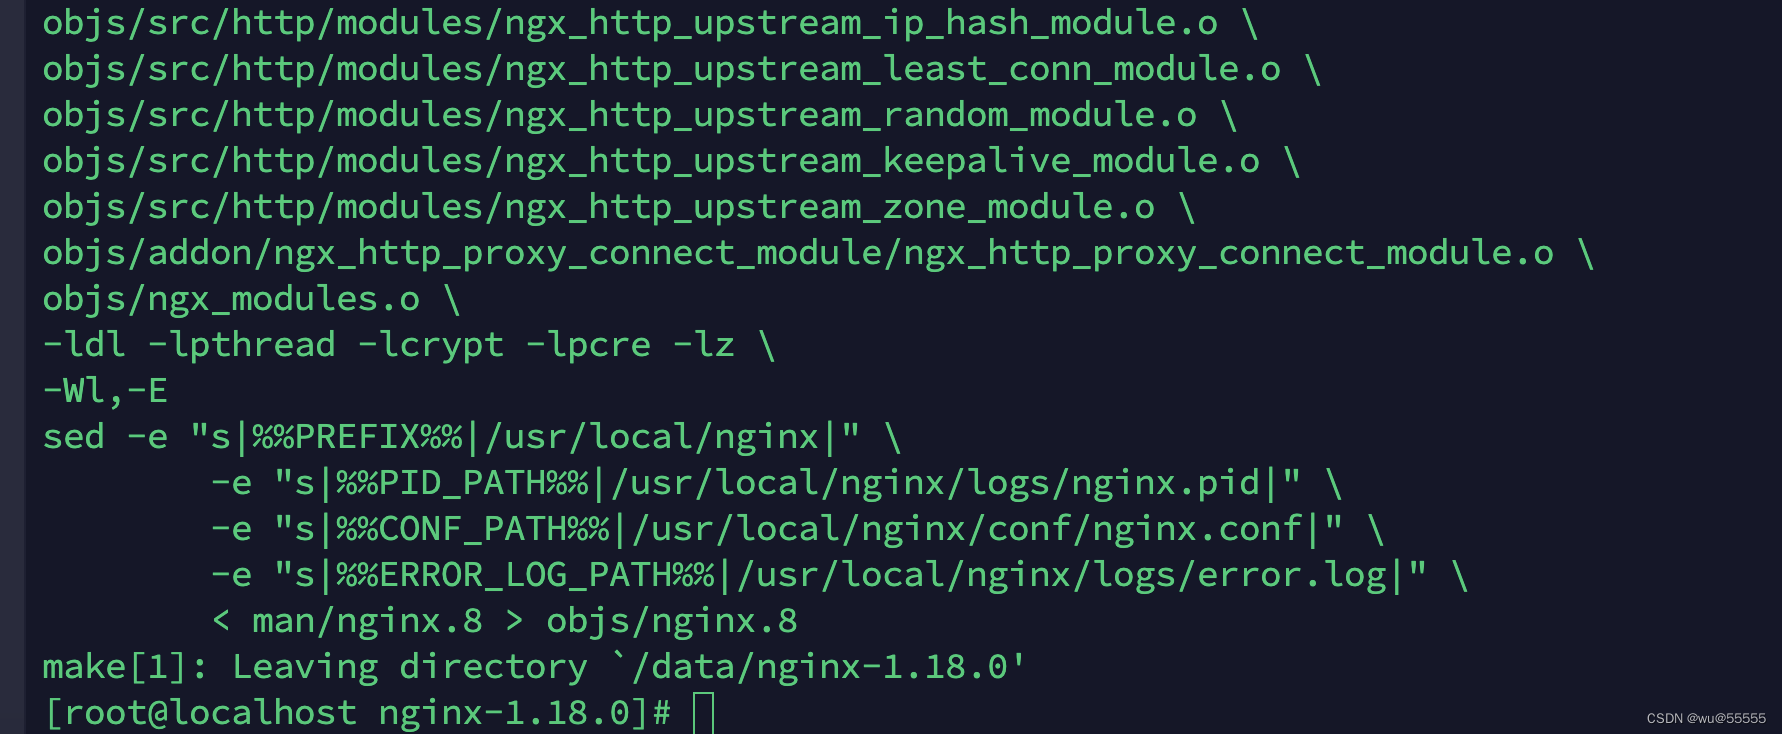
7、编译nginx服务
make
执行报错:
In file included from src/http/ngx_http.h:32:0, from src/http/ngx_http.c:10: src/http/ngx_http_request.h:47:0: error: "NGX_HTTP_CONNECT" redefined [-Werror] #define NGX_HTTP_CONNECT 0x10000 ^ src/http/ngx_http_request.h:44:0: note: this is the location of the previous definition #define NGX_HTTP_CONNECT 0x00010000
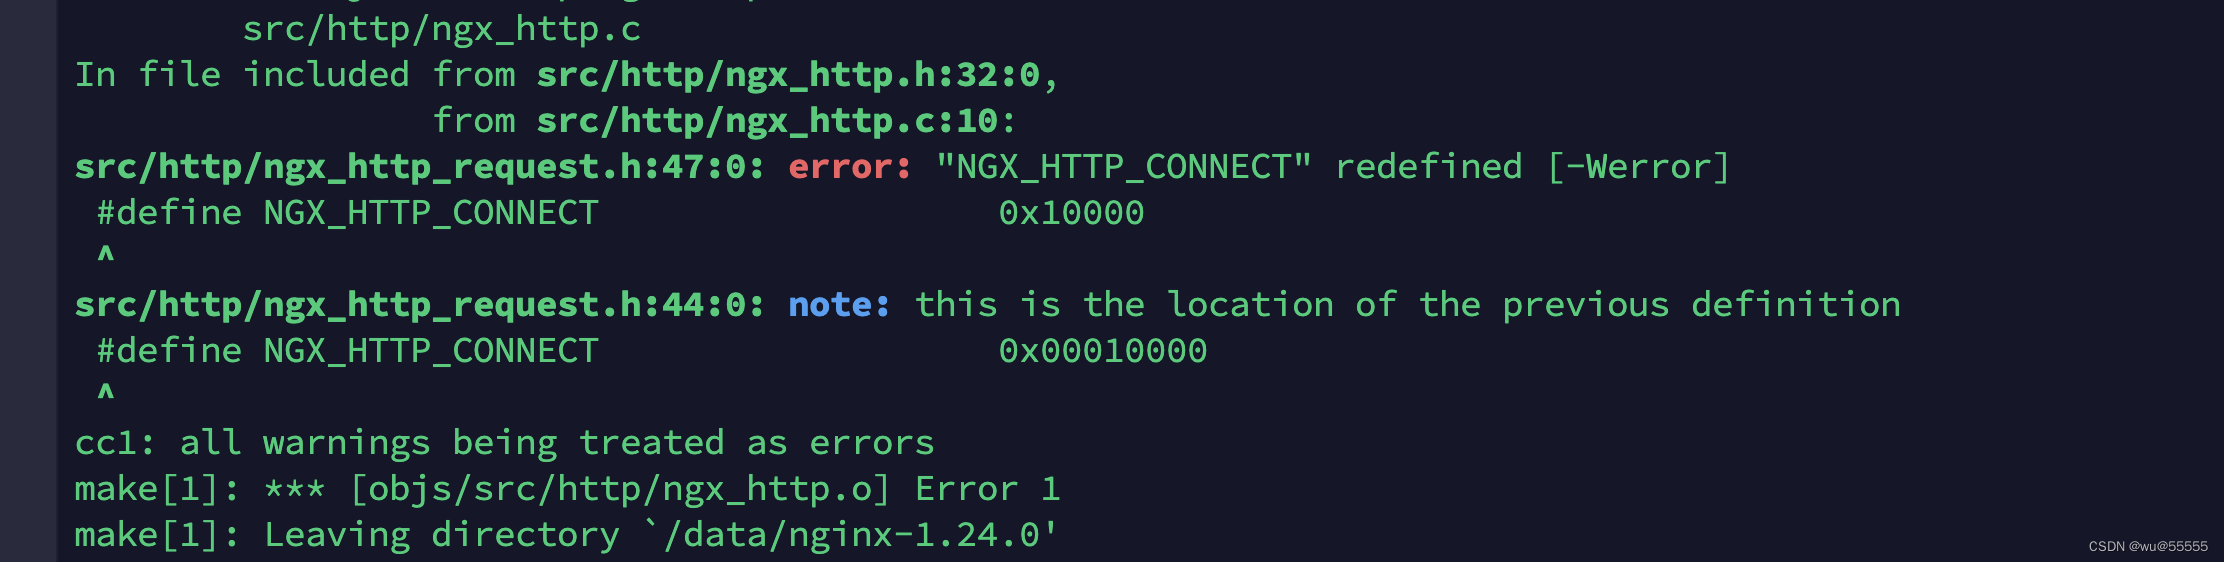
该报错是因为对应版本的nginx,不支持该插件。本次验证中使用了Nginx1.18.0可以正常安装。或者是没有使用对应的patch文件,按照上文示图用作者声明的nginx版本和对应的patch文件
正常安装结果如下
【选择步骤:如果没有安装过nginx的,执行安装指令】
8、安装nginx,如果之前通过yum安装了nginx的,可跳过这步,不要重复安装
make install
【选择步骤:如果通过yum或者编译安装了nginx的,执行替换nginx执行文件指令】
cp /data/nginx-1.24.0/objs/nginx /usr/sbin/
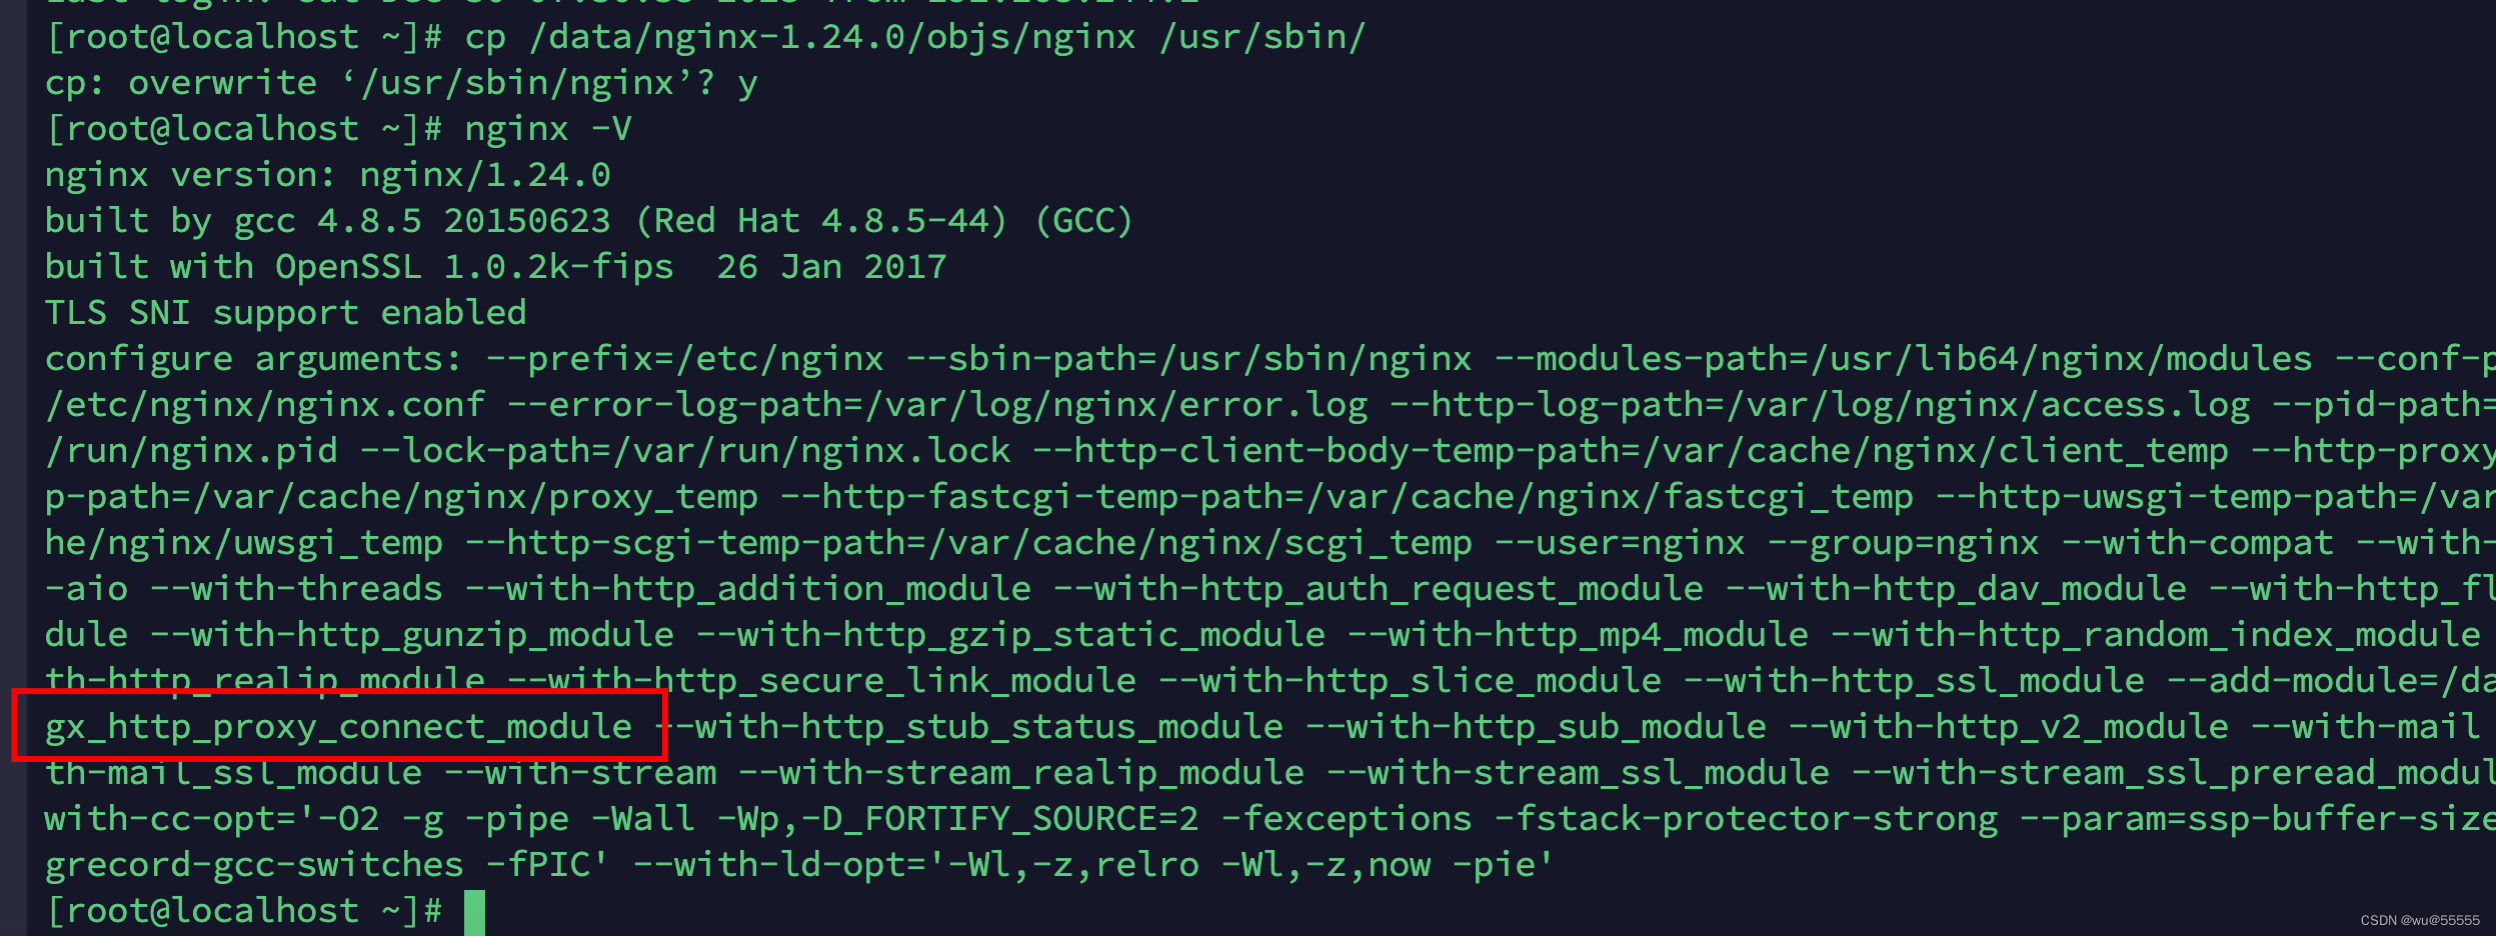
9、查看版本,可以看到ngx_http_proxy_connect_module模块已经添加进去了,如果这里没有,说明没有添加成功,检查上述步骤,特别是如果是已经安装了的nginx,有没有成功用objs/nginx替换原有的nginx执行文件
nginx -V
10、启动项目
nginx
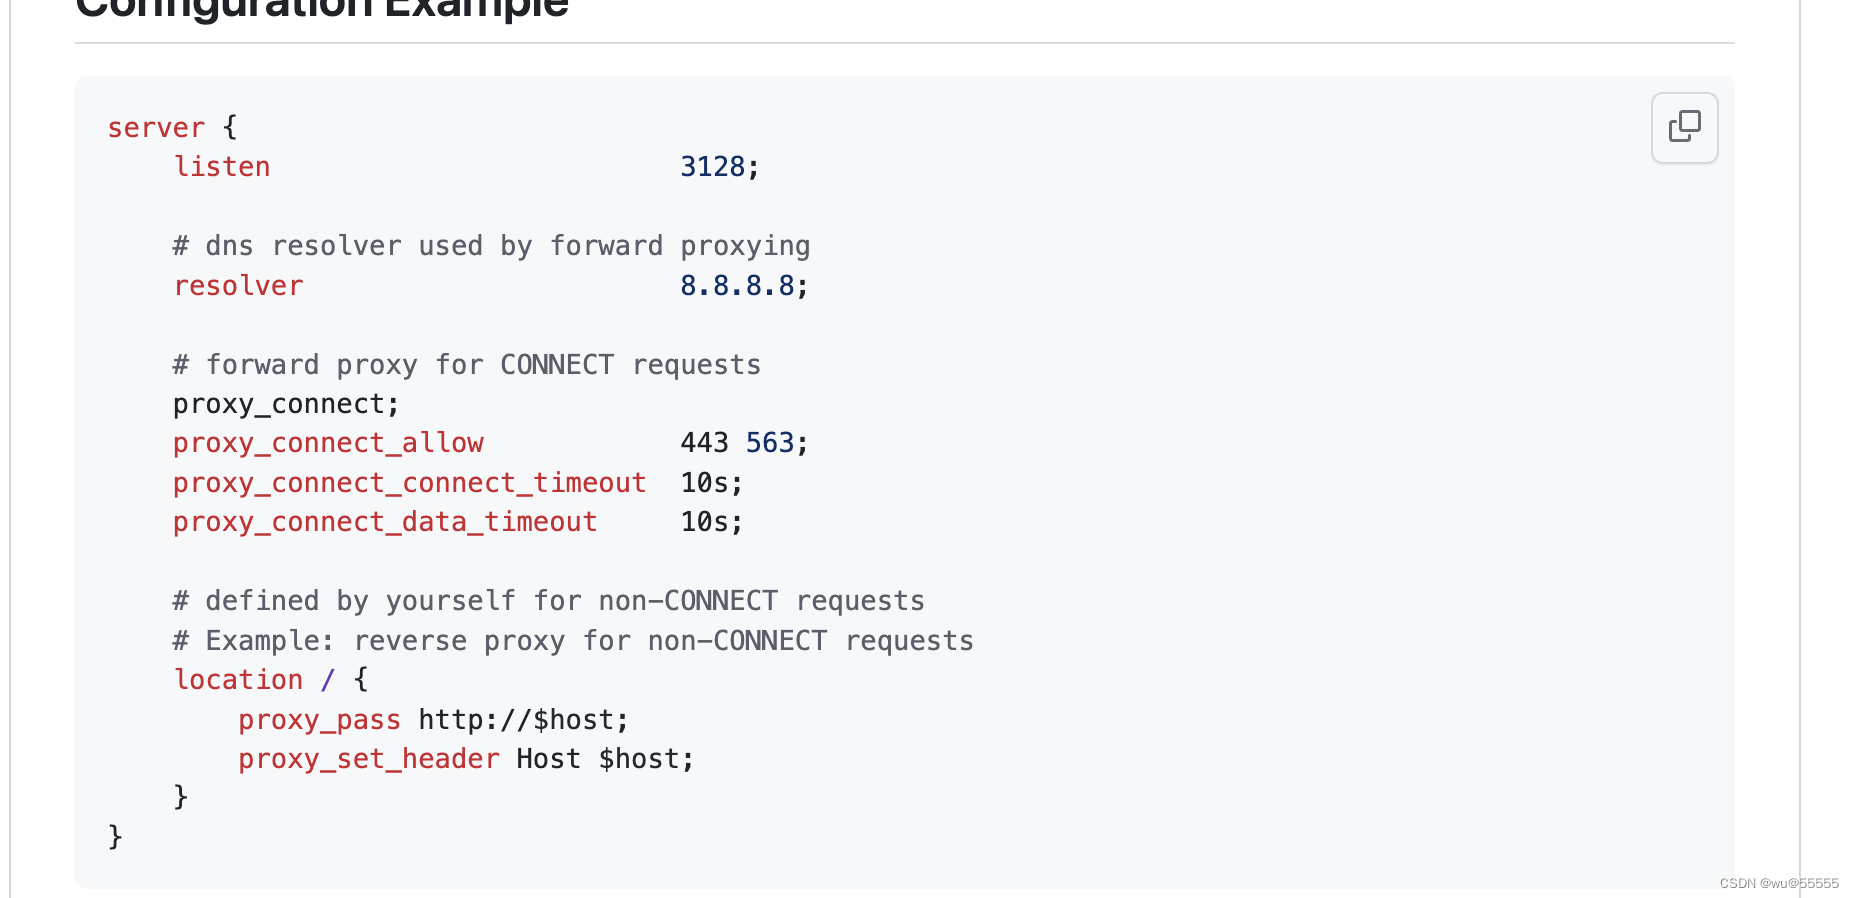
12、调整一下配置文件,修改转发配置(编译安装的nginx的默认路径在/usr/local/nginx下)
server {
        listen       80; # 监听端口
        resolver 223.5.5.5 8.8.8.8; # 指定DNS服务器IP地址
        proxy_connect;                          #启用 CONNECT HTTP方法
        proxy_connect_allow            443 80;  #指定代理CONNECT方法可以连接的端口号或范围的列表
        proxy_connect_connect_timeout  20s;     #定义客户端与代理服务器建立连接的超时时间
        proxy_connect_read_timeout     20s;     #定义客户端从代理服务器读取响应的超时时间
        proxy_connect_send_timeout     20s;     #设置客户端将请求传输到代理服务器的超时时间
        location / {
           proxy_pass $scheme://$http_host$request_uri;
        }
 }
该配置项在github中也有示例
3. java实现请求代理
我们这里用java 来模拟客户端请求,在java httpClient中,可以通过设置setProxy方法来设置代理服务器地址和端口以及协议,需要注意的是代理服务器只能是http的,真实服务器可以是http或https。
这里我们测试使用的是GET来请求模拟接口,如果需要POST请求,大家自己调整请求代码即可
import jar.org.apache.http.HttpHost;
import jar.org.apache.http.HttpStatus;
import jar.org.apache.http.client.config.RequestConfig;
import jar.org.apache.http.client.methods.CloseableHttpResponse;
import jar.org.apache.http.client.methods.HttpGet;
import jar.org.apache.http.impl.client.CloseableHttpClient;
import jar.org.apache.http.impl.client.HttpClients;
import jar.org.apache.http.util.EntityUtils;

import java.io.IOException;

/**
 * @author benjamin_5
 * @Description
 * @date 2023/12/29
 */
public class ProxyTest {
    public static void main(String[] args) {
        test();
    }

    public static void test() {
        // 接口地址
        String url = "/xx/xx/xx";
        // post请求返回结果
        CloseableHttpClient httpClient = HttpClients.createDefault();
        HttpGet http = new HttpGet(url);
        // 实际请求服务地址,如果自测的话,可以自己模拟一个接口或者访问
        HttpHost target = new HttpHost("api.xxx.com", 443, "https");
        // 代理服务地址
        HttpHost proxy = new HttpHost("192.168.244.41", 80, "http");
        // 设置请求和传输超时时间
        RequestConfig requestConfig = RequestConfig.custom().setSocketTimeout(2000).setConnectTimeout(2000).setProxy(proxy).build();
        http.setConfig(requestConfig);
        try {
            CloseableHttpResponse result = httpClient.execute(target,http);
            // 请求发送成功,并得到响应
            if (result.getStatusLine().getStatusCode() == HttpStatus.SC_OK) {
                String str = "";
                try {
                    // 读取服务器返回过来的json字符串数据
                    str = EntityUtils.toString(result.getEntity(), "utf-8");
                    System.out.println("返回数据: " + str);
                } catch (Exception e) {
                    e.printStackTrace();
                    System.out.println("post请求提交失败:" + url);
                }
            }else{
                System.out.println("调用错误:"+result.getStatusLine().getStatusCode());
            }
        } catch (IOException e) {
            e.printStackTrace();
            System.out.println("post请求提交失败:" + url);
        } finally {
            http.releaseConnection();
        }
    }
}
请求结果正常返回了,说明代理配置正确

4. 总结
综上,我们就完成了对nginx正向代理的解读和实操,希望大家可以通过这样一个案例,来加深对正向代理的理解
本文来自互联网用户投稿,该文观点仅代表作者本人,不代表本站立场。本站仅提供信息存储空间服务,不拥有所有权,不承担相关法律责任。 如若内容造成侵权/违法违规/事实不符,请联系我的编程经验分享网邮箱:veading@qq.com进行投诉反馈,一经查实,立即删除!