Spring IoC
IOC控制反转:是一种设计理念,由代理人来创建和管理对象,消费者通过代理人来获取对象。IOC的目的是降低对象之间直接耦合。
加入IOC容器将对象统一管理,让对象关联变为弱耦合。
DI依赖注入,完成在程序运行过程中对象的创建与绑定。
DI在Java中利用反射技术实现对象注入。
Sping的含义:狭义Spring是指Spring框架,广义的Spring是指Spring生态体系。
Spring框架的核心是IOC容器和AOP面向切面编程。
Spring IOC负责创建和管理系统对象,并在此基础上扩展功能
基于配置实现应用程序的可维护性和可扩展性

三种配置方式:
- 基于XML配置Bean
- 基于注解配置Bean
- 基于Java代码配置Bean
一、基于XML配置Bean
实例化Bean的三种方式:
- 基于构造方法对象实例化(默认、带参)
- 基于静态工厂实例化
- 基于工厂实例方法实例化
基于构造方法对象实例化
 <!--利用默认构造方法实例化Bean-->
    <bean id="apple1" class="com.io.spring.ioc.entity.Apple">
    </bean>
<!--利用带参构造方法实例化Bean-->
    <bean id="apple2" class="com.io.spring.ioc.entity.Apple">
        <!--通过参数名实例化对象-->
        <constructor-arg name="title" value="红富士"/>
        <constructor-arg name="color" value="红色"/>
        <constructor-arg name="origin" value="欧洲"/>
    </bean>

    <bean id="apple3" class="com.io.spring.ioc.entity.Apple">
        <!--通过索引实例化对象-->
        <constructor-arg index="0" value="红富士"/>
        <constructor-arg index="1" value="红色"/>
        <constructor-arg index="2" value="欧洲"/>
    </bean>
基于静态工厂实例化
/**
 * 静态工厂通过静态方法创建对象,隐藏创建对象的细节
 */
public class AppleStaticFactory {
    public static Apple createSweetApple(){
        Apple apple = new Apple();
        apple.setTitle("红富士");
        apple.setOrigin("欧洲");
        apple.setColor("红色");
        return apple;
    }
}
<!--    利用静态工厂获取对象-->
    <bean id="apple4" class="com.io.spring.ioc.factory.AppleStaticFactory"
            factory-method="createSweetApple"/>
基于工厂实例方法实例化
/**
 * 工厂方法创建对象是指IOC容器对工厂类进行实例化并调用对应对实例方法创建对象的过程
 */
public class AppleFactoryInstance {
    public Apple createSweetApple(){
        Apple apple = new Apple();
        apple.setTitle("红富士");
        apple.setOrigin("欧洲");
        apple.setColor("红色");
        return apple;
    }
}
<!--    利用工厂实例方法获取对象-->
    <bean id="factoryInstance" class="com.io.spring.ioc.factory.AppleFactoryInstance"/>
    <bean id="apple5" factory-bean="factoryInstance" factory-method="createSweetApple"/>
Bean的id和name属性:
都是设置对象在IOC容器中唯一标识,两者在同一个配置文件中都不允许重复,多个配置文件中允许出现重复且新对象覆盖旧对象。
id要求更为严格,一次只能定义一个对象标识,name一次允许定义多个对象标识
<bean name="apple1,apple7" class="com.io.spring.ioc.entity.Apple"/>
在没有id和name的bean默认使用类名全称作为bean标识
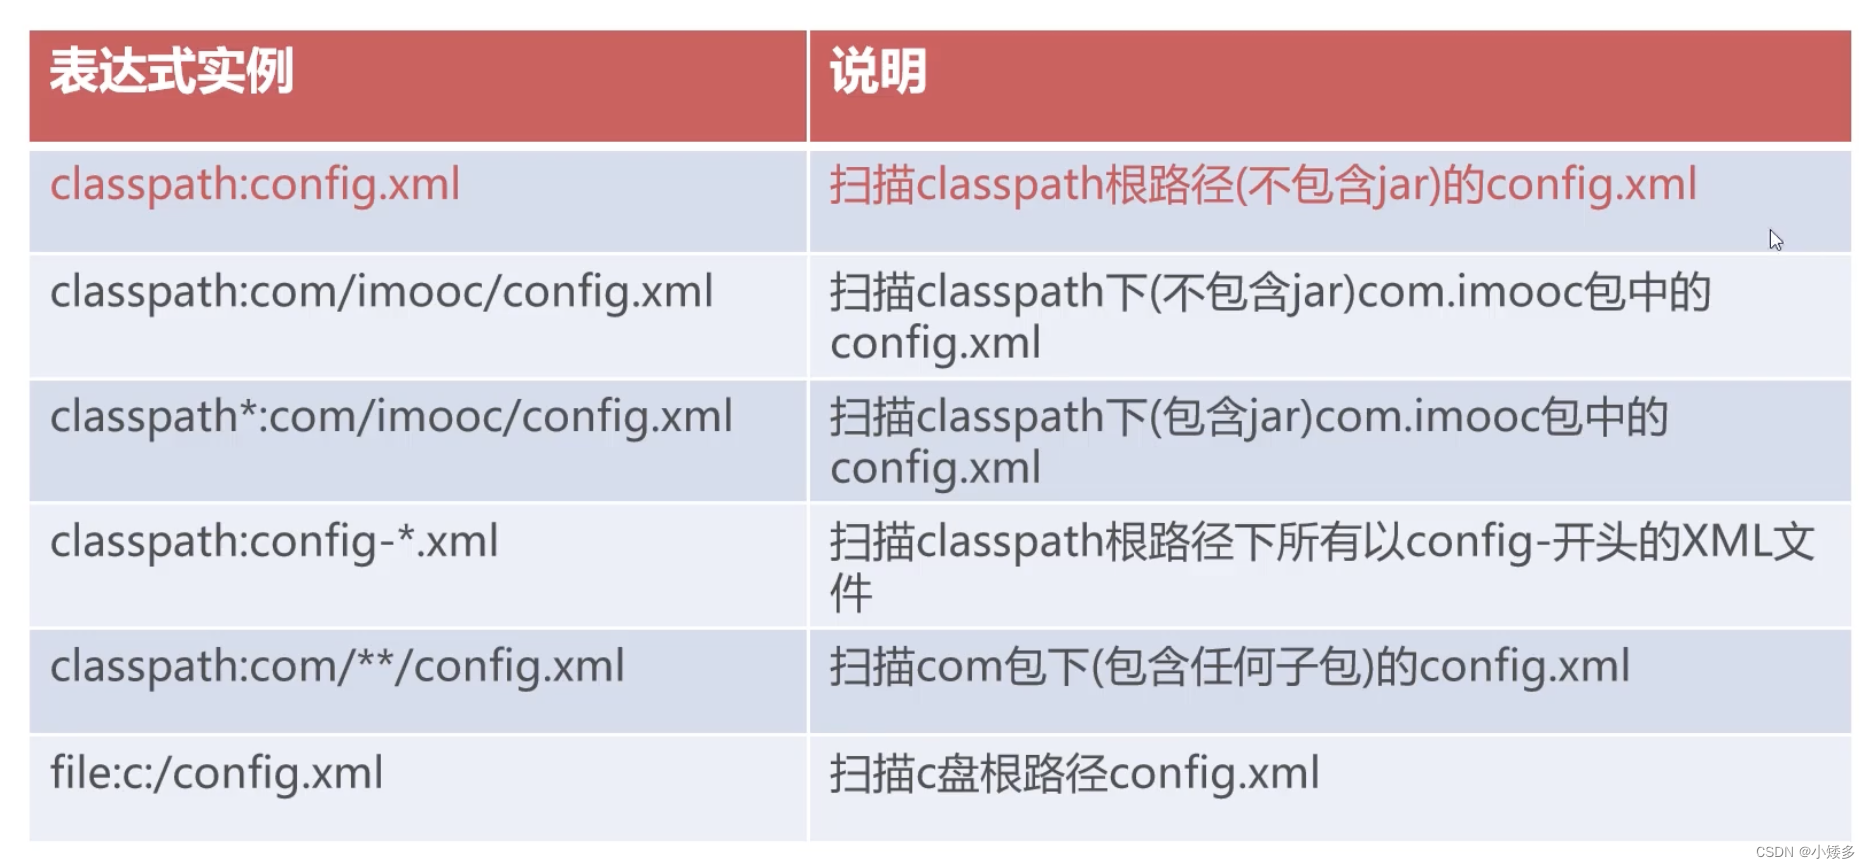
路径表达式用法:
对象依赖注入
依赖注入是指运行时将容器内对象利用反射赋值给其他对象
对象注入的方法:
- 基于setter方法注入对象
<!--IOC容器自动利用反射机制运行时调用setXXX方法为属性赋值-->
<bean id="sweetApple" class="com.io.spring.ioc.entity.Apple">
        <!--利用value设置静态值-->
        <property name="title" value="红富士"></property>
        <property name="origin" value="欧洲"></property>
        <property name="color" value="红色"></property>
</bean>
<bean id="andy" class="com.io.spring.ioc.entity.Child">
       <!--利用ref注入依赖对象-->
       <property name="name" value="安迪"></property>
       <property name="apple" ref="rdApple"></property>
</bean>
- 基于构造方法注入对象
<bean id="andy" class="com.io.spring.ioc.entity.Child">
		<!--利用ref注入依赖对象-->
        <constructor-arg name="name" value="安迪"/>
        <constructor-arg name="apple" ref="sourApple"/>
</bean>
注入集合对象:
public class Company {
    private List<String> rooms;
    private Map<String,Computer> computers;
    private Properties info;
    ...
<bean id="company" class="com.spring.ioc.entity.Company">
        <property name="rooms">
        //生成ArrayList对象
            <list>
                <value>2001-总裁办</value>
                <value>2003-总经理办公室</value>
                <value>2010-研发部会议室</value>
            </list>
        </property>
        <property name="computers">
        //生成LinkedHashMap对象
            //<map>
            //    <entry key="dev-88172" value-ref="c1"/>
            //</map>
            <map>
            	<entry key="dev-88172">
					<bean class="com.spring.ioc.entity.Computer">
        				<constructor-arg name="brand" value="联想"/>
        				<constructor-arg name="type" value="台式机"/>
        				<constructor-arg name="sn" value="8389283012"/>
        				<constructor-arg name="price" value="3085"/>
    				</bean>
				</entry>
            </map>
        </property>
        <property name="info">
        //Properties类似于map,但是key和value都必须是String类型
            <props>
                <prop key="phone">010-12345678</prop>
                <prop key="address">XXXXXXXXX</prop>
                <prop key="website">http://www.xxx.com</prop>
            </props>
        </property>
</bean>
需要去重时使用set
public class Company {
    private Set<String> rooms;
    ...
<bean id="company" class="com.spring.ioc.entity.Company">
        <property name="rooms">
        //生成LinkedHashSet对象
            <set>
                <value>2001-总裁办</value>
                <value>2003-总经理办公室</value>
                <value>2010-研发部会议室</value>
                 <value>2010-研发部会议室</value>
            </set>
        </property>
    </bean>
运行
public class SpringApplication {
    public static void main(String[] args) {
        ApplicationContext context = new ClassPathXmlApplicationContext("classpath:applicationContext.xml");
        Company company = context.getBean("company", Company.class);
        System.out.println(company);
        System.out.println(company.getInfo().getProperty("address"));
    }
}
查看容器内对象
//获取容器内所有beanId数组
        String[] beanNames = context.getBeanDefinitionNames();
        for(String beanName:beanNames){
            System.out.println(beanName);
            System.out.println(context.getBean(beanName).getClass().getName());
            System.out.println(context.getBean(beanName));
        }
        //通过类全称+标识获取匿名bean
        System.out.println(context.getBean("com.spring.ioc.entity.Computer#1", Computer.class));
        System.out.println(context.getBean("com.spring.ioc.entity.Computer#0", Computer.class));
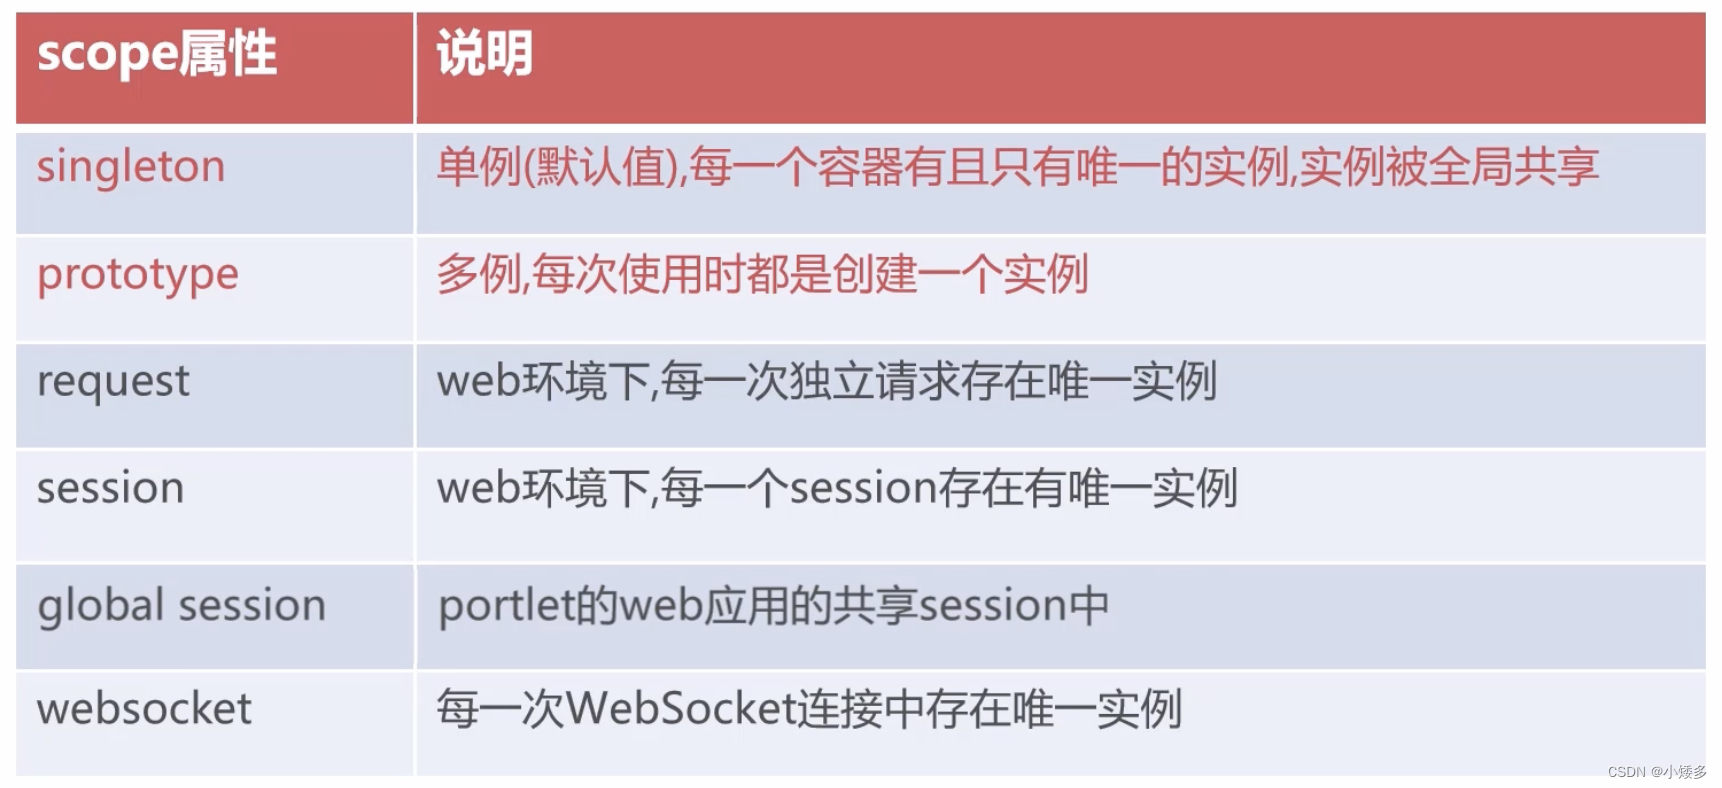
bean scope属性:决定对象何时被创建与作用范围
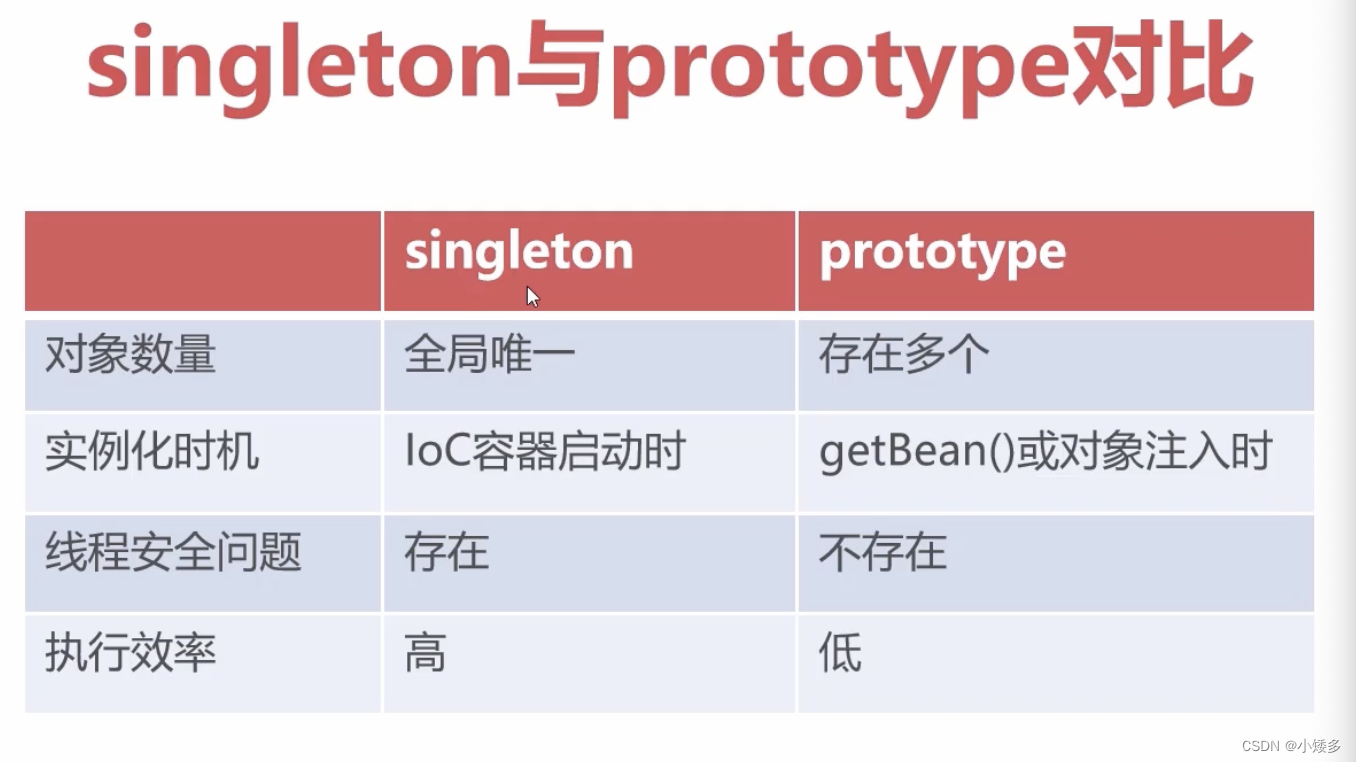
设置bean scope属性将影响容器内对象的数量
默认情况下bean会在IoC容器创建后自动实例化,全局唯一
scope="prototype" //允许存在多个实例
bean的生命周期:
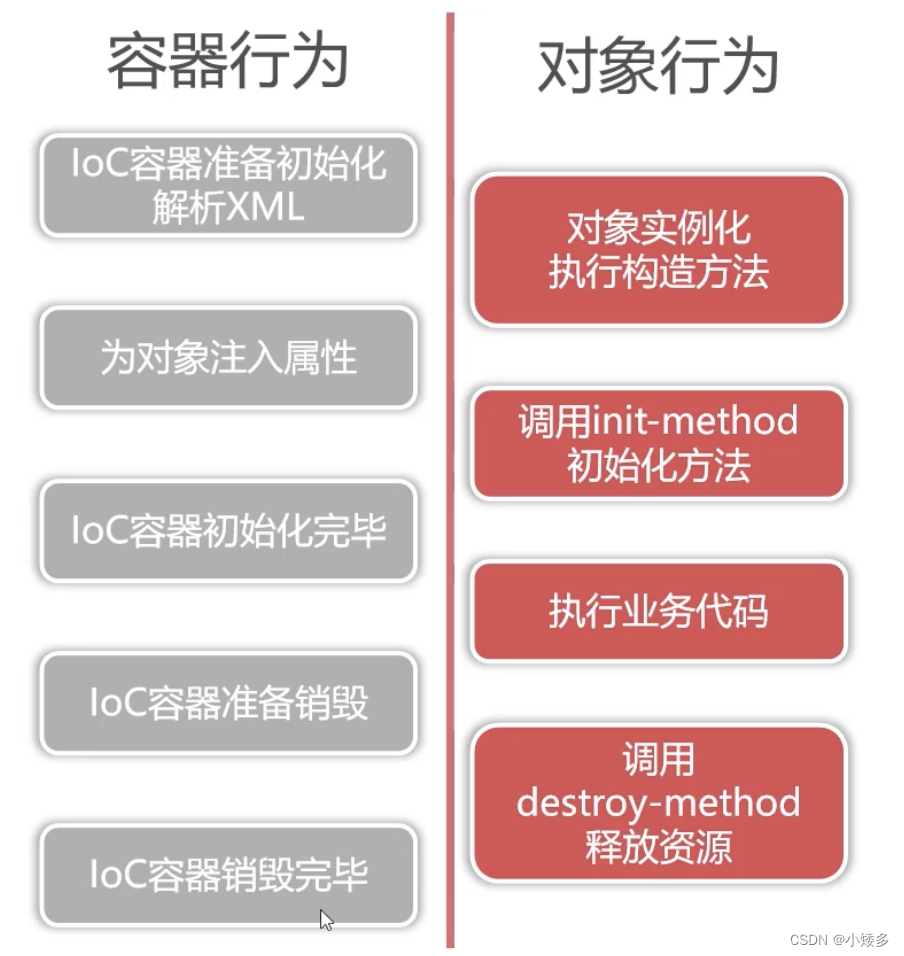
创建对象-设置属性-执行init()方法-执行业务方法-执行destroy()方法释放对象相关资源
//执行销毁IOC容器的方法
((ClassPathXmlApplicationContext)context).registerShutdownHook();
二、基于注解配置IoC容器
基于注解配置IoC容器
优势:
摆脱繁琐的XML形式的bean与依赖注入配置
基于“声明式”的原则,更适合轻量级的现代企业应用
让代码可读性变好,研究人员拥有更好的开发体验
三类注解:
- 组件类型注解-声明当前类的功能和职责
- 自动装配注解-根据属性特征自动注入对象
- 元数据注解-更细化的辅助IoC容器管理对象的注解
四类组件类型注解:

XML配置开启组件扫描,才能使用注解
<?xml version="1.0" encoding="UTF-8"?>
<beans xmlns="http://www.springframework.org/schema/beans"
       xmlns:xsi="http://www.w3.org/2001/XMLSchema-instance"
       xmlns:context="http://www.springframework.org/schema/context"
       xsi:schemaLocation="http://www.springframework.org/schema/beans
        https://www.springframework.org/schema/beans/spring-beans.xsd
        http://www.springframework.org/schema/context
        https://www.springframework.org/schema/context/spring-context.xsd">

    <!--在IoC容器初始化时自动扫描四种组件类型注解完成实例化
        @Repository
        @Service
        @Controller
        @Component
    -->
    <context:component-scan base-package="spring.ioc"/>

</beans>
两类自动装配注解:
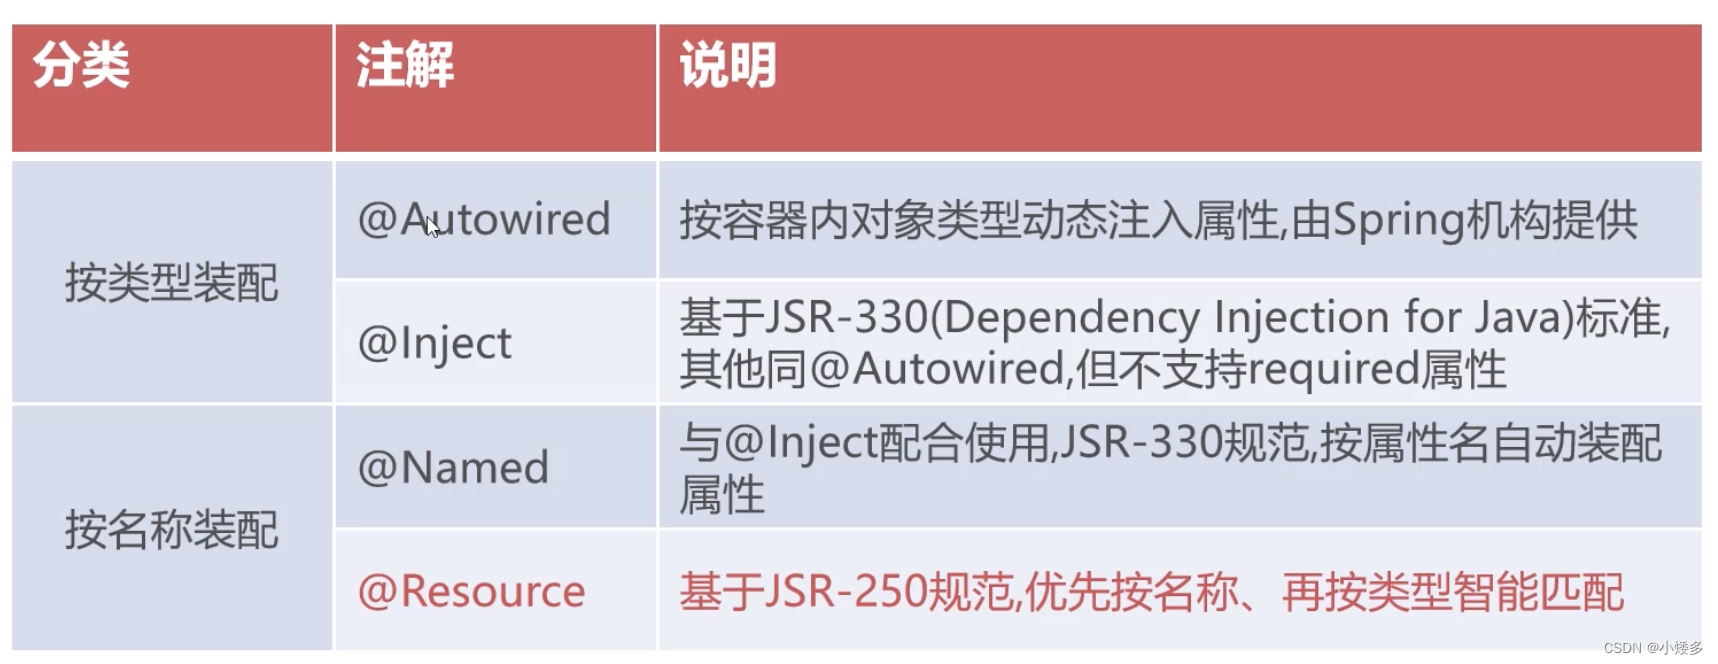
	@Autowired
    //Spring IoC容器会自动通过反射技术将属性private修饰符自动改为public,直接进行赋值
    //不再执行set方法
    private UserDao udao;

	//@Autowired
    //如果装配注解放在set方法上,则自动按类型/名称对set方法参数进行注解
    //所以一般无set方法
    //public void setUdao(UserDao udao) {
@Autowired默认按照类型装配,默认情况下要求依赖对象必须存在。
使用@Autowired进行属性注入时,如果该类型有多个实现类,可以在一个实现类上使用@Primary,表示优先使用该类。
 /**
     * 1.@Resource设置name属性,则按照name在IoC容器中将bean注入
     * 2.@Resource未设置name属性
     * 2.1 以属性名作为bean name在IoC容器中匹配bean,如有匹配到就注入
     * 2.2 按属性名未匹配,则按类型进行匹配,同@Autowired,需要加入@Primary解决类型冲突
     * 使用建议:在使用@resource对象时推荐设置name,或保证属性名与bean name一致
     */
    //@Resource(name="userOracleDao")
    //private IUserDao udao;
    @Resource
    private IUserDao udao;

    public void joinDepartment(){
        System.out.println(udao);
    }
@Resource有两个属性:name和type,Spring将@Resource注解的name属性解析为bean的名称,type属性解析为bean的类型,默认按照名称进行装配,名称可以通过name属性进行指定。
@Resource和@Autowired的区别:
- 都可以用来装配bean,都可以写在字段或setter方法上。
- @Resource默认按照名称装配,如果没有指定name属性,注解写在字段上,默认时取字段名作为名称查找,如果注解写在setter方法上默认是取属性的名称进行装配,当找不到名称匹配的bean时才按照类型进行匹配,如果name属性一旦指定,只会按照名称装配。
- @Resource的装配顺序:(1)如果同时指定了name和type,则寻找唯一匹配的bean进行装配;(2)如果指定了name,则查找名称(id)匹配的bean进行装配;(3)如果指定了type,查找类型匹配的唯一bean进行装配,找不到或者找到多个都抛出异常;(4)如果没指定name或type,自动按照byName方式装配,没匹配到按照原始类型匹配
- @Autowired允许null值,@Autowired(requied=false)
- @Autowired使用名称装配要结合@Qualifier,@Autowired @Qualifier(“test”),解决@Service重名问题。
元数据注解:
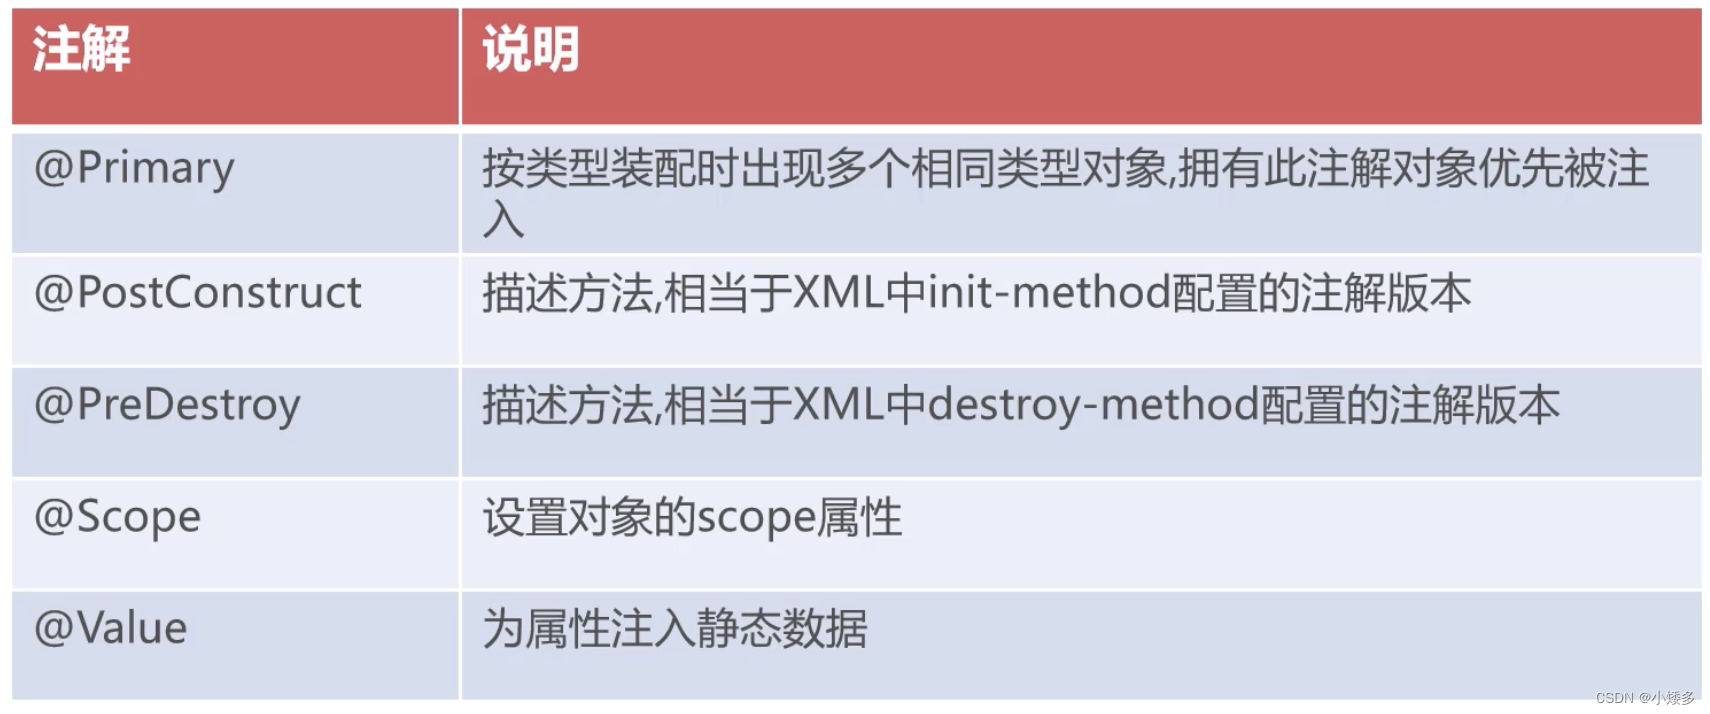
@Primary
@Scope("prototype") //设置单例/多例,和XML中bean scope完全相同
public class UserService {
	@Value("${metadata}") //读取config.properties的metadata属性值
    private String metaData;
	@PostConstruct //XML中bean init-method完全相同
    public void init(){
        System.out.println("初始化UserService对象,metaData="+metaData);
    }
}
@Value使用
1)创建配置文件config.properties,设置属性名=属性值
2)在applicationContext.xml中通过placeholder加载配置文件
<context:property-placeholder location="classpath:config.properties"/>
3)在代码中使用@Value("${属性名}")来给属性设置静态值
三、基于Java Config配置IoC容器
优势:完全摆脱XML的束缚,使用独立Java类管理对象与依赖。
注解配置相对分散,利用Java Config可对配置集中管理。
可以在编译时进行依赖检查,不容易出错。
Java Config核心注解:
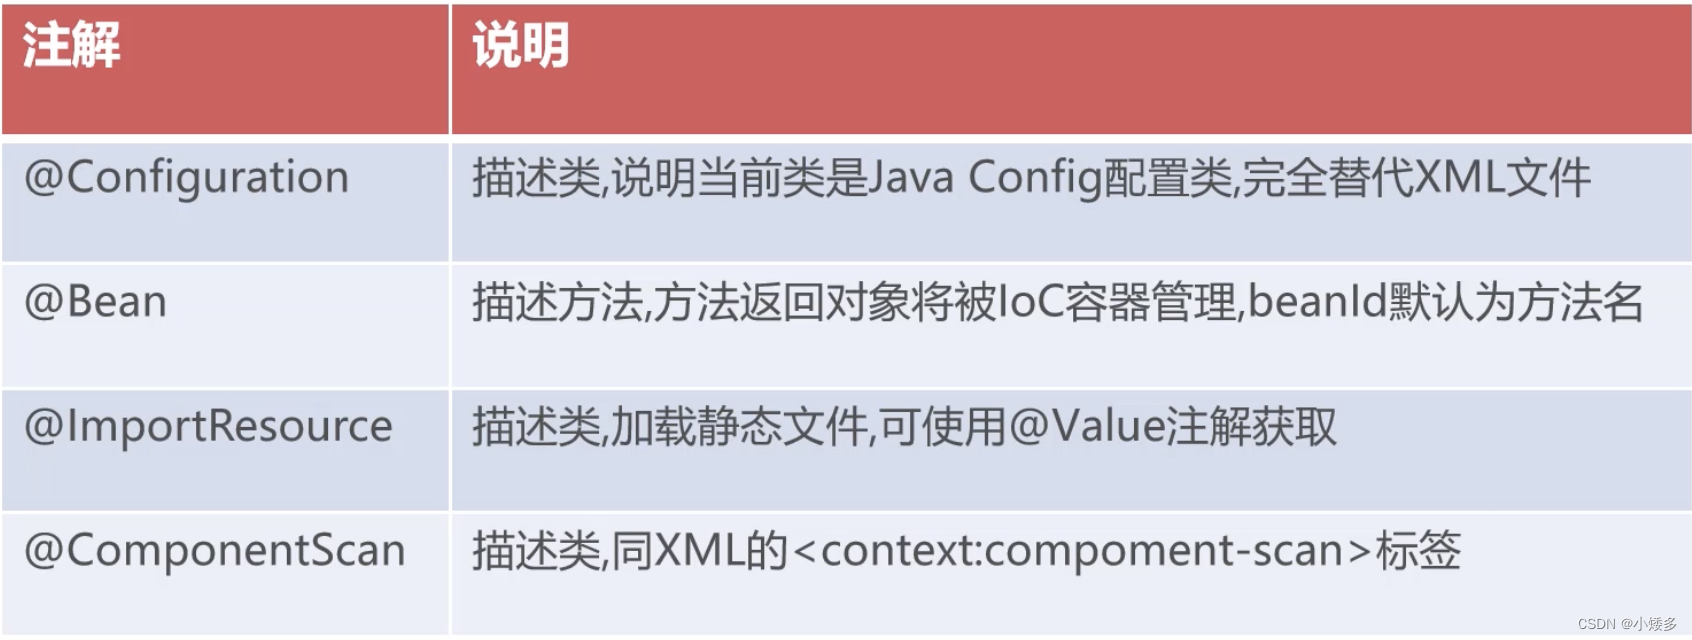
@Configuration //说明当前类是一个配置类,用于替代applicationContext.xml
@ComponentScan(basePackages = "spring.ioc")
public class Config {
    @Bean //Java Config利用方法创建对象,将方法返回对象放进容器,beanId=方法名
    @Primary
    public UserDao userDao(){
        UserDao userDao = new UserDao();
        System.out.println("已创建"+userDao);
        return userDao;
    }
    @Bean
    //通过参数进行依赖注入
    //先按name尝试注入,name不存在时按类型注入
    public UserService userService(UserDao userDao, EmployeeDao employeeDao){
        UserService userService = new UserService();
        System.out.println("已创建"+userService);
        userService.setUserDao(userDao);
        System.out.println("调用setUserDao:"+userDao);
        System.out.println("调用employeeDao:"+employeeDao);
        return userService;
    }
    @Bean
    @Scope("prototype")
    public UserController userController(UserService userService){
       UserController userController = new UserController();
       System.out.println("已创建"+userController);
       userController.setUserService(userService);
        System.out.println("调用setUserService:"+userService);
       return userController;
    }
}
Spring Test测试模块
Spring Test对JUnit单元测试框架有良好的整合。
通过Spring Test可以在JUnit单元测试时自动初始化IoC容器。
Spring与JUnit4整合过程:
- Maven工程依赖spring-test和junit
- 利用@RunWith和@ContextConfiguration描述测试用例类
- 测试用例类从容器获取对象完成测试用例执行
@RunWith(SpringJUnit4ClassRunner.class) //将Junit4的执行权交给Spring Test,在测试用例执行前自动初始化IoC容器
@ContextConfiguration(locations = {"classpath:applicationContext.xml"})//在IoC容器初始化过程中,通知要加载那个配置文件
public class SpringTestor {
    @Resource
    private UserService userService;
    @Test
    public void testUserService(){
        userService.createUser();
    }
}
本文来自互联网用户投稿,该文观点仅代表作者本人,不代表本站立场。本站仅提供信息存储空间服务,不拥有所有权,不承担相关法律责任。 如若内容造成侵权/违法违规/事实不符,请联系我的编程经验分享网邮箱:veading@qq.com进行投诉反馈,一经查实,立即删除!