项目知识—SSM及之后02
2024-01-09 08:22:11
1、resultMap写的Base内容必须保证select都使用上
2、VALUE单个 ,VALUES多个
3、
一对多,两张表,多的表加外键
比如班级和学生就是一对多,查就是按照学生表去查询
多对多,三张表,关系表加外键
4、数据库起名的时候,有关联的表的字段如果是相同的话一定要区分开来,命名不要一样,不然会出现值覆盖问题,可以一个叫name 一个叫dname?
5、If 0、不成功都要抛异常(throw new)
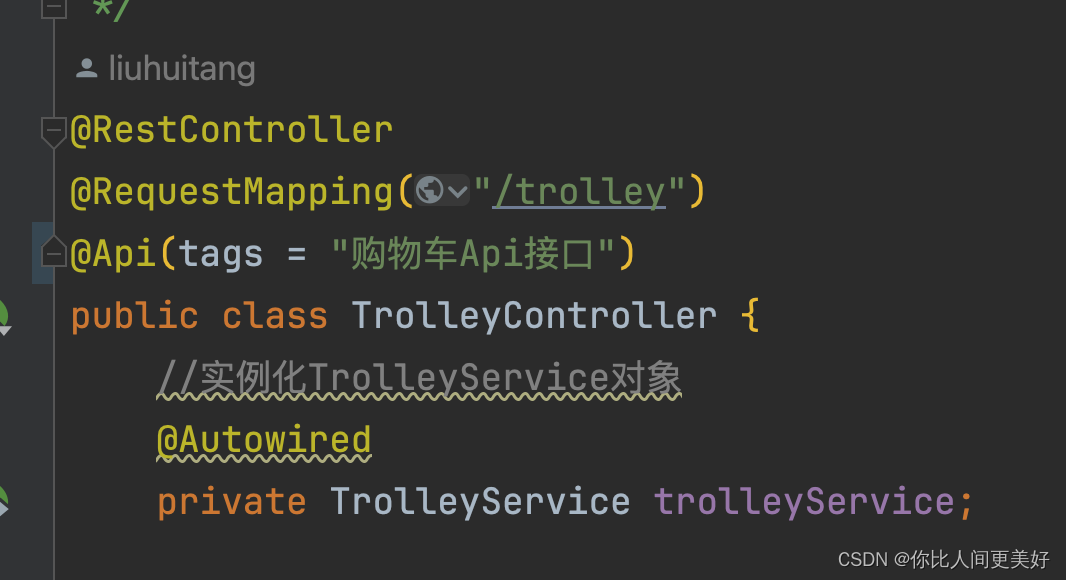
6、swagger的使用(都是提供说明的)
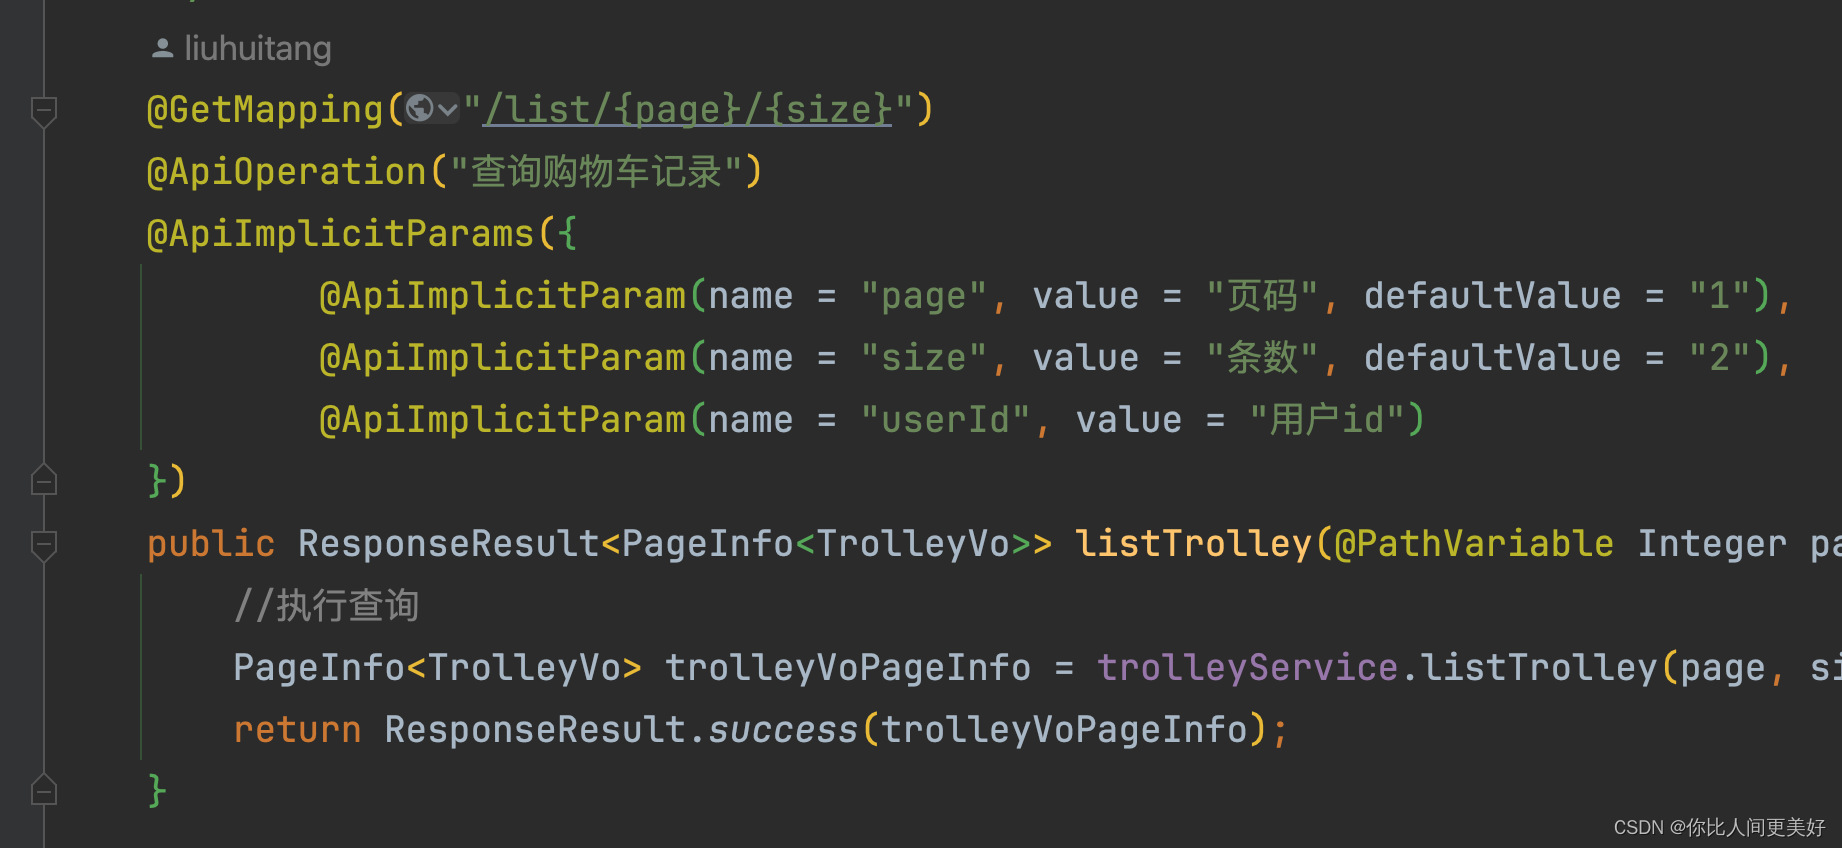
(1)Controller上
| @Api(tags = "购物车Api接口") | 用于为API或API的某个部分提供一个标签或分类 |
| @ApiOperation("新增购物车记录") | 用于为API操作提供一个简短的描述或标签 |
| ?@ApiImplicitParams({ ? ? ? ? ? ? @ApiImplicitParam(name = "page", value = "页码", defaultValue = "1"), ? ? ? ? ? ? @ApiImplicitParam(name = "size", value = "条数", defaultValue = "2"), ? ? ? ? ? ? @ApiImplicitParam(name = "userId", value = "用户id") ? ? }) | 用于为API参数提供更多元数据和描述集合。 |
| @ApiImplicitParam(name = "page", value = "页码", defaultValue = "1") | 用于为API参数提供更多元数据和描述 |
(2)实体类上
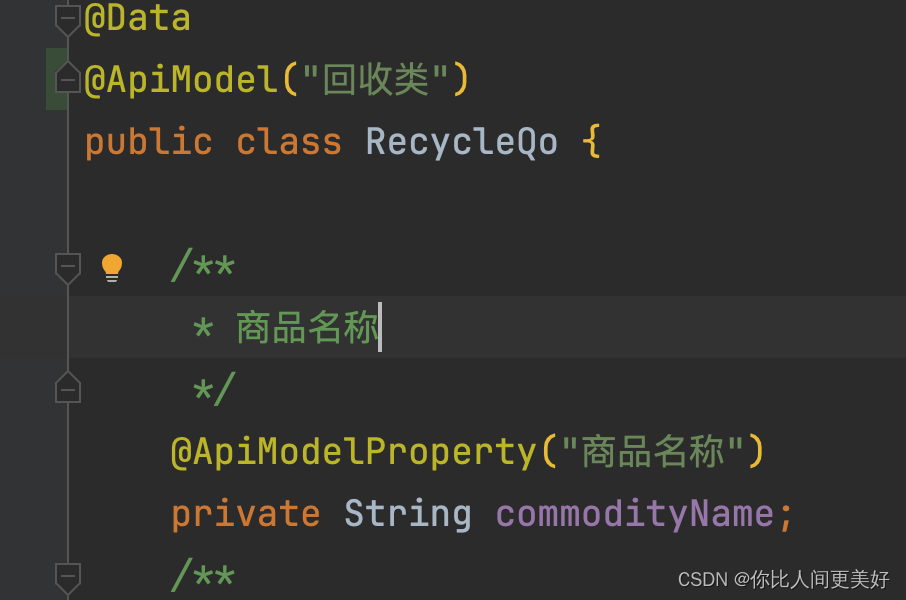
| @ApiModel("回收类") | 用于为API模型或模型类提供一个描述或标签 |
| @ApiModelProperty("商品名称") | 描述API模型属性的元数据 |


7、@ApiModelProperty(用于Java类中定义API模型属性)
| value | 用于提供模型属性的描述。例如,@ApiModelProperty(value = "商品名称") |
| required | 用于指定模型属性是否必需。如果设置为?true,则该属性是必需的。如果设置为?false,则该属性是可选的。例如,@ApiModelProperty(value = "商品描述", required = true) |
| example | 用于提供模型属性的示例值。这对于展示如何使用该属性非常有用。例如,@ApiModelProperty(value = "商品ID", example = "123456") |
| notes | 用于提供关于模型属性的额外说明或备注。例如,@ApiModelProperty(value = "商品ID", notes = "请使用唯一的商品ID") |
| dataType | 用于指定模型属性的数据类型。例如,@ApiModelProperty(value = "商品价格", dataType = "double") |
?8、六种类型参数传递
| 普通参数 | 直接传(或json) |
| 请求参数名与形参变量名不匹配 | 使用@RequestParam绑定参数关系 |
| 实体类参数 | 直接传属性(非json) |
| 嵌套pojo对象 | 按照对象层次结构关系接收 address.city |
| 数组参数 | key相同这样去传递(k1 值1;k2 值2) |
| 集合保存普通参数 | 使用@RequestParam(属性注解)绑定参数关系,其他跟数组一样 |
1)实体类参数:直接传属性

2)嵌套pojo对象:按照对象层次结构关系接收 address.city
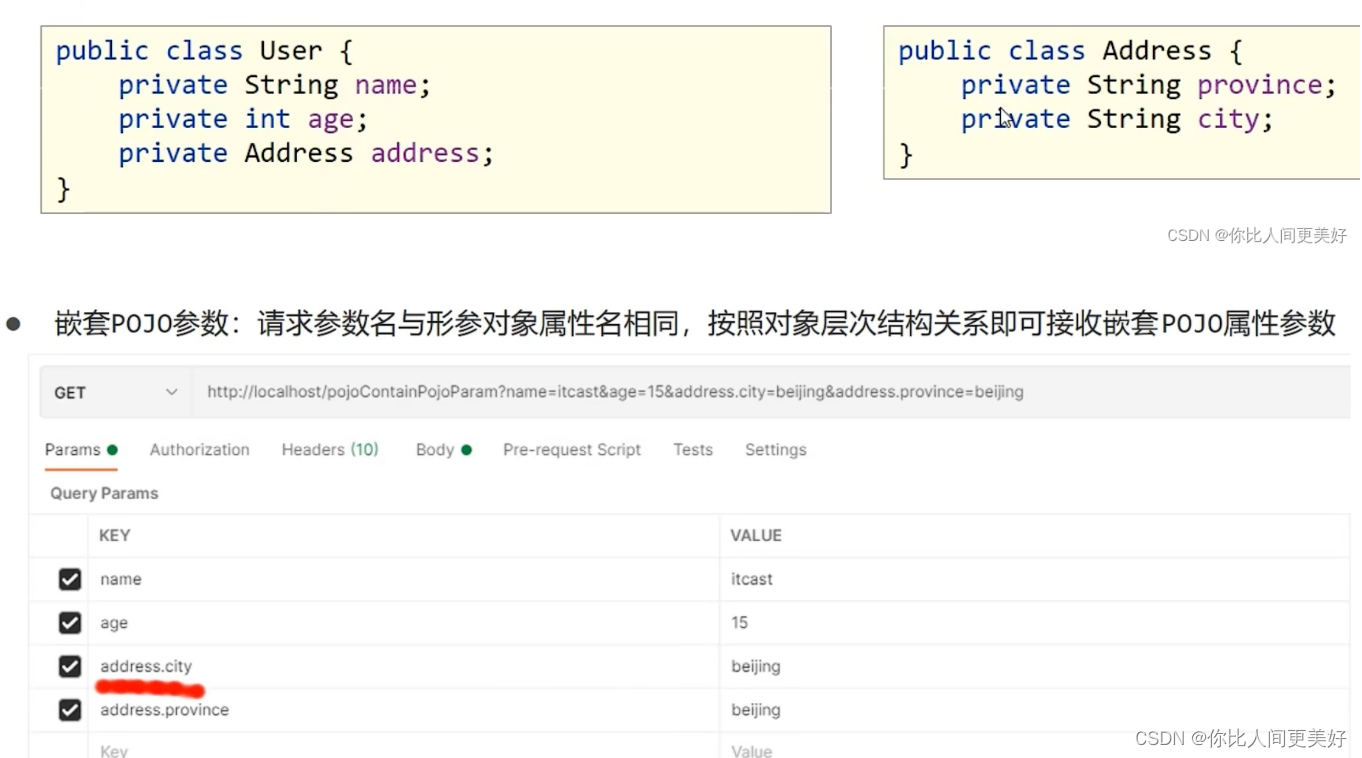
3)数组参数:key相同这样去传递

还可以这样?

4)集合保存普通参数:使用@RequestParam(属性注解)绑定参数关系,其他跟数组一样

9、swagger路径
http://localhost:8080/api/doc.html#/home
自动配置
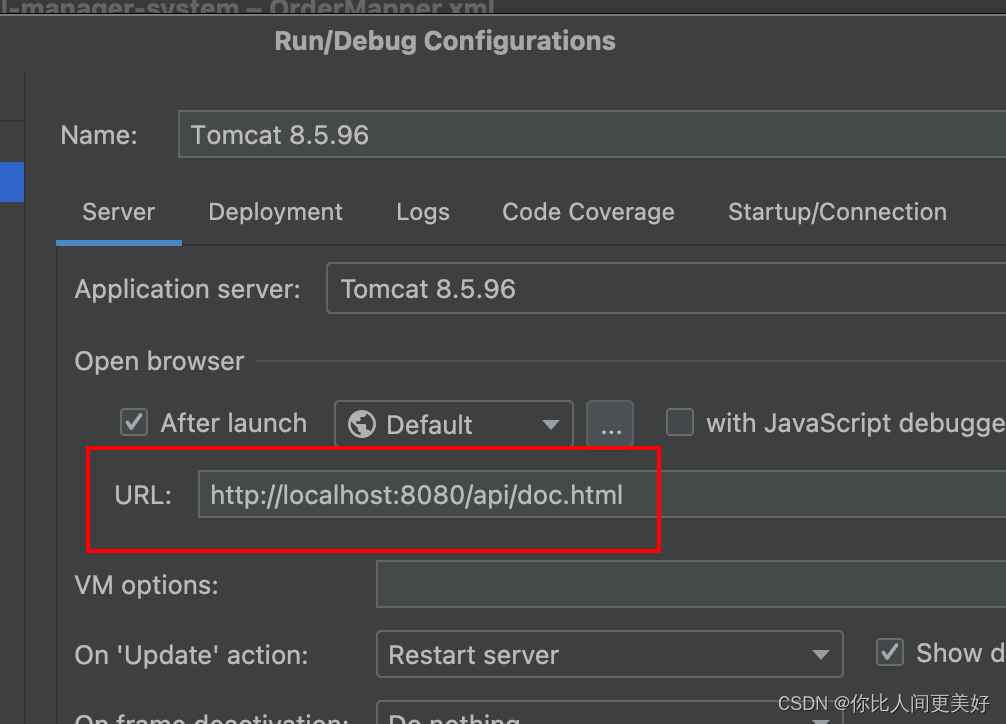
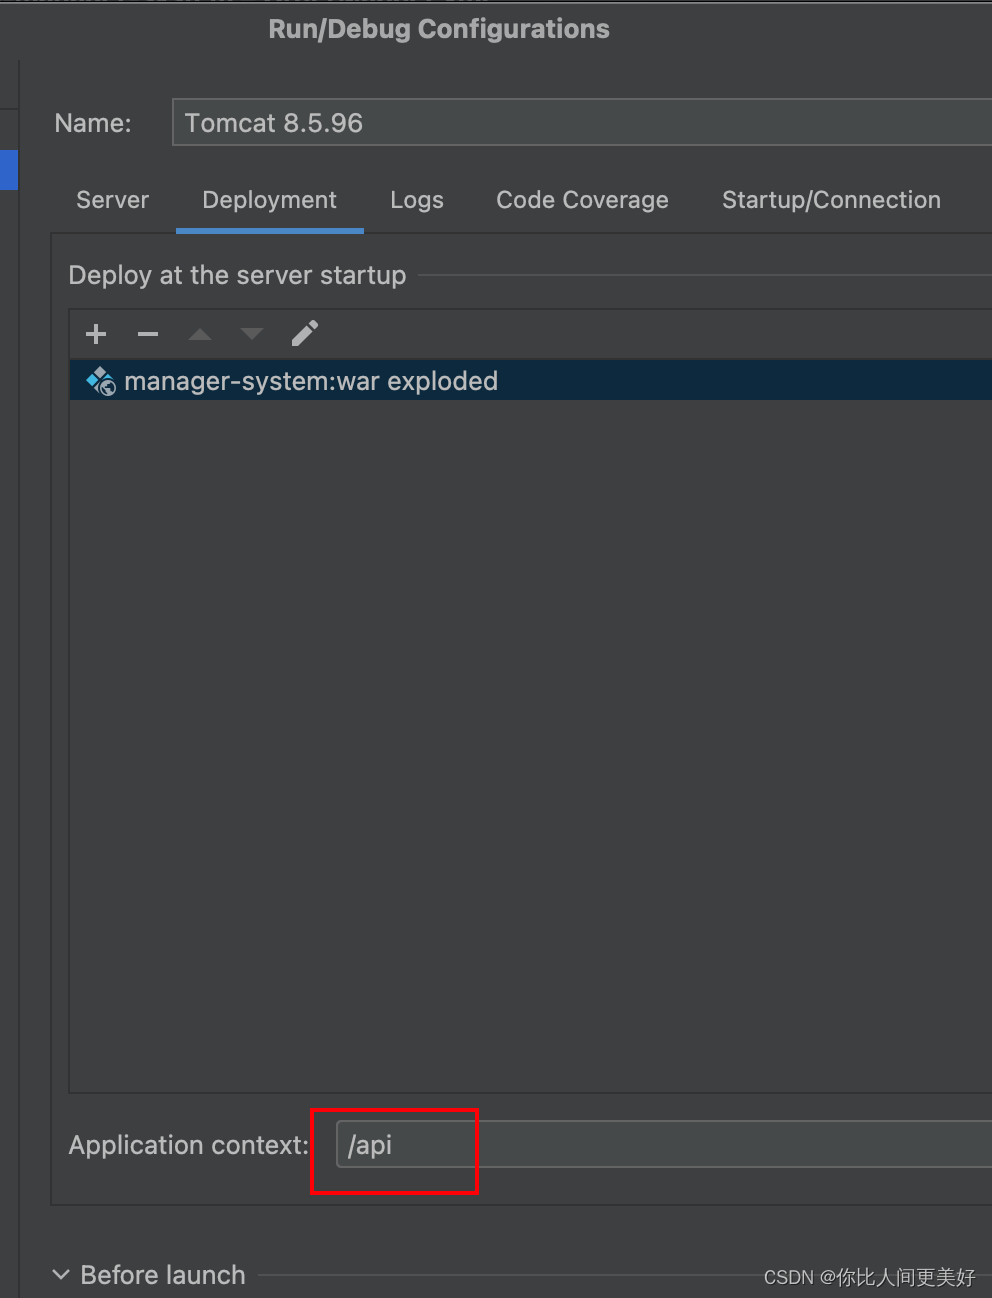
10、时间类型处理
(1)普通请求@DateTimeFormat
@GetMapping("/test1")
public String testDate(@DateTimeFormat(pattern = "HH:mm:ss") Date createDate) {
    return "接受客服端String类型的时间类型  转化Date类型";
}
(2)请求参数是json
? ? ? ? 1)@JsonFormat 局部配置
@Data
public class UserQo {
    @JsonFormat(pattern = "yyyy-MM-dd HH:mm:ss")
    private Date createDate;
}
@PostMapping("/test2")
public String testDateJson(@RequestBody UserQo userQo) {
System.out.println(userQo.getCreateDate().toString());
return "Json时间处理";
}? ? ? ? 2)全局配置
<mvc:annotation-driven>
    <mvc:message-converters>
        <bean class="org.springframework.http.converter.json.MappingJackson2HttpMessageConverter">
            <property name="objectMapper">
                <bean class="com.fasterxml.jackson.databind.ObjectMapper">
                    <property name="dateFormat">
                        <bean class="java.text.SimpleDateFormat">
                            <constructor-arg type="java.lang.String" value="yyyy-MM-dd HH:mm:ss"/>
                        </bean>
                    </property>
                </bean>
            </property>
        </bean>
    </mvc:message-converters>
</mvc:annotation-driven>
(3)响应时间
统一时间json方式
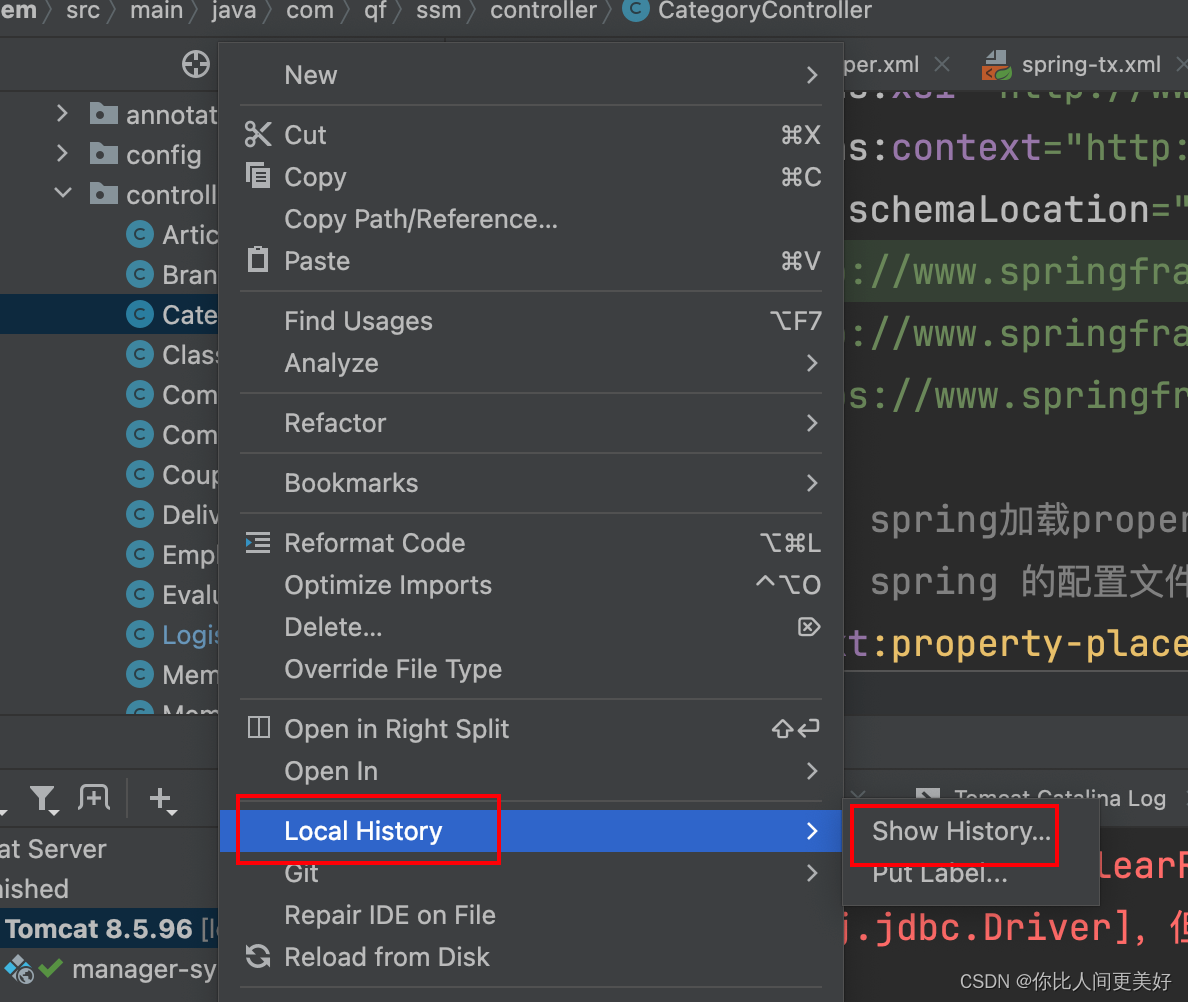
11、关于删除错了想要恢复
选中历史版本再恢复就可以了?
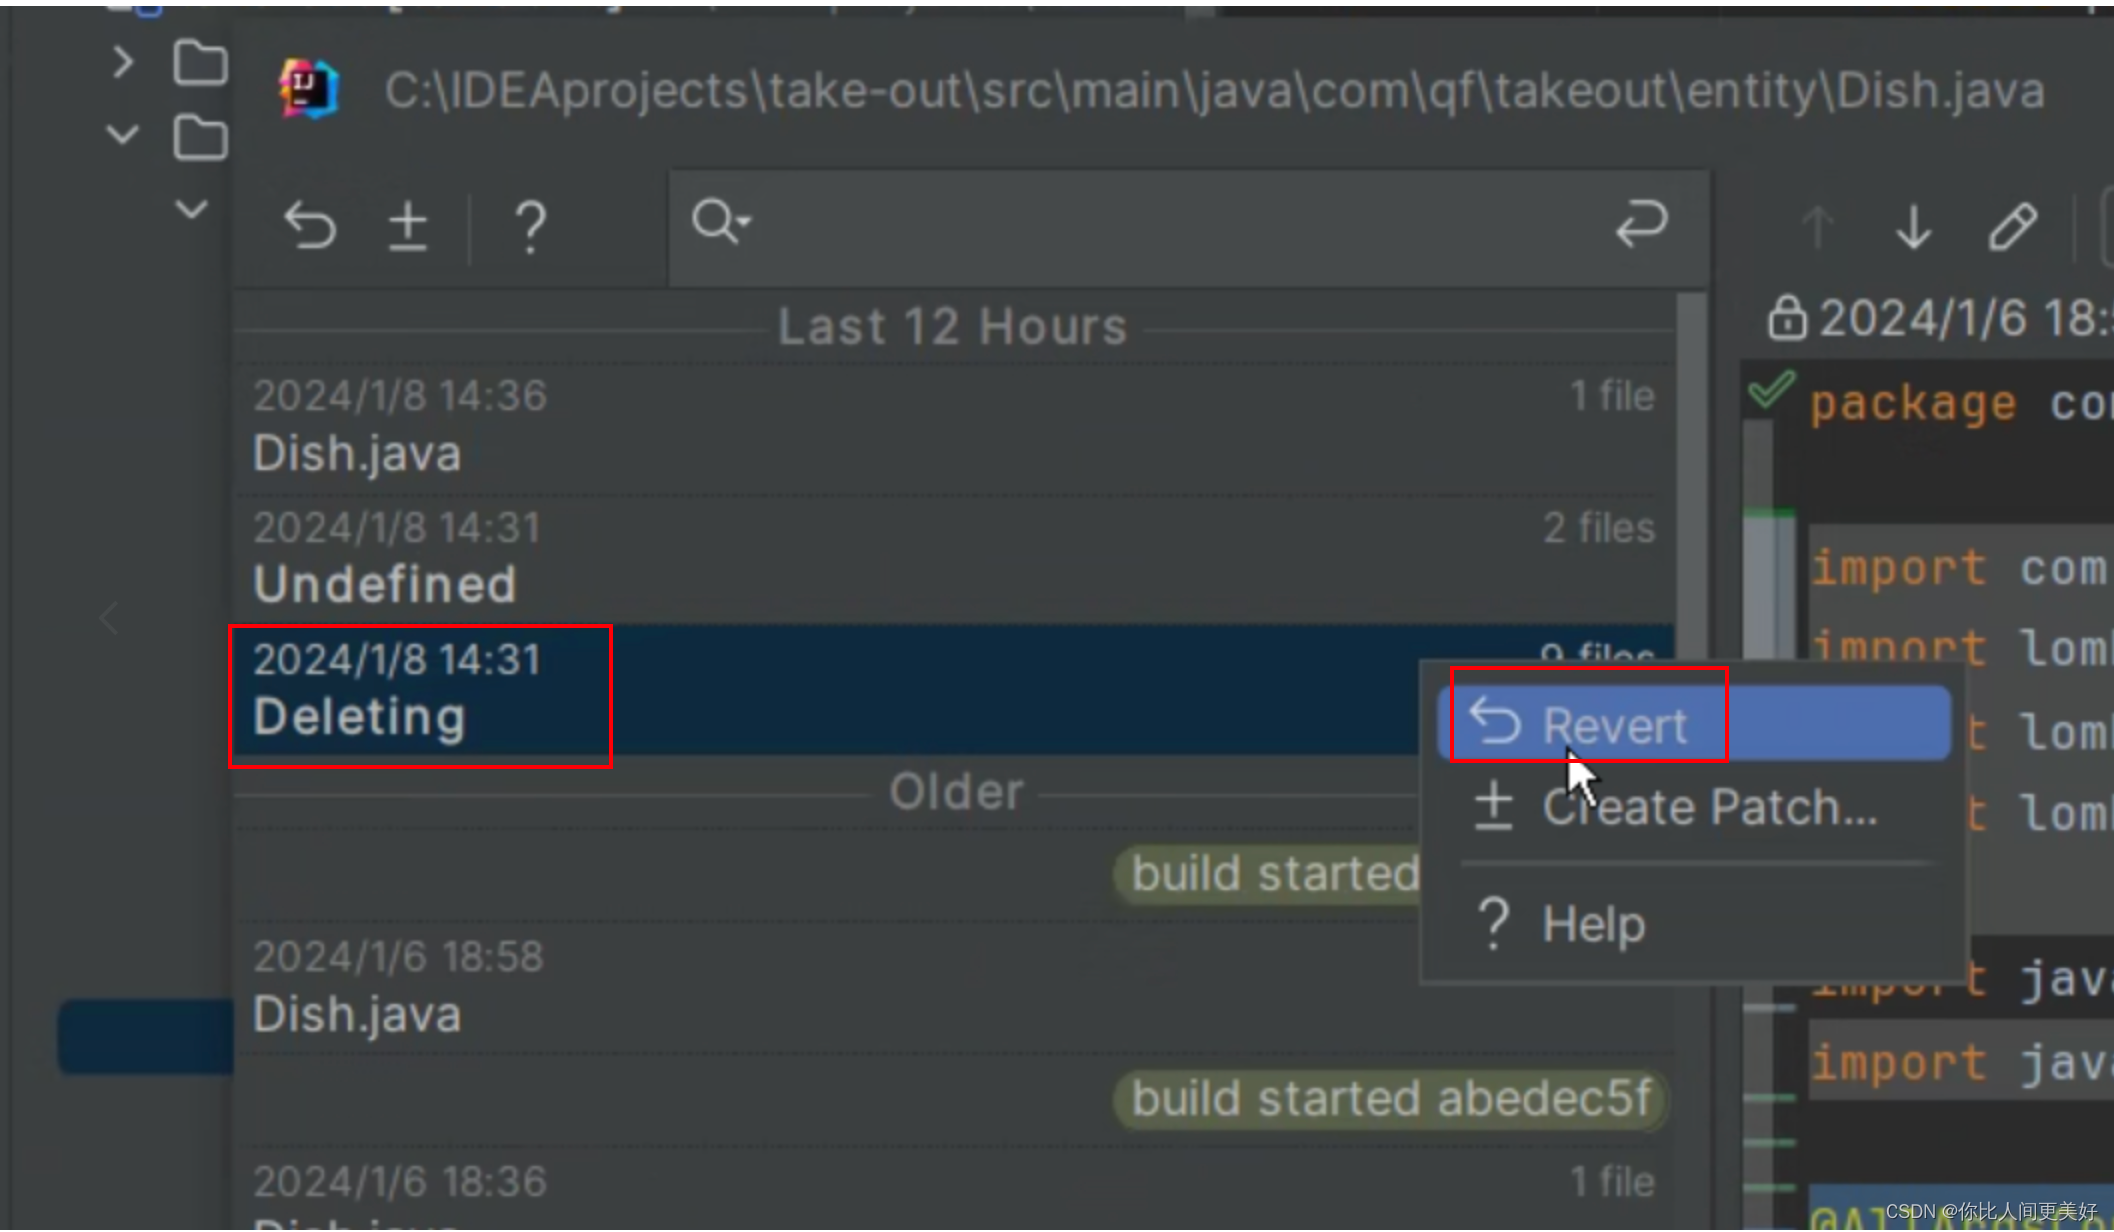
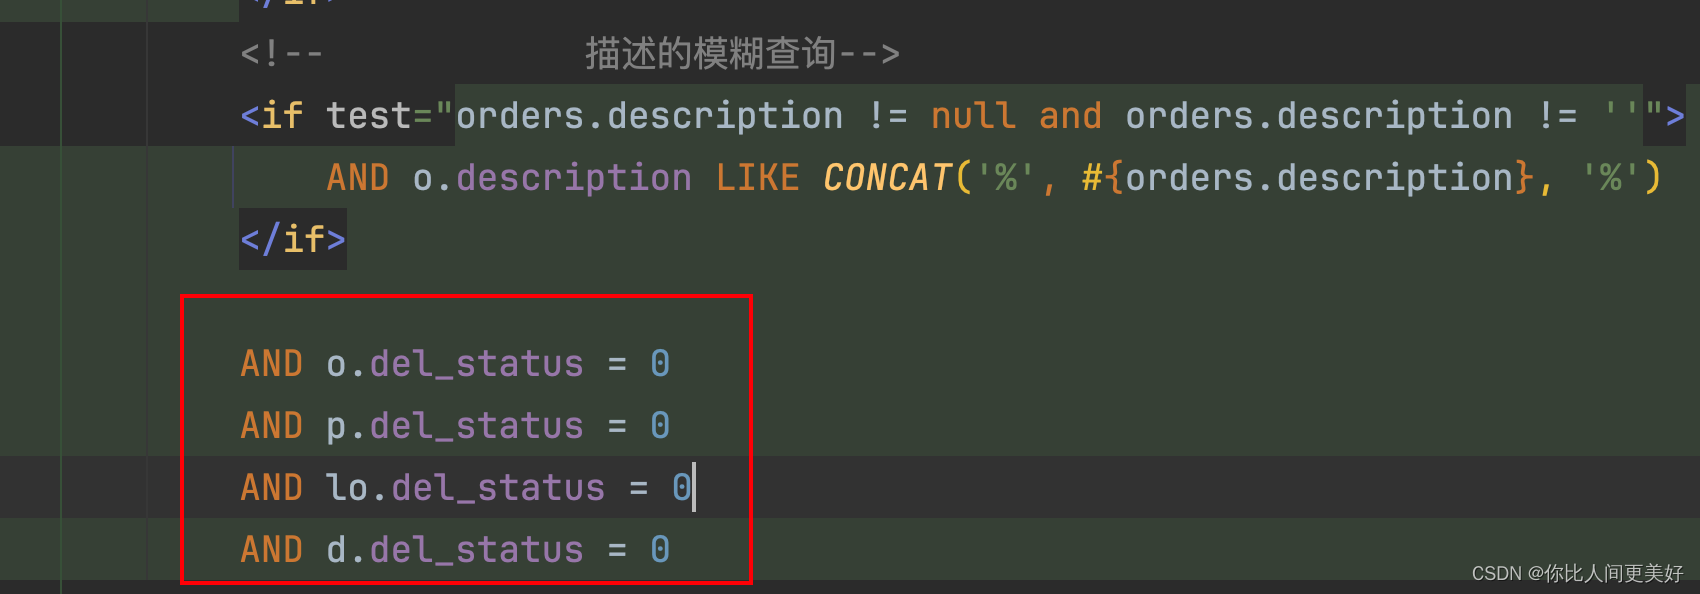
12、查询指定条件下的指定条件的话,嵌套就嵌套传递就可以了,sql语句where那里做判断就行
13、浏览器图片的上传下载显示通过数据库实现
<!-- 文件上传配置 -->
<bean id="multipartResolver" class="org.springframework.web.multipart.commons.CommonsMultipartResolver">
    <property name="maxUploadSize" value="10485760" />
</bean>

<!-- 文件下载配置 -->
<mvc:resources mapping="/download/**" location="file:/D:/uploads/" />
(1)图片上传
@Controller
@RequestMapping("/upload")
public class UploadController {

    @RequestMapping(value = "/image", method = RequestMethod.POST)
    @ResponseBody
    public String uploadImage(@RequestParam("file") MultipartFile file) {
        String fileName = file.getOriginalFilename();
        String path = "D:/uploads/" + fileName;
        try {
            File dest = new File(path);
            if (!dest.getParentFile().exists()) {
                dest.getParentFile().mkdirs();
            }
            file.transferTo(dest);
            return "success";
        } catch (Exception e) {
            e.printStackTrace();
            return "error";
        }
    }
}
?在控制层中,我们创建一个名为UploadController的类来处理上传请求。在该类中,我们需要添加一个方法,该方法用于处理上传请求并返回上传结果。在该方法中,我们需要使用SpringMVC提供的 MultipartResolver 类来解析上传的文件,获取文件信息,并将文件保存到服务器上
(2)图片下载
@Controller
@RequestMapping("/download")
public class DownloadController {

    @RequestMapping(value = "/image/{id}", method = RequestMethod.GET)
    public ResponseEntity<byte[]> downloadImage(@PathVariable("id") int id) {
        Image image = imageService.getImageById(id);
        String fileName = image.getName();
        String path = "D:/uploads/" + fileName;
        try {
            HttpHeaders headers = new HttpHeaders();
            headers.setContentType(MediaType.APPLICATION_OCTET_STREAM);
            headers.setContentDispositionFormData("attachment", fileName);
            File file = new File(path);
            return new ResponseEntity<byte[]>(FileUtils.readFileToByteArray(file), headers, HttpStatus.CREATED);
        } catch (Exception e) {
            e.printStackTrace();
            return null;
        }
    }
}
我们使用了 imageService.getImageById(id) 方法来获取要下载的图片的信息,这个方法可以自己实现或借助MyBatis框架读取数据库获取数据。
其中,id 为图片在数据库中的对应主键,response 为响应对象,conn 为数据库连接对象。通过操作 ResultSet 对象可以得到图片数据的输入流。
14、浏览器图片的上传下载显示通过数据库实现
(1)将图片添加到数据库
CREATE TABLE tb_image(
    `id` int(11) NOT NULL AUTO_INCREMENT COMMENT '主键',
    `name` varchar(255) NOT NULL COMMENT '文件名',
    `image` longblob NOT NULL COMMENT '图片数据',
    PRIMARY KEY (`id`)
) ENGINE=InnoDB DEFAULT CHARSET=utf8mb4 COMMENT='图片表';
public void addImage(String name, String imagePath) {
    try {
        FileInputStream fis = new FileInputStream(imagePath);
        PreparedStatement pstmt = conn.prepareStatement("INSERT INTO tb_image(name,image) VALUES(?,?)");
        pstmt.setString(1, name);  // 设置文件名
        pstmt.setBinaryStream(2, fis, fis.available());  // 设置图片数据
        pstmt.executeUpdate();
        pstmt.close();
    } catch (Exception e) {
        e.printStackTrace();
    }
}
(2)从数据库读取到前端页面
public void getImage(int id, HttpServletResponse response) {
    try {
        PreparedStatement pstmt = conn.prepareStatement("SELECT * FROM tb_image WHERE id=?");
        pstmt.setInt(1, id);
        ResultSet rs = pstmt.executeQuery();
        if (rs.next()) {
            String name = rs.getString("name");
            Blob imageBlob = rs.getBlob("image");
            InputStream is = imageBlob.getBinaryStream();
            ServletOutputStream out = response.getOutputStream();
            response.setContentType("image/jpeg");
            response.setHeader("Content-Disposition", "attachment;filename=" + name);
            byte[] b = new byte[1024];
            int len;
            while ((len = is.read(b)) > 0) {
                out.write(b, 0, len);
            }
            is.close();
            out.flush();
            out.close();
        }
        rs.close();
        pstmt.close();
    } catch (Exception e) {
        e.printStackTrace();
    }
}
15、图片上传 (正确)
- 首先,从上传的文件中获取原始文件名。
- 获取文件上传的路径。
- 获取文件扩展名的子字符串(例如,从"example.jpg"中获取".jpg")。
- 生成一个新的文件名,该文件名由UUID和原始文件的扩展名组成。
- 检查目标文件夹是否存在,如果不存在则创建它。
- 尝试将上传的文件转移到目标文件夹,并重命名为新生成的文件名。
- 如果文件转移成功,返回一个表示成功的
ResponseResult对象,其中包含新生成的文件名。 -
@PostMapping("/image/upload")
    @ApiOperation("上传车辆信息相关图片")
    @ApiResponses({@ApiResponse(code = 2000, message = "成功", response = String.class), @ApiResponse(code = 4000, message = "未知错误)")})
    public ResponseResult<String> upload(@RequestBody MultipartFile pic,HttpServletRequest request){
        String originalFilename = pic.getOriginalFilename();
        String realPath=request.getServletContext().getRealPath("WEB-INF/upload/carInfoImg");
        String substring = originalFilename.substring(originalFilename.lastIndexOf("."));
        String fileName = UUID.randomUUID().toString()+substring;
        File dir = new File(realPath);
        if (!dir.exists()){
            dir.mkdirs();
        }
        try {
            pic.transferTo(new File(realPath,fileName));
        } catch (IOException e) {
            e.printStackTrace();
        }
        return ResponseResult.success(fileName);
    }
16、图片回显(postman显示)(正确)
该方法通过将图片数据写入 HTTP 响应的输出流来实现图片的回显
- 首先,从请求中获取图片文件的真实路径。
- 创建一个
FileInputStream来读取该文件。 - 设置HTTP响应的内容类型为"image/jpeg",表示响应的内容是一个JPEG图片。
- 使用循环从输入流中读取数据,并写入到输出流中,从而将图片数据发送给客户端。这里使用了缓冲区以提高效率。
- 关闭输出流和输入流。
   @GetMapping("/image/download")
    @ApiOperation("图片下载回显")
    @ApiResponses({@ApiResponse(code = 2000, message = "成功", response =File.class), @ApiResponse(code = 4000, message = "未知错误)")})
    public void download(String pname, HttpServletResponse response,HttpServletRequest request){
        try {
            String realPath=request.getServletContext().getRealPath("WEB-INF/upload/carInfoImg/");
            //获取图片文件
            FileInputStream inputStream = new FileInputStream(new File(realPath+pname));
            //输出流
            ServletOutputStream outputStream = response.getOutputStream();

            response.setContentType("image/jpeg");

            int len = 0;
            byte[] bytes = new byte[1024];
            while ((len = inputStream.read(bytes)) != -1){
                outputStream.write(bytes,0,len);
                outputStream.flush();
            }
            outputStream.close();
            inputStream.close();
        } catch (Exception e) {
            throw new RuntimeException(e);
        }
    }
17、上传下载图片流程
(1)js实现
$(function(
  $("#uploadBtn").click(function(){
    // 获取上传文件
    var uploadPhoto = $("#upload")[0].files[0];
    // 利用FormDate对象封装文件数据
    var formdata = new FormData();
    formdata.append("uploadPhoto",uploadPhoto);
    $.ajax({
        url:'regUpload',
        type:'post',
        processData:false,
        contentType:false,//设置false,将请求数据类型设置为multipart/form-data
        data:formdata,
        success:function(data){
           if(data.result){
            alert("上传成功!");
            $("#imageSpan").html("<img src='<%=basePath%>"+data.msg+"' width='100px' />");
            $("#imgPath").val(data.msg);
            }else{
                alert("上传失败!原因:"+data.msg);
            }
        }
    });
  });

));
(2)图片上传
@RequestMapping("regUpload")
@ResponseBody
public Result regUpload(MultipartFile uploadPhoto, HttpServletRequest request) throws IOException {

    // 业务处理
    // 1、获取文件在服务器存储中的实际路径
    String realPath = request.getServletContext().getRealPath("/uploadImage/");
    File pathFile = new File(realPath);
    if(!pathFile.exists()){
        pathFile.mkdirs();
    }
    // 2、获取文件原始文件名,随机生成文件名
    String originalFilename = uploadPhoto.getOriginalFilename();

    String suffix = originalFilename.substring(originalFilename.lastIndexOf("."));

    String fileName = UUID.randomUUID()+suffix;
    // 3、实际路径拼接随机文件名,将文件存储至目标路径
    uploadPhoto.transferTo(new File(realPath+fileName));

    // 4、存储文件的原始名、随机名、文件类型至数据库
    String contentType = uploadPhoto.getContentType();
    PhotoImage photoImage = new PhotoImage("/uploadImage/"+fileName, originalFilename, fileName, contentType );
    System.out.println("============================");
    int flag = 0 ;
    try{
        flag =photoImageService.insertImage(photoImage);
    }catch (Exception e){
        e.printStackTrace();
    }
    if(flag==1){
        // 5、返回上传结果、存储路径+文件名
        Result result = new Result(true,"uploadImage/"+fileName);
        return result;
    }else{
        return new Result(false,"图片存储失败!");
    }
}
(3)图片下载
@RequestMapping("downloadFile")
public void downloadFile(String filename,HttpServletRequest req, HttpServletResponse resp) throws IOException {
    // Step2 后台接收请求,先设置响应头,表明为下载请求
    resp.setHeader("Content-Disposition", "attachment;filename="+filename);
    // Step3 获取文件的在硬盘上的绝对路径
    String realPath = req.getServletContext().getRealPath("/uploadImage/");
    // Step4 利用FileUtils将文件转成byte数组
    File file = new File(realPath,filename);
    byte[] bytes = FileUtils.readFileToByteArray(file);
    // Step5 从相应对象中获取输出流,将byte数组写出
    ServletOutputStream os = resp.getOutputStream();
    os.write(bytes);
    // Step6 清除输出流的缓存、关闭输出流
    os.flush();
    os.close();
}
18、可以在用户那里嵌套去筛选条件
<!--            城市模糊查询-->
            <if test="user.userDetail.city != null and user.userDetail.city != ''">
                AND d.city LIKE CONCAT('%', #{user.userDetail.city}, '%')
            </if>
19、设置了唯一字段然后又去找的话就只会出来一条
20、分页的工具类total是按查询出的条数来的
total看总条数,用user还是List<User>看查单User的多少条信息(因为多表都是由user牵扯出来的)
文章来源:https://blog.csdn.net/LHT233333/article/details/135421780
本文来自互联网用户投稿,该文观点仅代表作者本人,不代表本站立场。本站仅提供信息存储空间服务,不拥有所有权,不承担相关法律责任。 如若内容造成侵权/违法违规/事实不符,请联系我的编程经验分享网邮箱:veading@qq.com进行投诉反馈,一经查实,立即删除!
本文来自互联网用户投稿,该文观点仅代表作者本人,不代表本站立场。本站仅提供信息存储空间服务,不拥有所有权,不承担相关法律责任。 如若内容造成侵权/违法违规/事实不符,请联系我的编程经验分享网邮箱:veading@qq.com进行投诉反馈,一经查实,立即删除!
