LLM大语言模型(三):使用ChatGLM3-6B的函数调用功能前先学会Python的装饰器
2023-12-24 21:51:30
目录
ChatGLM3-6B的函数调用模式示例
ChatGLM3-6B目前有三种使用模式:
- 对话模式
- 工具模式(也就是本文要介绍的函数调用)
- 代码解释器模式
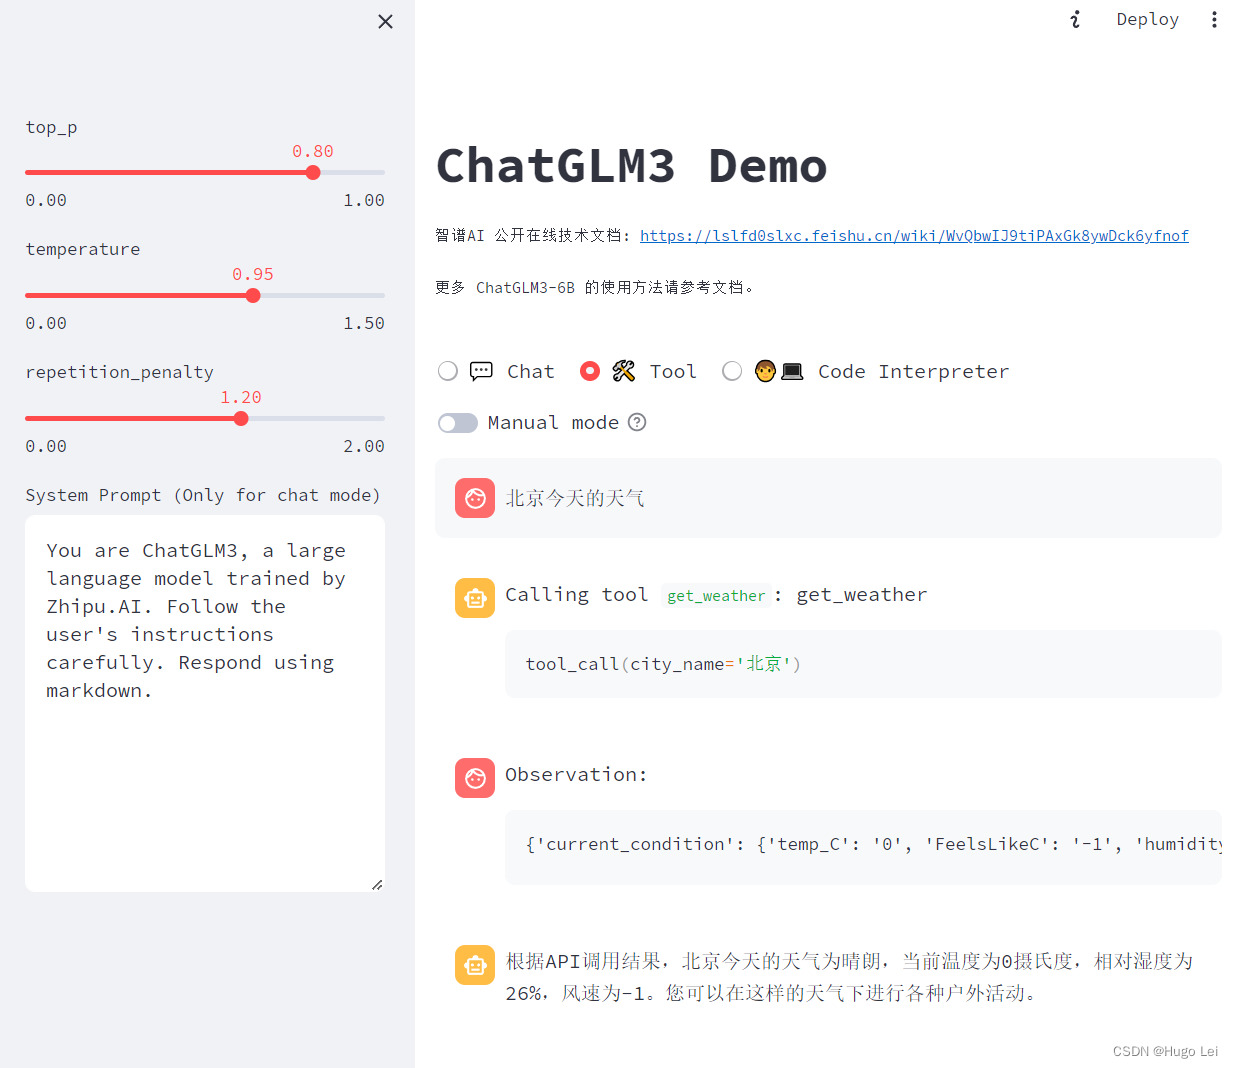
函数调用模式示例:

函数调用模式介绍:
- 首先进入Tool工具模式
- 询问“北京今天的天气”
- 大模型自动识别出,要调用get_weather工具(函数),且参数是“北京”
- 大模型接着调用get_weather,入参=北京,获取到函数执行的结果
- <|Observation|>展示的是函数的执行结果
- 紧接着大模型根据上述内容,继续生成回答“根据APIxxxxxxxxxxxx”
本地启动ChatGLM3-6B工具模式
进入conda对应的环境
conda activate chatglm进入composite_demo目录
cd composite_demo修改为使用本地模型,参考LLM大语言模型(一):ChatGLM3-6B本地部署-CSDN博客
# 修改client.py
MODEL_PATH = os.environ.get('MODEL_PATH', '====你的本地模型的绝对路径====')
启动模型
# 在composite_demo目录下
streamlit run main.py
然后在页面选择Tool模式即可。
如何在ChatGLM3-6B里新增一个自定义函数呢?
首先我们看下get_weather函数是如何实现的。
在composite_demo目录下有个tool_registry.py文件,里面包含两个已经定义好的函数:
-
random_number_generator
-
get_weather
其中get_weather就是上文对话中用到的函数。
get_weather基于Python的装饰器实现
@register_tool
def get_weather(
    city_name: Annotated[str, 'The name of the city to be queried', True],
) -> str:
    """
    Get the current weather for `city_name`
    """

    if not isinstance(city_name, str):
        raise TypeError("City name must be a string")

    key_selection = {
        "current_condition": ["temp_C", "FeelsLikeC", "humidity", "weatherDesc",  "observation_time"],
    }
    import requests
    try:
        resp = requests.get(f"https://wttr.in/{city_name}?format=j1")
        resp.raise_for_status()
        resp = resp.json()
        ret = {k: {_v: resp[k][0][_v] for _v in v} for k, v in key_selection.items()}
    except:
        import traceback
        ret = "Error encountered while fetching weather data!\n" + traceback.format_exc()

    return str(ret)
get_weather功能很简洁,最终是从
https://wttr.in/{city_name}?format=j1获取天气信息(https://wttr.in/%E5%8C%97%E4%BA%AC?format=j1)
函数注解@register_tool
register_tool的功能是将自定义的函数,转化为大模型需要的格式。?
def register_tool(func: callable):
    tool_name = func.__name__
    tool_description = inspect.getdoc(func).strip()
    python_params = inspect.signature(func).parameters
    tool_params = []

    # 解析param的Annotation

    for name, param in python_params.items():
        annotation = param.annotation
        if annotation is inspect.Parameter.empty:
            raise TypeError(f"Parameter `{name}` missing type annotation")
        if get_origin(annotation) != Annotated:
            raise TypeError(f"Annotation type for `{name}` must be typing.Annotated")

        typ, (description, required) = annotation.__origin__, annotation.__metadata__
        typ: str = str(typ) if isinstance(typ, GenericAlias) else typ.__name__
        if not isinstance(description, str):
            raise TypeError(f"Description for `{name}` must be a string")
        if not isinstance(required, bool):
            raise TypeError(f"Required for `{name}` must be a bool")

        tool_params.append({
            "name": name,
            "description": description,
            "type": typ,
            "required": required
        })
    tool_def = {
        "name": tool_name,
        "description": tool_description,
        "params": tool_params
    }

    print("[registered tool] " + pformat(tool_def))
    _TOOL_HOOKS[tool_name] = func
    _TOOL_DESCRIPTIONS[tool_name] = tool_def

    return func
register_tool函数实现了装饰器,它将自定义的函数转换为tool_def dict,其中自动生成了name,description,params等信息
{
    'name': 'get_weather',
    'description': 'Get the current weather for `city_name`',
    'params': [
        {
            'name': 'city_name',
            'description': 'The name of the city to be queried',
            'type': 'str',
            'required': True
        }
    ]
}
最终通过get_tools()将自定义的函数都暴露出去。
在上述demo中,其实是demo_tool.py里调用了get_tools()获取到所有的自定义函数。
def get_tools() -> dict:
    return copy.deepcopy(_TOOL_DESCRIPTIONS)
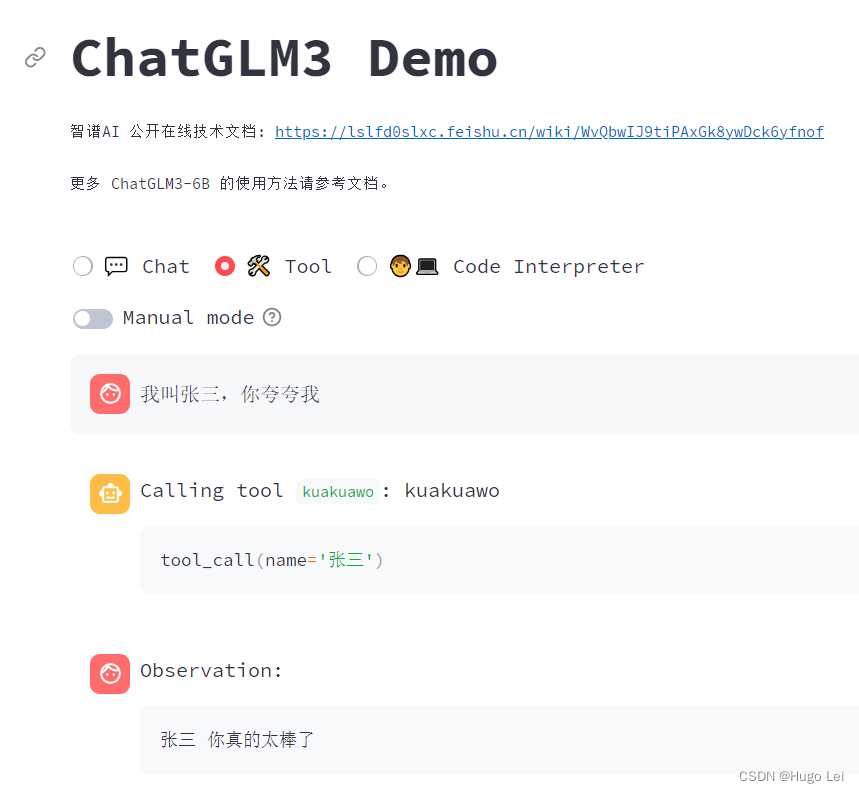
现在我们来自定义一个kuakuawo()函数
@register_tool
def kuakuawo(
    name: Annotated[str, 'The name of the user', True],
) -> str:
    """
    Generates a awesome praise for user
    """

    return f"{name} 你真的太棒了"
看看效果

?参考:
文章来源:https://blog.csdn.net/hugo_lei/article/details/135184337
本文来自互联网用户投稿,该文观点仅代表作者本人,不代表本站立场。本站仅提供信息存储空间服务,不拥有所有权,不承担相关法律责任。 如若内容造成侵权/违法违规/事实不符,请联系我的编程经验分享网邮箱:veading@qq.com进行投诉反馈,一经查实,立即删除!
本文来自互联网用户投稿,该文观点仅代表作者本人,不代表本站立场。本站仅提供信息存储空间服务,不拥有所有权,不承担相关法律责任。 如若内容造成侵权/违法违规/事实不符,请联系我的编程经验分享网邮箱:veading@qq.com进行投诉反馈,一经查实,立即删除!