Django 学习教程- Django模板(Template)
系列?
?
Django 学习教程- Hello world入门案例-CSDN博客
?

前言
在上一章节中我们使用django.http.HttpResponse() 来输出 "Hello World!"。该方式将数据与视图混合在一起,不符合 Django 的 MTV 思想。
本文将模板代码与逻辑代码分离以生产案例为标准引导您学习django模板的使用
模板应用实例
基于 helloworld 项目创建 templates 目录并创建?index.html 文件:
helloworld/
|-- helloworld
|   |-- __init__.py
|   |-- settings.py
|   |-- urls.py
|   |-- views.py
|   |-- wsgi.py
|   |-- asgi.py
|-- manage.py
|-- templates
    `-- index.html
在 index.html 放入如下内容:
<h1>{{ hello }}</h1>接下来我们需要向Django说明模板文件的路径,修改helloworld/settings.py,修改 TEMPLATES 中的 DIRS 为?[os.path.join(BASE_DIR, 'templates')],如下所示:
TEMPLATES = [
    {
        'BACKEND': 'django.template.backends.django.DjangoTemplates',
        'DIRS': [os.path.join(BASE_DIR, 'templates')],       # 修改位置
        'APP_DIRS': True,
        'OPTIONS': {
            'context_processors': [
                'django.template.context_processors.debug',
                'django.template.context_processors.request',
                'django.contrib.auth.context_processors.auth',
                'django.contrib.messages.context_processors.messages',
            ],
        },
    },
]
修改 views.py,增加一个新的对象,用于向模板提交数据:
from django.shortcuts import render

def index(request):
    context          = {}
    context['hello'] = 'Hello World!'
    return render(request, 'index.html', context)
修改 urls.py 放入如下内容:
from django.urls import path

from . import views

urlpatterns = [
    path('index/', views.index),
]
可以看到,我们这里使用 render 来替代之前使用的 HttpResponse。render 还使用了一个字典 context 作为参数。
context 字典中元素的键值?hello?对应了模板中的变量?{{ hello }}。
访问?http://127.0.0.1:8000/index/,你会看到 Hello World!
?
这样我们就完成了使用模板来输出数据,从而实现数据与视图分离。
接下来我们将具体介绍模板中常用的语法规则。
?
Django 模板标签
变量
模板语法:
view:{"HTML变量名" : "views变量名"}
HTML:{{变量名}}
helloworld/helloworld/views.py 文件代码
from django.shortcuts import render

def runoob(request):
  views_name = "Django学习教程"
  return  render(request,"index.html", {"name":views_name})
templates 中的 index.html?
<p>{{ name }}</p>访问 http://127.0.0.1:8000/index,你将会看到页面:?

列表
templates 中的 index.html中,可以用?.?索引下标取出对应的元素。
helloworld/helloworld/views.py 文件代码:
from?django.shortcuts?import?render

def?index(request):
? ? views_list?=?["Djiango教程1","Djiango教程2","Djiango教程3"]
? ??return?render(request,?"index.html",?{"views_list": views_list})
helloworld/templates/runoob.html 文件代码:
<p>{{ views_list }}</p>   # 取出整个列表
<p>{{ views_list.0 }}</p> # 取出列表的第一个元素
?访问 http://127.0.0.1:8000/index,你将会看到页面:

字典
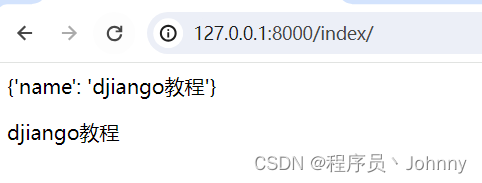
templates 中的 index.html中,可以用?.键?取出对应的值。
helloworld/helloworld/views.py 文件代码:
from?django.shortcuts?import?render

def?index(request):
? ? views_dict?=?{"name":"djiango教程"}
? ??return?render(request,?"index.html",?{"views_dict": views_dict})
helloworld/templates/index.html 文件代码:
<p>{{ views_dict }}</p> <p>{{ views_dict.name }}</p>再次访问 http://127.0.0.1:8000/index,可以看到页面:
过滤器
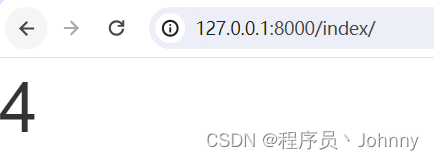
length
返回对象的长度,适用于字符串和列表。
字典返回的是键值对的数量,集合返回的是去重后的长度。
HelloWorld/HelloWorld/views.py 文件代码:
from django.shortcuts import render

def index(request):
    name ="菜鸟教程"
    return render(request, "index.html", {"name": name})
HelloWorld/templates/runoob.html 文件代码:
{{ name|length}}再次访问 http://127.0.0.1:8000/runoob,可以看到页面:
?
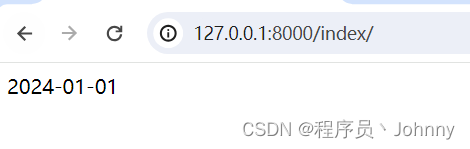
Date
根据给定格式对一个日期变量进行格式化。
格式?Y-m-d H:i:s返回?年-月-日 小时:分钟:秒?的格式时间。
helloworld/helloworld/views.py 文件代码:
from django.shortcuts import render

def index(request):
    import datetime
    now  =datetime.datetime.now()
    return render(request, "index.html", {"time": now})
helloworld/templates/index.html 文件代码:
{{ time|date:"Y-m-d" }}再次访问 http://127.0.0.1:8000/index,可以看到页面:?
?
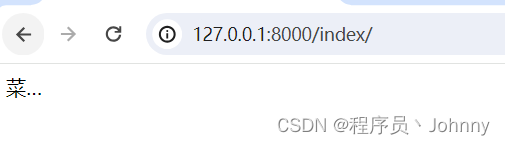
字符串截取(truncatechars)
如果字符串包含的字符总个数多于指定的字符数量,那么会被截断掉后面的部分。
截断的字符串将以?...?结尾。
helloworld/helloworld/views.py 文件代码:
from django.shortcuts import render

def index(request):
    views_str = "djiango教程"
return render(request, "index.html", {"views_str": views_str})helloworld/templates/index.html 文件代码:
{{ views_str|truncatechars:2}}再次访问 http://127.0.0.1:8000/index,可以看到页面:?
?
if/else 标签
基本语法格式如下:
{% if condition %}
     ... display
{% endif %}
或者:
{% if condition1 %}
   ... display 1
{% elif condition2 %}
   ... display 2
{% else %}
   ... display 3
{% endif %}
根据条件判断是否输出。if/else 支持嵌套。
{% if %} 标签接受 and , or 或者 not 关键字来对多个变量做判断 ,或者对变量取反( not ),例如:
{% if athlete_list and coach_list %}
     athletes 和 coaches 变量都是可用的。
{% endif %}
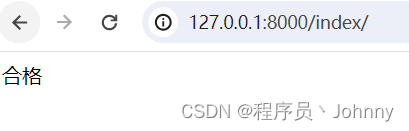
helloworld/helloworld/views.py 文件代码:
from django.shortcuts import render

def index(request):
    views_num = 88
    return render(request, "index.html", {"num": views_num})
helloworld/templates/index.html 文件代码:
{%if num > 90 and num <= 100 %}
优秀
{% elif num > 60 and num <= 90 %}
合格
{% else %}
一边玩去~
{% endif %}
再访问访问 http://127.0.0.1:8000/index,可以看到页面:
for 标签
{% for %} 允许我们在一个序列上迭代。
与 Python 的 for 语句的情形类似,循环语法是 for X in Y ,Y 是要迭代的序列而 X 是在每一个特定的循环中使用的变量名称。
每一次循环中,模板系统会渲染在?{% for %}?和?{% endfor %}?之间的所有内容。
例如,给定一个运动员列表 athlete_list 变量,我们可以使用下面的代码来显示这个列表:
<ul>
{% for athlete in athlete_list %}
<li>{{ athlete.name }}</li>
{% endfor %}
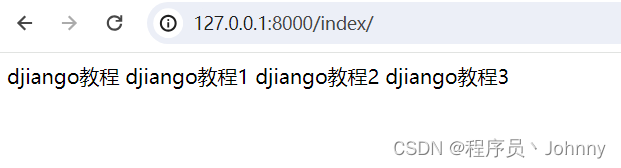
</ul>helloworld/helloworld/views.py 文件代码:
from django.shortcuts import render

def index(request):
    views_list = ["djiango教程","djiango教程1","djiango教程2","djiango教程3",]
    return render(request, "index.html", {"views_list": views_list})
helloworld/templates/index.html 文件代码:
{% for i in views_list %} {{ i }} {% endfor %}再访问访问 http://127.0.0.1:8000/index,可以看到页面:
?
ifequal/ifnotequal 标签
{% ifequal %} 标签比较两个值,当他们相等时,显示在 {% ifequal %} 和 {% endifequal %} 之中所有的值。
下面的例子比较两个模板变量 user 和 currentuser :
{% ifequal user currentuser %}
    <h1>Welcome!</h1>
{% endifequal %}
和 {% if %} 类似, {% ifequal %} 支持可选的 {% else%} 标签:8
{% ifequal section 'sitenews' %}
    <h1>Site News</h1>
{% else %}
    <h1>No News Here</h1>
{% endifequal %}
注释标签
Django 注释使用 {# #}。
{# 这是一个注释 #}include 标签
{% include %} 标签允许在模板中包含其它的模板的内容。
下面这个例子都包含了 nav.html 模板:
{% include "nav.html" %}?
?
配置静态文件
1、在项目根目录下创建 statics 目录。
?
2、在 settings 文件的最下方配置添加以下配置:
STATIC_URL = '/static/' # 别名
STATICFILES_DIRS = [
    os.path.join(BASE_DIR, "statics"),
]
?

3、在 statics 目录下创建 css 目录,js 目录,images 目录,plugins 目录, 分别放 css文件,js文件,图片,插件。
4、把 bootstrap 框架放入插件目录 plugins。
5、在 HTML 文件的 head 标签中引入 bootstrap。
注意:此时引用路径中的要用配置文件中的别名 static,而不是目录 statics。
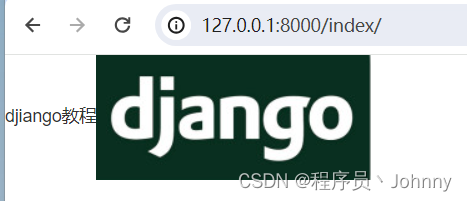
<link rel="stylesheet" href="/static/plugins/bootstrap.css">在模板中使用需要加入?{% load static %}?代码,以下实例我们从静态目录中引入图片。
helloworld/helloworld/views.py 文件代码:
from django.shortcuts import render

def index(request):
    name ="djiango教程"
    return render(request, "index.html", {"name": name})
HelloWorld/templates/runoob.html 文件代码:
{{name}}<img src="{% static 'images/django-logo.jpg' %}" alt="django-logo">再访问访问 http://127.0.0.1:8000/index,可以看到页面:
?
?
?
本文来自互联网用户投稿,该文观点仅代表作者本人,不代表本站立场。本站仅提供信息存储空间服务,不拥有所有权,不承担相关法律责任。 如若内容造成侵权/违法违规/事实不符,请联系我的编程经验分享网邮箱:veading@qq.com进行投诉反馈,一经查实,立即删除!