web架构师编辑器内容-创建业务组件和编辑器基本行为
2023-12-22 15:45:16
编辑器主要分为三部分,左侧是组件模板库,中间是画布区域,右侧是面板设置区域。
左侧是预设各种组件模板进行添加
中间是使用交互手段来更新元素的值
右侧是使用表单的方式来更新元素的值。
大致效果:

- 左侧组件模板库
最初的模板配置:
export const defaultTextTemplates = [
  {
    text: '大标题',
    fontSize: '30px',
    fontWeight: 'bold',
    tag: 'h2'
  },
  {
    text: '楷体副标题',
    fontSize: '20px',
    fontWeight: 'bold',
    fontFamily: '"KaiTi","STKaiti"',
    tag: 'h2'
  },
  {
    text: '正文内容',
    tag: 'p'
  },
  {
    text: '宋体正文内容',
    tag: 'p',
    fontFamily: '"SimSun","STSong"'
  },
  {
    text: 'Arial style',
    tag: 'p',
    fontFamily: '"Arial", sans-serif'
  },
  {
    text: 'Comic Sans',
    tag: 'p',
    fontFamily: '"Comic Sans MS"'
  },
  {
    text: 'Courier New',
    tag: 'p',
    fontFamily: '"Courier New", monospace'
  },
  {
    text: 'Times New Roman',
    tag: 'p',
    fontFamily: '"Times New Roman", serif'
  },
  {
    text: '链接内容',
    color: '#1890ff',
    textDecoration: 'underline',
    tag: 'p'
  },
  {
    text: '按钮内容',
    color: '#ffffff',
    backgroundColor: '#1890ff',
    borderWidth: '1px',
    borderColor: '#1890ff',
    borderStyle: 'solid',
    borderRadius: '2px',
    paddingLeft: '10px',
    paddingRight: '10px',
    paddingTop: '5px',
    paddingBottom: '5px',
    width: '100px',
    tag: 'button',
    textAlign: 'center'
  }
]
在component-list组件中循环渲染这个模板
compnent-list组件:
<div
  class="component-item"
  v-for="(item, index) in props.list"
  @click="onItemClick(item)"
  :key="index"
>
  <LText v-bind="item"></LText>
</div>

// LText组件
<component class="l-text-component" :is="props.tag" :style="styleProps" @click="handleClick">{{ props.text }}
</component>
- 中间画布区
基本的数据结构
export interface ComponentData {
  props: { [key: string]: any }
  id: string
  name: string
}
在左侧模板区域点击的时候,会emit一个onItemCreated事件:
const onItemCreated = (props: ComponentData) => {
  store.commit('addComponent', props)
}
store里面的addComponent方法:
addComponent(state, props) {
  const newComponent: ComponentData =
    id: uuidv4(),
    name: 'l-text',
    props
  }
  state.components.push(newComponent)
},
渲染中间画布区域:
<div v-for="component in components" :key="component.id">
    <EditWrapper v-if="!component.isHidden"
      :id="component.id"
      @set-active="setActive"
      :active="component.id === (currentElement && currentElement.id)" :props="component.props"
    >
    <component :is="canvasComponentList[component.name as 'l-text' | 'l-image' | 'l-shape']" v-bind="component.props" :isEditing="true"/>
  </EditWrapper>
  </div>
editWrapper组件就是为了隔离两个组件,方便后续的一些拖拽,拉伸,吸附的一些效果。
<template>
<div class="edit-wrapper" @click="itemClick"
    @dblclick="itemEdit"
    ref="editWrapper"
    :class="{active: active}" :style="styleProps"
    :data-component-id="id"
>
  <!-- 元素的扩大 -->
  <div class="move-wrapper" ref="moveWrapper" @mousedown="startMove">
    <slot></slot>
  </div>
  <div class='resizers'>
    <div class='resizer top-left' @mousedown="startResize($event, 'top-left')"></div>
    <div class='resizer top-right'  @mousedown="startResize($event, 'top-right')"></div>
    <div class='resizer bottom-left' @mousedown="startResize($event, 'bottom-left')"></div>
    <div class='resizer bottom-right' @mousedown="startResize($event, 'bottom-right')"></div>
  </div>
</div>
</template>
- 右侧设置面板区域的渲染:
在中间画布区域进行点击的时候,通过setActive事件,我们可以拿到当前的元素,
// store中的setActive
setActive(state, currentId: string) {
  state.currentElement = currentId;
},
然后就可以通过props-table组件进行渲染了:
<PropsTable v-if="currentElement && currentElement.props"
  :props="currentElement.props"
  @change="handleChange"
></PropsTable>
props-table比较麻烦我们来一一讲解,首先来看一下props-talbe的template部分:
<template>
  <div class="props-table">
    <div
      v-for="(value, key) in finalProps"
      :key="key"
      :class="{ 'no-text': !value.text }"
      class="prop-item"
      :id="`item-${key}`"
    >
      <span class="label" v-if="value.text">{{ value.text }}</span>
      <div :class="`prop-component component-${value.component}`">
        <component
          :is="value.component"
          :[value.valueProp]="value.value"
          v-bind="value.extraProps"
          v-on="value.events"
        >
          <template v-if="value.options">
            <component
              :is="value.subComponent"
              v-for="(option, k) in value.options"
              :key="k"
              :value="option.value"
            >
              <render-vnode :vNode="option.text"></render-vnode>
            </component>
          </template>
        </component>
      </div>
    </div>
  </div>
</template>
我们最终渲染的是finalProps这个数据,finalProps数据的生成:
// 属性转化成表单的映射表 key:属性  value:使用的组件
export const mapPropsToForms: PropsToForms = {
  // 比如: text 属性,使用 a-input 这个组件去编辑
  text: {
    text: '文本',
    component: 'a-input',
    afterTransform: (e: any) => e.target.value,
  },
  fontSize: {
    text: '字号',
    component: 'a-input-number',
    // 为了适配类型,进行一定的转换
    initalTransform: (v: string) => parseInt(v),
    afterTransform: (e: number) => e ? `${e}px` : '',
  },
  lineHeight: {
    text: '行高',
    component: 'a-slider',
    extraProps: {
      min: 0,
      max: 3,
      step: 0.1
    },
    initalTransform: (v: string) => parseFloat(v)
  },
  textAlign: {
    component: 'a-radio-group',
    subComponent: 'a-radio-button',
    text: '对齐',
    options: [
      {
        value: 'left',
        text: '左'
      },
      {
        value: 'center',
        text: '中'
      },
      {
        value: 'right',
        text: '右'
      }
    ],
    afterTransform: (e: any) => e.target.value
  },
  fontFamily: {
    component: 'a-select',
    subComponent: 'a-select-option',
    text: '字体',
    options: [
      {
        value: '',
        text: '无'
      },
      ...fontFamilyOptions
    ],
    afterTransform: (e: any) => e
  },
  color: {
    component: 'color-pick',
    text: '字体颜色',
    afterTransform: (e: any) => e
  }
}
const finalProps = computed(() => {
  // reduce是使用loadsh里面的
  return reduce(
    props.props,
    (result, value, key) => {
      const newKey = key as keyof AllComponentProps;
      const item = mapPropsToForms[newKey];
      if (item) {
       // v-model默认绑定的值,是value,可以自定义
       // v-model双向数据绑定的事件,默认是change事件,也可以自定义
       // initalTransform编辑前的value转换,为了适配类型,进行一定的转换
       // afterTransform 处理上双向数据绑定后的值。
        const {
          valueProp = 'value',
          eventName = 'change',
          initalTransform,
          afterTransform,
        } = item;
        const newItem: FormProps = {
          ...item,
          value: initalTransform ? initalTransform(value) : value,
          valueProp,
          eventName,
          events: {
            [eventName]: (e: any) => {
              context.emit('change', {
                key,
                value: afterTransform ? afterTransform(e) : e,
              });
            },
          },
        };
        result[newKey] = newItem;
      }
      return result;
    },
    {} as { [key: string]: FormProps }
  );
});
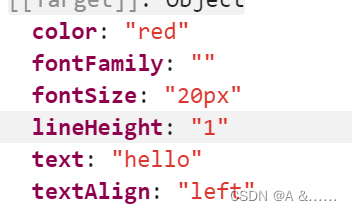
我们传递的props值是这样的:

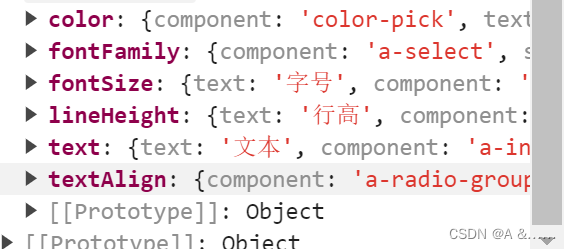
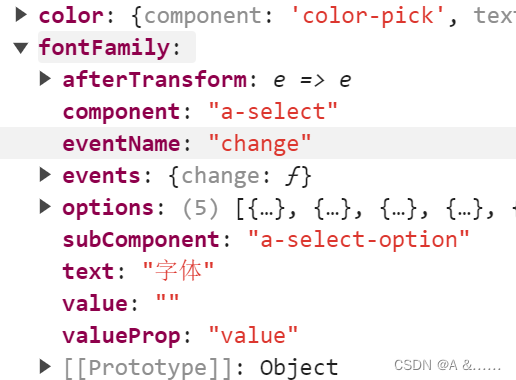
最终转换成出来的值是这样的


当组件内的change事件改变后,组件内部会触发
context.emit('change', { key, value: afterTransform ? afterTransform(e) : e,});
在父组件中接收change事件来改变stroe中的compoents的值
const handleChange = (e) => {
  console.log('event', e);
  store.commit('updateComponent', e)
}
在store中改变components属性
updateComponent(state, { id, key, value, isProps}) {
  const updatedComponent = state.components.find((component) => component.id === (id || state.currentElement)) as any
  if(updatedComponent) {
    updatedComponent.props[key as keyof TextComponentProps] = value;
  }
}
难点:
文章来源:https://blog.csdn.net/m0_47531829/article/details/135150581
本文来自互联网用户投稿,该文观点仅代表作者本人,不代表本站立场。本站仅提供信息存储空间服务,不拥有所有权,不承担相关法律责任。 如若内容造成侵权/违法违规/事实不符,请联系我的编程经验分享网邮箱:veading@qq.com进行投诉反馈,一经查实,立即删除!
本文来自互联网用户投稿,该文观点仅代表作者本人,不代表本站立场。本站仅提供信息存储空间服务,不拥有所有权,不承担相关法律责任。 如若内容造成侵权/违法违规/事实不符,请联系我的编程经验分享网邮箱:veading@qq.com进行投诉反馈,一经查实,立即删除!