OpenCV-Python(21):凸缺陷检测及点到多边形最短的距离求解
学习目标
- 凸缺陷的查找
- 求某一点到一个多边形的最短距离
- 不同形状的匹配
凸缺陷
????????前面我们已经学习了轮廓的凸包,对象上的任何凹陷都被成为凸缺陷。OpenCV 中有一个函数cv2.convexityDefect() 可以帮助我们找到凸缺。函数使用如下:
hull = cv2.convexHull(cnt,returnPoints = False)
defects = cv2.convexityDefects(cnt,hull)注意:如果查查找凸缺陷,在使用函数cv2.convexHull 找凸包时,参数returnPoints 一定要是False。?
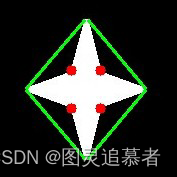
????????它会返回一个数组,其中每一行包含的值是[起点,终点,最远的点,到最远点的近似距离]。我们可以在一张图上显示它。我们将起点和终点用一条绿线连接,在最远点画一个圆圈,要记住的是返回结果的前三个值是轮廓点的索引。所以我们还要到轮廓点中去找它们。
import cv2
import numpy as np
img = cv2.imread('star.jpg')
img_gray = cv2.cvtColor(img,cv2.COLOR_BGR2GRAY)
ret, thresh = cv2.threshold(img_gray, 127, 255,0)
contours,hierarchy = cv2.findContours(thresh,2,1)
cnt = contours[0]
hull = cv2.convexHull(cnt,returnPoints = False)
defects = cv2.convexityDefects(cnt,hull)
for i in range(defects.shape[0]):
    s,e,f,d = defects[i,0]
    start = tuple(cnt[s][0])
    end = tuple(cnt[e][0])
    far = tuple(cnt[f][0])
cv2.line(img,start,end,[0,255,0],2)
cv2.circle(img,far,5,[0,0,255],-1)
cv2.imshow('img',img)
cv2.waitKey(0)
cv2.destroyAllWindows()
结果如下:?

点多边形测试?
? ? ? ? ?点多边形测试(Point Polygon Test)是求解图像中的一个点到一个对象轮廓的最短距离。如果点在轮廓的外面,返回值为负;如果在轮廓上,返回值为0;如果在廓内,返回值为正。
下面我们以点(50,50)为例:
dist = cv2.pointPolygonTest(cnt,(50,50),True)????????此函数的第三个参数是measureDist。如果设置为True,就会计算最短距离。如果是False,只会判断这个点与轮廓之间的位置关系,返回值为(+1,-1,0)
注意:如果你不知道具体距离,建议你将第三个参数设置为False,这样速度会度会提高2到3倍。
形状匹配
????????函数cv2.matchShape() 可以帮我们比较两个形状或轮廓的相似度。如果返回值越小,匹配度越好。它是根据Hu 矩来计算的。文档中对不同的方法都有解释。我们试着将下面的图形进行比较:
import cv2
import numpy as np

img1 = cv2.imread('star.jpg',0)
img2 = cv2.imread('star2.jpg',0)

ret, thresh = cv2.threshold(img1, 127, 255,0)
ret, thresh2 = cv2.threshold(img2, 127, 255,0)

contours,hierarchy = cv2.findContours(thresh,2,1)
cnt1 = contours[0]
contours,hierarchy = cv2.findContours(thresh2,2,1)
cnt2 = contours[0]

ret = cv2.matchShapes(cnt1,cnt2,1,0.0)
print (ret)

我得到的结果是:
? A 与自己匹配度 0.0
? A 与B 匹配度 0.001946
? A 与C 匹配度 0.326911

看到了吧,即使发生了旋转对匹配的结果影响也不是非常大。?

示例
? ? ? ? 1.创建一个小程序,可以将图片上的点绘制成不同的颜色,颜色是根据这个点到轮廓的距离来决定的。要使用的函数:cv2.pointPolygonTest()。
以下是一个示例代码,演示如何使用cv2.pointPolygonTest()函数根据点到轮廓的距离来确定颜色:
import cv2
import numpy as np

# 加载图像
image = cv2.imread('image.jpg')

# 将图像转为灰度图像
gray = cv2.cvtColor(image, cv2.COLOR_BGR2GRAY)

# 二值化图像
_, binary = cv2.threshold(gray, 127, 255, cv2.THRESH_BINARY_INV)

# 查找轮廓
contours, _ = cv2.findContours(binary, cv2.RETR_EXTERNAL, cv2.CHAIN_APPROX_SIMPLE)

# 创建一个空白图像
result = np.zeros_like(image)

# 绘制轮廓
cv2.drawContours(result, contours, -1, (255, 255, 255), 2)

# 遍历图像上的每个点
for y in range(result.shape[0]):
    for x in range(result.shape[1]):
        # 计算点到轮廓的距离
        distance = cv2.pointPolygonTest(contours[0], (x, y), True)

        # 根据距离设置颜色
        if distance > 0:
            result[y, x] = (0, 0, 255)  # 蓝色
        elif distance < 0:
            result[y, x] = (0, 255, 0)  # 绿色
        else:
            result[y, x] = (255, 0, 0)  # 红色

# 显示图像
cv2.imshow("Distance to Contour", result)
cv2.waitKey(0)
cv2.destroyAllWindows()
在上述代码中,首先加载图像,并将图像转换为灰度图像。然后使用cv2.threshold()函数对灰度图像进行二值化处理,得到二值图像binary。接下来使用cv2.findContours()函数查找轮廓,并将轮廓保存在contours中。然后创建一个空白图像result,并使用cv2.drawContours()函数绘制轮廓。接着使用两层循环遍历图像上的每个点,对每个点使用cv2.pointPolygonTest()函数计算该点到轮廓的距离,根据距离设置点的颜色。
最后,显示图像。点到轮廓的距离为正数表示点在轮廓的外部,为负数表示点在轮廓的内部,为零表示点在轮廓上。根据距离的正负,我们将点的颜色设置为蓝色、绿色或红色。请确保将代码中的image.jpg替换为你要处理的图像文件的路径。
2. 使用函数cv2.matchShapes() 匹配带有字母或者数字的图片。?
以下是一个使用cv2.matchShapes()函数匹配带有字母或数字的图片的示例代码:
import cv2
import numpy as np

# 加载模板图像
template = cv2.imread('template.jpg', 0)

# 加载目标图像
target = cv2.imread('target.jpg', 0)

# 二值化模板图像和目标图像
_, template_binary = cv2.threshold(template, 127, 255, cv2.THRESH_BINARY)
_, target_binary = cv2.threshold(target, 127, 255, cv2.THRESH_BINARY)

# 查找模板图像和目标图像的轮廓
template_contours, _ = cv2.findContours(template_binary, cv2.RETR_EXTERNAL, cv2.CHAIN_APPROX_SIMPLE)
target_contours, _ = cv2.findContours(target_binary, cv2.RETR_EXTERNAL, cv2.CHAIN_APPROX_SIMPLE)

# 计算模板图像和目标图像的Hu矩
template_hu_moments = cv2.HuMoments(cv2.moments(template_contours[0])).flatten()
target_hu_moments = cv2.HuMoments(cv2.moments(target_contours[0])).flatten()

# 计算模板图像和目标图像的形状匹配分数
match_score = cv2.matchShapes(template_contours[0], target_contours[0], cv2.CONTOURS_MATCH_I1, 0)

# 输出结果
print("Hu Moments of Template Image: ", template_hu_moments)
print("Hu Moments of Target Image: ", target_hu_moments)
print("Shape Matching Score: ", match_score)
在上述代码中,首先加载模板图像和目标图像,并将它们转换为灰度图像。然后使用cv2.threshold()函数对模板图像和目标图像进行二值化处理,得到二值图像template_binary和target_binary。
接下来使用cv2.findContours()函数查找模板图像和目标图像的轮廓,并将轮廓保存在template_contours和target_contours中。
然后计算模板图像和目标图像的Hu矩,使用cv2.moments()函数计算图像的矩,再使用cv2.HuMoments()函数计算Hu矩,并将其展平为一维数组。
最后使用cv2.matchShapes()函数计算模板图像和目标图像的形状匹配分数。cv2.matchShapes()函数的第一个参数是模板图像的轮廓,第二个参数是目标图像的轮廓,第三个参数是形状匹配方法,第四个参数是匹配时的数值参数。请确保将代码中的template.jpg和target.jpg替换为你要处理的模板图像和目标图像的路径。
本文来自互联网用户投稿,该文观点仅代表作者本人,不代表本站立场。本站仅提供信息存储空间服务,不拥有所有权,不承担相关法律责任。 如若内容造成侵权/违法违规/事实不符,请联系我的编程经验分享网邮箱:veading@qq.com进行投诉反馈,一经查实,立即删除!