springboot整合gateway网关
一、网关基本概念
1、API网关介绍
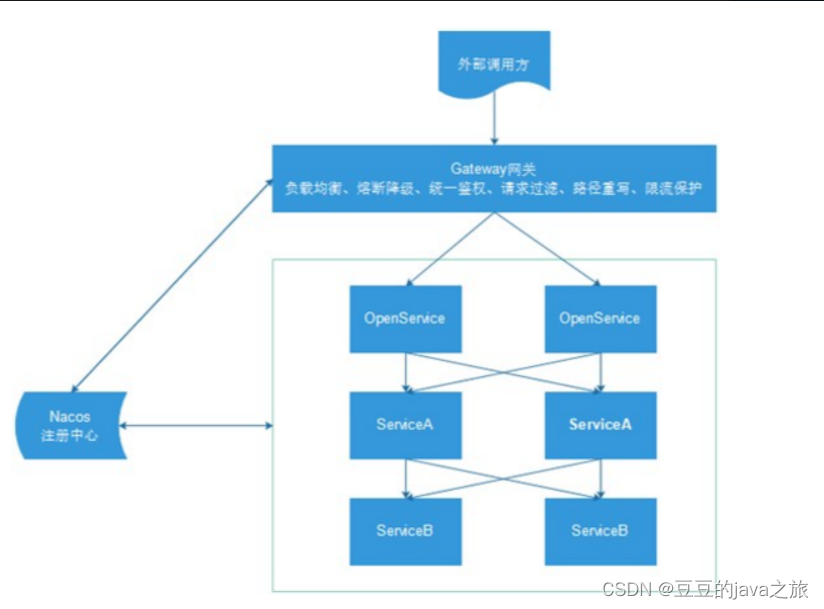
API 网关出现的原因是微服务架构的出现,不同的微服务一般会有不同的网络地址,而外部客户端可能需要调用多个服务的接口才能完成一个业务需求,如果让客户端直接与各个微服务通信,会有以下的问题:
(1)客户端会多次请求不同的微服务,增加了客户端的复杂性。
(2)存在跨域请求,在一定场景下处理相对复杂。
(3)认证复杂,每个服务都需要独立认证。
(4)难以重构,随着项目的迭代,可能需要重新划分微服务。例如,可能将多个服务合并成一个或者将一个服务拆分成多个。如果客户端直接与微服务通信,那么重构将会很难实施。
(5)某些微服务可能使用了防火墙 / 浏览器不友好的协议,直接访问会有一定的困难。
以上这些问题可以借助 API 网关解决。API 网关是介于客户端和服务器端之间的中间层,所有的外部请求都会先经过 API 网关这一层。也就是说,API 的实现方面更多的考虑业务逻辑,而安全、性能、监控可以交由 API 网关来做,这样既提高业务灵活性又不缺安全性
2、Spring Cloud Gateway
Spring cloud gateway是spring官方基于Spring 5.0、Spring Boot2.0和Project Reactor等技术开发的网关,Spring Cloud Gateway旨在为微服务架构提供简单、有效和统一的API路由管理方式,Spring Cloud Gateway作为Spring Cloud生态系统中的网关,目标是替代Netflix Zuul,其不仅提供统一的路由方式,并且还基于Filer链的方式提供了网关基本的功能,例如:安全、监控/埋点、限流等。
 3、Spring Cloud Gateway核心概念
网关提供API全托管服务,丰富的API管理功能,辅助企业管理大规模的API,以降低管理成本和安全风险,包括协议适配、协议转发、安全策略、防刷、流量、监控日志等贡呢。一般来说网关对外暴露的URL或者接口信息,我们统称为路由信息。如果研发过网关中间件或者使用过Zuul的人,会知道网关的核心是Filter以及Filter Chain(Filter责任链)。Sprig Cloud Gateway也具有路由和Filter的概念。下面介绍一下Spring Cloud Gateway中几个重要的概念。
(1)路由。路由是网关最基础的部分,路由信息有一个ID、一个目的URL、一组断言和一组Filter组成。如果断言路由为真,则说明请求的URL和配置匹配
(2)断言。Java8中的断言函数。Spring Cloud Gateway中的断言函数输入类型是Spring5.0框架中的ServerWebExchange。Spring Cloud Gateway中的断言函数允许开发者去定义匹配来自于http request中的任何信息,比如请求头和参数等。
(3)过滤器。一个标准的Spring webFilter。Spring cloud gateway中的filter分为两种类型的Filter,分别是Gateway Filter和Global Filter。过滤器Filter将会对请求和响应进行修改处理
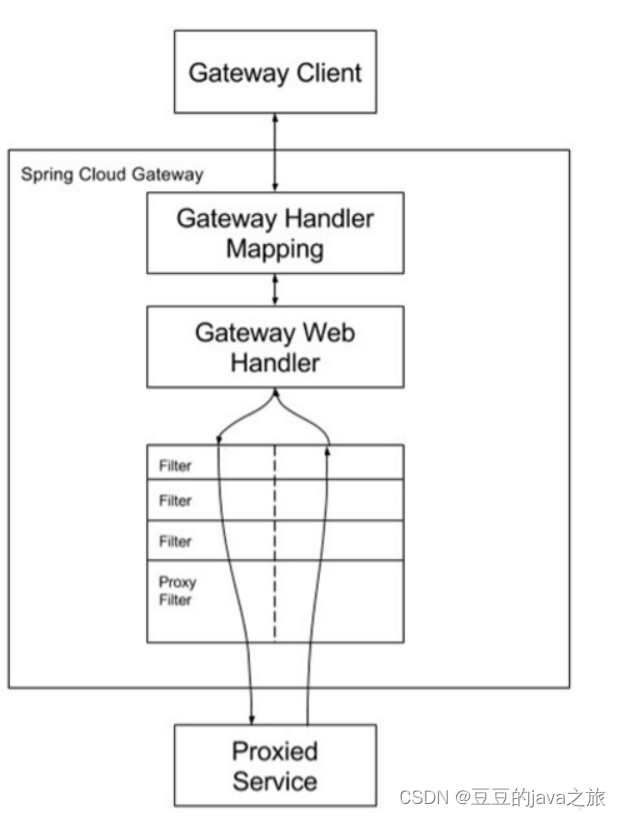
 如图所示,Spring cloud Gateway发出请求。然后再由Gateway Handler Mapping中找到与请求相匹配的路由,将其发送到Gateway web handler。Handler再通过指定的过滤器链将请求发送到实际的服务执行业务逻辑,然后返回。
二,整合与应用
gatway网关的原则是基于微服务,在微服务的基础上匹配寻找对应匹配的路径位置,他相比于nginx更加灵活,nginx具有繁琐的配置,用它实现返向代理需要去配置文件配置,并且url的端口号是写死的,而网关的出现解决了这一问题,更加灵活,只需要根据配置的微服务名去匹配就可以了,鉴于此,因此需要也将gatway网关注册到注册中心,方便进行寻址调用
1.整合
1.1创建maven项目,引入依赖
项目的公共包,gatway的依赖,注册中心的依赖
 <dependencies>
        <dependency>
            <groupId>com.atguigu</groupId>
            <artifactId>公共依赖</artifactId>
            <version>0.0.1-SNAPSHOT</version>
        </dependency>
        <dependency>
            <groupId>org.springframework.cloud</groupId>
            <artifactId>spring-cloud-starter-gateway</artifactId>
        </dependency>
        <!-- 服务注册 -->
        <dependency>
            <groupId>com.alibaba.cloud</groupId>
            <artifactId>spring-cloud-starter-alibaba-nacos-discovery</artifactId>
        </dependency>
    </dependencies>
1.2创建配置文件
配置文件由以下几部分组成
①端口号 尽量避免80端口的占用
②网关微服务的名称
③注册中心的地址
④网关的相关配置 断言,id,路由
# 服务端口
server.port=8222
# 服务名
spring.application.name=service-gateway

# nacos服务地址
spring.cloud.nacos.discovery.server-addr=127.0.0.1:8848

#使用服务发现路由
spring.cloud.gateway.discovery.locator.enabled=true

#############先根据断言匹配,如果定义的断言全部为true则根据uri去寻找对应的地址访问###########
#设置路由id
spring.cloud.gateway.routes[0].id=service-hosp
#设置路由的uri
spring.cloud.gateway.routes[0].uri=lb://service-hosp
#设置路由断言,代理servicerId为auth-service的/auth/路径
spring.cloud.gateway.routes[0].predicates= Path=/*/**hosp**/**

#设置路由id
spring.cloud.gateway.routes[1].id=service-cmn
#设置路由的uri
spring.cloud.gateway.routes[1].uri=lb://service-cmn
#设置路由断言,代理servicerId为auth-service的/auth/路径
spring.cloud.gateway.routes[1].predicates= Path=/*/cmn/**
1.3创建主启动类
@springbootapplicayion
2.应用
2.1使用网关解决跨域问题
创建配置类,并注册对应的bean
@Configuration
public class CorsConfig {
    @Bean
    public CorsWebFilter corsWebFilter(){

        // cors跨域配置对象
        CorsConfiguration configuration = new CorsConfiguration();
        configuration.addAllowedOrigin("*"); //设置允许访问的网络
        configuration.setAllowCredentials(true); // 设置是否从服务器获取cookie
        configuration.addAllowedMethod("*"); // 设置请求方法 * 表示任意
        configuration.addAllowedHeader("*"); // 所有请求头信息 * 表示任意

        // 配置源对象
        UrlBasedCorsConfigurationSource configurationSource = new UrlBasedCorsConfigurationSource();
        configurationSource.registerCorsConfiguration("/**", configuration);
        // cors过滤器对象
        return new CorsWebFilter(configurationSource);
    }
}
注意:如果在之前通过使用@corsorign注解来实现跨域,因此这里需要全部的取消此注解,也就意味着跨域方式的存在只能有一个,一山不容二虎.
2.2、全局Filter
@Component
public class AuthGlobalFilter implements GlobalFilter, Ordered {

    private AntPathMatcher antPathMatcher = new AntPathMatcher();

    @Override
    public Mono<Void> filter(ServerWebExchange exchange, GatewayFilterChain chain) {
        ServerHttpRequest request = exchange.getRequest();
        String path = request.getURI().getPath();
        //api接口,校验必须登录
        if(antPathMatcher.match("/testuser/**/auth/**", path)) {
            List<String> tokenList = request.getHeaders().get("token");
            if(null == tokenList) {
                ServerHttpResponse response = exchange.getResponse();
                return out(response);
            } else {
//                Boolean isCheck = JwtUtils.checkToken(tokenList.get(0));
//                if(!isCheck) {
                    ServerHttpResponse response = exchange.getResponse();
                    return out(response);
//                }
            }
        }
        //内部服务接口,不允许外部访问
        if(antPathMatcher.match("/**/inner/**", path)) {
            ServerHttpResponse response = exchange.getResponse();
            return out(response);
        }
        return chain.filter(exchange);
    }

    @Override
    public int getOrder() {
        return 0;
    }

    private Mono<Void> out(ServerHttpResponse response) {
        JsonObject message = new JsonObject();
        message.addProperty("success", false);
        message.addProperty("code", 28004);
        message.addProperty("data", "鉴权失败");
        byte[] bits = message.toString().getBytes(StandardCharsets.UTF_8);
        DataBuffer buffer = response.bufferFactory().wrap(bits);
        //response.setStatusCode(HttpStatus.UNAUTHORIZED);
        //指定编码,否则在浏览器中会中文乱码
        response.getHeaders().add("Content-Type", "application/json;charset=UTF-8");
        return response.writeWith(Mono.just(buffer));
    }
}
2.3统一处理异常
服务网关调用服务时可能会有一些异常或服务不可用,它返回错误信息不友好,需要我们覆盖处理
ErrorHandlerConfig:
@Configuration
@EnableConfigurationProperties({ServerProperties.class, ResourceProperties.class})
public class ErrorHandlerConfig {

    private final ServerProperties serverProperties;

    private final ApplicationContext applicationContext;

    private final ResourceProperties resourceProperties;

    private final List<ViewResolver> viewResolvers;

    private final ServerCodecConfigurer serverCodecConfigurer;

    public ErrorHandlerConfig(ServerProperties serverProperties,
                                     ResourceProperties resourceProperties,
                                     ObjectProvider<List<ViewResolver>> viewResolversProvider,
                                        ServerCodecConfigurer serverCodecConfigurer,
                                     ApplicationContext applicationContext) {
        this.serverProperties = serverProperties;
        this.applicationContext = applicationContext;
        this.resourceProperties = resourceProperties;
        this.viewResolvers = viewResolversProvider.getIfAvailable(Collections::emptyList);
        this.serverCodecConfigurer = serverCodecConfigurer;
    }

    @Bean
    @Order(Ordered.HIGHEST_PRECEDENCE)
    public ErrorWebExceptionHandler errorWebExceptionHandler(ErrorAttributes errorAttributes) {
        JsonExceptionHandler exceptionHandler = new JsonExceptionHandler(
                errorAttributes,
                this.resourceProperties,
                this.serverProperties.getError(),
                this.applicationContext);
        exceptionHandler.setViewResolvers(this.viewResolvers);
        exceptionHandler.setMessageWriters(this.serverCodecConfigurer.getWriters());
        exceptionHandler.setMessageReaders(this.serverCodecConfigurer.getReaders());
        return exceptionHandler;
    }
}
JsonExceptionHandler:
/**
 * 自定义异常处理
 *
 * <p>异常时用JSON代替HTML异常信息<p>
 *
 */
public class JsonExceptionHandler extends DefaultErrorWebExceptionHandler {

    public JsonExceptionHandler(ErrorAttributes errorAttributes, ResourceProperties resourceProperties,
                                ErrorProperties errorProperties, ApplicationContext applicationContext) {
        super(errorAttributes, resourceProperties, errorProperties, applicationContext);
    }

    /**
     * 获取异常属性
     */
    @Override
    protected Map<String, Object> getErrorAttributes(ServerRequest request, boolean includeStackTrace) {
        Map<String, Object> map = new HashMap<>();
        map.put("success", false);
        map.put("code", 20005);
        map.put("message", "网关失败");
        map.put("data", null);
        return map;
    }

    /**
     * 指定响应处理方法为JSON处理的方法
     * @param errorAttributes
     */
    @Override
    protected RouterFunction<ServerResponse> getRoutingFunction(ErrorAttributes errorAttributes) {
        return RouterFunctions.route(RequestPredicates.all(), this::renderErrorResponse);
    }

    /**
     * 根据code获取对应的HttpStatus
     * @param errorAttributes
     */
    @Override
    protected HttpStatus getHttpStatus(Map<String, Object> errorAttributes) {
        return HttpStatus.OK;
    }
}
本文来自互联网用户投稿,该文观点仅代表作者本人,不代表本站立场。本站仅提供信息存储空间服务,不拥有所有权,不承担相关法律责任。 如若内容造成侵权/违法违规/事实不符,请联系我的编程经验分享网邮箱:veading@qq.com进行投诉反馈,一经查实,立即删除!