微信小程序图片压缩原来这么easy!
前言
在日常业务中我们可能会涉及到图片上传功能,现代影像设备大多数的照片都是几MB,甚至几十MB大小,大文件的上传会导致上传进度缓慢、占用云存储空间。所以,我们会根据需求来做图片压缩,将过大的图片文件压缩到指定大小内。
微信提供了一个图片压缩API: wx.compressImage(Object object)
该API在IOS设备上仅支持压缩 JPG 格式图片,所以想要适配多机型、多格式的图片压缩,需要使用canvas标签,对图片进行重新绘制并导出。
canvas API 微信小程序更新过好多版,且很多API已经是停止维护状态。

自基础库2.9.0起,微信小程序提供 canvas 2d 接口(需指定 type 属性),同时支持同层渲染,原有接口不再维护。
接下来,我们对 Canvas 2D 图片压缩进行说明,同时 Canvas 2D 的部分内容会有提及。
开始
在开始之前,需要先了解这些知识:
使用 canvas 2d 时,我们需要在页面指定一个 canvas 标签
<view class="container">
  <canvas id="myCanvas" class="canvas-case" type="2d" style="border: 1px solid; width: 300px; height: 150px;" />
</view>
如果你仅仅只需要用到图片压缩功能,那么可以将 canvas 标签移到不可见的位置
.canvas-case{
  position: absolute;
  left: 0;
  top: 1000px;
}
我们通过获取元素节点的方式来获取 canvas 对象
const query = this.createSelectorQuery()
let dom = query.select('#myCanvas') // 获取 canvas 元素
在使用 canvas 前我们要先计算图片大小,计算公式如下:
计算图片当前大小和目标大小的比例:目标大小 / 图片当前大小
根据比例调整图片的尺寸:
新宽度 = 原始宽度 * √(目标大小 / 图片当前大小)
新高度 = 原始高度 * √(目标大小 / 图片当前大小)
// 宽度 > 最大限宽 -> 重置尺寸
if (width > config.maxWidth) {
    const ratio = config.maxWidth / width
    width = config.maxWidth
    height = height * ratio
}
// 高度 > 最大限高度 -> 重置尺寸
if (height > config.maxHeight) {
    const ratio = config.maxHeight / height
    width = width * ratio
    height = config.maxHeight
}
图片压缩
了解前面的知识后,我们开始通过 canvas 实现图片压缩
/**
  * 图片压缩
  * @param {object} file 图片信息:width、height、type、path
  * @param {string} canvasId canvas的id名
  * @param {object} config 限制最大宽高
  * @returns 压缩完成后的图片path
*/
async contraction(file, canvasId, config = { maxWidth: 1024, maxHeight: 768 }) {
  try {
        let ctxInfo = await new Promise((resolve, reject) => {
        // 获取图片原始宽高
        let width = file.width
        let height = file.height

        // 计算图片当前大小和目标大小的比例:目标大小 / 图片当前大小
        // 根据比例调整图片的尺寸:
        // 新宽度 = 原始宽度 * √(目标大小 / 图片当前大小)
        // 新高度 = 原始高度 * √(目标大小 / 图片当前大小)
        // 宽高同比例调整
        // 宽度 > 最大限宽 -> 重置尺寸
        if (width > config.maxWidth) {
            const ratio = config.maxWidth / width
            width = config.maxWidth
            height = height * ratio
        }
        // 高度 > 最大限高度 -> 重置尺寸
        if (height > config.maxHeight) {
            const ratio = config.maxHeight / height
            width = width * ratio
            height = config.maxHeight
        }

        // 获取canvas元素
        const query = this.createSelectorQuery()
        let dom = query.select(`#${canvasId}`)
        dom.fields({ node: true, size: true })
        .exec((res) => {
            // Canvas 对象
            const canvas = res[0].node
            // 渲染上下文
            const ctx = canvas.getContext('2d')

            // 根据设备像素比处理尺寸 = 大小 * 设备像素
            const dpr = wx.getSystemInfoSync().pixelRatio
            canvas.width = width * dpr
            canvas.height = height * dpr
            ctx.scale(dpr, dpr)

            //创建img对象
            let img = canvas.createImage();
            img.src = file.path; // 给图片添加路径
            //图片加载完毕
            img.onload = function () {
            // 将图片绘制到 canvas
            ctx.drawImage(img, 0, 0, width, height)
            // 生成图片
            wx.canvasToTempFilePath({
                   canvas,
                   x: 0,
                   y: 0,
                   destWidth: width,
                   destHeight: height,
                   success(res) {
                           resolve(res); // 生成临时文件路径
                    }
                 })
                }
              })
            })
       return ctxInfo
  } catch (err) { console.log(err); }
},
拆解上面的代码:
1、压缩图片大小,重置宽高
2、通过const canvas = res[0].node 创建 canvas 对象
3、通过 const ctx = canvas.getContext('2d') 渲染上下文
4、然后获取当前设备信息,给canvas设置尺寸大小,公式为:(宽&高) * 设备像素比, 防止图像失真
5、创建img对象,给img对象添加图片路径
6、图片加载完毕后,将图片绘制到canvas
7、生成图片
你可能会需要获取图片尺寸信息,例如:宽、高、图片类型、图片地址等,这里我封装了一个获取图片信息的函数,你只需要传入图片地址就可以获得图片信息。
/* 获取图片信息
 * @param {string} tempFilePath 图片路径
 * @returns 图片信息
 */
async getImgInfo(tempFilePath) {
	try {
		let image = await new Promise((resolve, reject) => {
			wx.getImageInfo({
				src: tempFilePath,
				success(res) {
					let imgInfo = {
						type: res.type,
						height: res.height,
						width: res.width,
						path: res.path
					}
					resolve(imgInfo)
				},
				fail(err) {
					reject(err)
				}
			})
		})
		return image
	} catch (err) { console.log(err); }
},
实际调用:
async afterRead(file) {
	let imgInfo = await this.getImgInfo(file.tempFilePath);  // 获取图片信息
  let ctxInfo = await this.contraction(imgInfo, 'myCanvas');  // 图片压缩
  // 后续保存操作.....
}
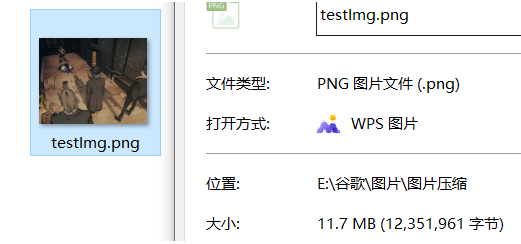
压缩前:

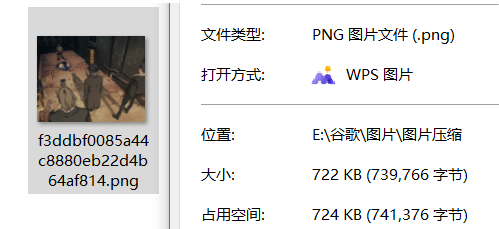
压缩后:

如果你觉得本文章不错,欢迎点赞👍、收藏💖、转发?哦~
阅读其它:
css绘制一个Pinia小菠萝
Module理解及使用
深入理解Promise
运算符:指数-链判断-Null判断-逻辑赋值
微信小程序动态生成表单来啦!你再也不需要手写表单了!
本文来自互联网用户投稿,该文观点仅代表作者本人,不代表本站立场。本站仅提供信息存储空间服务,不拥有所有权,不承担相关法律责任。 如若内容造成侵权/违法违规/事实不符,请联系我的编程经验分享网邮箱:veading@qq.com进行投诉反馈,一经查实,立即删除!