数字图像处理(实践篇)二十 人脸特征提取
2023-12-13 07:30:21
目录
使用face_recognition进行人脸特征提取.
1 安装face_recognition
pip install face_recognition或者
pip --default-timeout=100 install face_recognition -i http://pypi.douban.com/simple --trusted-host pypi.douban.com第二种方式安装得更快。
2 涉及的函数
- face_recognition.api.load_image_file()函数
face_recognition.api.load_image_file(file, mode='RGB')函数功能:下载图片文件(.jpg ?.png等)转成numpy array。
输入:
①file:要加载的图像文件名或文件对象
②mode:将图像转换成的格式。支持“RGB”(8位,3通道)和“L”(黑白)
返回:
①Numpy array 的图像内容。
- face_recognition.api.face_landmarks()函数
face_recognition.api.face_landmarks(face_image, face_locations=None, model='large')函数功能:返回图片中的每张人脸的人脸特征定位(眼睛,鼻子等)。
参数:
①face_image:输入的图片。
②face_locations:-可选-每个人脸的定位(已知)。
③model:-可选-使用的模型。
“large”为默认;“small”返回5点,但是更快。
返回:
面部特征位置(眼睛、鼻子等)的字典。
3 实践
实践①:large
- 代码
from PIL import Image, ImageDraw
import cv2
import matplotlib.pyplot as plt
import face_recognition
def dealImg(img):
b, g, r = cv2.split(img)
img_rgb = cv2.merge([r, g, b])
return img_rgb
def dealImageResult(img_path):
im = cv2.imread(img_path)
image = face_recognition.load_image_file(img_path)
# 查找图像中所有面部的所有面部特征
face_landmarks_list = face_recognition.face_landmarks(image, model='large')
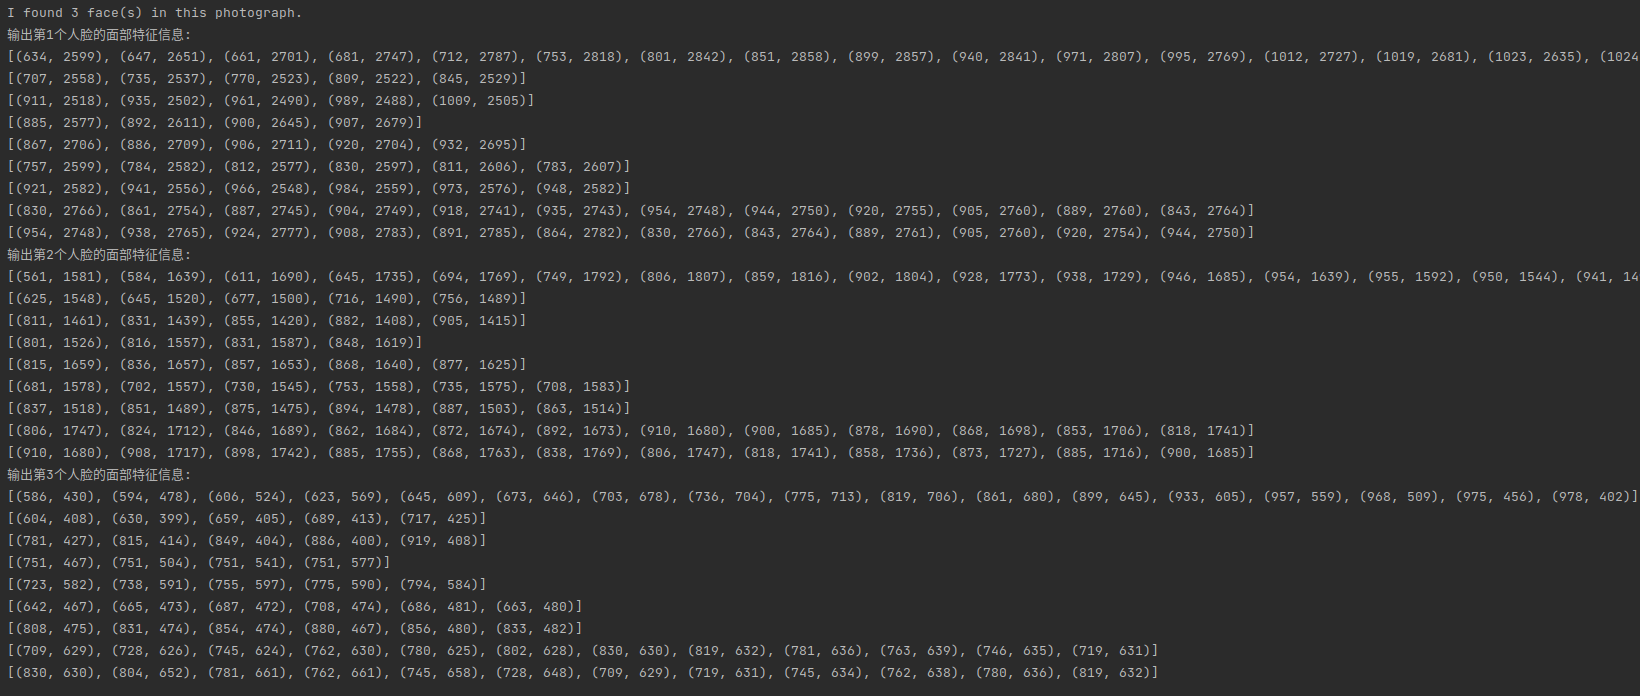
print("I found {} face(s) in this photograph.".format(len(face_landmarks_list)))
pil_image = Image.fromarray(image)
d = ImageDraw.Draw(pil_image)
for i, face_landmarks in enumerate(face_landmarks_list):
print("输出第{}个人脸的面部特征信息:".format(i+1))
print(face_landmarks_list[i]["chin"])
print(face_landmarks_list[i]["left_eyebrow"])
print(face_landmarks_list[i]["right_eyebrow"])
print(face_landmarks_list[i]["nose_bridge"])
print(face_landmarks_list[i]["nose_tip"])
print(face_landmarks_list[i]["left_eye"])
print(face_landmarks_list[i]["right_eye"])
print(face_landmarks_list[i]["top_lip"])
print(face_landmarks_list[i]["bottom_lip"])
facial_features = [
'chin',
'left_eyebrow',
'right_eyebrow',
'nose_bridge',
'nose_tip',
'left_eye',
'right_eye',
'top_lip',
'bottom_lip'
]
for facial_feature in facial_features:
d.line(face_landmarks[facial_feature], (0, 255, 255), width=8)
pass
pass
del d
im = dealImg(im)
fig = plt.figure(figsize=(10, 10))
titles = ["img", "large_result"]
images = [im, pil_image]
for i in range(2):
plt.subplot(1, 2, i + 1), plt.imshow(images[i], "gray")
plt.title("{}".format(titles[i]), fontsize=20, ha='center')
plt.xticks([]), plt.yticks([])
# plt.subplots_adjust(left=None, bottom=None, right=None, top=None, wspace=0.3, hspace=0)
# plt.tight_layout()
plt.show()
fig.savefig('test_results.jpg', bbox_inches='tight')
if __name__ == '__main__':
dealImageResult("Test.jpg")
pass- 效果图

实践②:small
- 代码
from PIL import Image, ImageDraw
import cv2
import matplotlib.pyplot as plt
import face_recognition
def dealImg(img):
b, g, r = cv2.split(img)
img_rgb = cv2.merge([r, g, b])
return img_rgb
def dealImageResult(img_path):
im = cv2.imread(img_path)
image = face_recognition.load_image_file(img_path)
# 查找图像中所有面部的所有面部特征
face_landmarks_list = face_recognition.face_landmarks(image, model='small')
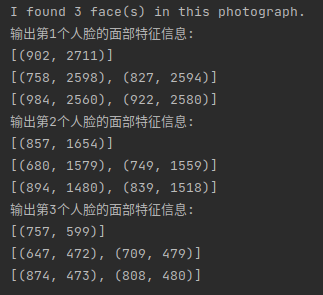
print("I found {} face(s) in this photograph.".format(len(face_landmarks_list)))
pil_image = Image.fromarray(image)
d = ImageDraw.Draw(pil_image)
for i, face_landmarks in enumerate(face_landmarks_list):
print("输出第{}个人脸的面部特征信息:".format(i+1))
print(face_landmarks_list[i]["nose_tip"])
print(face_landmarks_list[i]["left_eye"])
print(face_landmarks_list[i]["right_eye"])
facial_features = [
'nose_tip',
'left_eye',
'right_eye',
]
for facial_feature in facial_features:
d.line(face_landmarks[facial_feature], (0, 255, 255), width=8)
pass
pass
del d
im = dealImg(im)
fig = plt.figure(figsize=(10, 10))
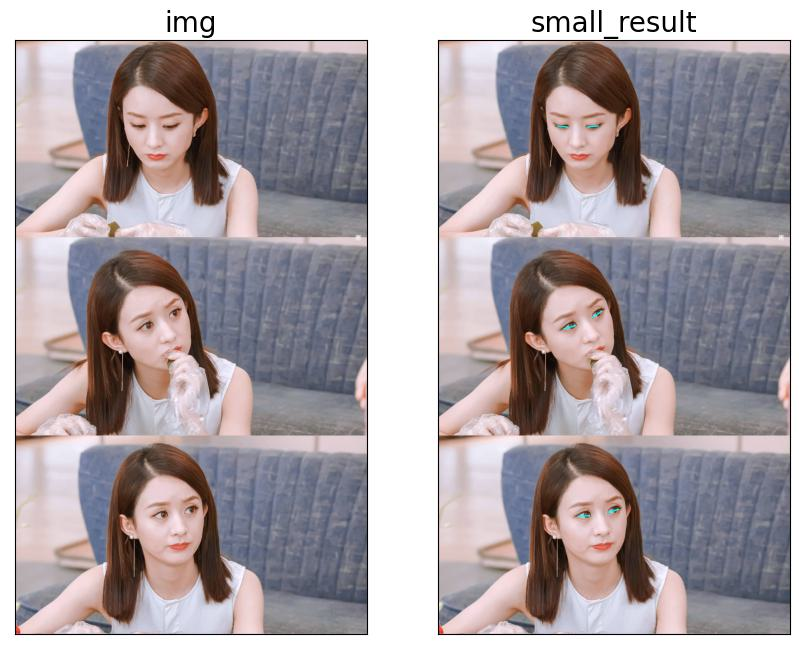
titles = ["img", "small_result"]
images = [im, pil_image]
for i in range(2):
plt.subplot(1, 2, i + 1), plt.imshow(images[i], "gray")
plt.title("{}".format(titles[i]), fontsize=20, ha='center')
plt.xticks([]), plt.yticks([])
# plt.subplots_adjust(left=None, bottom=None, right=None, top=None, wspace=0.3, hspace=0)
# plt.tight_layout()
plt.show()
fig.savefig('test_results.jpg', bbox_inches='tight')
if __name__ == '__main__':
dealImageResult("Test.jpg")
pass- 效果图
?
前文回顾
?入门篇目录
实践篇目录
数字图像处理(实践篇)一 将图像中的指定目标用bBox框起来吧!
数字图像处理(实践篇)四 图像拼接-基于SIFT特征点和RANSAC方法
数字图像处理(实践篇)五 使用Grabcut算法进行物体分割
文章来源:https://blog.csdn.net/wss794/article/details/134922060
本文来自互联网用户投稿,该文观点仅代表作者本人,不代表本站立场。本站仅提供信息存储空间服务,不拥有所有权,不承担相关法律责任。 如若内容造成侵权/违法违规/事实不符,请联系我的编程经验分享网邮箱:veading@qq.com进行投诉反馈,一经查实,立即删除!
本文来自互联网用户投稿,该文观点仅代表作者本人,不代表本站立场。本站仅提供信息存储空间服务,不拥有所有权,不承担相关法律责任。 如若内容造成侵权/违法违规/事实不符,请联系我的编程经验分享网邮箱:veading@qq.com进行投诉反馈,一经查实,立即删除!