Spring-AOP
简介
AOP定义
(1)AOP 面向切面的编程, 利用AOP可以对业务逻辑的各个部分进行隔离,从而使得业务逻辑各部分之间的耦合度减低, 提高程序的可重用性,同时提高了开发的效率
(2) 通俗描述: 不通过修改源代码的方式, 在主干功能里 添加新功能
?AOP(术语)
# 1.连接点
类里面哪些方法可以被增强,这些方法称为 连接点
# 2.切入点
实际被真正 增强的方法,称为 切入点
# 3.通知(增强)
(1)实际增强的逻辑部分称为通知(增强)
(2)通知有多种类型
前置通知
后置通知
环绕通知
异常通知
最终通知
# 4.切面
是动作,
(1)把通知应用到切入点过程?
AOP操作(准备)?
1.spring 框架一般都是基于AspectJ实现AOP操作
(1)什么是AspectJ?
AspectJ不是Spring组成部分,独立AOP框架,一般把AspectJ与spring框架一起使用,进行AOP操作2.基于AspectJ实现AOP操作
(1) 基于xml配置文件方式
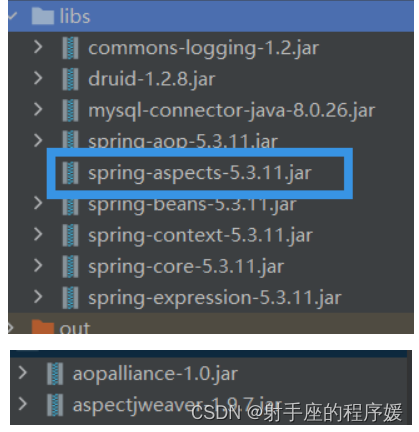
(2)基于注解方式实现---推荐3.在项目中 引入AOP相关依赖:
aopalliance.jar ? ?, aspectjweaver.jar , spring-aspects.jar4.切入点 表达式
(1) 切入点表达式作用: 知道对哪个类里面的哪个方法进行增强
(2) 语法结构
execution([权限修饰符][返回类型][类全路径][方法名]([参数列表]))
举例1: 对 com.ly.dao.BookDao 类里面的add进行增强
execution(* com.ly.dao.BookDao.add(..))
举例2: 对 com.ly.dao.BookDao 类里面的所以方法进行增强
execution(* com.ly.dao.BookDao.*(..))
举例3: 对 com.ly.dao.包里所有类,类里面的所以方法进行增强
execution(* com.ly.dao.*.*(..))?
?添加?
AOP操作(基于AspectJ注解)
1.创建类,在类里定义方法
package com.ly.aop.anno;

public class User {
    public void add(){
        System.out.println("add  .....");
    }
}
2.创建增强类,编写增强逻辑
(1)在增强类里面,创建方法,让不同方法代表不同通知类型
package com.ly.aop.anno;
//增强的类
public class UserProxy {

    //前置通知
    public void before(){
        System.out.println("before ........");
    }
}
进行通知的配置
(1) 在spring配置文件中,开启注解扫描
配置文件中 引入 context与aop 命名空间
<?xml version="1.0" encoding="UTF-8"?>
<beans xmlns="http://www.springframework.org/schema/beans"
       xmlns:xsi="http://www.w3.org/2001/XMLSchema-instance"
       xmlns:context="http://www.springframework.org/schema/context"
       xmlns:aop="http://www.springframework.org/schema/aop"
       xsi:schemaLocation="http://www.springframework.org/schema/beans http://www.springframework.org/schema/beans/spring-beans.xsd
       http://www.springframework.org/schema/context https://www.springframework.org/schema/context/spring-context.xsd
       http://www.springframework.org/schema/aop https://www.springframework.org/schema/aop/spring-aop.xsd
">
   <!--开启注解扫描-->
   <context:component-scan base-package="com.ly.aop"/>

</beans>
?(2)使用注解创建User和UserProxy对象, 为其添加@Component 注解
package com.ly.aop.anno;

import org.springframework.stereotype.Component;

//增强的类
@Component
public class UserProxy {

    //前置通知
    public void before(){
        System.out.println("before ........");
    }
}
package com.ly.aop.anno; import org.springframework.stereotype.Component; //被增强的类 @Component public class User { public void add(){ System.out.println("add ....."); } }(3) 在增强类上面添加注解 @Aspect
package com.ly.aop.anno;

import org.aspectj.lang.annotation.Aspect;
import org.springframework.stereotype.Component;

//增强的类
@Component
@Aspect    //生成代理对象
public class UserProxy {

    //前置通知
    public void before(){
        System.out.println("before ........");
    }
}
(4) 在spring 配置文件中 开启生成代理对象
<?xml version="1.0" encoding="UTF-8"?>
<beans xmlns="http://www.springframework.org/schema/beans"
       xmlns:xsi="http://www.w3.org/2001/XMLSchema-instance"
       xmlns:context="http://www.springframework.org/schema/context"
       xmlns:aop="http://www.springframework.org/schema/aop"
       xsi:schemaLocation="http://www.springframework.org/schema/beans http://www.springframework.org/schema/beans/spring-beans.xsd
       http://www.springframework.org/schema/context https://www.springframework.org/schema/context/spring-context.xsd
       http://www.springframework.org/schema/aop https://www.springframework.org/schema/aop/spring-aop.xsd
">
   <!--开启注解扫描-->
   <context:component-scan base-package="com.ly.aop"/>

   <!--开启Aspect生成代理对象, 如果 采用 纯注解 配置类增加 @EnableAspectJAutoProxy   //动态生成代理类-->
   <aop:aspectj-autoproxy />
</beans>
配置不同类型的通知
(1)在增强类的里面,在作为通知方法上 添加 通知类型的注解,使用切入点表达式配置
package com.ly.aop.anno;

import org.aspectj.lang.annotation.Aspect;
import org.aspectj.lang.annotation.Before;
import org.springframework.stereotype.Component;

//增强的类
@Component
@Aspect    //生成代理对象
public class UserProxy {

    //前置通知
    @Before(value="execution(* com.ly.aop.anno.User.add(..))")
    public void before(){
        System.out.println("before ........");
    }
}
5.编写测试类
package test;

import com.ly.aop.anno.User;
import org.junit.Test;
import org.springframework.context.ApplicationContext;
import org.springframework.context.support.ClassPathXmlApplicationContext;

public class TestAop {
    @Test
    public void testAdd(){
        ApplicationContext ac = new ClassPathXmlApplicationContext("bean1.xml");
        User user = ac.getBean("user", User.class);
        user.add();
    }
}

执行结果:
before ........
add  .....
#### ***程序执行正常:\***
1、环绕通知前
?2、@Before通知
?3、程序逻辑
?4、@AfterReturning通知
?5、@After通知
?6、环绕通知后#### ***程序执行异常:\***
1、环绕通知前
?2、@Before通知
?3、@AfterThrowing异常通知
?4、@After通知
package com.ly.aop.anno;

import org.aspectj.lang.ProceedingJoinPoint;
import org.aspectj.lang.annotation.*;
import org.springframework.stereotype.Component;

//增强的类
@Component
@Aspect    //生成代理对象
public class UserProxy {

    //异常通知
    @AfterThrowing(value="execution(* com.ly.aop.anno.User.add(..))")
    public void afterThrowing(){
        System.out.println("afterThrowing .....");
    }
    //后置通知(返回通知)
    @AfterReturning(value="execution(* com.ly.aop.anno.User.add(..))")
    public void afterReturning(){
        System.out.println("afterReturning .....");
    }
    //环绕通知
    @Around(value="execution(* com.ly.aop.anno.User.add(..))")
    public void around(ProceedingJoinPoint proceedingJoinPoint) throws Throwable {
        System.out.println("around ..1...");
        //被增强的方法 执行
        proceedingJoinPoint.proceed();
        System.out.println("around ..2...");
    }

    //最终通知
    @After(value="execution(* com.ly.aop.anno.User.add(..))")
    public void after(){
        System.out.println("after .....");
    }


    //前置通知
    @Before(value="execution(* com.ly.aop.anno.User.add(..))")
    public void before(){
        System.out.println("before ........");
    }
}
?
4. ==出现异常时==
? ?around ..1...
? ?before ........
? ?afterThrowing .....
? ?after .....==未出现异常时 ===
around ..1...
before ........
add ?.....
afterReturning .....
after .....
around ..2...
?相同切入点的抽取
package com.ly.aop.anno;

import org.aspectj.lang.ProceedingJoinPoint;
import org.aspectj.lang.annotation.*;
import org.springframework.stereotype.Component;

//增强的类
@Component
@Aspect    //生成代理对象
public class UserProxy {

    //形同切入点 抽取
    @Pointcut(value="execution(* com.ly.aop.anno.User.add(..))")
    public void pointDemo(){

    }


    //异常通知
    //@AfterThrowing(value="execution(* com.ly.aop.anno.User.add(..))")
    @AfterThrowing(value = "pointDemo()")
    public void afterThrowing(){
        System.out.println("afterThrowing .....");
    }
    //后置通知
    //@AfterReturning(value="execution(* com.ly.aop.anno.User.add(..))")
    @AfterReturning(value = "pointDemo()")
    public void afterReturning(){
        System.out.println("afterReturning .....");
    }
    //环绕通知
  //  @Around(value="execution(* com.ly.aop.anno.User.add(..))")
    @Around(value = "pointDemo()")
    public void around(ProceedingJoinPoint proceedingJoinPoint) throws Throwable {
        System.out.println("around ..1...");
        //被增强的方法 执行
        proceedingJoinPoint.proceed();
        System.out.println("around ..2...");
    }

    //最终通知
    //@After(value="execution(* com.ly.aop.anno.User.add(..))")
    @After(value = "pointDemo()")
    public void after(){
        System.out.println("after .....");
    }


    //前置通知
   // @Before(value="execution(* com.ly.aop.anno.User.add(..))")
     @Before(value = "pointDemo()")
    public void before(){
        System.out.println("before ........");
    }
}
有多个增强类, 对同一个方法进行增强,设置增强类的优先级
(1)在 增强类上面 添加注解 @Order ? (数字类型值),数字类型值越小,优先级越高
package com.ly.aop.anno;

import org.aspectj.lang.ProceedingJoinPoint;
import org.aspectj.lang.annotation.*;
import org.springframework.core.annotation.Order;
import org.springframework.stereotype.Component;

//增强的类
@Component
@Aspect    //生成代理对象
@Order(3)
public class UserProxy {

    //形同切入点 抽取
    @Pointcut(value="execution(* com.ly.aop.anno.User.add(..))")
    public void pointDemo(){

    }


    //异常通知
    //@AfterThrowing(value="execution(* com.ly.aop.anno.User.add(..))")
    @AfterThrowing(value = "pointDemo()")
    public void afterThrowing(){
        System.out.println("afterThrowing .....");
    }
    //后置通知
    //@AfterReturning(value="execution(* com.ly.aop.anno.User.add(..))")
    @AfterReturning(value = "pointDemo()")
    public void afterReturning(){
        System.out.println("afterReturning .....");
    }
    //环绕通知
  //  @Around(value="execution(* com.ly.aop.anno.User.add(..))")
    @Around(value = "pointDemo()")
    public void around(ProceedingJoinPoint proceedingJoinPoint) throws Throwable {
        System.out.println("around ..1...");
        //被增强的方法 执行
        proceedingJoinPoint.proceed();
        System.out.println("around ..2...");
    }

    //最终通知
    //@After(value="execution(* com.ly.aop.anno.User.add(..))")
    @After(value = "pointDemo()")
    public void after(){
        System.out.println("after .....");
    }


    //前置通知
   // @Before(value="execution(* com.ly.aop.anno.User.add(..))")
     @Before(value = "pointDemo()")
    public void before(){
        System.out.println("before ........");
    }
}
package com.ly.aop.anno; import org.aspectj.lang.annotation.AfterThrowing; import org.aspectj.lang.annotation.Aspect; import org.aspectj.lang.annotation.Before; import org.springframework.core.annotation.Order; import org.springframework.stereotype.Component; @Component @Aspect @Order(1) public class PersonProxy { //异常通知 @Before(value="execution(* com.ly.aop.anno.User.add(..))") public void before(){ System.out.println("person before ....."); } }执行结果
person before ..... ? ? ? ? ? 先执行
around ..1...
before ........
add ?.....
afterReturning .....
after .....
around ..2...
全注解式开发?
创建配置类, 不需要创建xml配置文件
package com.ly.aop.config;

import org.springframework.context.annotation.ComponentScan;
import org.springframework.context.annotation.Configuration;
import org.springframework.context.annotation.EnableAspectJAutoProxy;

@Configuration
@ComponentScan(basePackages = {"com.ly.aop"})
@EnableAspectJAutoProxy(proxyTargetClass = true)
public class Config {
}


// 编写测试类
    @Test
    public void testMyBean2(){
        ApplicationContext ac = new AnnotationConfigApplicationContext(Config.class);// 加载配置类
        User user = ac.getBean("user", User.class);
        user.add();
    }
基于xml方式
1.创建连个类, 增加类和被增强类,创建方法
package com.ly.aop.xml;
//增强类
public class Book {

    public void buy(){
        System.out.println("buy..........");
    }
}
?
package com.ly.aop.xml;

public class BookProxy {

    public void before(){
        System.out.println("bookproxy-----------");
    }
}
2.在spring配置文件中创建 两个类对象 ? ?bean2.xml
<?xml version="1.0" encoding="UTF-8"?>
<beans xmlns="http://www.springframework.org/schema/beans"
       xmlns:xsi="http://www.w3.org/2001/XMLSchema-instance"
       xmlns:context="http://www.springframework.org/schema/context"
       xmlns:aop="http://www.springframework.org/schema/aop"
       xsi:schemaLocation="http://www.springframework.org/schema/beans http://www.springframework.org/schema/beans/spring-beans.xsd
       http://www.springframework.org/schema/context https://www.springframework.org/schema/context/spring-context.xsd
       http://www.springframework.org/schema/aop https://www.springframework.org/schema/aop/spring-aop.xsd
">

   <!--创建对象-->
   <bean id="book" class="com.ly.aop.xml.Book"></bean>
   <bean id="bookProxy" class="com.ly.aop.xml.BookProxy"></bean>
</beans>
3.在spring配置文件中,配置切入点
bean2.xml
<!--创建对象-->
   <bean id="book" class="com.ly.aop.xml.Book"></bean>
   <bean id="bookProxy" class="com.ly.aop.xml.BookProxy"></bean>
   <!--配置aop增强-->
   <aop:config>
      <!--切入点-->
      <aop:pointcut id="p" expression="execution(* com.ly.aop.xml.Book.buy(..))"/>
      <!--配置切面-->
      <aop:aspect ref="bookProxy">
         <!--增强作用在具体的方法上-->
         <aop:before method="before" pointcut-ref="p"></aop:before>
      </aop:aspect>
   </aop:config>
测试类
 @Test
    public void testxml(){
        ApplicationContext ac = new ClassPathXmlApplicationContext("bean2.xml");
        Book book = ac.getBean("book", Book.class);
        book.buy();
    }

// 执行结果
bookproxy-----------
buy..........
本文来自互联网用户投稿,该文观点仅代表作者本人,不代表本站立场。本站仅提供信息存储空间服务,不拥有所有权,不承担相关法律责任。 如若内容造成侵权/违法违规/事实不符,请联系我的编程经验分享网邮箱:veading@qq.com进行投诉反馈,一经查实,立即删除!