keepalived+lvs 对nginx做负载均衡和高可用
2023-12-14 21:35:08

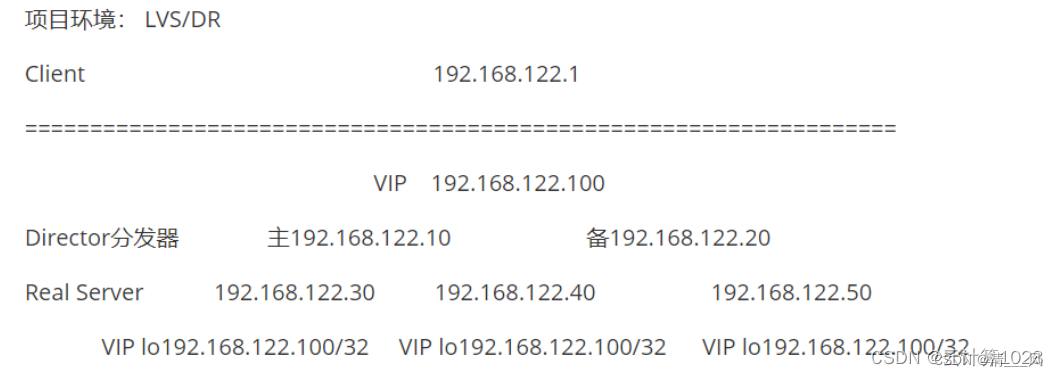
LVS_Director + KeepAlived

KeepAlived在该项目中的功能:
1. 管理IPVS的路由表(包括对RealServer做健康检查)
2. 实现调度器的HA
http://www.keepalived.org

Keepalived所执行的外部脚本命令建议使用绝对路径
=================================================================================
实施步骤:
1. 主/备调度器安装软件
[root@lvs-keepalived-master ~]# yum -y install ipvsadm keepalived
[root@lvs-keepalived-slave ~]# yum -y install ipvsadm keepalived
2. Keepalived
lvs-master
[root@ha-proxy-master ~]# vim /etc/keepalived/keepalived.conf
! Configuration File for keepalived

global_defs {
   router_id lvs-keepalived-master    #辅助改为lvs-backup
}

vrrp_instance VI_1 {
    state MASTER
    interface ens33                #VIP绑定接口
    virtual_router_id 80         #VRID 同一组集群,主备一致
    priority 100            #本节点优先级,辅助改为50
    advert_int 1            #检查间隔,默认为1s
    authentication {
        auth_type PASS
        auth_pass 1111
    }
    virtual_ipaddress {
        192.168.246.110/32
    }
}

virtual_server 192.168.246.110 80 {    #LVS配置
	delay_loop 6   #健康检查rs时间间隔
	lb_algo rr     #LVS调度算法
	lb_kind DR     #LVS集群模式(路由模式)
	protocol TCP      #健康检查使用的协议
	real_server 192.168.246.162 80 {
		weight 1
		inhibit_on_failure   #当该节点失败时,把权重设置为0,而不是从IPVS中删除
		TCP_CHECK {          #健康检查
			connect_port 80   #检查的端口
			connect_timeout 3  #连接超时的时间
			}
		}
	real_server 192.168.246.163 80 {
		weight 1
		inhibit_on_failure
		TCP_CHECK {
			connect_timeout 3
			connect_port 80
			}
		}
}

[root@lvs-keepalived-slave ~]# vim /etc/keepalived/keepalived.conf
! Configuration File for keepalived

global_defs {
   router_id lvs-keepalived-slave
}

vrrp_instance VI_1 {
    state BACKUP
    interface ens33
    virtual_router_id 80
    priority 50
    advert_int 1
    authentication {
        auth_type PASS
        auth_pass 1111
    }
    virtual_ipaddress {
        192.168.246.110/24
    }
}
virtual_server 192.168.246.110 80 {
	delay_loop 6
	lb_algo rr
	lb_kind DR
	protocol TCP
	real_server 192.168.246.162 80 {
		weight 1
		inhibit_on_failure
		TCP_CHECK {
			connect_port 80
			connect_timeout 3
			}
		}
	real_server 192.168.246.163 80 {
		weight 1
		inhibit_on_failure
		TCP_CHECK {
			connect_timeout 3
			connect_port 80
			}
		}
}
3. 启动KeepAlived(主备均启动)
[root@lvs-keepalived-master ~]# systemctl start keepalived
[root@lvs-keepalived-master ~]# systemctl enable keepalived

[root@lvs-keepalived-master ~]# ipvsadm -Ln
IP Virtual Server version 1.2.1 (size=4096)
Prot LocalAddress:Port Scheduler Flags
  -> RemoteAddress:Port           Forward Weight ActiveConn InActConn
TCP  192.168.246.110:80 rr persistent 20
  -> 192.168.246.162:80           Route   1      0          0
  -> 192.168.246.163:80           Route   0      0          0

4. 所有RS配置(nginx1,nginx2)
配置好网站服务器,测试所有RS
[root@test-nginx1 ~]# yum install -y nginx
[root@test-nginx2 ~]# yum install -y nginx
[root@test-nginx1 ~]# ip addr add dev lo 192.168.246.110/32
[root@test-nginx1 ~]# echo "net.ipv4.conf.all.arp_ignore = 1" >> /etc/sysctl.conf
[root@test-nginx1 ~]# sysctl -p
[root@test-nginx1 ~]# echo "web1..." >> /usr/share/nginx/html/index.html
[root@test-nginx1 ~]# systemctl start nginx
注意事项:如果之前配置了vip,导致显示不了vip
需要执行systemctl stop keepalived #先停止在重启
` systemctl start keepalived `
即可显示vip
文章来源:https://blog.csdn.net/xubaodong_1/article/details/134921775
本文来自互联网用户投稿,该文观点仅代表作者本人,不代表本站立场。本站仅提供信息存储空间服务,不拥有所有权,不承担相关法律责任。 如若内容造成侵权/违法违规/事实不符,请联系我的编程经验分享网邮箱:veading@qq.com进行投诉反馈,一经查实,立即删除!
本文来自互联网用户投稿,该文观点仅代表作者本人,不代表本站立场。本站仅提供信息存储空间服务,不拥有所有权,不承担相关法律责任。 如若内容造成侵权/违法违规/事实不符,请联系我的编程经验分享网邮箱:veading@qq.com进行投诉反馈,一经查实,立即删除!