FastDFS安装与测试
目录
目标
- 在Linux服务器上搭建单机版FastDFS系统。(考虑到Linux服务器访问GitHub受限,这里我将依赖包下载到本地,再将本地的依赖包上传到Linux服务器上。所以我的操作与Wiki上的操作略有不同,但本质一样)。
- 在Linux服务器上,使用命令行实现文件上传、下载、删除等功能。
- 熟悉FastDFS系统架构。
版本
6.11.0
环境
CentOS 7
官方文档
FastDFS 6.11.0版本官网文档![]() https://github.com/happyfish100/fastdfs/tree/V6.11.0
https://github.com/happyfish100/fastdfs/tree/V6.11.0
安装手册![]() https://github.com/happyfish100/fastdfs/wiki
https://github.com/happyfish100/fastdfs/wiki
相关概念
DFS(分布式文件系统)
????????分布式文件系统(DistributedFileSystem,DFS)是指文件系统管理的物理存储资源不一定直接连接在本地节点上,而是通过计算机网络与节点(可简单的理解为一台计算机)相连;或是若干不同的逻辑磁盘分区或卷标组合在一起而形成的完整的有层次的文件系统。DFS为分布在网络上任意位置的资源提供一个逻辑上的树形文件系统结构,从而使用户访问分布在网络上的共享文件更加简便。单独的DFS共享文件夹的作用是相对于通过网络上的其他共享文件夹的访问点
FastDFS(Fast分布式文件系统)
FastDFS is an open source high performance distributed file system. Its major functions include: file storing, file syncing and file accessing (file uploading and file downloading), and it can resolve the high capacity and load balancing problem. FastDFS should meet the requirement of the website whose service based on files such as photo sharing site and video sharing site.
? ? ? ? FastDFS(Fast Distributed File System)是一个开源的高性能分布式文件系统。其主要功能包括:文件存储、文件同步和文件访问(文件上传和文件下载),可以解决大容量和负载均衡问题。FastDFS应满足照片共享网站、视频共享网站等基于文件服务的网站的要求。
????????FastDFS由淘宝网的余庆使用C语言实现。支持Linux、FreeBSD、MacOS等类UNIX系统。FastDFS类似google FS,属于应用级文件系统,不是通用的文件系统,只能通过专有API访问,目前提供了C客户端和Java SDK,以及PHP扩展SDK。
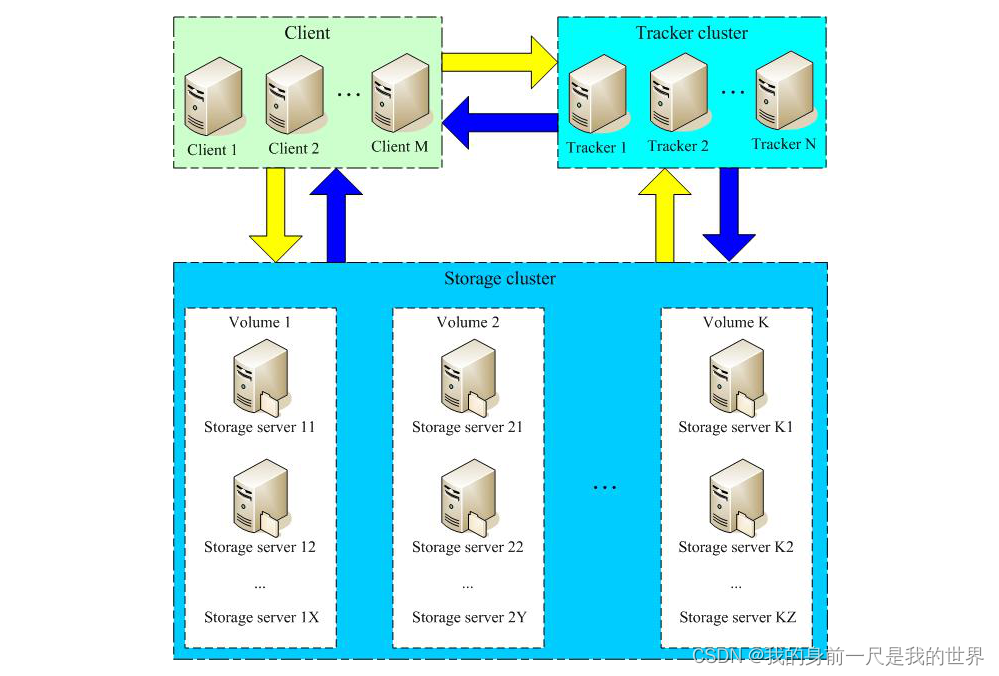
????????FastDFS为互联网应用量身定做,解决大容量文件存储问题,实现高性能和高扩展性。FastDFS可以看做是基于文件的key value存储系统,key为文件ID,value为文件本身,因此称作分布式文件存储服务更为合适。下图为FastDFS的架构图(来源于官网):

????????Tracker(跟踪器)和Storage(存储器)是服务端的概念,我们开发的程序是客户端(使用API调用FastDFS的功能)。
Tracker(跟踪器)
FastDFS has two roles: tracker and storage. The tracker takes charge of scheduling and load balancing for file access.
????????Tracker是FastDFS的两个角色之一。Tracker负责调度和负载均衡以进行文件访问。
Storage(存储器)
The storage store files and it's function is file management including: file storing, file syncing, providing file access interface. It also manage the meta data which are attributes representing as key value pair of the file. For example: width=1024, the key is "width" and the value is "1024".
????????Storage是FastDFS的两个角色之一。Storage用于存储文件,其功能包括文件管理、文件存储、文件同步和提供文件访问接口。它还管理元数据,这些元数据是文件的属性,表示为键值对。
安装FastDFS
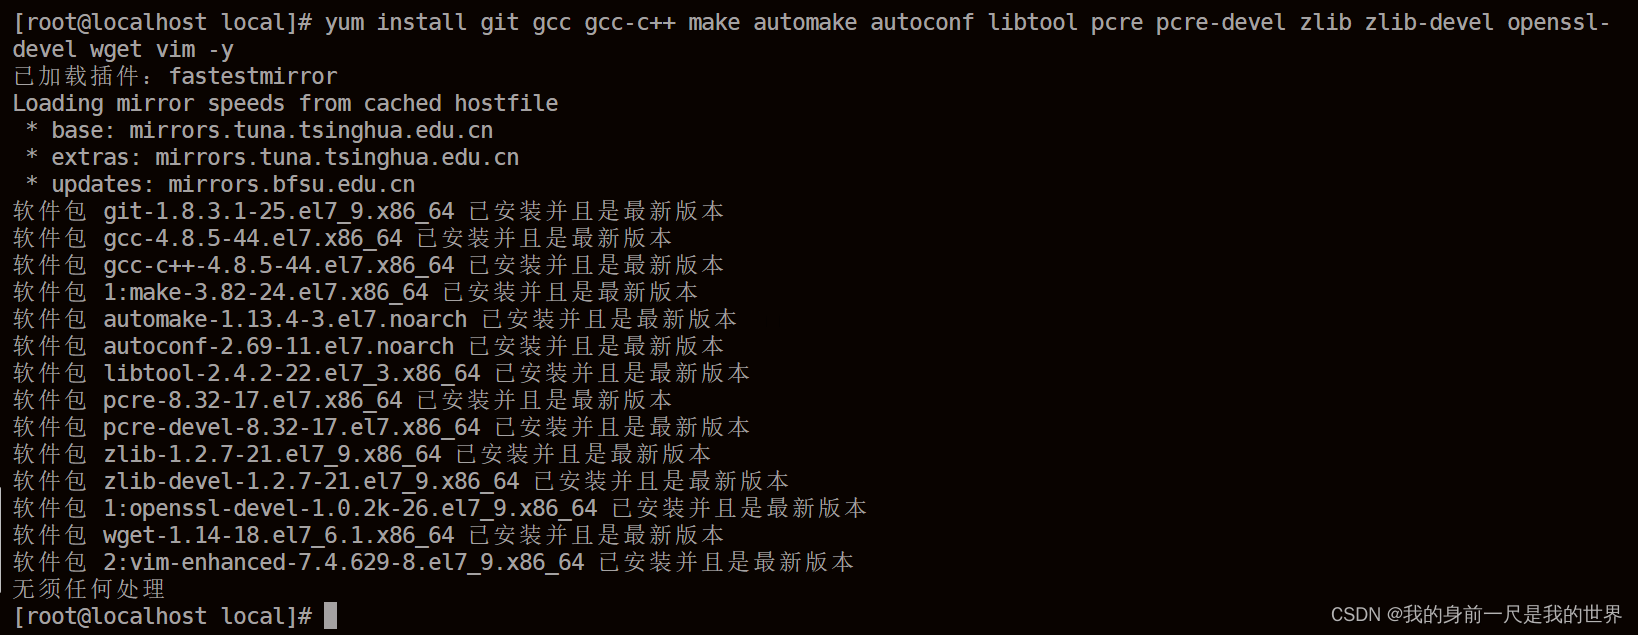
第一步:编译CentOS环境。
yum install git gcc gcc-c++ make automake autoconf libtool pcre pcre-devel zlib zlib-devel openssl-devel wget vim -y
第二步:下载好相关依赖包(这里和Wiki上的操作略有不同,但本质一样。如果大家一定要按照Wiki上的操作去安装FastDFS,前提条件是服务器对GitHub访问不受限)。
https://github.com/happyfish100/libfastcommon/archive/V1.0.71.tar.gz
https://github.com/happyfish100/libserverframe/archive/V1.2.1.tar.gz
https://github.com/happyfish100/fastdfs/archive/V6.11.0.tar.gz
https://codeload.github.com/happyfish100/fastdfs-client-java/zip/refs/heads/master
https://codeload.github.com/happyfish100/fastdfs-nginx-module/zip/refs/heads/master
第三步:将依赖包上传至Linux服务器上,我将它们上传到/usr/local目录。
第四步:解压依赖包,并执行编译和安装命令(按照顺序编译安装)。
tar -zxvf libfastcommon-1.0.71
cd /usr/local/libfastcommon-1.0.71
./make.sh && ./make.sh install

tar -zxvf libserverframe-1.2.1.tar.gz
cd /usr/local/libserverframe-1.2.1
./make.sh && ./make.sh install

tar -zxvf fastdfs-6.11.0.tar.gz
cd /usr/local/fastdfs-6.11.0
./make.sh && ./make.sh install
第五步:复制相关配置文件到/etc/fds目录下,供Nginx访问用。
cp /usr/local/fastdfs-6.11.0/conf/http.conf /etc/fdfs
cp /usr/local/src/fastdfs/conf/mime.types /etc/fdfs/第六步:进入/etc/fdfs目录,编译tracker.conf文件,设置存储数据和日志文件的基本路径。我设置的路径是/opt/fastdfs/tracker
#在tracker.conf文件内设置基础路径。
base_path = /opt/fastdfs/tracker
#创建目录。-p表示一次创建多级目录。
mkdir -p /opt/fastdfs/tracker?第七步:进入/etc/fdfs目录,编译storage.conf文件,设置存储数据和日志文件的基本路径。我设置的路径是/opt/fastdfs/storage
#在storage.conf文件内设置基础路径。
base_path = /opt/fastdfs/storage
#设置存放文件的目录
store_path0 = /opt/fastdfs/storage/files
#配置tracker_server地址。
tracker_server = 192.168.157.101:22122
#创建目录。
mkdir -p /opt/fastdfs/storage/files启动FastDFS
前言
????????在/etc/fdfs目录下执行fdfs_trackerd和fdfs_storaged命令,会弹出该命令的相关参数。

第一步:用/etc/fdfs目录下的配置文件,启动tracker服务。
fdfs_trackerd /etc/fdfs/tracker.conf
第二步:用/etc/fdfs目录下的配置文件,启动storage服务。
fdfs_storaged /etc/fdfs/storage.conf
第三步:去storage.conf文件所设置的store_path0目录,查看该路径下的内容。可以发现在/opt/fastdfs/storage/files下有个data目录,这个目录是FastDFS第一次启动后创建的。data目录下有256个文件夹,这里每个文件里面又有256个文件夹(也就是说data下有65536个文件夹,即2的16次方数量)。


关闭FastDFS
第一步:用/etc/fdfs目录下的配置文件执行关闭命令。
fdfs_trackerd tracker.conf stop
fdfs_storaged /etc/fdfs/storage.conf stop

重启FastDFS
第一步:用/etc/fdfs目录下的配置文件执行重启命令。
fdfs_trackerd tracker.conf restart
fdfs_storaged /etc/fdfs/storage.conf restart
用命令测试上传文件
第一步:编辑/etc/fdfs/client.conf文件,有些版本的FastDFS的/etc/fdfs下没有client.conf,而有一个client.conf.sample文件,如果是这种情况需要修改client.conf.sample文件名称为client.conf
vi /etc/fdfs/client.confbase_path = /opt/fastdfs/client
tracker_server = 192.168.157.101:22122第二步:编辑好/etc/fdfs/client.conf文件文件后,创建刚才设置的base_path文件夹。
mkdir -p /opt/fastdfs/client第三步:创建一个文件并添加测试内容用于测试。
vi a.txt第四步:可以选择使用/usr/bin或者/usr/local/fastdfs-6.11.0/client的fdfs_test命令做测试。根据执行fdfs_test命令后返回的信息来看,最后一行介绍了操作选项有很多,比如:upload、download、delete等。
cd /usr/local/fastdfs-6.11.0/client
fdfs_test
第五步:上传我们刚才创建的a.txt文件。这里我在/usr/bin和/usr/local/fastdfs-6.11.0/client两个目录下执行了上传命令,都能正常上传文件。
#或者进入到/usr/bin目录下,也有fdfs_test命令。
cd /usr/local/fastdfs-6.11.0/client
fdfs_test /etc/fdfs/client.conf upload /etc/fdfs/a.txt?信息解读:
- 从返回的结果来看,我们可以看到有storage_upload_by_filename和storage_upload_slave_by_filename两个大类。其中storage_upload_by_filename用于上传文件,storage_upload_slave_by_filename用于上传与主文件相关的从文件,以支持更复杂的文件关系,如备份、缩略图等。
- remote_filename的值开头是M00,这和/etc/fdfs/storage.conf文件的store_path_count配置有关。假如store_path_count = 3,则remote_filename的值开头是M00、M01、M02,我们配置文件中的store_path_count = 1,所以remote_filename的值开头是M00,后续我们学FastDFS集群时再来详细分析store_path_count的意义和作用。
- 进入到/opt/fastdfs/storage/files/data/00/00文件夹,我们可以下面多了4个文件,这4个文件的作用如图3所述。检查wKidZWWUHRKAa6g0AAAAGcc2DgA732.txt和wKidZWWUHRKAa6g0AAAAGcc2DgA732_big.txt文件发现内容确实和我们定义的a.txt内容一致。
- url给出的链接暂时不能访问,后续我们安装好Nginx才能访问。


用命令测试下载文件
第一步:可以选择使用/usr/bin或者/usr/local/fastdfs-6.11.0/client的fdfs_test命令做测试。下载我们刚才上传的文件,执行如下命令:
fdfs_test /etc/fdfs/client.conf download group1 M00/00/00/wKidZWWZZ1qAOKS-AAAADCApozA963.txt
用命令测试删除文件
第一步:可以选择使用/usr/bin或者/usr/local/fastdfs-6.11.0/client的fdfs_test命令做测试。删除我们刚才上传的文件,执行如下命令:
fdfs_test /etc/fdfs/client.conf delete group1 M00/00/00/wKidZWWUHRKAa6g0AAAAGcc2DgA732.txt
第二步:查看目标文件,发现该文件已经被删除了。

用HTTP的方式访问FastDFS中的文件
前言
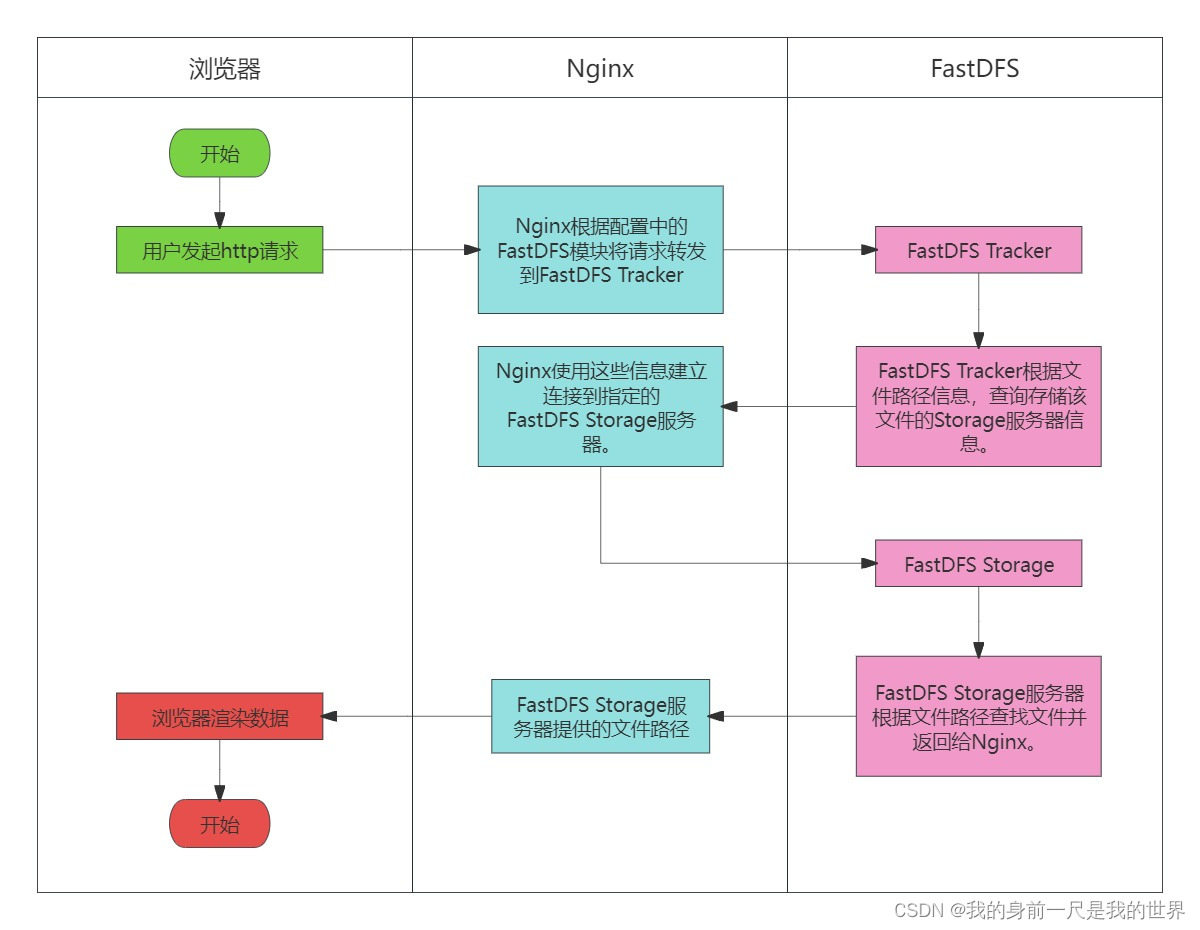
????????向FastDFS上传文件成功后,FastDFS提供了http链接,但是该链接并不能直接在浏览器打开,而需要Nginx的支持才能实现(本文不讲述Linux安装Nginx的步骤,需要大家提前安装好)。
????????FastDFS提供了Nginx的扩展模块,也就是我们之前下载的fastdfs-nginx-module-master.zip压缩包。

第一步:上传fastdfs-nginx-module-master.zip压缩包到Linux服务器,我将它上传到/usr/local目录。
第二步:解压fastdfs-nginx-module-master.zip压缩包。
unzip fastdfs-nginx-module-master.zip 
第三步:下载/usr/local/fastdfs-nginx-module-master/src/mod_fastdfs.conf配置文件到桌面,并修改相关属性:
#tracker服务器IP和端口。
tracker_server=192.168.157.101:22122
#url是否包含组名称。
url_have_group_name=true
#和storage.conf配置文件中的store_path0一致。
store_path0=/opt/fastdfs/storage/files
base_path=/opt/fastdfs/nginx_mod
mkdir /opt/fastdfs/nginx_mod第四步:编译 Nginx 时包含 fastdfs-nginx-module模块。需要在Nginx的解压目录下执行以下命令:
#在Nginx的解压目录下执行如下命令:
./configure --prefix=/usr/local/nginx_fdfs --add-module=/usr/local/fastdfs-nginx-module-master/src
make
make install
第五步:Nginx重新编译后,会生成/usr/local/nginx_fdfs目录。修改/usr/local/nginx_fdfs/conf/nginx.conf文件内容如下:
server {
    listen       8888;    ## 该端口为storage.conf中的http.server_port相同
    server_name  localhost;
    location ~/group[0-9]/ {
        ngx_fastdfs_module;
    }
    error_page   500 502 503 504  /50x.html;
    location = /50x.html {
    root   html;
    }
}
第六步:把刚才下载到桌面上并修改好属性的mod_fastdfs.conf文件上传到/etc/fdfs目录下,并复制Nginx的mime.types文件到/etc/fdfs目录下。
cp /usr/local/nginx_fdfs/conf/mime.types /etc/fdfs/mime.types第七步:启动Nginx,命令如下:
/usr/local/nginx_fdfs/sbin/nginx -c /usr/local/nginx_fdfs/conf/nginx.conf
第八步:在浏览器上输入http链接查看我们刚才上传的文件。
http://192.168.157.101:8888/group1/M00/00/00/wKidZWWZZ1qAOKS-AAAADCApozA963.txt
用HTTP的方式访问FastDFS中的文件整体流程

本文来自互联网用户投稿,该文观点仅代表作者本人,不代表本站立场。本站仅提供信息存储空间服务,不拥有所有权,不承担相关法律责任。 如若内容造成侵权/违法违规/事实不符,请联系我的编程经验分享网邮箱:veading@qq.com进行投诉反馈,一经查实,立即删除!