HALCON&VS .net混合编程案例【02】:检测芯片的管脚间距
前言:
本章给出的HALCON和Visual Studio的WPF项目中联合编程的案例。
VS中WPF的编程,UI的设计非常方便,如果结合HALCON的算法,可以很快实施机器视觉相关的应用。本例的应用,实现了自动检测的一个三洋的芯片的管脚的间距。
?
一、项目结果展示:
步骤一:读取图片
拍摄一张芯片PCB的图:

步骤二:构建模式
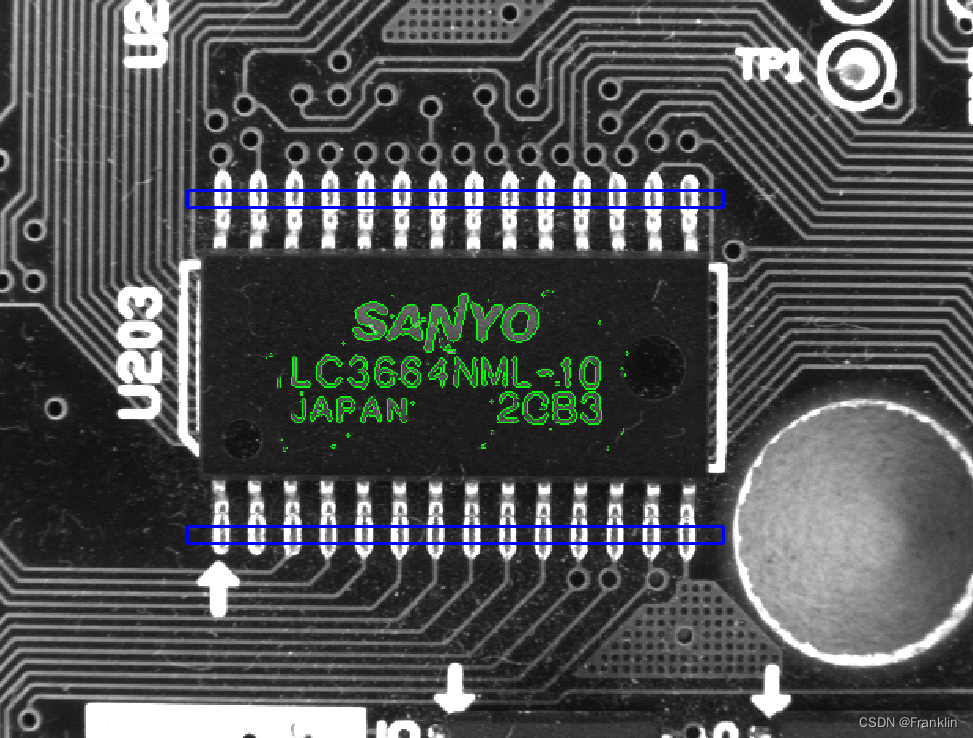
?对拍摄的图片,进行模式识别,这里构建了两个模式,模式1,OCR的文字识别,识别芯片上的文字。模式2,蓝色部分,实现对管脚的检测。
步骤三:检测时间匹配
对算法处理的节奏,进行处理

步骤四:管脚数量和间距检测

二、原理和设计说明:
2.1 设计说明:?
????????HALCON和 VS WPF应用结合,在Visual Studio的WPF项目中,可以通过拖动工具箱中的控件到设计视图来自动生成XAML代码。这些代码定义了用户界面的布局和控件。熟悉,XML语言的同学,应该知道,XML的标记语言,掌握了基本语法后,理解起来是很容易的。
? ? ? ? 拖动控件设计UI后,对于每个控件,你可以在其关联的code-behind文件中添加事件处理程序。就可以要编写或修改这些事件处理程序的代码,以实现你想要的功能。例如,某个按键控件的事件处理,Create_Click就是一个事件处理程序,它会在用户点击相关的按钮时被触发。
当然,为了实现具体的功能,你仍然需要编写和修改事件处理程序的代码。
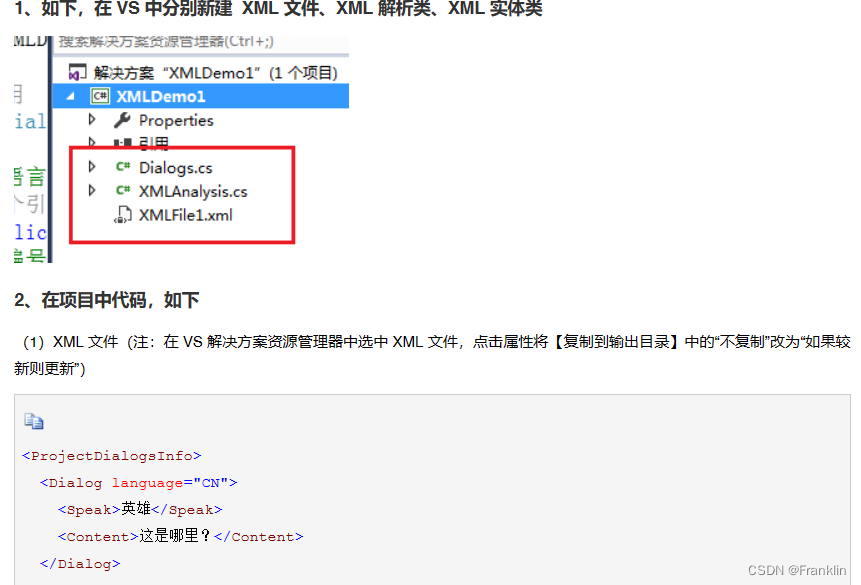
2.1.1 XML的VS设计
XML显然可以作为一种方式,这里笔者给出了链接和案例参考:
但是,XML的?方法不是,本例采用的语言,本例,采用AXML的方法。见下节:
2.1.2 AXML的设计
总的来说,虽然WPF的用户界面可以通过拖放控件来自动生成,但是HALCON的兼容界面设计,结合WPF似乎,采用AXML更方便。
【Franklin案】注意,这里提到的AXML和Android的AXML应该不是一个东西,别搞混了。
下面这个链接对AXML做了说明:
上文,针对AXML语法大致做了如上说明:
AXML有五种语法,包括:数据绑定、条件渲染、列表渲染、模版、渲染。
具体,参考链接:
至于 Android的AXML是什么,参考如下:
【Franklin案】所以,本项目中的AXML显然只是一句了AXML的对XML的一种裁剪的语言。
三、设计实例:
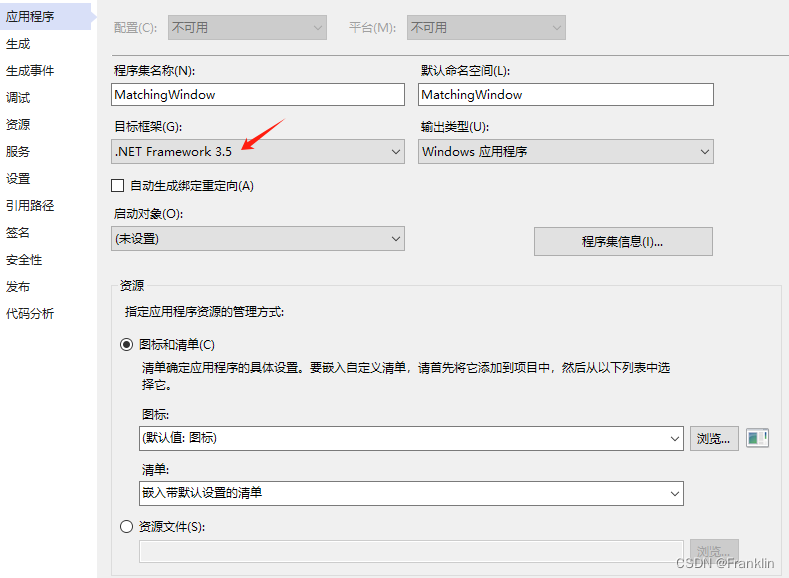
3.1 项目运行环境和配置:
本例,博主在WIN10+VS 2019上成功运行,需要如下.net的框架支持:
当然,作为HALCON混合编程,HALCONNET是必须的:
3.2 项目构建:

【Franklin案】我们大致了解一下,项目各个文件构建:
3.2.1 项目文件组成和各个文件的主要作用:
-
Properties 文件夹:包含四个文件,用于管理应用程序资源和用户设置。
Resources.resx?和?Resources.Designer.cs:用于管理应用程序资源。这些文件包含一个名为?resourceMan?的?ResourceManager?类型的字段和一个名为?resourceCulture?的?CultureInfo?类型的字段,这些字段用于处理资源的本地化。Settings.settings?和?Settings.Designer.cs:用于存储用户设置。这些文件包含一个名为?defaultInstance?的?Settings?类型的字段和一个名为?Default?的?Settings?类型的属性,这些字段和属性用于处理应用程序的设置。
-
XAML 文件:在这个项目中,AXML文件实际上是XAML文件,主要用于定义用户界面,包括布局、样式和控件等。它们不是自动生成的,需要你设计和编码。
App.xaml:用于应用程序级别的资源和启动代码。MatchingWindow.xaml:用于主窗口的用户界面定义。
-
Code-behind 文件:每个XAML文件都有一个关联的code-behind文件,包含逻辑。
App.xaml.csMatchingWindow.xaml.cs:这个文件包含一个名为?MatchingWindow?的类,该类从?Window?类继承,并包含多个字段和方法。这些字段(如?Framegrabber、Img、ImgWidth、ImgHeight?等)表明它与图像处理有关。这些方法(如?CreateBtn_Click?和?StopBtn_Click)表明它处理用户界面交互。
-
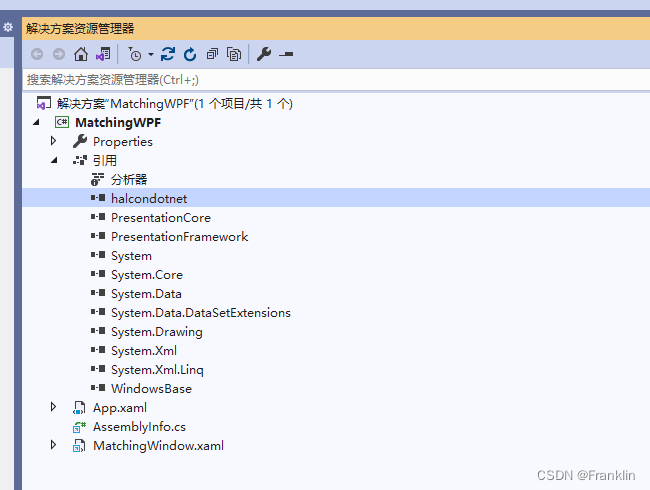
引用:项目还包含了多个库的引用,如?
halcondotnet、PresentationCore、PresentationFramework、System、System.Core、System.Data.DataSetExtensions、System.Drawing、System.Xml、System.Xml.Linq?和?WindowsBase。
3.2.2 UI的设计

UI的设计相对简单,就是拖动相关的控件到界面。

?3.2.3 对象浏览:
3.2.3.1 HalconDoNet (这是直接引用的)

混合编程,这个dll是最重要的,主要来自于你安装的HALCON的位置,博主的位置如下,作参考:

四,设计源码:
?4.1 UI界面源码:
<Window x:Class="MatchingWPF.MatchingWindow"
    xmlns="http://schemas.microsoft.com/winfx/2006/xaml/presentation"
    xmlns:x="http://schemas.microsoft.com/winfx/2006/xaml"
    Title="MatchingWindow" Height="951.068" Width="1202.765" Background="#FFD4D0C8">
    <Grid Margin="10, 10, 10, 10">
        <Grid.RowDefinitions>
            <RowDefinition Height="*"/>
            <RowDefinition MaxHeight="100"/>
        </Grid.RowDefinitions>
        <Grid.ColumnDefinitions>
            <ColumnDefinition />
        </Grid.ColumnDefinitions>

        <Grid Grid.Row="0" Grid.Column="0">
            <Grid.RowDefinitions>
                <RowDefinition/>
            </Grid.RowDefinitions>
            <Grid.ColumnDefinitions>
                <ColumnDefinition Width="*">
                </ColumnDefinition>
                <ColumnDefinition MaxWidth="150"></ColumnDefinition>
            </Grid.ColumnDefinitions>
            <StackPanel Grid.Row="0" Grid.Column="1" VerticalAlignment="Center">
                <Button Name="CreateBtn" Click="CreateBtn_Click" Grid.Row="0" Grid.Column="1" MinHeight="40" Margin="10">Create Model</Button>
                <Button Name="StartBtn" Click="StartBtn_Click" Grid.Row="0" Grid.Column="1"  MinHeight="40" Margin="10">Start</Button>
                <Button Name="StopBtn" Click="StopBtn_Click" Grid.Row="0" Grid.Column="1"  MinHeight="40" Margin="10">Stop</Button>
            </StackPanel>
            <my:HSmartWindowControlWPF Loaded="hWindowControlWPF1_HInitWindow" Name="hWindowControlWPF1"
                                   xmlns:my="clr-namespace:HalconDotNet;assembly=halcondotnet" Grid.Column="0" Grid.Row="0" />
        </Grid>

        <Grid Grid.Row="1" Grid.Column="0">
            <Grid.RowDefinitions>
                <RowDefinition/>
                <RowDefinition/>
            </Grid.RowDefinitions>
            <Grid.ColumnDefinitions>
                <ColumnDefinition/>
                <ColumnDefinition/>
                <ColumnDefinition/>
                <ColumnDefinition/>
            </Grid.ColumnDefinitions>

            <Label Name="MatchingLabel"      FontSize="12" Grid.Row="0" Grid.Column="0" HorizontalAlignment="Left">Matching:</Label>
            <Label Name="MatchingTimeLabel"  FontSize="12" Grid.Row="0" Grid.Column="1" HorizontalAlignment="Left">Time:</Label>
            <Label Name="MatchingScoreLabel" FontSize="12" Grid.Row="0" Grid.Column="2" HorizontalAlignment="Left">Score:</Label>

            <Label Name="MeasureLabel"     FontSize="12" Grid.Row="1" Grid.Column="0" HorizontalAlignment="Left">Measure:</Label>
            <Label Name="MeasureTimeLabel" FontSize="12" Grid.Row="1" Grid.Column="1" HorizontalAlignment="Left">Time:</Label>
            <Label Name="MeasureNumLabel"  FontSize="12" Grid.Row="1" Grid.Column="2" HorizontalAlignment="Left">Number of leads:</Label>
            <Label Name="MeasureDistLabel" FontSize="12" Grid.Row="1" Grid.Column="3">Minimum lead distance:</Label>
        </Grid>
    </Grid>
</Window>
?4.2 界面控件的事件操作:
    private void CreateBtn_Click(object sender, RoutedEventArgs e)
    {
      HImage ImgReduced;
      HRegion Rectangle1 = new HRegion();
      HRegion Rectangle2 = new HRegion();

      CreateBtn.IsEnabled = false;
      Window.SetColor("red");
      Window.SetDraw("margin");
      Window.SetLineWidth(3);

      ImgReduced = Img.ReduceDomain(Rectangle);
      ImgReduced.InspectShapeModel(out ModelRegion, 1, 30);
      Rectangle1.GenRectangle2(Rect1Row, Rect1Col, RectPhi, RectLength1, RectLength2);
      Rectangle2.GenRectangle2(Rect2Row, Rect2Col, RectPhi, RectLength1, RectLength2);
      ShapeModel = new HShapeModel(ImgReduced, 4, 0, new HTuple(360.0).TupleRad().D,
                new HTuple(1.0).TupleRad().D, "none", "use_polarity", 30, 10);

      Window.SetColor("green");
      Window.SetDraw("fill");
      ModelRegion.DispObj(Window);
      Window.SetColor("blue");
      Window.SetDraw("margin");
      Rectangle1.DispObj(Window);
      Rectangle2.DispObj(Window);

      StopBtn.IsEnabled = false;
      StartBtn.IsEnabled = true;
    }

    private void StartBtn_Click(object sender, RoutedEventArgs e)
    {
      Timer.Start();
      CreateBtn.IsEnabled = false;
      StopBtn.IsEnabled = true;
      StartBtn.IsEnabled = false;
    }


    private void StopBtn_Click(object sender, RoutedEventArgs e)
    {
      Timer.Stop();
      CreateBtn.IsEnabled = false;
      StopBtn.IsEnabled = false;
      StartBtn.IsEnabled = true;
    }

    private void Timer_Tick(object sender, System.EventArgs e)
    {
      Action();
    }
4.3 HALCON的核心算法部分:
  private void Action()
    {
      double        S1, S2;
      HTuple        RowCheck, ColumnCheck, AngleCheck, Score;
      HHomMat2D     Matrix = new HHomMat2D();
      HRegion       ModelRegionTrans;
      HTuple        Rect1RowCheck, Rect1ColCheck;
      HTuple        Rect2RowCheck, Rect2ColCheck;
      HRegion       Rectangle1 = new HRegion();
      HRegion       Rectangle2 = new HRegion();
      HMeasure      Measure1, Measure2;
      HTuple        RowEdgeFirst1, ColumnEdgeFirst1;
      HTuple        AmplitudeFirst1, RowEdgeSecond1;
      HTuple        ColumnEdgeSecond1, AmplitudeSecond1;
      HTuple        IntraDistance1, InterDistance1;
      HTuple        RowEdgeFirst2, ColumnEdgeFirst2;
      HTuple        AmplitudeFirst2, RowEdgeSecond2;
      HTuple        ColumnEdgeSecond2, AmplitudeSecond2;
      HTuple        IntraDistance2, InterDistance2;
      HTuple        MinDistance;
      int         NumLeads;

      Img.Dispose();
      Img.GrabImage(Framegrabber);
      Img.DispObj(Window);

      // Find the IC in the current image.
      S1 = HSystem.CountSeconds();
      ShapeModel.FindShapeModel(Img, 0,
                  new HTuple(360).TupleRad().D,
                  0.7, 1, 0.5, "least_squares",
                  4, 0.9, out RowCheck, out ColumnCheck,
                  out AngleCheck, out Score);
      S2 = HSystem.CountSeconds();
      MatchingTimeLabel.Content = "Time: " +
        String.Format("{0,4:F1}", (S2 - S1)*1000) + "ms";
      MatchingScoreLabel.Content = "Score: ";

      if (RowCheck.Length == 1)
      {
        MatchingScoreLabel.Content = "Score: " +
                      String.Format("{0:F5}", Score.D);
        // Rotate the model for visualization purposes.
        Matrix.VectorAngleToRigid(new HTuple(Row), new HTuple(Column), new HTuple(0.0),
                      RowCheck, ColumnCheck, AngleCheck);

        ModelRegionTrans = ModelRegion.AffineTransRegion(Matrix, "false");
        Window.SetColor("green");
        Window.SetDraw("fill");
        ModelRegionTrans.DispObj(Window);
        // Compute the parameters of the measurement rectangles.
        Matrix.AffineTransPixel(Rect1Row, Rect1Col,
                    out Rect1RowCheck, out Rect1ColCheck);
        Matrix.AffineTransPixel(Rect2Row, Rect2Col, out Rect2RowCheck,
                    out Rect2ColCheck);

        // For visualization purposes, generate the two rectangles as
        // regions and display them.
        Rectangle1.GenRectangle2(Rect1RowCheck.D, Rect1ColCheck.D,
                    RectPhi + AngleCheck.D,
                    RectLength1, RectLength2);
        Rectangle2.GenRectangle2(Rect2RowCheck.D, Rect2ColCheck.D,
                    RectPhi + AngleCheck.D,
                    RectLength1, RectLength2);
        Window.SetColor("blue");
        Window.SetDraw("margin");
        Rectangle1.DispObj(Window);
        Rectangle2.DispObj(Window);
        // Do the actual measurements.
        S1 = HSystem.CountSeconds();
        Measure1 = new HMeasure(Rect1RowCheck.D, Rect1ColCheck.D,
                    RectPhi + AngleCheck.D,
                    RectLength1, RectLength2,
                    ImgWidth, ImgHeight, "bilinear");
        Measure2 = new HMeasure(Rect2RowCheck.D, Rect2ColCheck.D,
                    RectPhi + AngleCheck.D,
                    RectLength1, RectLength2,
                    ImgWidth, ImgHeight, "bilinear");
        Measure1.MeasurePairs(Img, 2, 90,
                  "positive", "all",
                  out RowEdgeFirst1,
                  out ColumnEdgeFirst1,
                  out AmplitudeFirst1,
                  out RowEdgeSecond1,
                  out ColumnEdgeSecond1,
                  out AmplitudeSecond1,
                  out IntraDistance1,
                  out InterDistance1);
        Measure2.MeasurePairs(Img, 2, 90,
                  "positive", "all",
                  out RowEdgeFirst2,
                  out ColumnEdgeFirst2,
                  out AmplitudeFirst2,
                  out RowEdgeSecond2,
                  out ColumnEdgeSecond2,
                  out AmplitudeSecond2,
                  out IntraDistance2,
                  out InterDistance2);
        S2 = HSystem.CountSeconds();
        MeasureTimeLabel.Content = "Time: " +
          String.Format("{0,5:F1}", (S2 - S1)*1000) + "ms";
        Window.SetColor("red");
        Window.DispLine(RowEdgeFirst1 - RectLength2*Math.Cos(AngleCheck),
                ColumnEdgeFirst1 - RectLength2*Math.Sin(AngleCheck),
                RowEdgeFirst1 + RectLength2*Math.Cos(AngleCheck),
                ColumnEdgeFirst1 + RectLength2*Math.Sin(AngleCheck));
        Window.DispLine(RowEdgeSecond1 - RectLength2*Math.Cos(AngleCheck),
                ColumnEdgeSecond1 - RectLength2*Math.Sin(AngleCheck),
                RowEdgeSecond1 + RectLength2*Math.Cos(AngleCheck),
                ColumnEdgeSecond1 + RectLength2*Math.Sin(AngleCheck));
        Window.DispLine(RowEdgeFirst2 - RectLength2*Math.Cos(AngleCheck),
                ColumnEdgeFirst2 - RectLength2*Math.Sin(AngleCheck),
                RowEdgeFirst2 + RectLength2*Math.Cos(AngleCheck),
                ColumnEdgeFirst2 + RectLength2*Math.Sin(AngleCheck));
        Window.DispLine(RowEdgeSecond2 - RectLength2*Math.Cos(AngleCheck),
                ColumnEdgeSecond2 - RectLength2*Math.Sin(AngleCheck),
                RowEdgeSecond2 + RectLength2*Math.Cos(AngleCheck),
                ColumnEdgeSecond2 + RectLength2*Math.Sin(AngleCheck));
        NumLeads = IntraDistance1.Length + IntraDistance2.Length;
        MeasureNumLabel.Content = "Number of leads: " +
                      String.Format("{0:D2}", NumLeads);
        MinDistance = InterDistance1.TupleConcat(InterDistance2).TupleMin();
        MeasureDistLabel.Content = "Minimum lead distance: " +
          String.Format("{0:F3}", MinDistance.D);
        Window.FlushBuffer();
        Measure1.Dispose();
        Measure2.Dispose();
      }
    }

  }
小结:
本例的应用,实现了自动检测的一个三洋的芯片的管脚的间距。
项目的完全源码,需要的读者朋友通过扫我博客微信图片,加我好友询问获取。
文章主要是实践HALCON的混合编程案例,如有错误,还望原谅,指出,谢谢大家!
本文来自互联网用户投稿,该文观点仅代表作者本人,不代表本站立场。本站仅提供信息存储空间服务,不拥有所有权,不承担相关法律责任。 如若内容造成侵权/违法违规/事实不符,请联系我的编程经验分享网邮箱:veading@qq.com进行投诉反馈,一经查实,立即删除!