pytorch:YOLOV1的pytorch实现
pytorch:YOLOV1的pytorch实现
注:本篇仅为学习记录、学习笔记,请谨慎参考,如果有错误请评论指出。
参考:
动手学习深度学习pytorch版——从零开始实现YOLOv1
目标检测模型YOLO-V1损失函数详解
3.1 YOLO系列理论合集(YOLOv1~v3)代码仓库:https://gitee.com/wtryb/yolov1-pytorch-implement
模型权重:链接:https://pan.baidu.com/s/1ZSl-VwkjaRUPuD9CkA6sdg?pwd=blhj
提取码:blhj
YoloV1的预测过程

上图是作者在原论文Introduction部分对YoloV1检测器系统的大致介绍。对比R-CNN系列,YoloV1的结构相对来说简单很多。Yolo的主要思想就是将识别问题看作是一个回归问题。因为全连接层的存在YoloV1只能接受(448x448)尺寸(分辨率)的图片,因此需要将输入的图片进行resize然后输入到网络中,通过网络进行预测后的结果进行非极大值抑制得到最终结果。
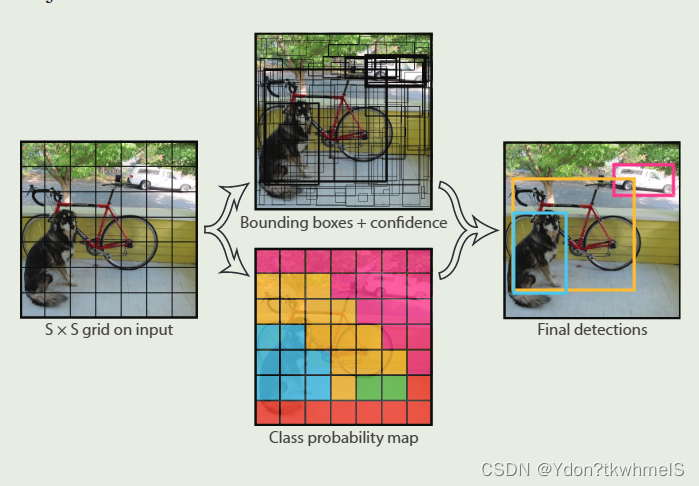
上图是作者在原论文中Introduction部分对网络预测过程解释的原图。虽然这张图有两个分支,但是是从一个网络中得到两个分支上的结果。网格会将输入图片分成(SxS)个小方格(grid cell),然后在每个小方格上预测边界框和类别概率,最后得到最后的预测结果。YoloV1这种将输入分为小网格的操作和锚框有些相似。
1、网络将输入分成SxS个小网格,S是超参数可以设置不同的值,原论文设置为7,也就是将输入图像分成了7x7个(64x64)的小网格。
2、如果某个对象(Objectness)的中心坐标落在了哪一个网格内,那个网格就负责预测这个物体。网格会预测B个边界框和C个类别概率,边界框数和类别数是超参数,可以设置网格预测多少个边界框原论文是2个以及有多少个类别就有多少个类别概率。而每个边界框会有5个参数:x,y,w,h,c,因此网络最终输出就是(batch, (B*5+C), S,S)。下面说明边界框预测参数的含义。
x , y x,y x,y:边界框的中心相对于网格左上角的坐标偏移。
w , h w,h w,h:边界框相对于整个图像的大小。
c c c:边界框的置信度。
这五个参数的取值范围都是[0,1]。其他四个参数都好理解,主要是C边界框置信度(confidence score)这个参数怎么理解。下面两个问题我认为是关键。
如何理解边界框置信度这个参数?
原论文中说明,边界框置信度(confidence score)就是网络认为网格中存在物体的置信度以及网络对于预测的边界框的准确率。也就是说这个值越高越好,越高越认为这个网格预测到了对象(objectness)而且很准确。
如何计算置信度?
论文中将C定义为了
P
r
(
O
b
j
e
c
t
)
?
I
O
U
p
r
e
d
t
r
u
t
h
Pr\left( Object \right) *IOU_{pred}^{truth}
Pr(Object)?IOUpredtruth?。解释下这两个值的意思:
P
r
(
O
b
j
e
c
t
)
=
{
1
有对象存在
0
无对象存在
Pr\left( Object \right) =\begin{cases} 1& \text{有对象存在}\\ 0& \text{无对象存在}\\ \end{cases}
Pr(Object)={10?有对象存在无对象存在?
I
O
U
p
r
e
d
t
r
u
c
h
:
G
T
真实边界框与预测边界框的
I
O
U
值。
IOU_{pred}^{truch}:GT真实边界框与预测边界框的IOU值。
IOUpredtruch?:GT真实边界框与预测边界框的IOU值。
那么两个值乘起来也就意味着,如果这个网格有对象存在,置信度就等于GT真实边界框与预测边界框的IOU值,如果没有对象存在就等于0。YoloV1对于采样区域策略以及正负样本区分做的很粗糙,因此训练时C的取值无非就是0和1,GT边界框中心落在哪个网格哪个网格的置信度就取1此外取0。推理预测时,哪个网格的置信度越接近于1,对象中心在那个网格的概率以及边界框预测准确率越高。
总而言之,置信度的取值衡量了,网格对于对象预测的质量,值越高越质量越好。
YoloV1的网络设计
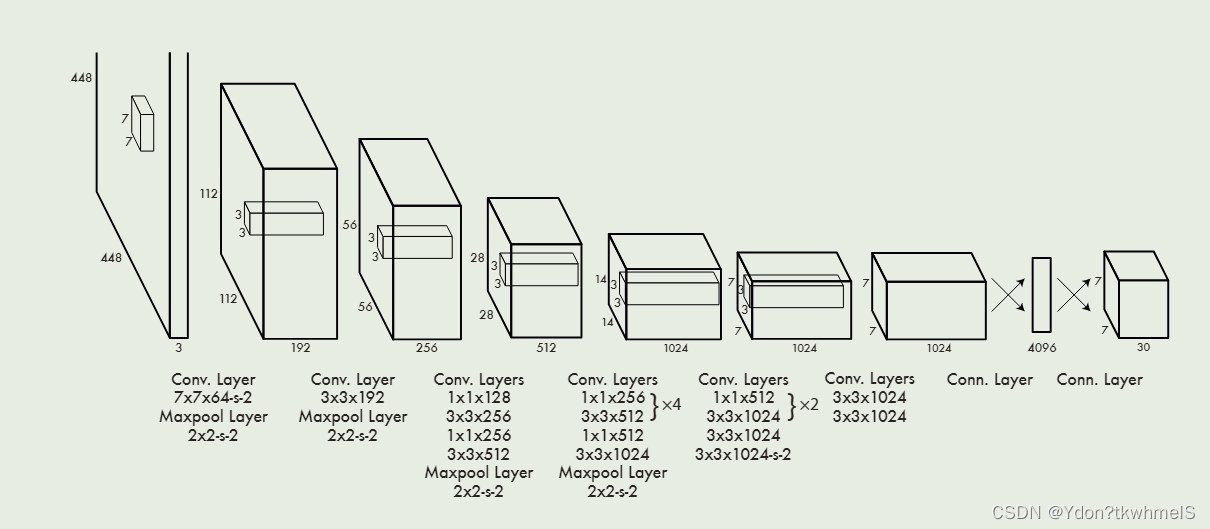
作者收到GoogleNet的启发,设计了Darknet,其结构如上图所示。随着Yolo系列的迭代,主干网络也在迭代。
YoloV1的损失函数设计
作者在论文中提到使用了平方误差和损失(sum-squared error)因为它易于优化,但是对于最终最大平均精度(maximizing average precision)的目标来说不是很合适,因为它没有区分开定位损失和类别损失,因此作者做了一些修改。下面来进行说明。
1、对正负样本的损失设置权重。在训练时,负样本的数量大大压过正样本,正负样本也就是存在和不存在对象的小网格,这会使得网络难以训练以及造成网络训练时的不稳定。
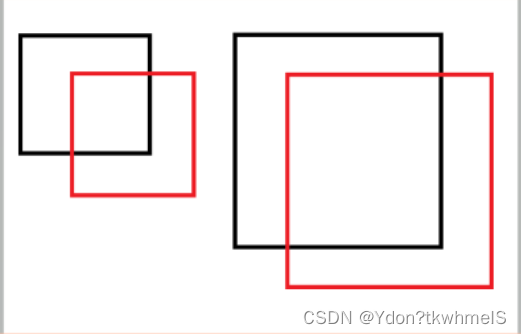
2、使用宽高的平方根计算损失。平方误差和损失将大边界框和小边界框的误差认为是同等程度的误差,而实际情况是相同的偏移误差对于小边界框影响更大。如下图,黑框是GT边界框,红框是预测边界框,小红框和大红框相对各自的GT边界框的坐标偏移是相同的,从视觉上来看相同的偏移对于小框影响更大。
3、采用于GT边界框最大IOU的边界框作为预测器。Yolo每个网格生成多个框,但是只采用于GT边界框IOU最大的边界框作为预测器,这种操作使得边界框有了分化,使得边界框在预测特定大小、宽高比、类别时更加准确。
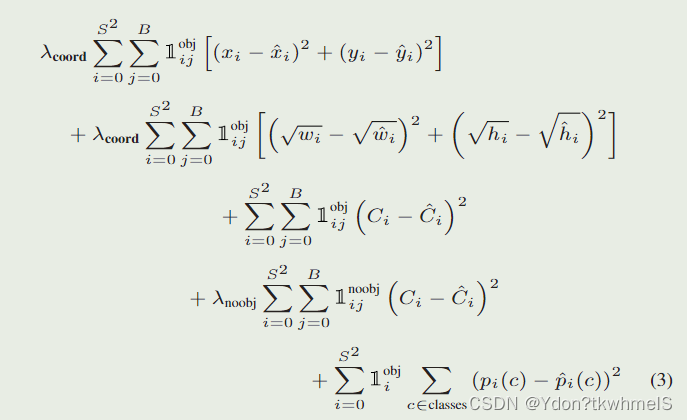
论文给出的损失函数如图。解释几个参数:
λ
c
o
o
r
d
:取
5
,正样本的权重
\lambda _{coord}:取5,正样本的权重
λcoord?:取5,正样本的权重
λ
n
o
o
b
j
:取
0.5
,负样本的权重
\lambda _{noobj}:取0.5,负样本的权重
λnoobj?:取0.5,负样本的权重
1
i
j
o
b
j
:第
i
个网格的第
j
个边界框作为预测器时取
1
,其余取
0
1_{ij}^{obj}:第i个网格的第j个边界框作为预测器时取1,其余取0
1ijobj?:第i个网格的第j个边界框作为预测器时取1,其余取0
1
i
j
n
o
o
b
j
:第
i
个网格的第
j
个边界框不作为预测器时取1,其余取
0
1_{ij}^{noobj}\text{:第}i\text{个网格的第}j\text{个边界框不作为预测器时取1,其余取}0
1ijnoobj?:第i个网格的第j个边界框不作为预测器时取1,其余取0
S
:网格的数量
S\text{:网格的数量}
S:网格的数量
B
:每个网格预测边界框的数量
B\text{:每个网格预测边界框的数量}
B:每个网格预测边界框的数量
总体理解下YoloV1的损失函数:
正样本参与位置损失、置信度损失和类别损失的计算,负样本只计算置信度损失,同时为了减弱负样本数量过多的问题给正负样本的损失计算加上了权重。
YoloV1的优缺点
优点:
1、非常快
2、结构简单
缺点:
1、定位误差大
2、区域采样机制设计粗糙
YoloV1的Pytorch实现
1、构建数据集。
使用Pascal VOC2007数据集,这里不再多介绍。YoloV1的输入尺寸固定是(448x448)因此读入图片后需要进行resize,直接resize即可,不需要做其他操作。
VOC2007对于每张图片都有标注文件,读取标注文件中的边界框和类别,按照YoloV1的输出进行编码。
def yolo_encoder(boxes, labels, yolo_config):
    # print("进入编码器")
    target = torch.zeros(size= (30, yolo_config["num_grid"], yolo_config["num_grid"]), dtype= torch.float)
    # print("标签的形状: ", target.shape)
    cell_size = yolo_config["input_size"] / yolo_config["num_grid"]
    # print("网格大小:", cell_size)
    # print(f"一共处理{len(boxes)}个边界框 Boxes:{boxes}")
    for index, box in enumerate(boxes):
        # print(f"正在处理第{index+1}个边界框:", box)
        x_c, y_c, w, h = point_to_center(box)
        # print("归一化前 x_c, y_c", x_c, y_c)
        # print("归一化前 w, h", w, h)
        x_i = math.ceil(x_c // cell_size)
        y_i = math.ceil(y_c // cell_size)
        delta_x = float((x_c - x_i * cell_size) / cell_size)
        delta_y = float((y_c - y_i * cell_size) / cell_size)
        w = float(w / yolo_config["input_size"])
        h = float(h / yolo_config["input_size"])
        # print("物体中心所在网格:", (x_i, y_i))
        # print("得到边界框偏移:", (delta_x, delta_y))
        # print("归一化后边界框宽高:", w, h)
        # print(x_i, y_i)
        # 前两个值是中心坐标对网格左上角坐标的偏移,归一化到0-1
        target[0, x_i, y_i] = delta_x
        target[1, x_i, y_i] = delta_y
        # print("delta_x, delta_y", delta_x, delta_y)
        target[2, x_i, y_i] = w
        target[3, x_i, y_i] = h
        # print("w, h", w, h)
        # 每个网格预测两个边界框,每个边界框的最后一个参数是confidence score因为数据集里是真实框因此为1
        # 预测到了物体而且就是就是真实框,置信度就是1
        target[4, x_i, y_i] = 1

        target[5, x_i, y_i] = delta_x
        target[6, x_i, y_i] = delta_y
        target[7, x_i, y_i] = w
        target[8, x_i, y_i] = h
        target[9, x_i, y_i] = 1

        # 把边界框对应的类在编码中的位置置为1,代表概率是1
        target[labels[index]+10, x_i, y_i] = 1
        # print(labels[index])
        # print("编码结果:", target[:, x_i, y_i])
    return target
class YoloV1Dataset(Dataset):
    def __init__(self, path):
        self.path = path
        # 从数据集中获取样本
        # 这个过程耗时很短
        self.obj_dict_list = pascal_VOC.xml_parse_dict(path)

    def __getitem__(self, index):
        # 按照索引获取对应的图片名称
        self.image_name = self.obj_dict_list[index]["image_name"]
        # print(self.image_name)
        # 读取图像
        img = cv2.imread(
            os.path.join(self.path, "JPEGImages",self.image_name)
        )
        # 转换色彩通道
        img = cv2.cvtColor(img, cv2.COLOR_BGR2RGB)
        # 按照索引获取边界和对应标号
        boxes_and_label_list = self.obj_dict_list[index]["boxes"]
        # print("boxes_and_label_list", boxes_and_label_list)
        # print(boxes_and_label_list)
        # 放缩图片同时放缩边界框
        img, self.boxes = scale_img_with_box(img, [i[0:4] for i in boxes_and_label_list])
        # print("scale_img_with_box new boxes", self.boxes)
        self.labels = [i[4] for i in boxes_and_label_list]
        # self.boxes = [point_to_center(i) for i in self.boxes]
        # print("point_to_center self.boxes", self.boxes)
        # print(f"一共有{len(self.boxes)}个边界框")
        # 通过编码器,编码网络的标签
        target = yolo_encoder(self.boxes, self.labels, yolo_config)
        # print(target.shape)
        # 转换为张量
        img = transforms.ToTensor()(img)
        return img, target

    def __len__(self):
        # 图片的个数
        return len(self.obj_dict_list)
2、构建YoloV1网络
使用Resnet34代替Darknet主干网络。
from torch import nn
from torchvision.models import resnet34, resnet18
import torch

from torchsummary import summary

from yoloconfig import yolo_config

class yoloV1Resnet(nn.Module):
    def __init__(self):
        super(yoloV1Resnet, self).__init__()
        # 使用预训练
        #resnet = resnet18(pretrained= True)
        resnet = resnet34(pretrained=True)
        # print(resnet)
        # 记录卷积输出的通道数
        resnet_out_channels = resnet.fc.in_features
        # 构造网络,去掉resnet34的全连接层
        self.feature_extractor = nn.Sequential(*list(resnet.children())[:-2])
        # 以下是YOLOv1的最后四个卷积层
        self.Conv_layers = nn.Sequential(
            nn.Conv2d(resnet_out_channels, 1024, 3, padding=1),
            nn.BatchNorm2d(1024),  # 为了加快训练,这里增加了BN层,原论文里YOLOv1是没有的
            nn.LeakyReLU(),
            nn.Conv2d(1024, 1024, 3, stride=2, padding=1),
            nn.BatchNorm2d(1024),
            nn.LeakyReLU(),
            nn.Conv2d(1024, 1024, 3, padding=1),
            nn.BatchNorm2d(1024),
            nn.LeakyReLU(),
            nn.Conv2d(1024, 1024, 3, padding=1),
            nn.BatchNorm2d(1024),
            nn.LeakyReLU(),
        )
        # 以下是YOLOv1的最后2个全连接层
        self.Conn_layers = nn.Sequential(
            nn.Linear(7 * 7 * 1024, 4096),
            nn.LeakyReLU(),
            nn.Linear(4096, 7 * 7 * 30),
            nn.Sigmoid()  # 增加sigmoid函数是为了将输出全部映射到(0,1)之间,因为如果出现负数或太大的数,后续计算loss会很麻烦
        )

    def forward(self, input):
        input = self.feature_extractor(input)
        input = self.Conv_layers(input)
        input = input.view(input.size()[0], -1)
        input = self.Conn_layers(input)
        return input.reshape(-1, (5 * yolo_config["num_boxes"] + yolo_config["num_class"]), 7, 7)  # 记住最后要reshape一下输出数据


if __name__ == "__main__":
    if __name__ == '__main__':
        x = torch.randn((1, 3, 448, 448))
        net = yoloV1Resnet()
        print(net)
        y = net(x)
        print(y.size())
3、训练网络
from torch.utils.data import DataLoader
import torch
from MyLib.nnTools.Trainer import Trainer

from network import yolo
from dataprocess import dataset
from network import yololoss


def train_model():

    # PATH = r"E:\Postgraduate_Learning\Python_Learning\DataSets\pascal voc2012\VOCtrainval_11-May-2012\VOCdevkit\VOC2012"
    PATH = r"E:\Postgraduate_Learning\Python_Learning\DataSets\pascal_voc2007\VOCdevkit\VOC2007"


    # 定义yolo网络
    yolo_net = yolo.yoloV1Resnet()
    yolo_net.load_state_dict(torch.load("models/_keyboardInterrupt_.pth"))
    # 冻结卷积层的参数
    for layer in yolo_net.children():
       layer.requires_grad = False
       break

    # 定义数据集
    yolo_train_dataset = dataset.YoloV1Dataset(PATH)
    # 定义数据加载器0
    yolo_train_iter = DataLoader(dataset= yolo_train_dataset, shuffle= True, batch_size= 4)

    optimer = torch.optim.SGD(yolo_net.parameters(), lr=1e-3, weight_decay= 0.0005)
    StepLR = torch.optim.lr_scheduler.StepLR(optimer, step_size=7, gamma=0.65)

    loss = yololoss.yoloV1Loss()

    trainer = Trainer()
    trainer.config_trainer(net= yolo_net, dataloader= yolo_train_iter,
                           optimer= optimer, loss= loss, lr_scheduler= StepLR)
    trainer.config_task(num_epoch= 60)
    trainer.start_task(True, "./models")

if __name__ == "__main__":

    train_model()
4、推理预测
YoloV1的网络输出还需要进行一步解码才能获取边界框和类别。
def yolo_decoder(pred, class_name_list, yolo_config, confidence_thr= 0.0002, class_thr= 0.5):
    boxes = []
    cell_size = yolo_config["input_size"] / yolo_config["num_grid"]
    # 循环遍历每个批次
    for batch in range(pred.shape[0]):
        # 循环遍历x轴
        for x in range(yolo_config["num_grid"]):
            # 循环遍历y轴
            for y in range(yolo_config["num_grid"]):

                # 得到类别
                class_name = class_name_list[torch.argmax(pred[batch, 10:, x, y])]
                print("class predict", torch.max(pred[batch, 10:, x, y]).item())
                confidence_box1 = pred[batch, 4, x, y]#  * torch.max(pred[batch, 10:, x, y])
                confidence_box2 = pred[batch, 9, x, y]#  * torch.max(pred[batch, 10:, x, y])

                print(f"confidence_box1: {confidence_box1.item()}", f"confidence_box2: {confidence_box2.item()}")

                # 如果没有物体,跳过
                if confidence_box1 < confidence_thr or confidence_box2 < confidence_thr:
                    continue
                if torch.max(pred[batch, 10:, x, y]).item() < class_thr:
                    # print("不符合阈值的box1", pred[batch, 0:5, x, y], "不符合阈值的box1", pred[batch, 6:11, x, y])
                    continue
                # print(f"有物体存在的网格",x,y)
                # 判断confidence scores哪个大哪个就是预测器
                if confidence_box1 >= confidence_box2:

                    box = pred[batch, 0:5, x, y]
                    # print(box)
                    # print(f"解码前结果 box: ", box)
                    box[0] = (box[0] * cell_size + x * cell_size).item()
                    box[1] = (box[1] * cell_size + y * cell_size).item()
                    box[2] = (box[2] * yolo_config["input_size"]).item()
                    box[3] = (box[3] * yolo_config["input_size"]).item()
                    # 转换坐标
                    box_xy = center_to_point(box[0:4])
                    # print(f"解码结果 box: ", box)
                    # print(f"解码结果 class_name: ", class_name)
                    boxes.append((*(box_xy), confidence_box1.item(), class_name))

                if confidence_box1 < confidence_box2:
                    box = pred[batch, 6:11, x, y]
                    # print(box)
                    # print(f"解码前结果 box: ", box)
                    box[0] = (box[0] * cell_size + x * cell_size).item()
                    box[1] = (box[1] * cell_size + y * cell_size).item()
                    box[2] = (box[2] * yolo_config["input_size"]).item()
                    box[3] = (box[3] * yolo_config["input_size"]).item()
                    # 转换坐标
                    box_xy = center_to_point(box[0:4])
                    # print(f"解码结果 box: ", box)
                    # print(f"解码结果 class_name: ", class_name)
                    boxes.append((*(box_xy), confidence_box2.item(), class_name))
                # print(box)

    return boxes
import cv2
import torch

import yoloconfig
from network import yolo
from network.encoder import calculate_iou, yolo_decoder
from torch.utils.data import DataLoader
from torchvision.transforms import transforms
import numpy as np

from MyLib.imgProcess.draw import cv2_draw_one_box


COLOR = [(255,0,0),(255,125,0),(255,255,0),(255,0,125),(255,0,250),
         (255,125,125),(255,125,250),(125,125,0),(0,255,125),(255,0,0),
         (0,0,255),(125,0,255),(0,125,255),(0,255,255),(125,125,255),
         (0,255,0),(125,255,125),(255,255,255),(100,100,100),(0,0,0),]  # 用来标识20个类别的bbox颜色,可自行设定
CLASS = ['aeroplane', 'bicycle', 'bird', 'boat', 'bottle', 'bus', 'car', 'cat', 'chair', 'cow', 'diningtable', 'dog',
         'horse', 'motorbike', 'person', 'pottedplant', 'sheep', 'sofa', 'train', 'tvmonitor']


def calculate_iou_1(box1, box2):
    # 计算两个边界框的交集面积
    x_left = max(box1[0], box2[0])
    y_top = max(box1[1], box2[1])
    x_right = min(box1[2], box2[2])
    y_bottom = min(box1[3], box2[3])

    if x_right < x_left or y_bottom < y_top:
        return 0.0

    intersection_area = (x_right - x_left) * (y_bottom - y_top)
    box1_area = (box1[2] - box1[0]) * (box1[3] - box1[1])
    box2_area = (box2[2] - box2[0]) * (box2[3] - box2[1])
    iou = intersection_area / float(box1_area + box2_area - intersection_area)
    return iou

def nms(boxes, threshold):
    """
    非极大值抑制算法(NMS)
    :param boxes: 包含每个边界框的左上角和右下角坐标、置信度和类别的列表
    :param threshold: 重叠面积阈值
    :return: 保留的边界框列表
    """

    if len(boxes) == 0:
        return []

    # 分别提取边界框的坐标、置信度和类别信息
    x1 = np.array([box[0] for box in boxes])
    y1 = np.array([box[1] for box in boxes])
    x2 = np.array([box[2] for box in boxes])
    y2 = np.array([box[3] for box in boxes])
    scores = np.array([box[4] for box in boxes])

    areas = (x2 - x1 + 1) * (y2 - y1 + 1)

    # 根据边界框置信度降序排列
    order = scores.argsort()[::-1]

    keep = []
    while len(order) > 0:
        i = order[0]  # 取出当前置信度最高的边界框
        keep.append(i)

        xx1 = np.maximum(x1[i], x1[order[1:]])
        yy1 = np.maximum(y1[i], y1[order[1:]])
        xx2 = np.minimum(x2[i], x2[order[1:]])
        yy2 = np.minimum(y2[i], y2[order[1:]])

        w = np.maximum(0.0, xx2 - xx1 + 1)
        h = np.maximum(0.0, yy2 - yy1 + 1)
        intersection = w * h

        iou = intersection / (areas[i] + areas[order[1:]] - intersection)

        inds = np.where(iou <= threshold)[0]
        order = order[inds + 1]

    return [boxes[i] for i in keep]


if __name__ == '__main__':
    model = yolo.yoloV1Resnet()


    # 2023.11.11 定位不准可能是单元格内边界框的置信度误差比较大,导致定位时,定位在了错误的网格
    #            训练时loss会震荡
    # 11.12 模型训练loss仍然下不来,可能是数据集太少的原因
    # 11.13 改小batch继续训练,之前尝试更换主体网络为resnet18不行,减小学习率不行
    model.load_state_dict(torch.load("models/_keyboardInterrupt_.pth")) # 加载训练好的模型
    model.eval()
    model.cuda()

    img = cv2.imread("./img/000229.jpg")
    img = cv2.resize(img, (448, 448))
    inputs = cv2.cvtColor(img, cv2.COLOR_BGR2RGB)
    inputs = transforms.ToTensor()(inputs)
    inputs = inputs.to(torch.device("cuda:0"))
    inputs = torch.unsqueeze(inputs, dim=0)

    pred = model(inputs)  # pred的尺寸是(1,30,7,7)
    pred = pred.detach().cpu()
    # pred = pred.squeeze(dim=0)  # 压缩为(30,7,7)
    # pred = pred.permute((1, 2, 0))  # 转换为(7,7,30)
    print(pred[0, 4, :, :])
    print(pred[0, 9, :, :])
    boxes = yolo_decoder(pred, CLASS, yolo_config=yoloconfig.yolo_config, confidence_thr=0.1)
    print("boxes", boxes)
    box_boxes = []
    for i in boxes:
        if i[3] - i[1] <= 10:
            continue
        else:
            box_boxes.append(i)

    # print("nms前", box_boxes)
    new_boxes = nms(box_boxes, 0.3)
    # print("nms后", new_boxes)
    for i in new_boxes:
        # print(i)
        cv2_draw_one_box(img, i, (255, 0, 255))
    cv2.imshow("aa", img)
    cv2.waitKey(0)
本文来自互联网用户投稿,该文观点仅代表作者本人,不代表本站立场。本站仅提供信息存储空间服务,不拥有所有权,不承担相关法律责任。 如若内容造成侵权/违法违规/事实不符,请联系我的编程经验分享网邮箱:veading@qq.com进行投诉反馈,一经查实,立即删除!