shp文件与数据库(创建表)
前言
第三方库准备
shp文件是什么?笔者就不多做解释。后面将使用python的一些第三方库
1、sqlalchemy
2、pyshp
3、geoalchemy2
4、geopandas
这四个是主要的库,具体怎么使用可以参考相关教程,当然还有其他库,后面在介绍。
数据库准备
shp文件一般包含空间数据,所以选用的数据库是PostgreSQL。具体操作不多说。
shp文件准备
打开阿里云数据可视化平台,DataV.GeoAtlas地理小工具系列 (aliyun.com)
比如选择成都市,如下图。

可以其中类型中选择下载,直接下载json文件,也可以通过对json API 发送请求,得到json数据。
代码如下。
import requests
import json
r=requests.get(url='https://geo.datav.aliyun.com/areas_v3/bound/geojson?code=510100_full')
str_data=json.dumps(r.json(),ensure_ascii=False)
with open('成都.json','w',encoding='utf-8') as f:
    f.write(str_data)
修改code参数,就可以得到其他地区的数据。
后面可以通过网站把json文件转shp文件,如下这个网站,JSON to SHP Converter Online - MyGeodata Cloud,当然也可以通过python把json转shp文件,很简单,代码如下。
import geopandas as gpd
data = gpd.read_file('成都市.json')
data.to_file('成都', driver='ESRI Shapefile', encoding='utf-8')
运行是成功的,如果有如下警告,可以忽略,不存在。

则会在当前目录下生成shp及相关的文件,如下图

通过arcmap打开shp文件,在通过arcmap修改一下属性,显示的结果如图。

打开属性表,可以看到数据,如下图所示。

正文
读取shp文件,有多种方法,可以通过peopandas,或者pyshp(shapefile)读取,因为要创建表,笔者使用pyshp来读取shp文件。
得到列
代码如下。
import shapefile
file=shapefile.Reader('成都/成都.shp')
fileds=file.fields
for i in fileds:
    print(i)
shapes=file.shape()
print(shapes.shapeTypeName)
打印的数据如下。
('DeletionFlag', 'C', 1, 0)
['adcode', 'N', 18, 0]
['name', 'C', 80, 0]
['childrenNu', 'N', 18, 0]
['level', 'C', 80, 0]
['parent', 'C', 80, 0]
['subFeature', 'N', 18, 0]
POLYGON
分析数据的意思
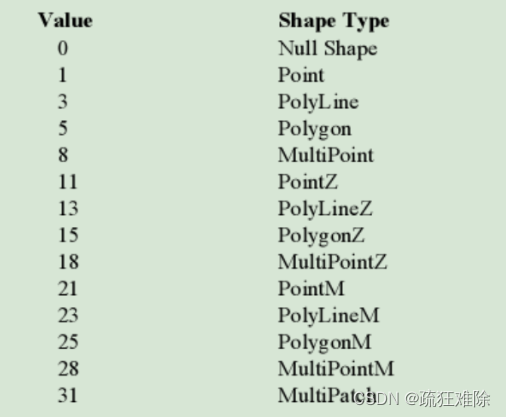
DeletionFlag没有用,可以删除,POLYGON,对应的空间数据是面,还有其他类型,如下图所示

具体含义可自行搜索。以['adcode', 'N', 18, 0]为例
'adcode' 是字段名。
'N' 是字段类型,表示数值类型,可以是整数或浮点数。
18 是字段长度,表示这个字段可以存储的最大字符数。
0 是小数位数,表示数值可以有的小数位数。在这个例子中,小数位数为 0,所以这个字段应该是整数类型。
还有其他字段类型,如下所示。
| 字段索引 | 字段类型 |
|---|---|
| C | 字符,文字 |
| N | 数字,带或不带小数 |
| F | 浮动(与“N”相同) |
| L | 逻辑,表示布尔值True / False值 |
| D | 日期 |
| M | 备忘录,在GIS中没有意义,而是xbase规范的一部分 |
所以,可以总结出表的属性分别有
id(自己建立),geometry,adcode,name,childrenNu,level,parent,subFeature
和arcmap中看到的一致。
创建表
创建表可以自己使用sql语句,笔者直接使用已有的轮子,sqlalchemy,先对怎么创建表举个例子
示例——创建学生表
代码如下。
from sqlalchemy import create_engine,Integer,String,Column
from sqlalchemy.orm import declarative_base
# 构造基础类
Base = declarative_base()
# 创建交互引擎
engine = create_engine('mysql+pymysql://username:password@localhost:3306/database')

# 表的定义
class Student(Base):
    __tablename__ = 'student'
    id = Column(Integer(), primary_key=True, autoincrement=True, nullable=False, comment='学生id')
    name = Column(String(16), nullable=False, comment='学生姓名')

# 执行创建
Base.metadata.create_all(engine)
需要安装pymysql库,如果是PostgreSQL,需要安装psycopg2库。
创建shp文件中的表
代码如下。
from geoalchemy2 import Geometry
# Geometry 空间数据类型
from sqlalchemy.schema import CreateTable
from sqlalchemy.orm import declarative_base
from sqlalchemy import Table, Column, Integer, VARCHAR, create_engine, BigInteger, Numeric, DATE, Boolean
from dataclasses import dataclass, fields
import shapefile

Base = declarative_base()


@dataclass
class Shp2Postgres:
    shp_path: str
    table_name: str = 'shp'
    pg_db: str = 'arcgis'
    engine: create_engine = create_engine(f'postgresql+psycopg2://username:password@localhost/{pg_db}')
    file: shapefile.Reader = None
    words: list = None
    shape_name: str = None
    """
    :param shp_path: shp文件路径
    :param table_name: 表名
    :param pg_db: 数据库名
    :param engine: 数据库引擎
    :param file: shp文件
    :param words: shp文件字段
    :param shape_name: shp文件类型
    :param ShpTable: shp文件对应的表
    """

    def __post_init__(self):
        self.file = shapefile.Reader(self.shp_path)
        self.words = self.file.fields[1:]
        self.shape_name = self.file.shapeTypeName

        class ShpTable(Base):
            __tablename__ = self.table_name
            id = Column(Integer(), primary_key=True, autoincrement=True, nullable=False, comment='id')
            geometry = Column(Geometry(geometry_type=self.shape_name, srid=4326), comment='空间信息')

        self.ShpTable = ShpTable
        self.add_column()

    def add_column(self):
        """
        添加字段
        :return:
        """
        for field in self.words:
            name = field[0]
            _type = field[1]
            length = field[2]
            decimal = field[3]
            match _type:
                case 'N':
                    _type = BigInteger()
                case 'C':
                    _type = VARCHAR(length)
                case 'F':
                    _type = Numeric(length, decimal)
                case 'L':
                    _type = Boolean()
                case 'D':
                    _type = DATE()
                case 'M':
                    _type = VARCHAR(255)
                case _:
                    _type = VARCHAR(255)
            setattr(self.ShpTable, name, Column(_type, comment=name, name=name, quote=False))

    def execute(self):
        """
        执行创建
        :return:
        """
        # 执行创建
        Base.metadata.create_all(self.engine)
        # 打印创建表的sql语句
        table = CreateTable(self.ShpTable.__table__).compile(self.engine)
        print(table)
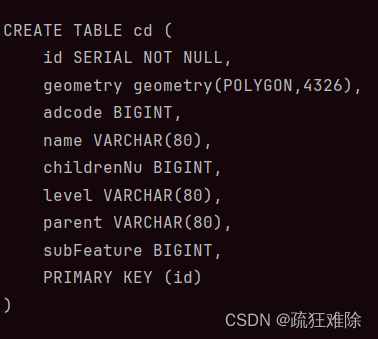
运行以下

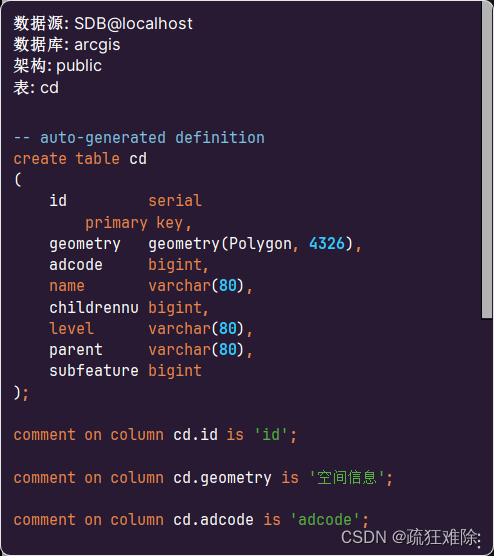
数据库中表如下

创建成功。
最后
下一篇接着写,怎么插入数数据。
本文来自互联网用户投稿,该文观点仅代表作者本人,不代表本站立场。本站仅提供信息存储空间服务,不拥有所有权,不承担相关法律责任。 如若内容造成侵权/违法违规/事实不符,请联系我的编程经验分享网邮箱:veading@qq.com进行投诉反馈,一经查实,立即删除!