Kind创建k8s - JAVA操作控制
简介
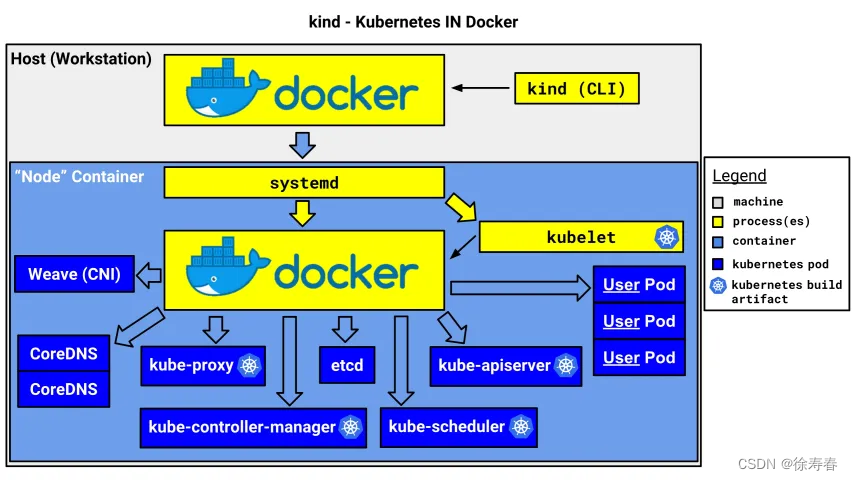
kind 是 Kubernetes in Docker 的简写,是一个使用 Docker 容器作为 Nodes,在本地创建和运行 Kubernetes 群集的工具。适用于在本机创建 Kubernetes 群集环境进行开发和测试。
kind 由以下组件构成:
- Go packages implementing cluster creation, image build, etc.
- A command line interface (kind) built on these packages.
- Docker image(s) written to run systemd, Kubernetes, etc.
- kubetest integration also built on these packages (WIP)
kind 使用 kubeadm 创建和启动群集节点。
kind 架构
kind 官方架构图如下,它将 docker 容器作为 kubernetes 的 “node”,并在该 “node” 中安装 kubernetes 组件,包括一个或者多个 Control Plane 和 一个或者多个 Work nodes。这就解决了在本机运行多个 node 的问题,而不需要虚拟化 (sysin)。
安装 Kind (必备工具)
docker官网
yum -y install yum-utils device-mapper-persistent-datalvm2

yum-config-manager --add-repo http://mirrors.aliyun.com/docker-ce/linux/centos/docker-ce.repo

yum makecache fast

yum install docker-ce docker-ce-cli containerd.io

systemctl start docker

systemctl enable docker

docker run hello-world
kubectl官网
kubectl 是Kubernetes的命令行工具,可以让我们通过命令访问、操作、管理Kubernetes集群。brew安装方法如下
curl -LO "https://dl.k8s.io/release/$(curl -L -s https://dl.k8s.io/release/stable.txt)/bin/linux/amd64/kubectl"

mv kubectl /usr/local/bin/kubectl
kind官网
curl -Lo ./kind https://kind.sigs.k8s.io/dl/v0.20.0/kind-linux-amd64
# 如果安装不了 用下面的
chmod +x ./kind
mv ./kind /usr/local/bin/kind
校验安装结果
kubectl version --client
kind version
关于kind 命令
- build 用来从 k8s source 构建一个镜像。
- create、delete 创建、删除集群。
- export 命令目前只有一个 logs 选项,作用是将内部所有容器的日志拷贝到宿主机的某个目录下。
- get 查看当前有哪些集群,哪些节点,以及 kubectl 配置文件的地址
- load 可以从宿主机向 k8s 容器内导入镜像。
安装一个集群
kind create cluster
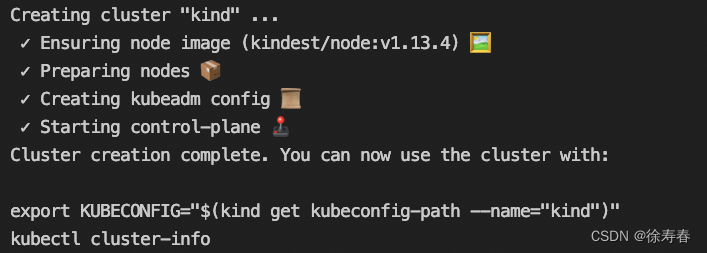
export KUBECONFIG="$(kind get kubeconfig-path --name="kind")"
kubectl cluster-info

查看当前 Kubernetes 集群中的节点信息。
kubectl get node

查看当前命名空间下中的Pod(容器实例)的信息。
kubectl get namespace
kubectl get po -A
kubectl get po -n kube-system

使用 kind create cluster 安装,关于安装方式
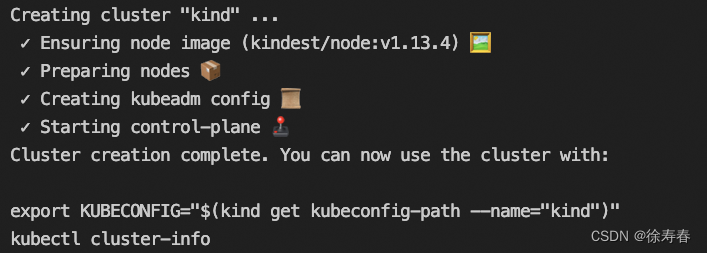
从安装打印出的输出来看,分为4步:
- 查看本地上是否存在一个基础的安装镜像,默认是 kindest/node:v1.13.4,这个镜像里面包含了需要安装的所有东西,包括了 kubectl、kubeadm、kubelet 二进制文件,以及安装对应版本 k8s 所需要的镜像
- 准备你的 node,这里就是做一些启动容器、解压镜像之类的工作
- 生成对应的 kubeadm 的配置,之后通过 kubeadm 安装,安装之后还会做另外的一些操作,比如像我刚才仅安装单节点的集群,会帮你删掉 master 节点上的污点,否则对于没有容忍的 pod 无法部署。
- 启动完毕
查看当前集群运行组件
kubectl get po -n kube-system
默认方式启动的节点类型是 control-plane 类型,包含了所有的组件
- 两个coredns
- etcd
- api-server
- controller-manager
- kube-proxy
- sheduler
- 网络插件方面默认使用的是 weave
查看一下 kind 下面是基础容器内部的 /kind 目录
进入容器
docker exec -it kind-control-plane /bin/bash

cd /bin
- 在 bin 目录下安装了 kubelet、kubeadm、kubectl 这些二进制文件
- 在images 下面是镜像的 tar 包,kind 在启动基础镜像后会执行一遍 docker load 操作将这些 tar 包导入
- 在manifests 下面是 weave 的 cni
关于: Kubelet、kubeadm 和 kubectl
Kubelet、kubeadm 和 kubectl 是 Kubernetes 生态系统中的三个关键组件,各自具有不同的功能和职责。
- Kubelet: Kubelet 是运行在每个 Kubernetes 节点上的组件,负责管理和控制节点上的容器。它与容器运行时(如 Docker、containerd)交互,确保 Pod 的容器在节点上正确创建、启动、停止和删除。Kubelet 还与 Kubernetes 控制平面交互,汇报节点状态和接收分配给节点的任务。
- Kubeadm: Kubeadm 是 Kubernetes 官方提供的用于部署和管理 Kubernetes 集群的工具。它简化了 Kubernetes 集群的初始化过程,帮助管理员在几个节点上快速创建一个稳定的、符合最佳实践的集群。Kubeadm 处理集群的引导、证书生成、网络配置、设置控制平面组件等任务,使得集群部署变得更加容易。
- Kubectl: kubectl 是 Kubernetes 的命令行工具,用于与 Kubernetes 集群进行交互和管理。它是与 Kubernetes API 通信的主要方式,允许用户执行各种操作,如创建、删除和管理资源(如 Pod、Service、Deployment 等)、查看集群状态、进行日志和调试等。kubectl 是与 Kubernetes 交互的主要入口。
综上所述,Kubelet 是在每个节点上运行的组件,负责管理和控制容器;kubeadm 是用于部署和初始化 Kubernetes 集群的工具;kubectl 是用于与 Kubernetes 集群进行交互和管理的命令行工具。它们各自扮演着不同的角色,共同构建和管理 Kubernetes 集群。
关于"Weave"
Weave是一种 Kubernetes 网络插件,它提供了一个容器网络接口(Container Networking Interface,CNI)的实现。
- CNI 是 Kubernetes 中用于管理容器网络的标准接口,它定义了一组规范和API,用于在容器运行时环境中创建、配置和连接容器网络。CNI 插件负责实现这些规范和API,以便 Kubernetes 能够为容器提供网络功能。
- “Weave CNI” 是基于 Weave 网络的 CNI 插件。它使用 Weave 的技术和协议来创建和管理容器网络。当您在 Kubernetes 中使用 Weave CNI 时,它将负责在各个节点上创建和配置网络接口,使得容器能够在集群中进行通信。
Weave CNI 提供了一种简单而灵活的容器网络解决方案,它能够自动创建虚拟网络,并在不同节点上的容器之间建立安全的通信通道。它还支持网络策略和服务发现等功能,使您能够对容器网络进行更精细的控制和管理。
总而言之,通过使用 Weave CNI 插件,您可以轻松地在 Kubernetes 集群中创建和管理容器网络,实现容器之间的通信和连接。
创建集群
从上诉下载的文档来看默认安装的集群只带上了一个控制节点

默认的群集名称为kind,使用参数–name指定创建的群集的名称,可以创建多个群集:
在 node 中可以配置的不是很多,除了 role 另外的可以更改 node 使用的镜像,不过我还是使用默认的镜像创建集群
# default
kind create cluster --image kindest/node:latest
# 1.20.0
kind create cluster --image kindest/node:v1.20.0
因为前面已经创建了kind 所以命令如下 使用默认景象,创建为kind-test2 集群
kind create cluster --name kind-2
查看当前拥有哪些集群
通过 kind get clusters 可以看到当前有两个集群

既然有两个集群,可以通过集群切换到指定对应集群处理。kind-集群
# 切换到群集`kind`
kubectl cluster-info --context kind-kind

# 切换到群集`kind-2`
kubectl cluster-info --context kind-kind-2
删除某个集群
 kind get clusters
 # 指定删除某个
 kind delete cluster --name kind
 # 删除全部
 kind delete cluster --all
通过yaml 文件创建集群
- 首先删除所有集群
kind delete cluster --all
- 创建配置文件 kind-config.yaml
vim kind-config.yaml
- 创建集群 两个节点 一个平面
apiVersion: kind.sigs.k8s.io/v1alpha3
kind: Cluster
nodes:
  - role: control-plane
  - role: worker
  - role: worker
kind create cluster --name multi-node --config=kind-config.yaml
端口暴露
docker ps

在这里我被坑了好久,127.0.0.1:38884 映射容器里里面的k8s 6443 导致后无法访问serviceApi 6443端口,因为他要本地的12.0.0.1的ip4网段,这个后面会说
127.0.0.1:38884->6443/tcp
目前可以看到只有33884这个端口可以从外部访问,用kind创建K8s时,相当在本地运行了一个容器,而K8s Cluster就运行在这个容器中。
所以,如果我想从外部访问kind K8s的话,就需要把这个容器的端口(K8s的端口)暴露出来。首先删除所有 k8s cluster
kind delete cluster --all
搭建集群 带端口映射
vim kind-single #创建一个测试单节点集群
kind: Cluster
apiVersion: kind.x-k8s.io/v1alpha4
nodes:
  - role: control-plane
    kubeadmConfigPatches:
      - |
        kind: InitConfiguration
        nodeRegistration:
          kubeletExtraArgs:
            node-labels: "ingress-ready=true"
    extraPortMappings:
      - containerPort: 80
        hostPort: 8001
        protocol: TCP
创建单节点集群脚本 主机端口 8001 映射到内部容器 80
关于于 ingress-ready=true 需要解释一下
- role: control-plane 表示该节点将作为控制平面节点运行。
- kubeadmConfigPatches 是一个配置补丁列表,用于向节点的 kubeadm 配置添加额外的配置项。
- kind: InitConfiguration 表示正在修改节点的初始化配置。
- nodeRegistration 部分用于修改节点注册的相关配置。
- kubeletExtraArgs 是一个用于在节点的 kubelet 配置中添加额外参数的字段。在这个例子中,我们添加了一个 node-labels 参数,并将它设置为 “ingress-ready=true”。
“ingress-ready=true” 下面扩展端口映射确保只将流量发送到已准备好的节点上
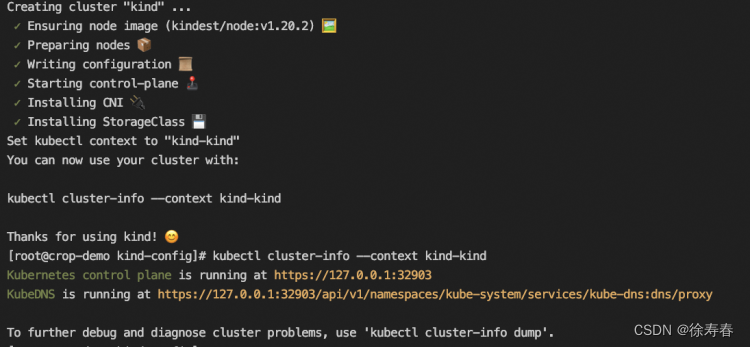
kind create cluster --name tsk8s --config /usr/local/kind-config/kind-single
部署nginx测试
切换到当前 kind
kubectl cluster-info --context kind-kind
docker ps
创建一个需要部署的应用 nginx.yaml
apiVersion: apps/v1
kind: Deployment
metadata:
  labels:
    app: web-nginx
  name: web-nginx-Deployment
spec:
  replicas: 3
  selector:
    matchLabels:
      app: web-nginx
  template:
    metadata:
      labels:
        app: web-nginx
    spec:
      containers:
      - image: nginx
        name: nginx
        ports:
        - containerPort: 80
---
apiVersion: v1
kind: Service
metadata:
  name: web-nginx
spec:
  selector:
    app: web-nginx
  type: NodePort
  ports:
    - port: 80
      nodePort: 30080
这是一个 Kubernetes 的 YAML 配置文件示例,描述了一个 Deployment 和一个 Service 的定义。
- apiVersion: apps/v1 和 apiVersion: v1 分别指定了所使用的 Kubernetes API 的版本。apps/v1 表示使用的是 Apps API 的 v1 版本,而 v1 表示使用的是核心 API 的 v1 版本。
- kind: Deployment 和 kind: Service 定义了资源的类型。
- Deployment 表示定义一个 Deployment 资源,用于管理应用程序的副本。
- Service 表示定义一个 Service 资源,用于暴露应用程序的网络服务。
- metadata 区域包含元数据信息,如资源的标签和名称。
- spec 区域定义了资源的规范或配置。
对于 Deployment 部分:
- replicas: 3 指定了要创建的副本数量为 3。
- selector 指定了用于选择要进行部署的 Pod 的标签。
- template 定义了要创建的 Pod 的模板,其中包含了 Pod 的标签、容器以及相关的配置信息。
在 containers 下的
- image: nginx 指定了要使用的容器镜像
- name: nginx 为容器命名,
- ports 下的 - containerPort: 80 指定了容器监听的端口号为 80。
对于 Service 部分: - selector 指定了要将该 Service 与哪些 Pod 进行关联,通过匹配标签 app: web-nginx。
- type: NodePort 表示 Service 类型为 NodePort,可以通过任意节点的 IP 和指定的 NodePort 来访问该 Service。
- ports 下的 - port: 80 指定了 Service 其他 Pod 可以通过的端口号为 80,nodePort: 30080 指定了节点上的端口号为 30080,用于外部访问 Service。
这个配置文件描述了一个使用 Nginx 镜像构建的 Deployment 和一个相关的 Service,用于管理和暴露一个名为 web-nginx 的应用程序。
执行以下命令启动应用部署3个pod单位的nginx 本次发布部署为 web-nginx-Deployment
kubectl create -f nginx.yaml
http://你的主机:30070/ . 可以看到
创建集群搭建 kubernetes-dashboard 控制台
可能你会需要kubernetes的控制台
创建 kubernetes-dashboard .yaml
# Copyright 2017 The Kubernetes Authors.
#
# Licensed under the Apache License, Version 2.0 (the "License");
# you may not use this file except in compliance with the License.
# You may obtain a copy of the License at
#
#     http://www.apache.org/licenses/LICENSE-2.0
#
# Unless required by applicable law or agreed to in writing, software
# distributed under the License is distributed on an "AS IS" BASIS,
# WITHOUT WARRANTIES OR CONDITIONS OF ANY KIND, either express or implied.
# See the License for the specific language governing permissions and
# limitations under the License.

apiVersion: v1
kind: Namespace
metadata:
  name: kubernetes-dashboard

---

apiVersion: v1
kind: ServiceAccount
metadata:
  labels:
    k8s-app: kubernetes-dashboard
  name: kubernetes-dashboard
  namespace: kubernetes-dashboard

---

kind: Service
apiVersion: v1
metadata:
  labels:
    k8s-app: kubernetes-dashboard
  name: kubernetes-dashboard
  namespace: kubernetes-dashboard
spec:
  ports:
    - port: 443
      targetPort: 8443
  selector:
    k8s-app: kubernetes-dashboard

---

apiVersion: v1
kind: Secret
metadata:
  labels:
    k8s-app: kubernetes-dashboard
  name: kubernetes-dashboard-certs
  namespace: kubernetes-dashboard
type: Opaque

---

apiVersion: v1
kind: Secret
metadata:
  labels:
    k8s-app: kubernetes-dashboard
  name: kubernetes-dashboard-csrf
  namespace: kubernetes-dashboard
type: Opaque
data:
  csrf: ""

---

apiVersion: v1
kind: Secret
metadata:
  labels:
    k8s-app: kubernetes-dashboard
  name: kubernetes-dashboard-key-holder
  namespace: kubernetes-dashboard
type: Opaque

---

kind: ConfigMap
apiVersion: v1
metadata:
  labels:
    k8s-app: kubernetes-dashboard
  name: kubernetes-dashboard-settings
  namespace: kubernetes-dashboard

---

kind: Role
apiVersion: rbac.authorization.k8s.io/v1
metadata:
  labels:
    k8s-app: kubernetes-dashboard
  name: kubernetes-dashboard
  namespace: kubernetes-dashboard
rules:
  # Allow Dashboard to get, update and delete Dashboard exclusive secrets.
  - apiGroups: [""]
    resources: ["secrets"]
    resourceNames: ["kubernetes-dashboard-key-holder", "kubernetes-dashboard-certs", "kubernetes-dashboard-csrf"]
    verbs: ["get", "update", "delete"]
    # Allow Dashboard to get and update 'kubernetes-dashboard-settings' config map.
  - apiGroups: [""]
    resources: ["configmaps"]
    resourceNames: ["kubernetes-dashboard-settings"]
    verbs: ["get", "update"]
    # Allow Dashboard to get metrics.
  - apiGroups: [""]
    resources: ["services"]
    resourceNames: ["heapster", "dashboard-metrics-scraper"]
    verbs: ["proxy"]
  - apiGroups: [""]
    resources: ["services/proxy"]
    resourceNames: ["heapster", "http:heapster:", "https:heapster:", "dashboard-metrics-scraper", "http:dashboard-metrics-scraper"]
    verbs: ["get"]

---

kind: ClusterRole
apiVersion: rbac.authorization.k8s.io/v1
metadata:
  labels:
    k8s-app: kubernetes-dashboard
  name: kubernetes-dashboard
rules:
  # Allow Metrics Scraper to get metrics from the Metrics server
  - apiGroups: ["metrics.k8s.io"]
    resources: ["pods", "nodes"]
    verbs: ["get", "list", "watch"]

---

apiVersion: rbac.authorization.k8s.io/v1
kind: RoleBinding
metadata:
  labels:
    k8s-app: kubernetes-dashboard
  name: kubernetes-dashboard
  namespace: kubernetes-dashboard
roleRef:
  apiGroup: rbac.authorization.k8s.io
  kind: Role
  name: kubernetes-dashboard
subjects:
  - kind: ServiceAccount
    name: kubernetes-dashboard
    namespace: kubernetes-dashboard

---

apiVersion: rbac.authorization.k8s.io/v1
kind: ClusterRoleBinding
metadata:
  name: kubernetes-dashboard
roleRef:
  apiGroup: rbac.authorization.k8s.io
  kind: ClusterRole
  name: kubernetes-dashboard
subjects:
  - kind: ServiceAccount
    name: kubernetes-dashboard
    namespace: kubernetes-dashboard

---

kind: Deployment
apiVersion: apps/v1
metadata:
  labels:
    k8s-app: kubernetes-dashboard
  name: kubernetes-dashboard
  namespace: kubernetes-dashboard
spec:
  replicas: 1
  revisionHistoryLimit: 10
  selector:
    matchLabels:
      k8s-app: kubernetes-dashboard
  template:
    metadata:
      labels:
        k8s-app: kubernetes-dashboard
    spec:
      securityContext:
        seccompProfile:
          type: RuntimeDefault
      containers:
        - name: kubernetes-dashboard
          image: kubernetesui/dashboard:v2.5.0
          imagePullPolicy: Always
          ports:
            - containerPort: 8443
              protocol: TCP
          args:
            - --auto-generate-certificates
            - --namespace=kubernetes-dashboard
            # Uncomment the following line to manually specify Kubernetes API server Host
            # If not specified, Dashboard will attempt to auto discover the API server and connect
            # to it. Uncomment only if the default does not work.
            # - --apiserver-host=http://my-address:port
          volumeMounts:
            - name: kubernetes-dashboard-certs
              mountPath: /certs
              # Create on-disk volume to store exec logs
            - mountPath: /tmp
              name: tmp-volume
          livenessProbe:
            httpGet:
              scheme: HTTPS
              path: /
              port: 8443
            initialDelaySeconds: 30
            timeoutSeconds: 30
          securityContext:
            allowPrivilegeEscalation: false
            readOnlyRootFilesystem: true
            runAsUser: 1001
            runAsGroup: 2001
      volumes:
        - name: kubernetes-dashboard-certs
          secret:
            secretName: kubernetes-dashboard-certs
        - name: tmp-volume
          emptyDir: {}
      serviceAccountName: kubernetes-dashboard
      nodeSelector:
        "kubernetes.io/os": linux
      # Comment the following tolerations if Dashboard must not be deployed on master
      tolerations:
        - key: node-role.kubernetes.io/master
          effect: NoSchedule

---

kind: Service
apiVersion: v1
metadata:
  labels:
    k8s-app: dashboard-metrics-scraper
  name: dashboard-metrics-scraper
  namespace: kubernetes-dashboard
spec:
  ports:
    - port: 8000
      targetPort: 8000
  selector:
    k8s-app: dashboard-metrics-scraper

---

kind: Deployment
apiVersion: apps/v1
metadata:
  labels:
    k8s-app: dashboard-metrics-scraper
  name: dashboard-metrics-scraper
  namespace: kubernetes-dashboard
spec:
  replicas: 1
  revisionHistoryLimit: 10
  selector:
    matchLabels:
      k8s-app: dashboard-metrics-scraper
  template:
    metadata:
      labels:
        k8s-app: dashboard-metrics-scraper
    spec:
      securityContext:
        seccompProfile:
          type: RuntimeDefault
      containers:
        - name: dashboard-metrics-scraper
          image: kubernetesui/metrics-scraper:v1.0.7
          ports:
            - containerPort: 8000
              protocol: TCP
          livenessProbe:
            httpGet:
              scheme: HTTP
              path: /
              port: 8000
            initialDelaySeconds: 30
            timeoutSeconds: 30
          volumeMounts:
            - mountPath: /tmp
              name: tmp-volume
          securityContext:
            allowPrivilegeEscalation: false
            readOnlyRootFilesystem: true
            runAsUser: 1001
            runAsGroup: 2001
      serviceAccountName: kubernetes-dashboard
      nodeSelector:
        "kubernetes.io/os": linux
      # Comment the following tolerations if Dashboard must not be deployed on master
      tolerations:
        - key: node-role.kubernetes.io/master
          effect: NoSchedule
      volumes:
        - name: tmp-volume
          emptyDir: {}
配置 dashboard-config.yaml
kind: Cluster
apiVersion: kind.x-k8s.io/v1alpha4
nodes:
  - role: control-plane
    kubeadmConfigPatches:
      - |
        kind: InitConfiguration
        nodeRegistration:
          kubeletExtraArgs:
            node-labels: "ingress-ready=true"
    extraPortMappings:
      - containerPort: 31000
        hostPort: 31000
        protocol: TCP
查看端口映射情况
docker ps
0.0.0.0:31000->31000/tcp, 127.0.0.1:35017->6443/tcp
确认 kubernetes-dashboard.yaml 映射情况
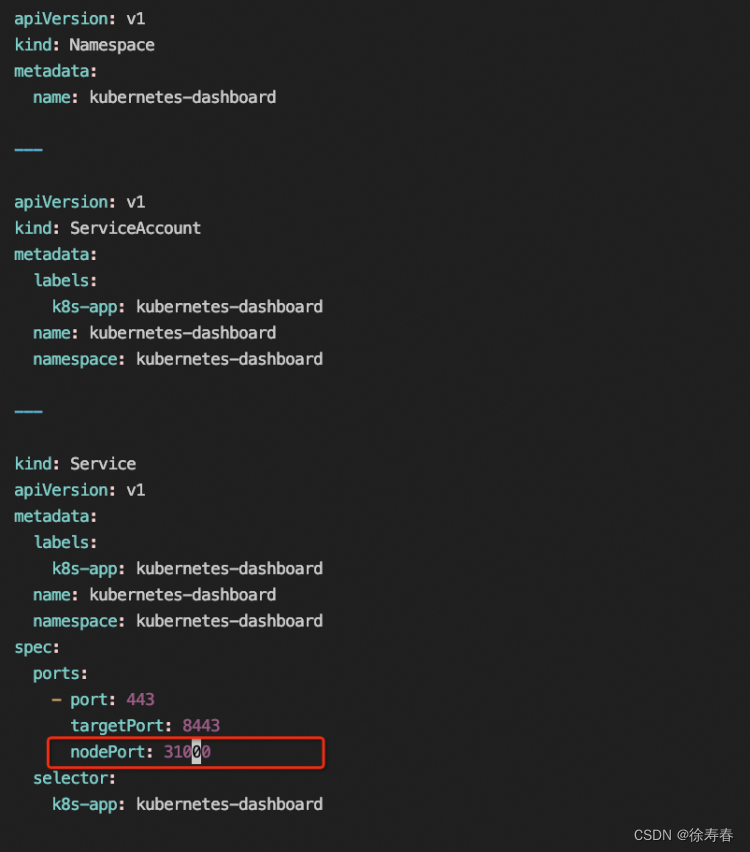
节点映射 31000. 设置类型为nodePort 供外部访问
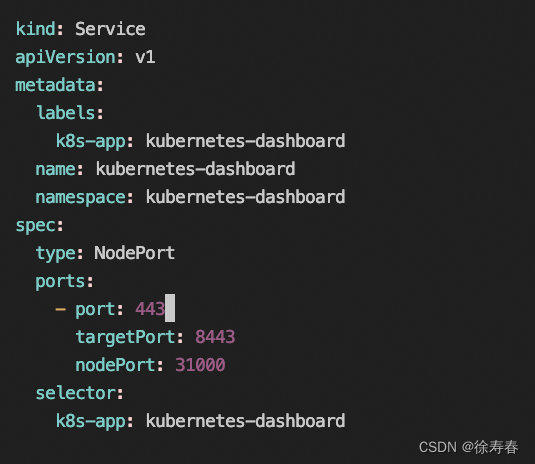
spec:
  type: NodePort
  selector:
    app: kubernetes-dashboard
  ports:
    - port: 443
      targetPort: 8443
      nodePort:31000
      protocol: TCP
创建集群
kind create cluster --name kind-dashboard --config=/usr/local/kind-config/cluster/dashboard-cluster-config.yaml
切换到当前容器
kubectl cluster-info --context kind-kind-dashboard
应用 Dashboard
kubectl apply -f /usr/local/kind-config/kubernetes-dashboard.yaml
如果没有设置nodePort 会报错 not be used when type is ‘ClusterIP’
The Service "kubernetes-dashboard" is invalid: spec.ports[0].nodePort: Forbidden: may not be used when `type` is 'ClusterIP'
表明在 Service 对象的定义中,当 type 字段设置为 ClusterIP 时,不允许使用 nodePort 字段。nodePort 字段是用于 NodePort 类型的 Service,而不是 ClusterIP 类型的 Service。
为了解决这个问题,您可以考虑以下两种方法之一:
- 修改 Service 对象的 type 字段为 NodePort:
- 如果您只需要 ClusterIP 类型的 Service,请删除 nodePort 字段:
因为是修改dashboard.yaml service 端口映射,如果没有类型默认是 类型 所以要修改一下
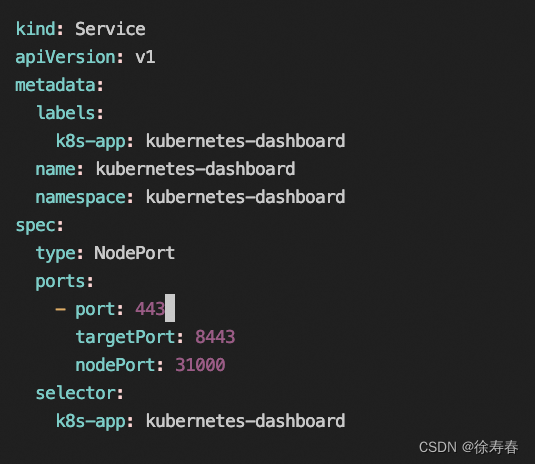
创建Secret - service-account-secret.yaml
# 在kubernetes-dashboard命名空间下创建名为 admin-user 的服务账户
apiVersion: v1
kind: ServiceAccount
metadata:
  name: admin-user
  namespace: kubernetes-dashboard

---

# 将服务账户admin-user绑定到内置的ClusterRole集群角色cluster-admin上, 实现授权
apiVersion: rbac.authorization.k8s.io/v1
kind: ClusterRoleBinding
metadata:
  name: admin-user
roleRef:
  apiGroup: rbac.authorization.k8s.io
  kind: ClusterRole
  name: cluster-admin
subjects:
- kind: ServiceAccount
  name: admin-user
  namespace: kubernetes-dashboard

---

# 对名为admin-user的服务账户手动创建Secret
apiVersion: v1
kind: Secret
metadata:
  name: admin-user-secret
  namespace: kubernetes-dashboard
  annotations:
    kubernetes.io/service-account.name: admin-user
type: kubernetes.io/service-account-token
也可以不创建但是需要,创建 ClusterRoleBinding 获得群集 admin 访问权限:都是一样的,这个后面说
应用权限并拿到token
kubectl apply -f /usr/local/kind-config/service-account-secret.yaml
通过service-account-secret.yaml配置文件,给kubernetes-dashboard命名空间下名为admin-user的服务账户手动创建了一个名为admin-user-secret的Secret。现在可以通过该Secret获取相应的Token。通过kubectl describe、kubectl get两种方式获取。
kubectl describe secret admin-user-secret -n kubernetes-dashboard
查看是否ok
kubectl get po,svc -n kubernetes-dashboard
service 上面有对应的端口映射,我们前文已经暴露了,所以31000应该打service的31000
如果不想像上面一样拿token获取,还有一种,不过前期学习不建议,操作如下
- 创建 ClusterRoleBinding 获得群集 admin 访问权限:
kubectl create clusterrolebinding default-admin --clusterrole cluster-admin --serviceaccount=default:default
#提示:
clusterrolebinding.rbac.authorization.k8s.io/default-admin created
- 创建登录 Dashboard 的 token:
token=$(kubectl get secrets -o jsonpath="{.items[?(@.metadata.annotations['kubernetes\.io/service-account\.name']=='default')].data.token}"|base64 --decode)
- 拿到token
echo $token
最后访问:https://你的主机ip:31000/。拿到对应的token去访问,如果访问为不安全的的可能是证书问题,如何解决
thisisunsafe
如果不处理证书,似乎没有什么终极解决办法,
两种方案:
一,点击“高级”,再点击“继续浏览……”,下一次再打开该网页时谷歌浏览器就不会提示不是私密连接了。
二、看到“你的连接不是私密连接”画面时,直接在键盘上敲击“thisisunsafe”12个字母,谷歌浏览器会自动刷新显示网页。
java链接kind 创建的k8s
上面的案例如果看完了,基本我的坑就走完了,你已经大致明白了如何通过kind去如何创建一个k8s了,我也是摸了好多坑肝出来了,但是在机器上面操作并不满足我们的日常需求,太麻烦了,所以能不能像k8s一样去链接service端进行操作。首先说结论,是可行的。连接方式跟我们连接k8s是一样的,你完全可以按我的demo进行操作,不过我也刚打通,里面的还不是很清楚
整体demo依赖可以建一个空项目
<?xml version="1.0" encoding="UTF-8"?>
<project xmlns="http://maven.apache.org/POM/4.0.0"
         xmlns:xsi="http://www.w3.org/2001/XMLSchema-instance"
         xsi:schemaLocation="http://maven.apache.org/POM/4.0.0 http://maven.apache.org/xsd/maven-4.0.0.xsd">
    <modelVersion>4.0.0</modelVersion>

    <groupId>org.example</groupId>
    <artifactId>k8sDemo</artifactId>
    <version>1.0.0-SNAPSHOT</version>

    <name>springboot-k8s</name>
    <description>k8s 介入</description>
    <parent>
        <groupId>org.springframework.boot</groupId>
        <artifactId>spring-boot-starter-parent</artifactId>
        <version>2.0.4.RELEASE</version>
    </parent>


    <dependencies>
        <dependency>
            <groupId>org.springframework.boot</groupId>
            <artifactId>spring-boot-starter-web</artifactId>
        </dependency>

        <dependency>
            <groupId>com.google.api-client</groupId>
            <artifactId>google-api-client</artifactId>
            <version>1.32.1</version>
            <exclusions>
                <exclusion>
                    <artifactId>guava</artifactId>
                    <groupId>com.google.guava</groupId>
                </exclusion>
            </exclusions>
        </dependency>

        <dependency>
            <groupId>org.quartz-scheduler</groupId>
            <artifactId>quartz</artifactId>
        </dependency>

        <dependency>
            <groupId>org.springframework.boot</groupId>
            <artifactId>spring-boot-configuration-processor</artifactId>
            <optional>true</optional>
        </dependency>

        <dependency>
            <groupId>org.projectlombok</groupId>
            <artifactId>lombok</artifactId>
            <version>1.18.20</version>
        </dependency>


        <dependency>
            <groupId>org.apache.commons</groupId>
            <artifactId>commons-lang3</artifactId>
            <version>3.7</version>
        </dependency>

        <dependency>
            <groupId>io.kubernetes</groupId>
            <artifactId>client-java</artifactId>
            <version>12.0.1</version>
        </dependency>

        <dependency>
            <groupId>io.fabric8</groupId>
            <artifactId>kubernetes-client</artifactId>
            <version>5.10.0</version>
        </dependency>

        <dependency>

            <groupId>com.alibaba</groupId>
            <artifactId>fastjson</artifactId>
            <version>1.2.78</version>
        </dependency>

    </dependencies>

</project>
package com.k8s.demo;


import io.kubernetes.client.openapi.ApiClient;
import io.kubernetes.client.openapi.Configuration;
import io.kubernetes.client.openapi.apis.CoreV1Api;
import io.kubernetes.client.openapi.models.V1Pod;
import io.kubernetes.client.openapi.models.V1PodList;
import io.kubernetes.client.util.ClientBuilder;
import io.kubernetes.client.util.KubeConfig;
import lombok.extern.slf4j.Slf4j;
import okhttp3.OkHttpClient;
import org.springframework.util.ResourceUtils;


import java.io.FileReader;
import java.io.IOException;


@Slf4j
public class KubernetesExample {
    public static void main(String[] args) {
        try {

           // 创建ApiClient
            String kubeConfigPath = ResourceUtils.getURL("classpath:config").getPath();
            ApiClient client = ClientBuilder.kubeconfig(KubeConfig.loadKubeConfig(new FileReader(kubeConfigPath))).build();
            OkHttpClient httpClient = client.getHttpClient().newBuilder()
                    .hostnameVerifier((hostname, session) -> true)  // 允许任何主机名
                    .build();
            client.setHttpClient(httpClient);

            Configuration.setDefaultApiClient(client);
            CoreV1Api api = new CoreV1Api();

            // invokes the CoreV1Api client
            V1PodList list = api.listPodForAllNamespaces(null, null, null, null, null, null, null, null, null, null);
            System.out.println("Listing all pods: ");
            for (V1Pod item : list.getItems()) {
                System.out.println(item.getMetadata().getName());
            }

        } catch (IOException e) {
            log.error("读取kubeConfigPath异常", e);
        } catch (Exception e) {
            log.error("构建K8s-Client异常", e);
        }
    }
}
关于这个:classpath:config:在你主机上输入
vim ~/.kube/config
把这个配置文件拿下来,里面有你这个主机所有集群的配置,你也可以作为参数传入进去,这个就看你自己
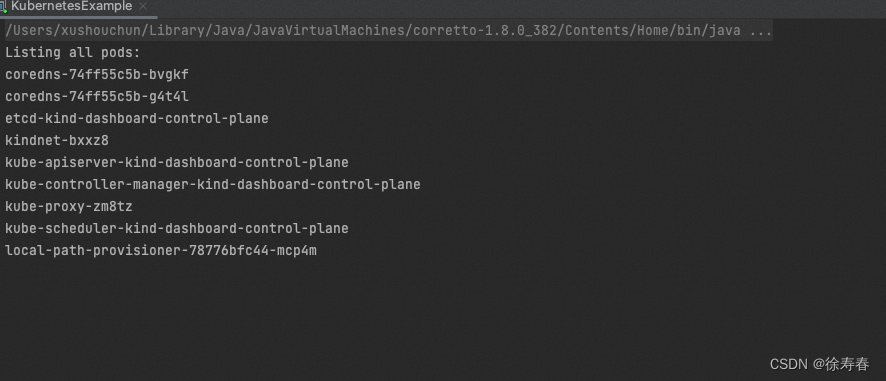
如果你看到这个样子,已经通了。但是这个连接没有证书,后面可能需要处理一下,既然已经到这里了,其实还是要聊一下k8s
可能你在连接的时候会出现以下错误
当你连接到 Kubernetes 集群时,可能会遇到 javax.net.ssl.SSLPeerUnverifiedException 异常,而异常消息是 Hostname not verified 或者类似的错误信息。
这个错误通常是由于连接的主机名与证书中的主机名不匹配引起的。为了确保安全,SSL/TLS 连接需要验证证书中的主机名与实际连接的主机名是否匹配。上文我已经忽略了
还有可能出现,Kubernetes control plane is running at https://[::1]:对应端口 这是你用了ipv6 但是又没有指定,以为他是支持ipv4 和 ipv6的
你如果对于ipv4和ipv6不了解没关系下面我会说一下
你还可能会出现 你的主机不是 127.0.0.1,而你无法通过 kubectl 访问 kind 创建的本地 Kubernetes 集群这时候你需要指定,在创建集群的时候,来源为kind 的配置文件
kind配置文件网址 对应配置 以下为我摘要的
您可以在 iptables 和 ipvs 之间配置将使用的 kube-proxy 模式。默认情况下使用 iptables
kind: Cluster
apiVersion: kind.x-k8s.io/v1alpha4
networking:
  kubeProxyMode: "ipvs"
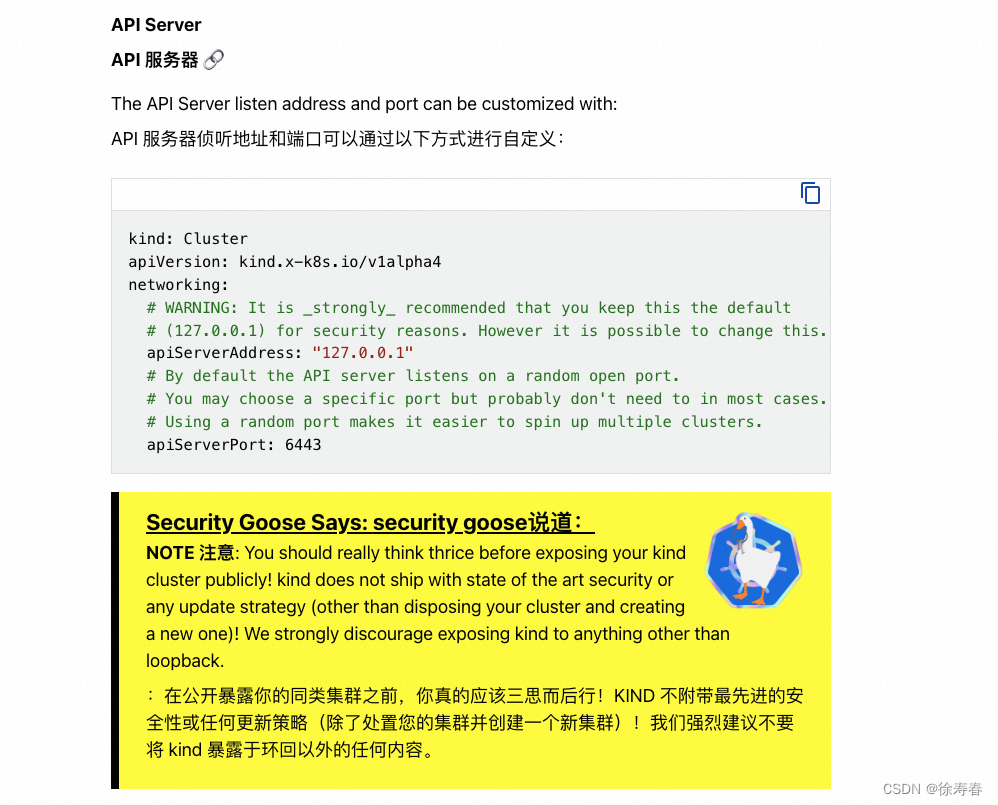
所以你可能需要配置一下地址,为0.0.0.0 这样所有ipv4的都可以访问

关于IPv4和IPv6
IPv4和IPv6是互联网协议的两个版本,它们之间的主要区别在于地址的格式和长度。
IPv4使用32位地址,表示为4个十进制数,每个数的取值范围为0-255,例如:192.168.0.100。IPv4地址空间有限,随着互联网的快速发展,IPv4地址已经趋于枯竭。
IPv6使用128位地址,表示为8组16进制数,每组之间用冒号分隔,例如:2001:0db8:85a3:0000:0000:8a2e:0370:7334。IPv6拥有更大的地址空间,可以容纳更多的设备和连接。
在容器服务中,使用IPv4或IPv6来访问容器的服务有以下区别:
IP地址格式:IPv4使用点分十进制表示法,IPv6使用冒号分隔的16进制表示法。
地址空间:IPv4地址空间有限,而IPv6地址空间更加广阔。
支持设备数量:IPv6能够支持更多的设备和连接,可以满足互联网发展的需求。
兼容性:由于IPv4和IPv6是不同的地址格式,不同的网络设备和应用程序可能对IPv6支持程度不同。一些旧的设备和应用程序可能仅支持IPv4。
在选择使用IPv4还是IPv6来访问容器服务时,需要考虑网络环境、设备支持和应用程序需求等因素。同时,还需要确保网络配置正确并与容器服务的网络配置相匹配,以确保能够成功访问容器的服务。
k8s概念
本文来自互联网用户投稿,该文观点仅代表作者本人,不代表本站立场。本站仅提供信息存储空间服务,不拥有所有权,不承担相关法律责任。 如若内容造成侵权/违法违规/事实不符,请联系我的编程经验分享网邮箱:veading@qq.com进行投诉反馈,一经查实,立即删除!