011 数据结构_哈希
前言
本文将会向你介绍哈希概念,哈希方法,如何解决哈希冲突,以及闭散列与开散列的模拟实现
1. 哈希概念
顺序结构以及平衡树中,元素关键码与其存储位置之间没有对应的关系,因此在查找一个元素时,必须要经过关键码的多次比较。顺序查找时间复杂度为O(N),平衡树中为树的高度,即 O( l o g 2 N log_2N log2?N),搜索的效率取决于搜索过程中元素的比较次数。
理想的搜索方法:可以不经过任何比较,一次直接从表中得到要搜索的元素。
如果构造一种存储结构,通过某种函数(hashFunc)使元素的存储位置与它的关键码之间能够建立一 一映射的关系,那么在查找时通过该函数可以很快找到该元素。 当向该结构中: 插入元素根据待插入元素的关键码,以此函数计算出该元素的存储位置并按此位置进行存放搜索元素
对元素的关键码进行同样的计算,把求得的函数值当做元素的存储位置,在结构中按此位置取元素比较,若关键码相等,则搜索成功
该方式即为哈希方法,哈希方法中使用的转换函数称为哈希函数,构造出来的结构称为哈希表(Hash Table)(或者称散列表
例如:数据集合{1,7,6,4,5,9};
哈希函数设置为:hash(key) = key % size; size为存储元素底层空间总的大小。
2. 哈希方法
哈希方法:我们通常对关键码key进行转换来确定存储的位置,比如由字符串abc转换成一个整数作为存储的位置,这个转换的方法称为哈希方法,哈希方法中运用的函数叫做哈希函数
(1)直接定址法
ps:哈希方法是一个广义的概念,而哈希函数是哈希方法的一种具体实现。
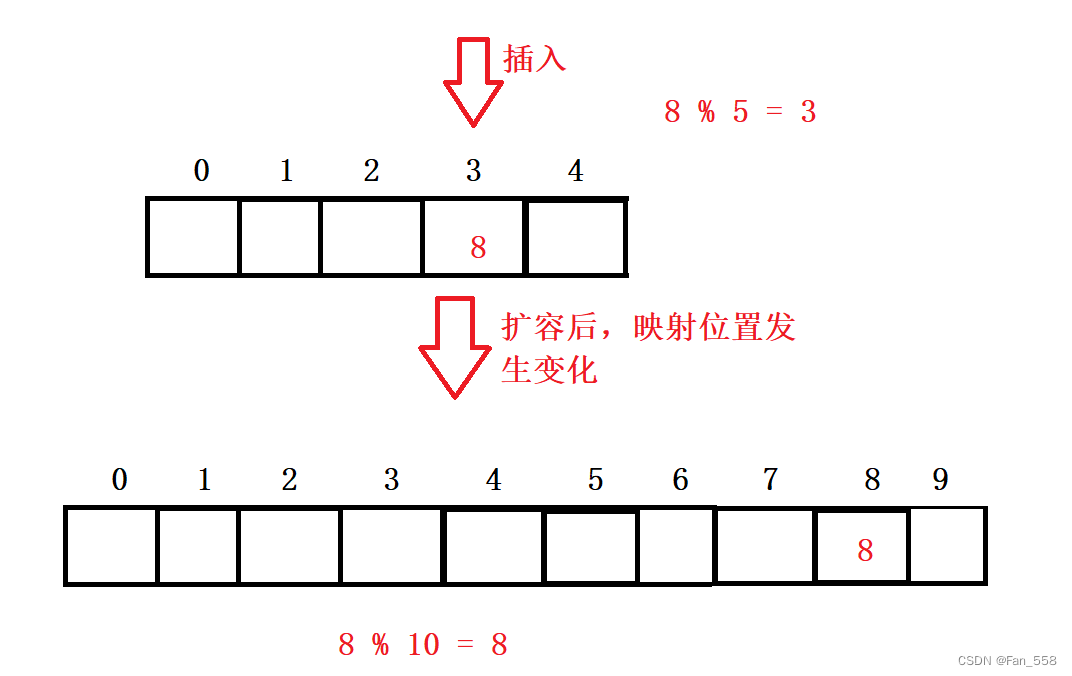
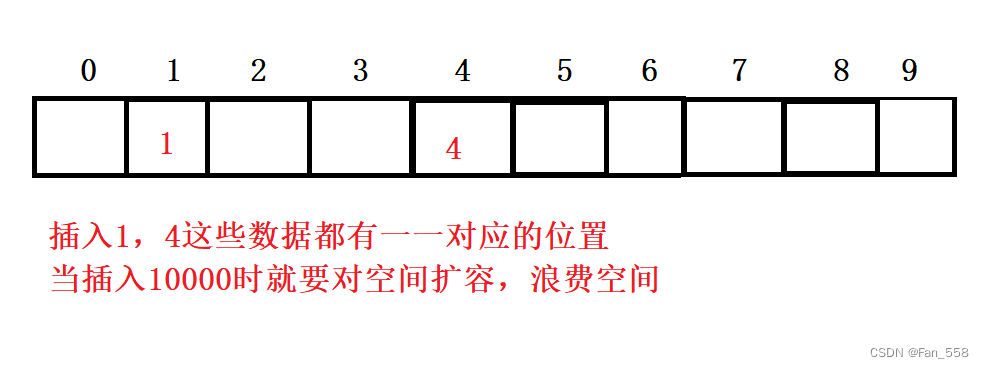
1、直接定址法 值和位置关系唯一关系,每个值都有一个唯一位置,但是值很分散,直接定址会导致空间开很大,导致空间浪费
(此方法运用于关键字范围集中,量不大的情况,关键字和存储位置是一对一的关系,不存在哈希冲突)
引入哈希冲突
哈希冲突概念:不同关键字通过相同的哈希函数计算出相同的哈希存储位置(不同的值映射到相同的位置上去),这种现象被称为哈希冲突或哈希碰撞,哈希冲突的发生与哈希函数的设计有关
(2)除留余数法
主要应用于关键字可以很分散,量可以很大,关键字和存储位置是多对一的关系的情况,但是存在哈希冲突

3. 解决哈希冲突
(1)闭散列
概念: 闭散列又称开放定址法,指当前位置被占用(哈希冲突),开放空间里按照某种规则,找一个没有被占用的位置存储
1、线性探测
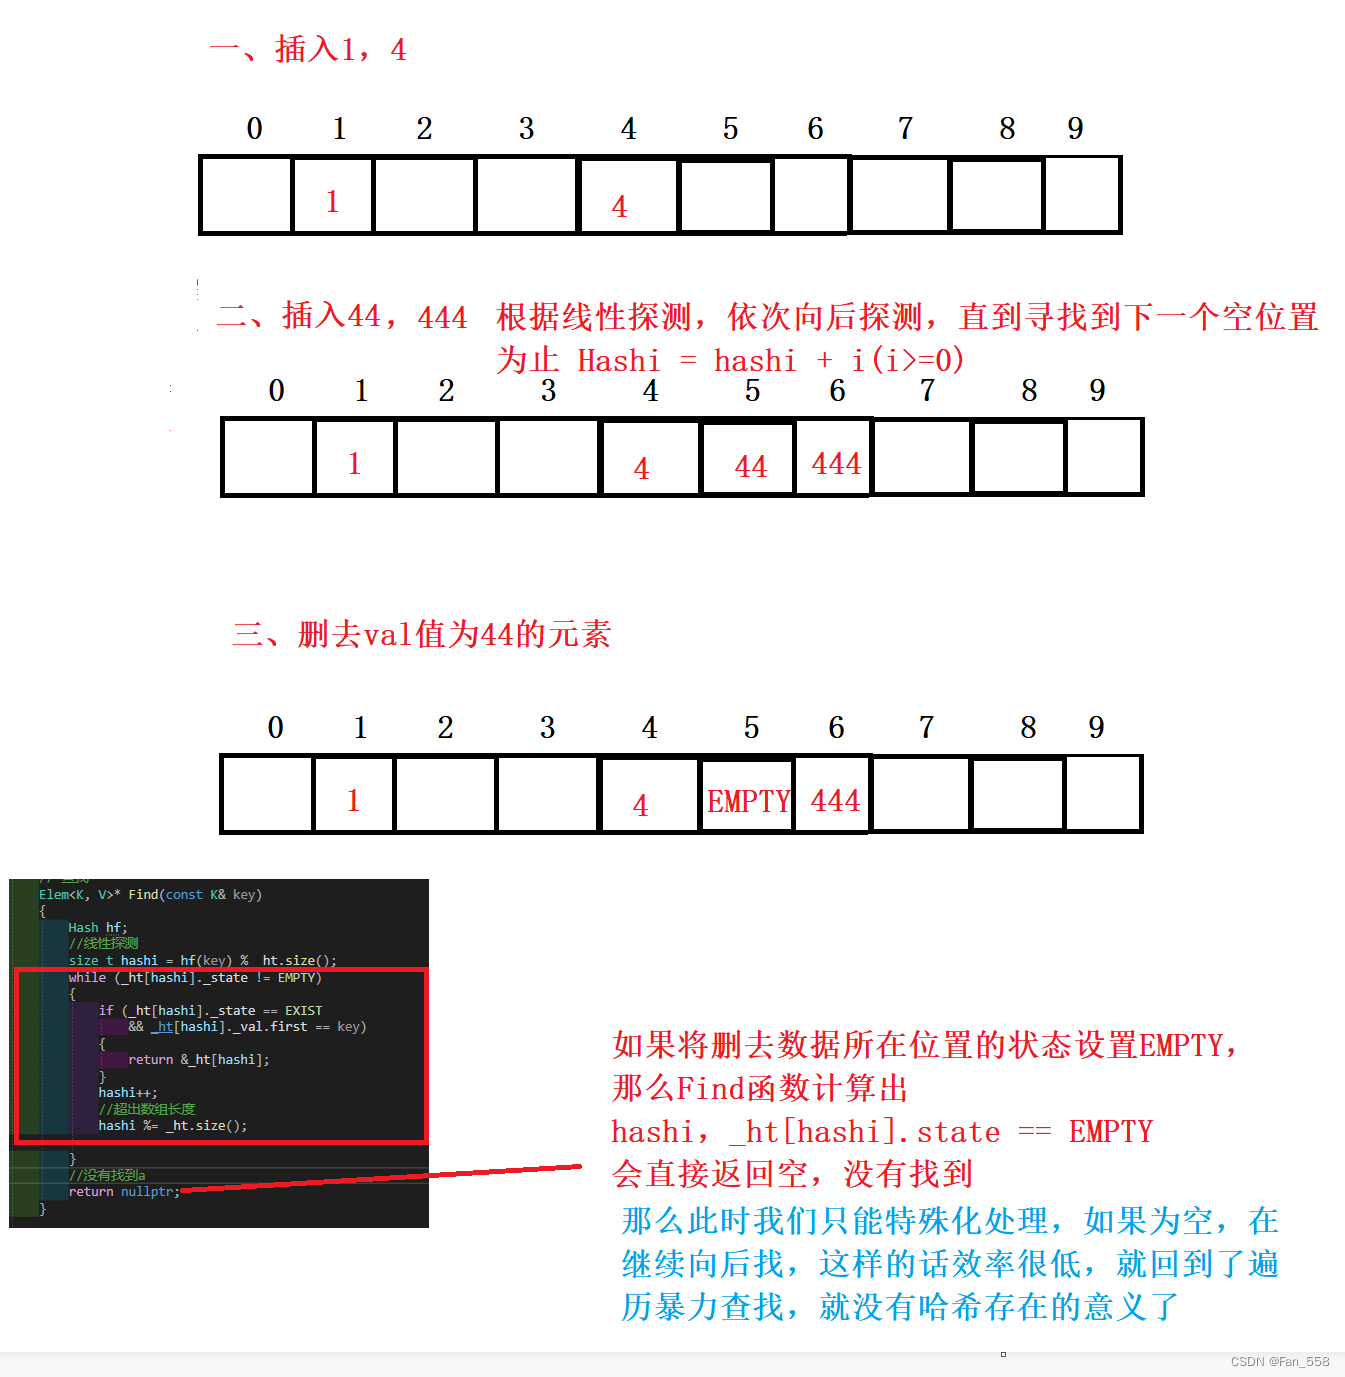
从发生冲突的位置开始,依次向后探测,直到寻找到下一个空位置为止 Hashi = hashi + i(i>=0)
2、二次探测
探测公式发生变化 hashi + i^2(i>=0)
(2)开散列
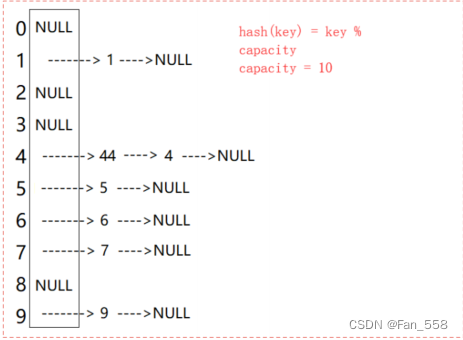
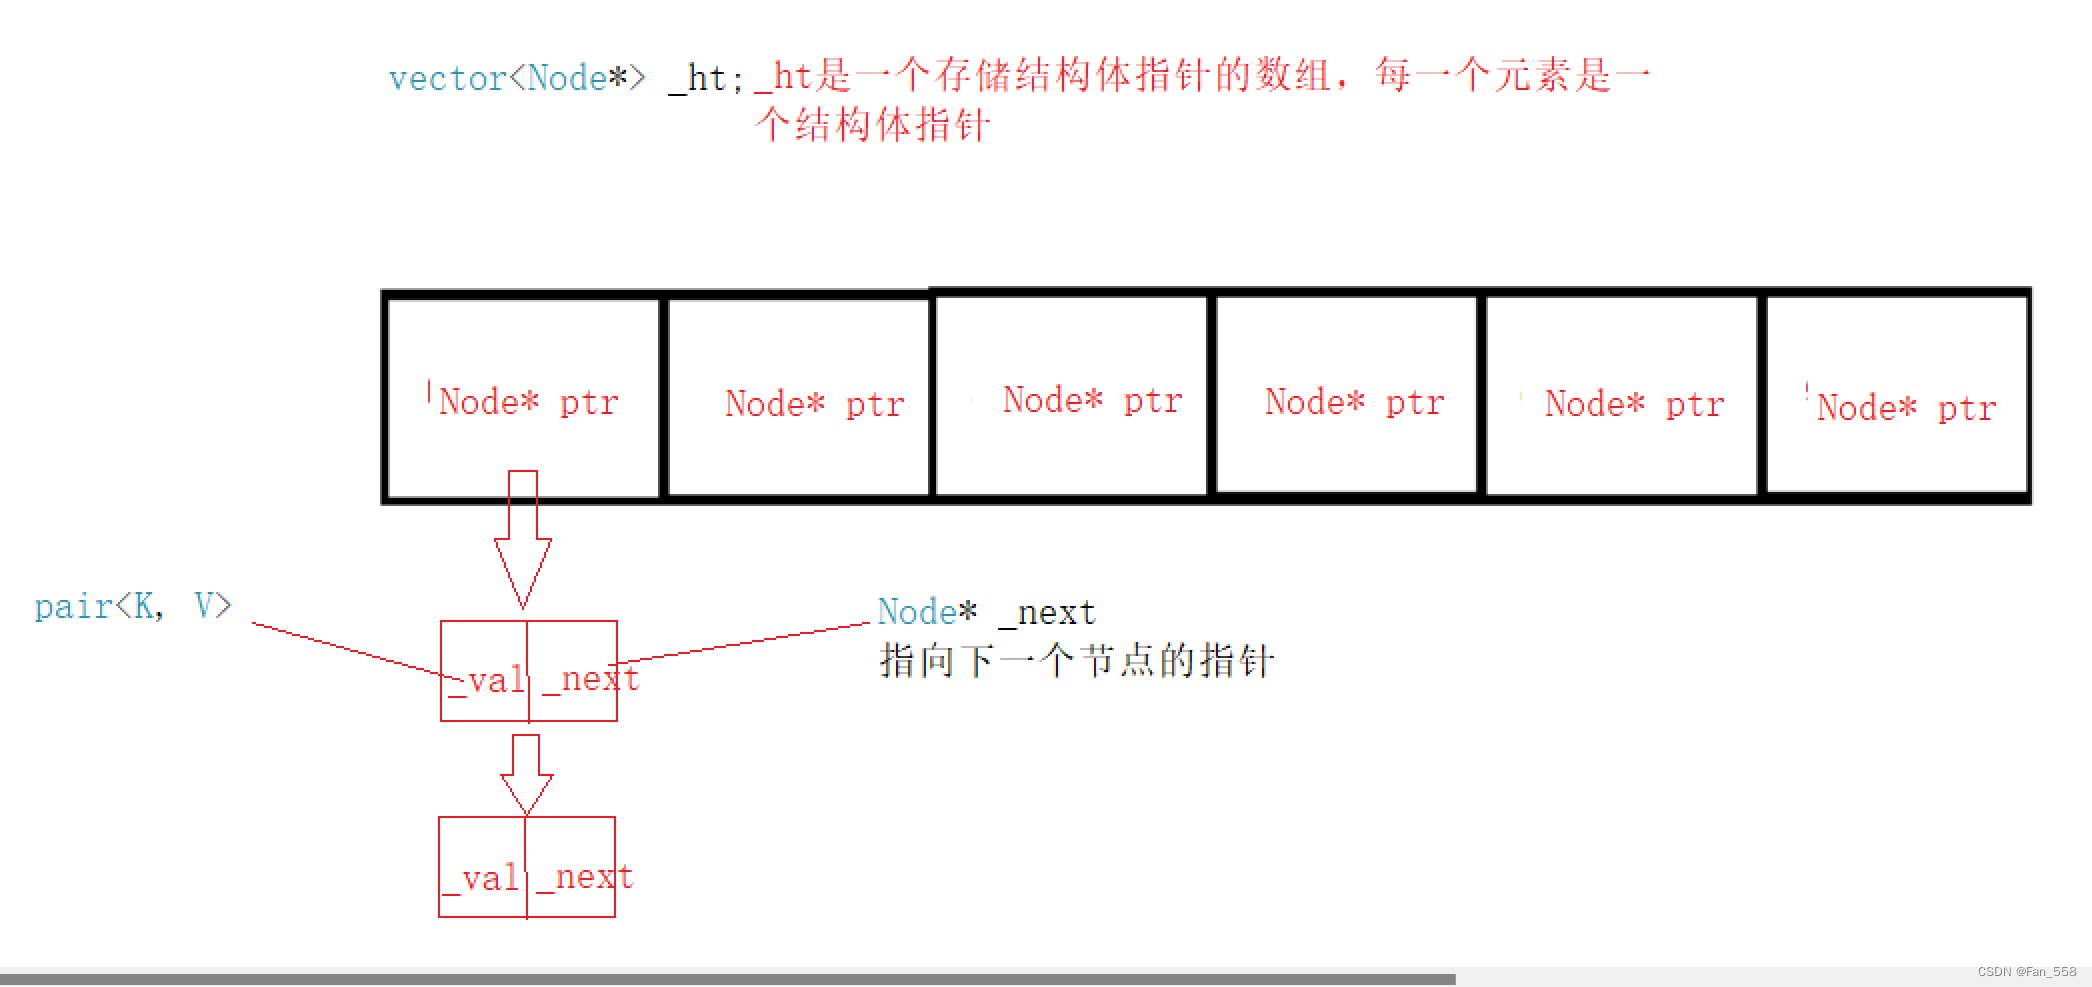
开散列法又叫链地址法(开链法),首先对关键码集合用散列函数计算散列地址,具有相同地
址的关键码归于同一子集合,每一个子集合称为一个桶,各个桶中的元素通过一个单链表链接起来,各链表的头结点存储在哈希表中。
如图可观察到,val值为44的节点和节点val值为4的节点发生哈希冲突
开散列中每个桶中放大都是发生哈希冲突的元素
引入负载因子
负载因子:存储个数/空间的大小(注意这里的空间的大小是size而不是capacity)
由于在哈希表中,operator[]操作会根据已有的元素数量(即size())进行检查。因此,在计算负载因子时,要使用已有元素的个数除以哈希表的大小(即size())
size()函数返回的是当前哈希表中实际存储的元素数量,而capacity()函数返回的是哈希表的容量(即内部存储空间的大小)
负载因子:存储关键字个数/空间大小 负载因子太大,冲突可能会剧增,冲突增加,效率降低 负载因子太小,冲突降低,但是空间利用率就低了
5. 哈希表扩容
扩容的核心是先开辟新空间,然后遍历旧空间的数据,按照hashi = hashi % Newsize重新建立映射,然后将旧空间的数据拷贝到新空间去,最后交换新旧哈希表,本质上我们还是要对旧哈希表进行扩容,因此最后要swap交换两表
6. 哈希表插入
三种状态EMPTY、EXIST、DELETE
EMPTY,表示该位置为空。
EXIST,表示该位置被占用了。
DELETE,表示该位置被删除了。
删除状态存在的含义
或许你会有疑问:删除为什么不能直接设为空状态,而是将被删除的状态设置为DELETE
7. 闭散列模拟实现
数据结构
struct Elem
{
	pair<K, V> _val;
	State _state = EMPTY;
};
vector<Elem<K, V>> _ht;

闭散列插入
闭散列的插入步骤是:判断是否存在,判断是否需要扩容(结合负载因子),遍历旧空间拷贝数据
关于闭散列的模拟实现,核心步骤在上文都有讲,这里就不再多作赘述,具体可看下面的代码与注释
namespace Close_Hash
{
	template<class T>
	struct HashFunc
	{
		size_t operator()(const T& key)
		{
			return (size_t)key;
		}
	};

	//因为字符串做键值非常常见,库里面也特化了一份
	//BKDR算法,这里不会展开来讲
	template<>
	struct HashFunc<string>
	{
		size_t operator()(const string& key)
		{
			size_t hashi = 0;
			for (auto ch : key)
			{
				hashi = hashi * 31 + ch;
			}
			return hashi;
		}
	};

	enum State
	{
		EMPTY
		,EXIST
		,DELETE
	};
	template <class K, class V>
	struct Elem
	{
		pair<K, V> _val;
		State _state = EMPTY;
	};
	template<class K, class V, class Hash = HashFunc<K>>
	class HashTable
	{
	public:
		HashTable(size_t capacity = 3)
			: _ht(capacity)
			,_size(0)
			, _totalSize(0)
		{
			for (size_t i = 0; i < capacity; ++i)
				_ht[i]._state = EMPTY;
		}

		// 插入
		bool Insert(const pair<K, V>& val)
		{
			Hash hf;
			_size = _ht.size();
			//已有
			if (Find(val.first))
			{
				return false;
			}
			else
			{
				//扩容,负载因子==0.6
				if ((double)_totalSize / _size >= 0.6)
				{
					//开辟新空间
					size_t newsize = _size * 2;
					HashTable<K, V, Hash> NewHt;
					NewHt._ht.resize(newsize);

					//遍历旧空间
					for (int i = 0; i < _size; i++)
					{
						if (_ht[i]._state == EXIST)
						{
							NewHt.Insert(_ht[i]._val);
						}
					}
					NewHt._ht.swap(_ht);
				}
				size_t hashi = hf(val.first) % _size;
				//不为空,向后查找
				while (_ht[hashi]._state == EXIST)
				{
					hashi++;
					//如果超出数组长度
					hashi %= _size;
				}
				//为空,插入
				_ht[hashi]._val.first = val.first;
				_ht[hashi]._val.second = val.second;
				_ht[hashi]._state = EXIST;
				++_totalSize;
				return true;
			}
		}

		// 查找
		Elem<K, V>* Find(const K& key)
		{
			Hash hf;
			//线性探测
			size_t hashi = hf(key) % _ht.size();
			while (_ht[hashi]._state != EMPTY)
			{
				if (_ht[hashi]._state == EXIST
					&& _ht[hashi]._val.first == key)
				{
					return &_ht[hashi];
				}
				hashi++;
				//超出数组长度
				hashi %= _ht.size();

			}
			//没有找到a
			return nullptr;
		}

		// 删除
		bool Erase(const K& key)
		{
			Elem<K, V>* ret = Find(key);
			//不为空就说明找到
			if (ret)
			{
				ret->_state = DELETE;
				--_totalSize;
				return true;
			}
			else return false;
		}

	private:
		size_t HashFunc(const K& key)
		{
			return key % _ht.capacity();
		}

		void CheckCapacity();
	private:
		vector<Elem<K, V>> _ht;
		size_t _size;
		size_t _totalSize;  // 哈希表中的所有元素:有效和已删除, 扩容时候要用到
	};
}
测试
		void Print()
		{
			for (int i = 0; i < _ht.size(); i++)
			{
				if (_ht[i]._state == EXIST)
				{
					//printf("[%d]->%d\n", i, _tables[i]._kv.first);
					cout << "[" << i << "]->" << _ht[i]._val.first << ":" << _ht[i]._val.second << endl;
				}
				else if (_ht[i]._state == EMPTY)
				{
					printf("[%d]->\n", i);
				}
				else
				{
					printf("[%d]->D\n", i);
				}
			}

void TestHT1()
{
	Close_Hash::HashTable<int, int> ht;
	int a[] = { 4,14,24,34,5,7,1 };
	for (auto e : a)
	{
		ht.Insert(make_pair(e, e));
	}
	ht.Print();
	ht.Insert(make_pair(3, 3));
	ht.Insert(make_pair(3, 3));
	ht.Insert(make_pair(-3, -3));
	ht.Print();
	cout << endl;

	ht.Erase(3);;
	ht.Print();

	if (ht.Find(3))
	{
		cout << "3存在" << endl;
	}
	else
	{
		cout << "3不存在" << endl;
	}
	ht.Insert(make_pair(23, 3));
	ht.Insert(make_pair(3, 3));
	if (ht.Find(3))
	{
		cout << "3存在" << endl;
	}
	else
	{
		cout << "3不存在" << endl;
	}
	ht.Print();
}
8. 开散列模拟实现
数据结构
	struct HashNode
	{
		HashNode* _next;
		pair<K, V> _val;
		HashNode(const pair<K, V>& val)
			:_next(nullptr)
			,_val(val)
		{}
	};
	typedef HashNode<K, V> Node;
	vector<Node*> _ht;
开散列插入
插入的主要逻辑是:先查找是否存在,判断是否需要扩容(依据平衡因子),开辟新空间然后遍历旧空间,将旧空间的数据拷贝到新空间上(需要根据新的映射关系,待会会细讲),最后插入节点
bool Insert(const pair<K, V>& val)
{
	Hash hf;
	//已有
	if (Find(val.first))
	{
		return false;
	}
	//扩容,负载因子==1
	if (_totalSize == _ht.size())
	{
		//开辟新空间
		size_t newsize = _ht.size() * 2;
		vector<Node*> NewHt;
		NewHt.resize(newsize);

		//遍历旧空间
		for (int i = 0; i < _ht.size(); i++)
		{
			Node* cur = _ht[i];
			while (cur)
			{
				//保存下一个结构体指针
				Node* next = cur->_next;
				size_t hashi = hf(cur->_val.first) % NewHt.size();
				//将新空间上hashi位置处的哈希桶链接到需要处理的当前节点
				cur->_next = NewHt[hashi];
				NewHt[hashi] = cur;
				//处理旧空间上哈希桶的下一个节点
				cur = next;
			}
			//防止出现悬空指针的问题
			_ht[i] = nullptr;
		}
		_ht.swap(NewHt);
	}
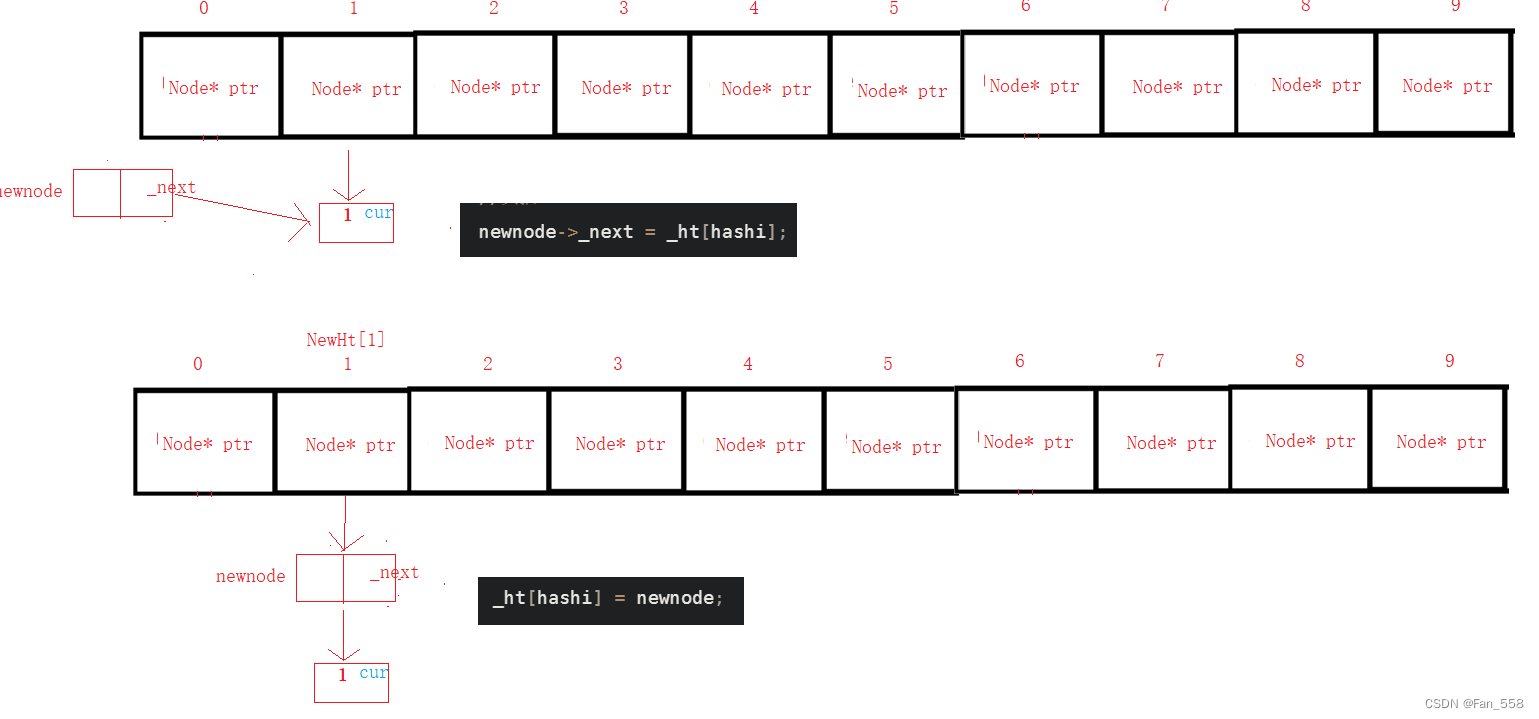
		//插入节点
		size_t hashi = hf(val.first) % _ht.size();
		Node* newnode = new Node(val);
		//头插
		newnode->_next = _ht[hashi];
		_ht[hashi] = newnode;
		++_totalSize;
		return true;
}
以下是遍历旧空间,拷贝数据的图解
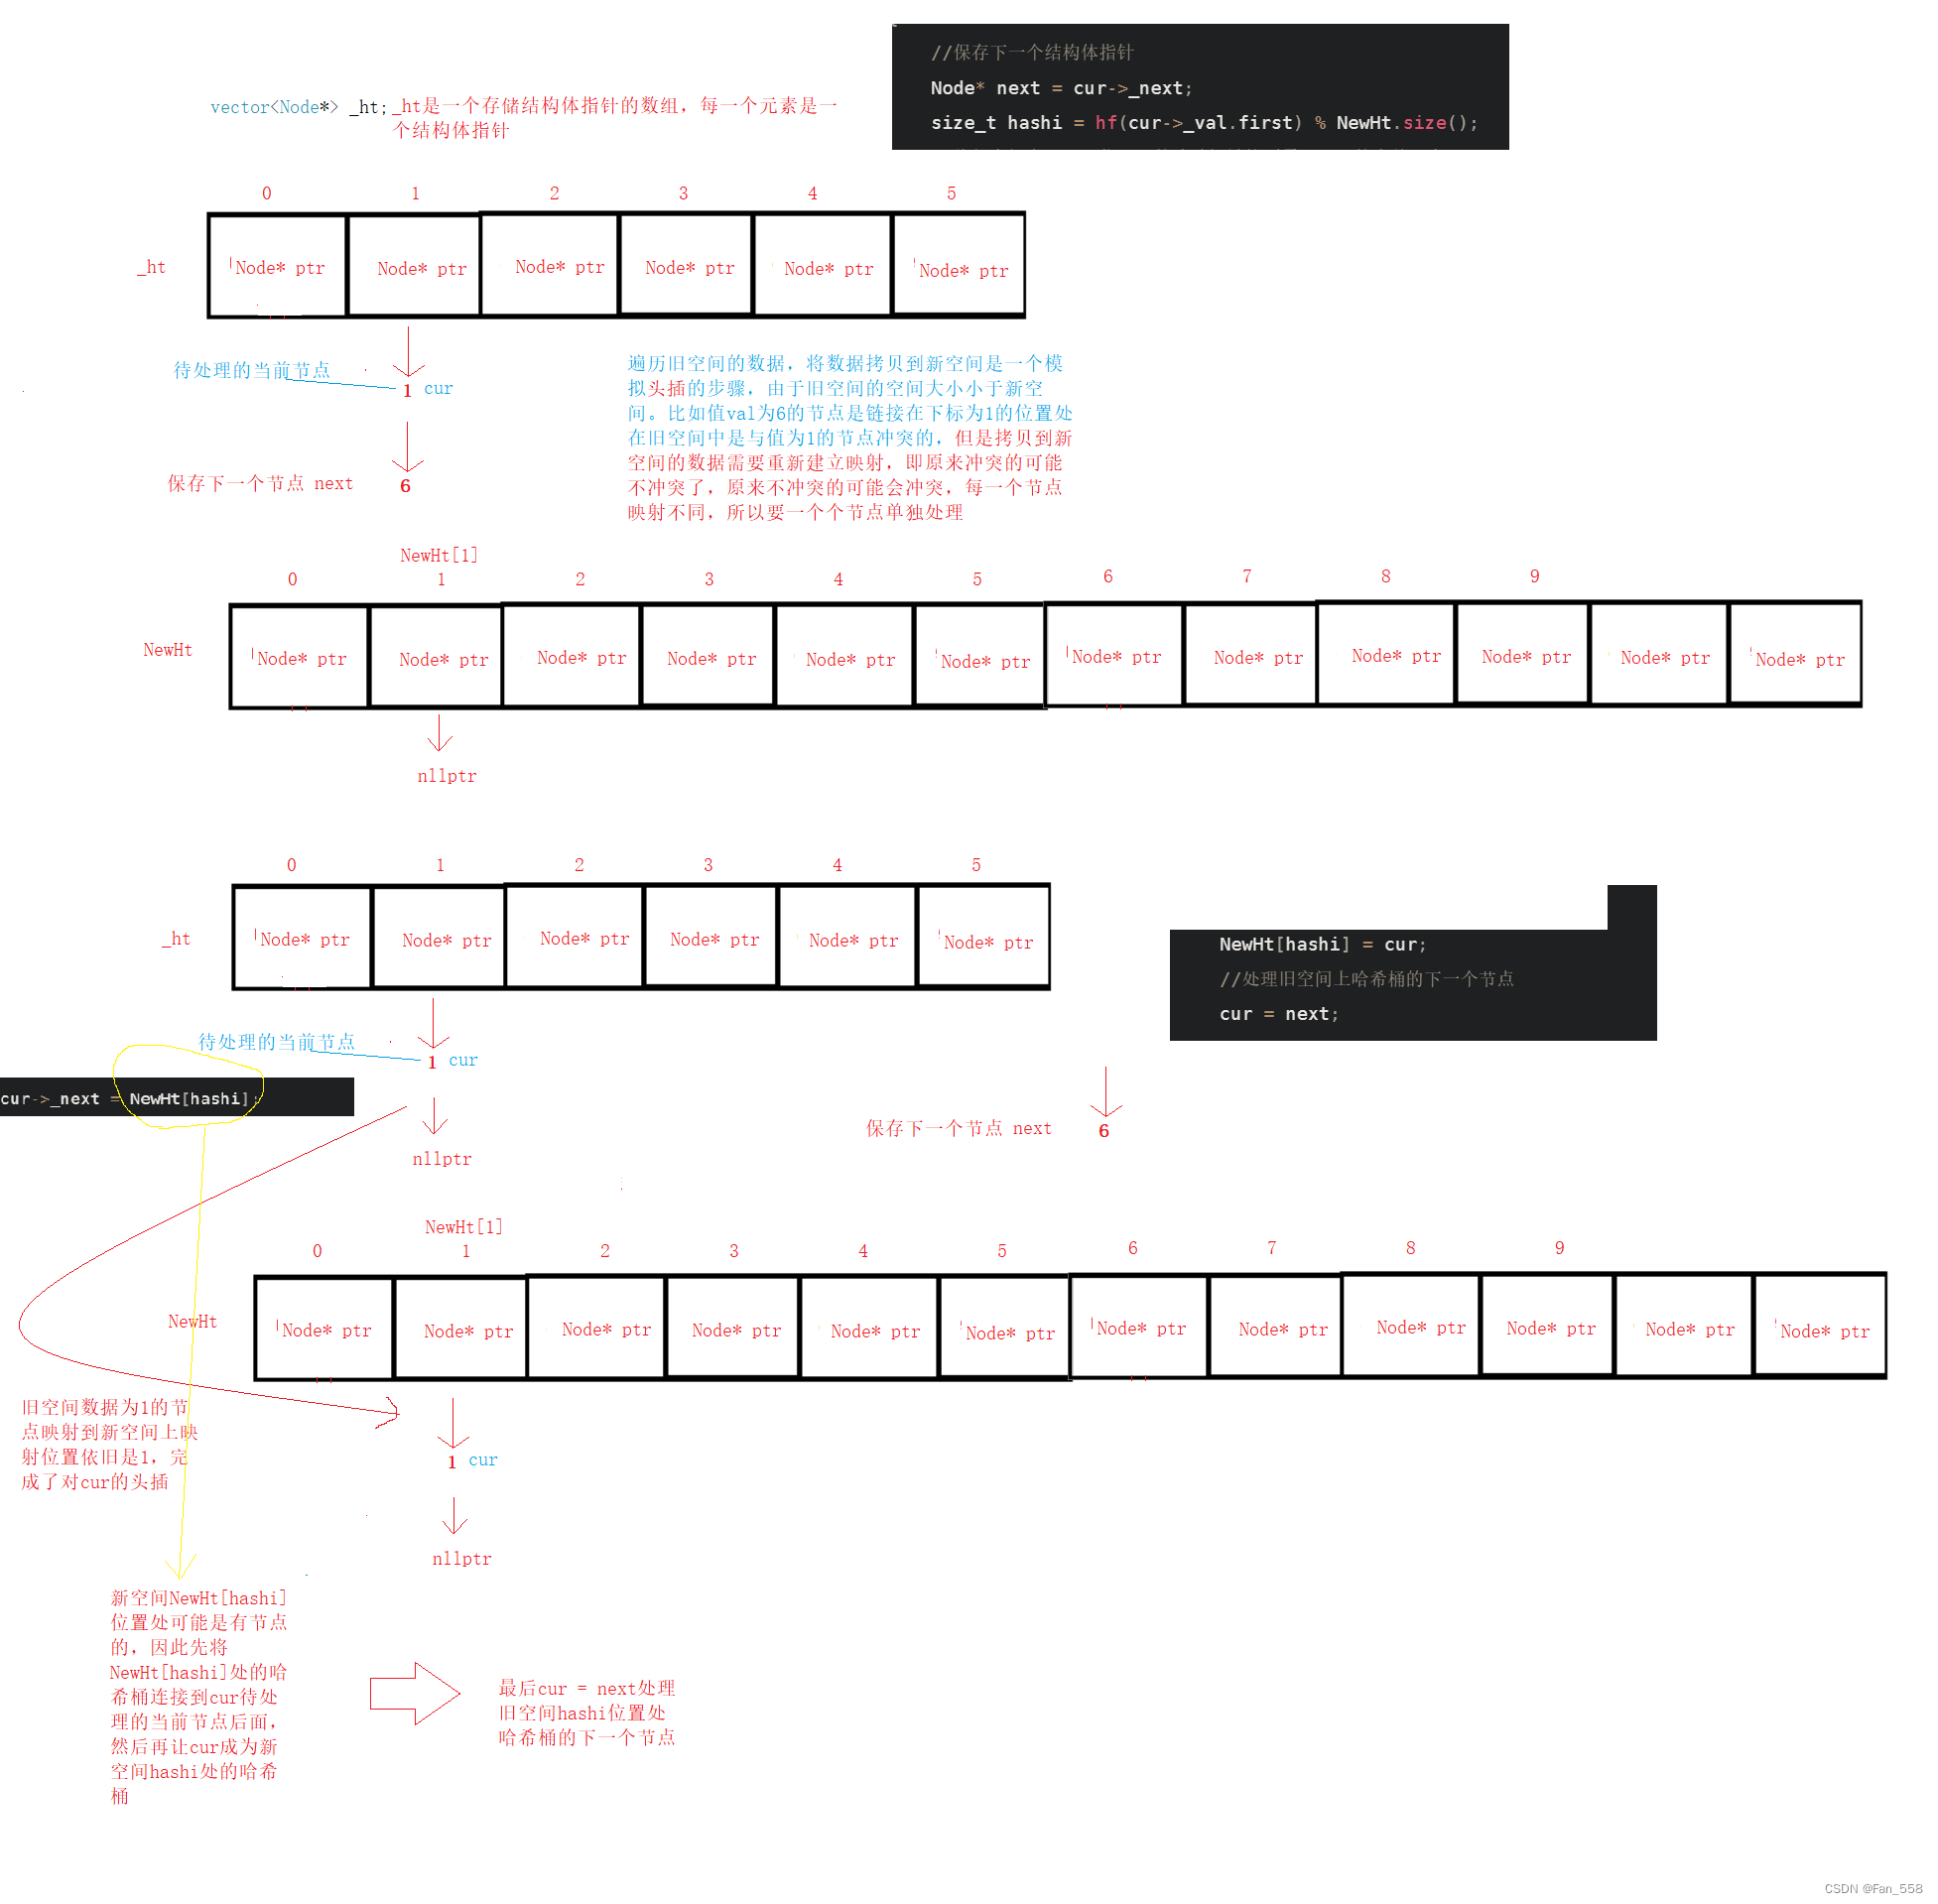
插入过程图解
全部代码
namespace Open_Hash
{
	template<class T>
	struct HashFunc
	{
		size_t operator()(const T& key)
		{
			if (key >= 0)
			{
				return (size_t)key;
			}
			else
			{
				return abs(key);
			}
		}
	};

	//字符串哈希算法这里不展开讲,采用的是BKDR算法
	template<>
	struct HashFunc<string>
	{
		size_t operator()(const string& key)
		{
			size_t hashi = 0;
			for (auto ch : key)
			{
				hashi = hashi * 31 + ch;
			}
			return hashi;
		}
	};
	template <class K, class V>
	struct HashNode
	{
		HashNode* _next;
		pair<K, V> _val;
		HashNode(const pair<K, V>& val)
			:_next(nullptr)
			,_val(val)
		{}
	};

	template<class K, class V, class Hash = HashFunc<K>>
	class HashTable
	{
	public:
		HashTable()
		{
			_ht.resize(10);
		}
		~HashTable()
		{
			for (int i = 0; i < _ht.size(); i++)
			{
				Node* cur = _ht[i];
				while (cur)
				{
					Node* next = cur->_next;
					delete cur;
					cur = next;
				}
				//将当前哈希桶置空
				_ht[i] = nullptr;
			}
		}
		typedef HashNode<K, V> Node;
		// 插入
		bool Insert(const pair<K, V>& val)
		{
			Hash hf;
			//已有
			if (Find(val.first))
			{
				return false;
			}
			//扩容,负载因子==1
			if (_totalSize == _ht.size())
			{
				//开辟新空间
				size_t newsize = _ht.size() * 2;
				vector<Node*> NewHt;
				NewHt.resize(newsize);

				//遍历旧空间
				for (int i = 0; i < _ht.size(); i++)
				{
					Node* cur = _ht[i];
					while (cur)
					{
						//保存下一个结构体指针
						Node* next = cur->_next;
						size_t hashi = hf(cur->_val.first) % NewHt.size();
						//将新空间上hashi位置处的哈希桶链接到需要处理的当前节点
						cur->_next = NewHt[hashi];
						NewHt[hashi] = cur;
						//处理旧空间上哈希桶的下一个节点
						cur = next;
					}
					//防止出现悬空指针的问题
					_ht[i] = nullptr;
				}
				_ht.swap(NewHt);
			}
				//插入节点
				size_t hashi = hf(val.first) % _ht.size();
				Node* newnode = new Node(val);
				//头插
				newnode->_next = _ht[hashi];
				_ht[hashi] = newnode;
				++_totalSize;
				return true;
		}

		//查找
		Node* Find(const K& key)
		{
			Hash hf;
			//线性探测
			size_t hashi = hf(key) % _ht.size();
			Node* cur = _ht[hashi];
			//遍历对应hashi位置处的哈希桶
			while (cur)
			{
				if (cur->_val.first == key)
				{
					return cur;
				}
				cur = cur->_next;
			}
			//没有找到
			return nullptr;
		}
		// 删除
		bool Erase(const K& key)
		{
			Hash hf;
			Node* ret = Find(key);
			size_t hashi = hf(key) % _ht.size();
			//不为空就说明找到
			if (ret)
			{
				Node* cur = _ht[hashi];
				Node* prev = nullptr;
				//遍历当前哈希桶
				while (cur)
				{
					if (cur->_val.first == key)
					{
						//判断是头删还是中间位置处的删除
						if (prev == nullptr)
						{
							_ht[hashi] = cur->_next;
						}
						else
						{
							prev->_next = cur->_next;
						}
						delete cur;
						return true;
					}
					prev = cur;
					cur = cur->_next;
				}
			}
			//未找到
			return false;
		}

	private:
			vector<Node*> _ht;
			Node* _next = nullptr;
			size_t _totalSize = 0;  // 哈希表中的所有元素:有效和已删除, 扩容时候要用到
	};
}
测试
		//打印
		void Print1()
		{
			for (int i = 0; i < _ht.size(); i++)
			{
				Node* cur = _ht[i];
				cout << "[" << i << "]:";
				//哈希桶不为空
				while(cur)
				{
					cout << "(" << cur->_val.first << "," << cur->_val.second << ")" << "->";
					cur = cur->_next;
				}
				cout << endl;
			}
			cout << endl;
		}

		void Print2()
		{
			for (int i = 0; i < _ht.size(); i++)
			{
				Node* cur = _ht[i];
				//哈希桶不为空
				while (cur)
				{
					cout << cur->_val.first << ":"<< cur->_val.second << " ";
					cur = cur->_next;
				}
			}
			cout << endl;
		}
//测试
		void TestHT1()
		{
			HashTable<int, int> ht;
			int a[] = { 4,14,24,34,5,7,1 };
			for (auto e : a)
			{
				ht.Insert(make_pair(e, e));
			}

			ht.Insert(make_pair(3, 3));
			ht.Insert(make_pair(3, 3));
			ht.Insert(make_pair(-3, -3));
			ht.Print1();

			ht.Erase(3);
			ht.Print1();

			if (ht.Find(3))
			{
				cout << "3存在" << endl;
			}
			else
			{
				cout << "3不存在" << endl;
			}

			ht.Insert(make_pair(3, 3));
			ht.Insert(make_pair(23, 3));
			//ht.Insert(make_pair(-9, -9));
			ht.Insert(make_pair(-1, -1));
			ht.Print1();
		}

		void TestHT2()
		{
			string arr[] = { "香蕉", "甜瓜","苹果", "西瓜", "苹果", "西瓜", "苹果", "苹果", "西瓜", "苹果", "香蕉", "苹果", "香蕉" };
			//HashTable<string, int, HashFuncString> ht;
			HashTable<string, int> ht;
			for (auto& e : arr)
			{
				//auto ret = ht.Find(e);
				HashNode<string, int>* ret = ht.Find(e);
				if (ret)
				{
					ret->_val.second++;
				}
				else
				{
					ht.Insert(make_pair(e, 1));
				}
			}

			ht.Print2();

			ht.Insert(make_pair("apple", 1));
			ht.Insert(make_pair("sort", 1));

			ht.Insert(make_pair("abc", 1));
			ht.Insert(make_pair("acb", 1));
			ht.Insert(make_pair("aad", 1));

			ht.Print2();
		}

		void Some()
		{
				const size_t N = 100;
				vector<int> v;
				v.reserve(N);
				srand(time(0));
				for (size_t i = 0; i < N; ++i)
				{
					//v.push_back(rand()); // N比较大时,重复值比较多
					v.push_back(rand()%100+i); // 重复值相对少
					//v.push_back(i); // 没有重复,有序
				}
				HashTable<int, int> ht;
				for (auto e : v)
				{
					ht.Insert(make_pair(e, e));
				}
				ht.Print1();
		}
小结
今日的分享就到这里啦,后续将会向你带来位图与布隆过滤器的知识,如果本文存在疏漏或错误的地方还请您能够指出,另外如果你存在疑问,也可以评论留言哦!
本文来自互联网用户投稿,该文观点仅代表作者本人,不代表本站立场。本站仅提供信息存储空间服务,不拥有所有权,不承担相关法律责任。 如若内容造成侵权/违法违规/事实不符,请联系我的编程经验分享网邮箱:veading@qq.com进行投诉反馈,一经查实,立即删除!

