Linux学习笔记-Ubuntu下ssh服务器连接异常Connection reset
文章目录
角色:百世经纶一页书
诗号:世事如棋,乾坤莫测,笑尽英雄啊!
佛门高僧,苦境正道精神指标及领导者之一,亦是灭境三天之一的『梵天』。
与素还真、叶小钗并称霹雳三台柱。
与素还真并列苦境中原武林两大支柱,亦称“梵天”。
高深的禅修大般若与武学修为,法相庄严、胸怀无私、正气凛然,出道以来屡次帮助素还真携手共同弭平武林狼烟、扭转乾坤化解危机。
身为佛门高僧,悲悯如一页天书渡化迷航众生,但行事作风果决明快、妒恶如仇,铲奸除恶绝不手软;为正道的精神指标及领导者之一,与众不同的百世经纶,半阖眼眸看尽世俗庸人,微扬嘴角笑尽天下英雄。
一、问题问题现象
1.1 连接重置无法访问的的问题
ssh_exchange_identification: read: Connection reset
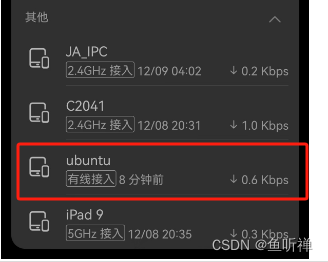
1.2 查看服务器连接状态

通过查看路由器信息,发现服务器已经正常连接上网络。
1.3 使用调试模式查看的信息
PS C:\WINDOWS\system32> ssh -v [IP地址] -p [端口].
OpenSSH_for_Windows_7.7p1, LibreSSL 2.6.5
debug1: Reading configuration data C:\\Users\\LJM/.ssh/config
debug1: Connecting to [IP地址] port [端口].
debug1: Connection established.
debug1: identity file C:\\Users\\LJM/.ssh/id_rsa type 0
debug1: key_load_public: No such file or directory
debug1: identity file C:\\Users\\LJM/.ssh/id_rsa-cert type -1
debug1: key_load_public: No such file or directory
debug1: identity file C:\\Users\\LJM/.ssh/id_dsa type -1
debug1: key_load_public: No such file or directory
debug1: identity file C:\\Users\\LJM/.ssh/id_dsa-cert type -1
debug1: key_load_public: No such file or directory
debug1: identity file C:\\Users\\LJM/.ssh/id_ecdsa type -1
debug1: key_load_public: No such file or directory
debug1: identity file C:\\Users\\LJM/.ssh/id_ecdsa-cert type -1
debug1: key_load_public: No such file or directory
debug1: identity file C:\\Users\\LJM/.ssh/id_ed25519 type -1
debug1: key_load_public: No such file or directory
debug1: identity file C:\\Users\\LJM/.ssh/id_ed25519-cert type -1
debug1: key_load_public: No such file or directory
debug1: identity file C:\\Users\\LJM/.ssh/id_xmss type -1
debug1: key_load_public: No such file or directory
debug1: identity file C:\\Users\\LJM/.ssh/id_xmss-cert type -1
debug1: Local version string SSH-2.0-OpenSSH_for_Windows_7.7
ssh_exchange_identification: read: Connection reset
PS C:\WINDOWS\system32>
可以看到有连接上ssh服务器,但是,一直没有找到对应的密钥信息。
二、临时解决方法
我将服务器的插座换成了只能插座,这个问题一般临时处理都是直接重启服务器,一次不行就两次,开个几次就能连接上了。

万能的重启法啊,我也很无奈。

三、从根源解决问题
3.1 问题分析
通过调试模式看到的信息,显示的是密钥没有找到。
首先,有可能是密钥丢失的问题,但是服务器一直有在正常使用,也都正常访问,不应该是密钥文件丢失。
然后,开始的时候也有考虑是不是ssh服务没有启动,但是设置了开机自己启动了,为了安全我每天断电先使用crontab设置了定时关机,然后再断电,很少有服务不启动了。然后日志显示服务是有启动的。
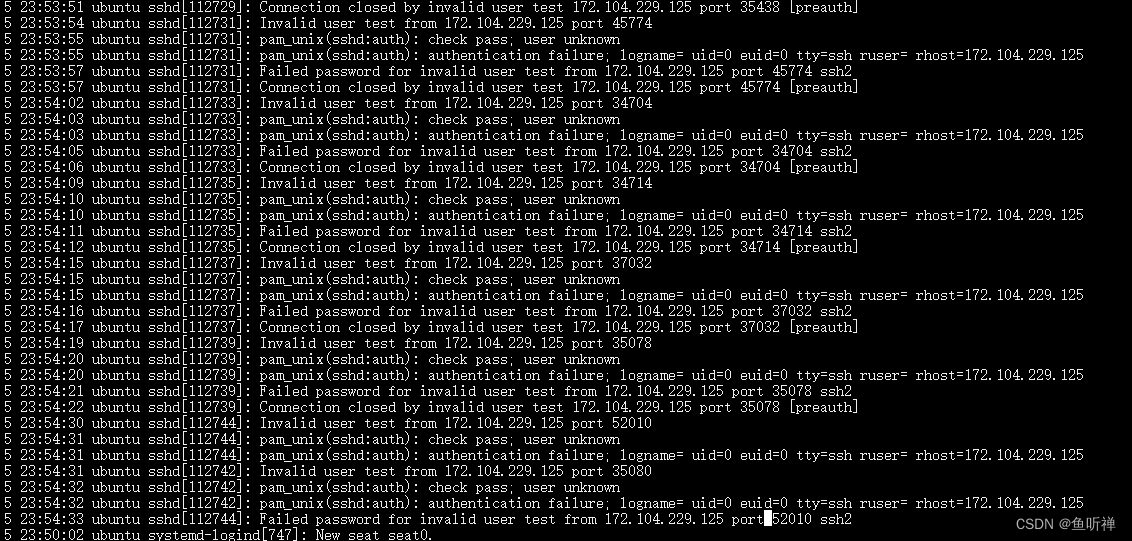
后面上网搜了下,大部分说是因为过多的访问,导致服务器拒绝连接了。
3.2 服务器的ssh日志
ubuntu@ubuntu:~$ sudo cat /var/log/auth.log | grep -a sshd
服务器有一些暴力访问的:

3.3 修改ssh配置禁止root登录
ubuntu@ubuntu:~$ sudo vim /etc/ssh/sshd_config # 编辑配置文件
修改PermitRootLogin选项为no
PermitRootLogin no # 禁止mroot账户登录

这是避免恶意共计,对本次问题或许有改善,但是还是发生了无法访问的问题。
3.4 配置允许所有ip访问
ubuntu@ubuntu:~$ sudo cat /etc/hosts.allow		# 查看服务允许连接的ip信息
# /etc/hosts.allow: list of hosts that are allowed to access the system.
#                   See the manual pages hosts_access(5) and hosts_options(5).
#
# Example:    ALL: LOCAL @some_netgroup
#             ALL: .foobar.edu EXCEPT terminalserver.foobar.edu
#
# If you're going to protect the portmapper use the name "rpcbind" for the
# daemon name. See rpcbind(8) and rpc.mountd(8) for further information.
#

ubuntu@ubuntu:~$ sudo vim /etc/hosts.allow		# 通过vim添加 sshd:ALL
ubuntu@ubuntu:~$ sudo cat /etc/hosts.allow		# 再次查看下有添加进去了
# /etc/hosts.allow: list of hosts that are allowed to access the system.
#                   See the manual pages hosts_access(5) and hosts_options(5).
#
# Example:    ALL: LOCAL @some_netgroup
#             ALL: .foobar.edu EXCEPT terminalserver.foobar.edu
#
# If you're going to protect the portmapper use the name "rpcbind" for the
# daemon name. See rpcbind(8) and rpc.mountd(8) for further information.
#
sshd:ALL
ubuntu@ubuntu:~$ systemctl restart sshd		# 重启服务,如果服务重启不了,也可以使用reboot重启服务器。
结果:
此招,我设置之后,第2天就还是报一样的问题了,无效。
3.5 修改认证方法
万能的重启之后,我有链接了,这次打印了正常的连接日志,重置的是在找密钥的问题。
debug1: identity file C:\\Users\\LJM/.ssh/id_xmss-cert type -1
debug1: Local version string SSH-2.0-OpenSSH_for_Windows_7.7
# 就是在这一步卡死,然后重置连接的。
debug1: Remote protocol version 2.0, remote software version OpenSSH_8.9p1 Ubuntu-3ubuntu0.3
debug1: match: OpenSSH_8.9p1 Ubuntu-3ubuntu0.3 pat OpenSSH* compat 0x04000000
debug1: Authenticating to *****:*** as 'ubuntu'
debug1: SSH2_MSG_KEXINIT sent
debug1: SSH2_MSG_KEXINIT received
debug1: kex: algorithm: curve25519-sha256
debug1: kex: host key algorithm: ecdsa-sha2-nistp256
debug1: kex: server->client cipher: chacha20-poly1305@openssh.com MAC: <implicit>
# ....
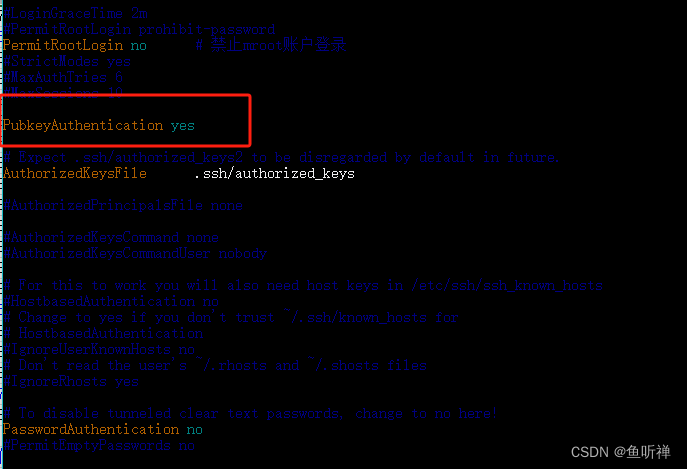
估摸着跟认证方式差异有关系,密钥认证没整上,或者到这个地方超时了,然后就重置。
修改了下server上的/etc/ssh/sshd_config文件,只保留了密钥登录选项,其他的都是no。

重启之后,连上了,有没有用,后面再说。
跑了三天,暂时还算OK。
初步认定,问题已经解决,后面有问题再继续说。
本文来自互联网用户投稿,该文观点仅代表作者本人,不代表本站立场。本站仅提供信息存储空间服务,不拥有所有权,不承担相关法律责任。 如若内容造成侵权/违法违规/事实不符,请联系我的编程经验分享网邮箱:veading@qq.com进行投诉反馈,一经查实,立即删除!
