JavaScript 事件冒泡与捕获机制 --- 带动态图理解
2023-12-13 06:02:48
?(1).事件捕获
从根元素往上传递??--- ---(由外到内)
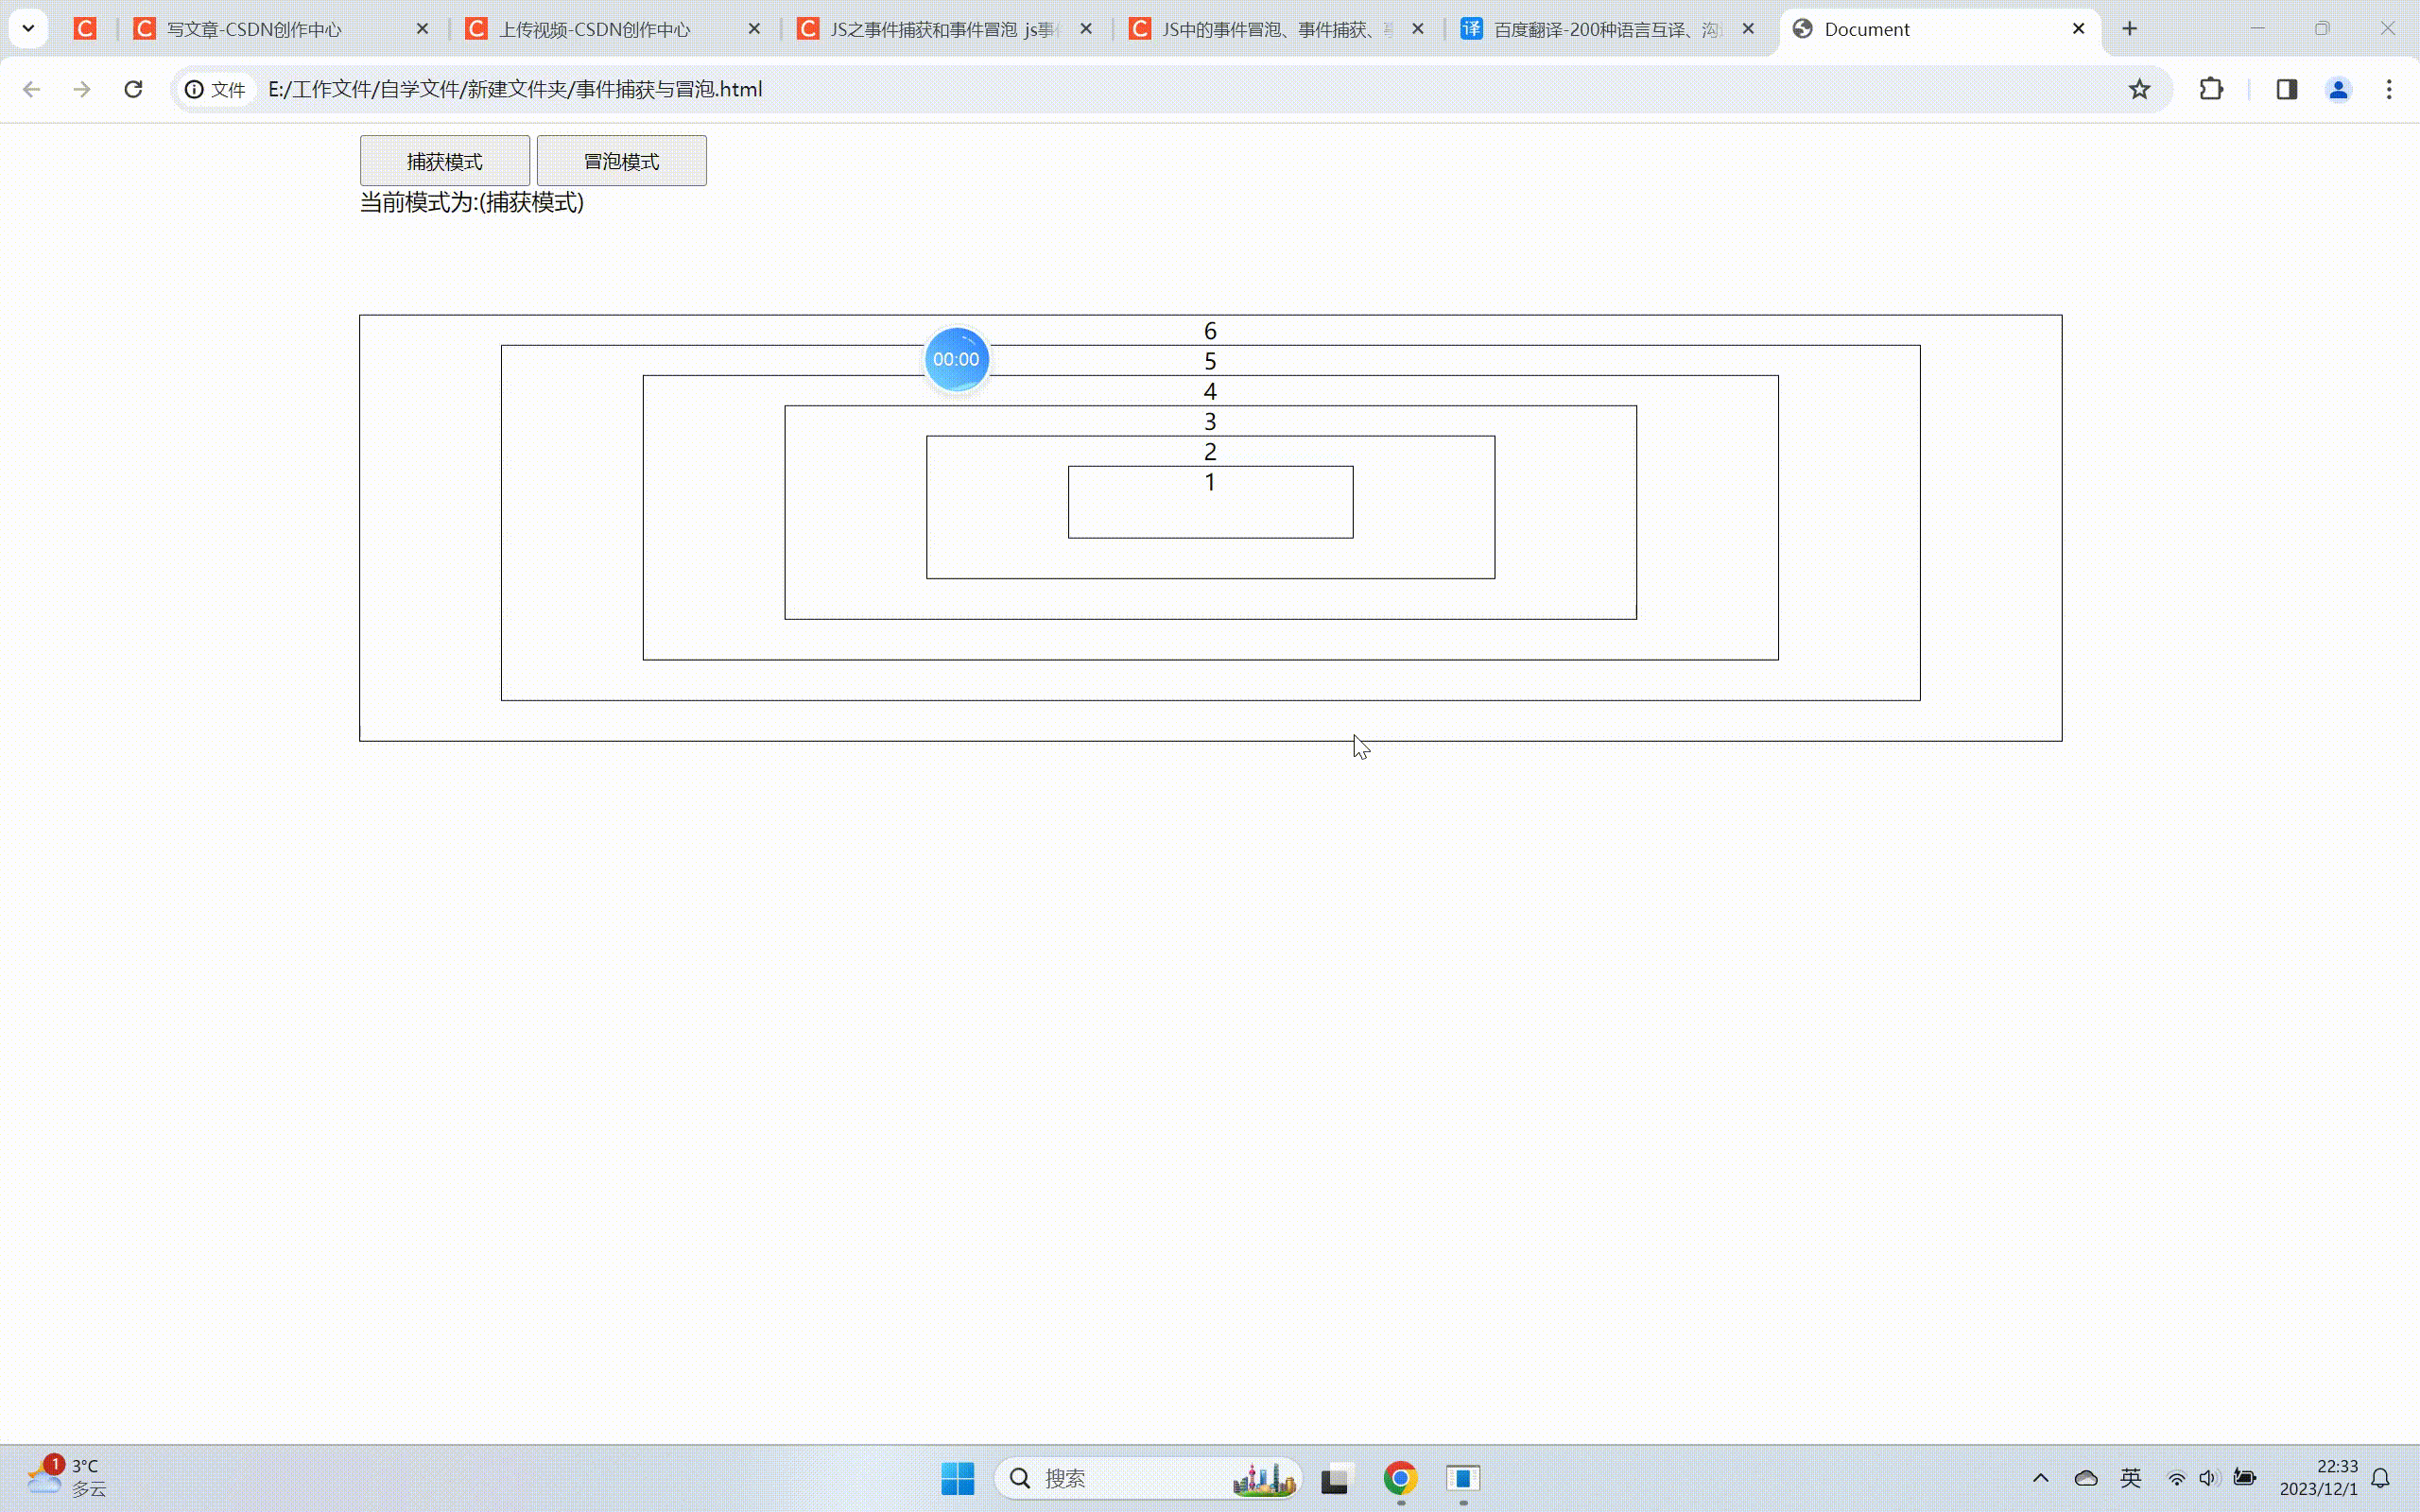
(2).事件冒泡
从元素传递到它的根源素? --- --- (由内到外)

代码:
<html lang="en">

<head>
    <meta charset="UTF-8">
    <meta name="viewport" content="width=device-width, initial-scale=1.0">
    <title>Document</title>
</head>
<!-- js中方法需要加() 如captrueMode()  -->

<body>
    <div class="buttonBox">
        <button class="captrue" onclick="captrueMode('捕获模式')">捕获模式</button>
        <button class="bubbling" onclick="bubblingMode('冒泡模式')">冒泡模式</button>
        <div>当前模式为:(<span id="activeShow"></span>)</div>
    </div>
    <div id="six">
        6
        <div id="five">
            5
            <div id="four">
                4
                <div id="three">
                    3
                    <div id="two">
                        2
                        <div id="one">
                            1
                        </div>
                    </div>
                </div>
            </div>
        </div>
    </div>
</body>
<script>
    // 获取元素
    var elementOne = document.getElementById('one');
    var elementTwo = document.getElementById('two');
    var elementThree = document.getElementById('three');
    var elementFour = document.getElementById('four');
    var elementFive = document.getElementById('five');
    var elementSix = document.getElementById('six');

    const elementArr = [elementOne, elementTwo, elementThree, elementFour, elementFive, elementSix];

    var modeFlag = false; // 默认 -- 冒泡模式
    // 改变模式提示文字方法
    const updateText = (text) => {
        return document.getElementById('activeShow').innerText = text;
    }

    // ! 模式效果操作函数封装
    const directionHandle = function (event) {
        operateHandle(event, this);
    }
    // 元素添加监听控制事件方法封装
    const addEventIsElement = function () {
        elementArr.forEach(item => item.addEventListener('click', directionHandle, modeFlag));
    }
    // 元素删除监听控制事件方法封装
    const removeEventIsElement = function () {
        elementArr.forEach(item => item.removeEventListener('click', directionHandle, modeFlag));
    }
    // 切换为捕获模式
    function captrueMode(mode) {
        removeEventIsElement();
        modeFlag = true, updateText(mode);
        addEventIsElement();
    }

    // 切换为冒泡模式
    function bubblingMode(mode) {
        removeEventIsElement();
        modeFlag = false, updateText(mode);
        addEventIsElement();
    }
    bubblingMode('冒泡模式'); // 默认切换为冒泡模式
    var showTime = 0;
    var cancelShowTime = 1000;

    // !! 封装操作函数 --  x
    const operateHandle = (event, thisDirection) => {
        if (modeFlag) {
            if (thisDirection.id === 'six') {
                showTime = 0;
                cancelShowTime = 1000;
                setTimeout(() => { thisDirection.className = 'activeColor'; }, showTime);// 2s
                setTimeout(() => { thisDirection.className = ''; }, cancelShowTime);
            } else {
                setTimeout(() => { thisDirection.className = 'activeColor'; }, showTime += 1000);
                setTimeout(() => { thisDirection.className = ''; }, cancelShowTime += 1000);
            }
        } else {
            if (event.srcElement.id === thisDirection.id) {
                showTime = 0;
                cancelShowTime = 1000;
                setTimeout(() => { thisDirection.className = 'activeColor'; }, showTime);// 2s
                setTimeout(() => { thisDirection.className = ''; }, cancelShowTime);
            } else {
                setTimeout(() => { thisDirection.className = 'activeColor'; }, showTime += 1000);
                setTimeout(() => { thisDirection.className = ''; }, cancelShowTime += 1000);
            }
        }
    }


</script>

</html>
<style lang="css">
    #six {
        width: 1200px;
        height: 300px;
        border: 1px solid #000;
        text-align: center;
        margin: auto;
        position: absolute;
        top: 50%;
        left: 50%;
        transform: translate(-50%, -110%);
        background-color: #fff;
    }

    #five {
        width: 1000px;
        height: 250px;
        border: 1px solid #000;
        margin: auto;
        background-color: #fff;
    }

    #four {
        width: 800px;
        height: 200px;
        border: 1px solid #000;
        margin: auto;
        background-color: #fff;
    }

    #three {
        width: 600px;
        height: 150px;
        border: 1px solid #000;
        margin: auto;
        background-color: #fff;
    }

    #two {
        width: 400px;
        height: 100px;
        border: 1px solid #000;
        margin: auto;
        background-color: #fff;
    }

    #one {
        width: 200px;
        height: 50px;
        border: 1px solid #000;
        margin: auto;
        background-color: #fff;


    }

    .activeColor {
        background-color: red !important;
    }

    .captrue {
        width: 120px;
        height: 36px;
    }

    .buttonBox {
        width: 1200px;
        margin: auto;
    }

    .bubbling {
        width: 120px;
        height: 36px;
    }
</style>
(3). 事件委托
事件委托:在需要的时候把事件交给别的元素来做 --- ---
优点 :(1) 减少内存消耗 ---- ---- 不用在每个标签上添加事件,只需获取父元素下的元素,绑定事件即可完成全部操作。
????????? ? (2) 具有动态绑定的效果 ---- ---- 在获取全部元素的条件下,不管增加或者减少的情况下都是一样的
?示例:在页面加载完的时候给元素添加上事件,然后来实现操作
<!DOCTYPE html>
<html lang="en">

<head>
    <meta charset="UTF-8">
    <title>JavaScript</title>
</head>

<body>
    <ul id="list" style="width: 100px;margin:0;float: left;">
        <li>1</li>
        <li>2</li>
        <li>3</li>
        <li>4</li>
    </ul>
    <button style="float:left;" id="addli">添加一个 li</button>
    <button style="float:left;" id="delli">删除一个 li</button>
    <script>
        window.onload = function () { 在页面加载完的时候获取到需要的元素
            debugger
            var the_ul = document.getElementById('list');
            var the_li = the_ul.getElementsByTagName('li');
            var sum = the_li.length
            the_ul.onclick = function (e) {
                console.log(e.target.innerHTML)
            };
            document.getElementById('addli').onclick = function () { 给需要的元素绑定上相应的事件
                var newli = document.createElement("li"); 逻辑处理
                newli.innerHTML = ++sum;
                the_ul.appendChild(newli);
            };
            document.getElementById('delli').onclick = function () { 给需要的元素绑定上相应的事件
                the_ul.firstElementChild.remove();逻辑处理
            };
        }
    </script>
</body>

</html>
文章来源:https://blog.csdn.net/QWERTYQ16/article/details/134961931
本文来自互联网用户投稿,该文观点仅代表作者本人,不代表本站立场。本站仅提供信息存储空间服务,不拥有所有权,不承担相关法律责任。 如若内容造成侵权/违法违规/事实不符,请联系我的编程经验分享网邮箱:veading@qq.com进行投诉反馈,一经查实,立即删除!
本文来自互联网用户投稿,该文观点仅代表作者本人,不代表本站立场。本站仅提供信息存储空间服务,不拥有所有权,不承担相关法律责任。 如若内容造成侵权/违法违规/事实不符,请联系我的编程经验分享网邮箱:veading@qq.com进行投诉反馈,一经查实,立即删除!