Nginx与keepalived高可用节点搭建实验
2023-12-15 05:03:58
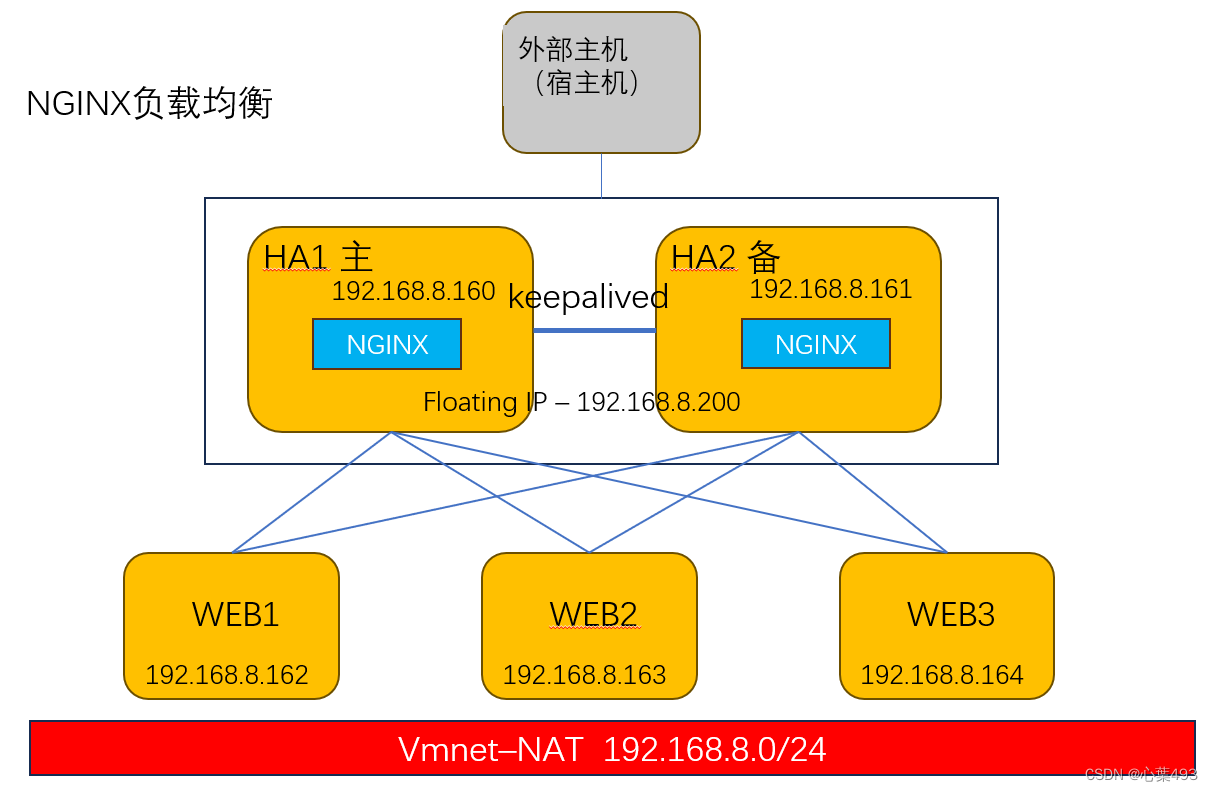
本文主要介绍了nginx+keepalived的部署实验,并简单说明了nginx的集中负载分担模式
简介:
nginx可以通过反向代理功能对后端服务器实现负载均衡功能
keepalived 是一种高可用集群选举软件
keepalived架构
分为三个模块:
1、keepalived core 核心模块
2、keepalived VRRP模块,加载vrrp协议,通过vrrp进行主备选举
——设置vrrp优先级,默认优先级100,
3、keepalive check检查模块,监控检查
——心跳检测,每一秒发送一次心跳
——备份节点如果三秒钟没有收到心跳信息,则认为主节点故障,备份节点切换为主节点
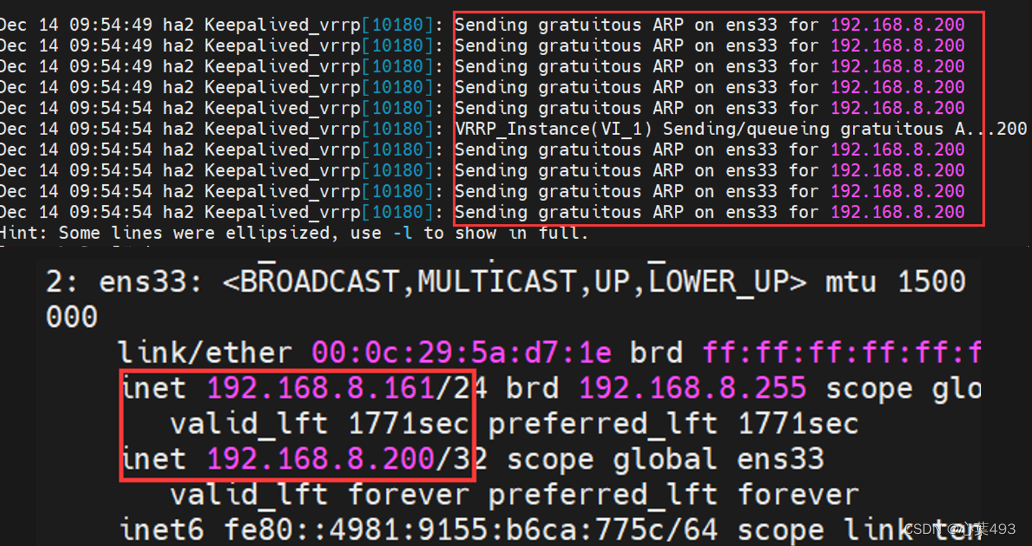
备份节点切换为主节点后,集群IP地址漂移到新的主节点 结合SMTP服务实现邮件发送
环境
VMwareworkstation 17 pro
CentOS Linux release 7.8.2003 (Core)
——4G内存,2core
——20G硬盘
——minimal安装
——NAT网络
#创建完web模板后进行克隆效率更高,随意#5节点部署,如图所示

搭建web节点
#搭建web节点
yum -y install httpd

#修改主机名与html文件
hostnamectl set-hostname WEB1 && bash
echo web1 > /var/www/html/index.html
hostnamectl set-hostname WEB2 && bash
echo web2 > /var/www/html/index.html
hostnamectl set-hostname WEB3 && bash
echo web3 > /var/www/html/index.html

systemctl enable httpd --now

#安全相关
systemctl disable firewalld --now
sed -i 's/^SELINUX=.*/SELINUX=disabled/' /etc/selinux/config
 ?搭建nginx服务
#搭建nginx节点
hostnamectl set-hostname HA1 && bash
hostnamectl set-hostname HA2 && bash

#安装软件包
yum -y install wget vim net-tools
wget -O /etc/yum.repos.d/epel.repo http://mirrors.aliyun.com/repo/epel-7.repo
yum -y install nginx nginx-mod-stream

systemctl enable nginx --now
netstat -tunlp | grep -i nginx # #验证
#tcp        0      0 0.0.0.0:80              0.0.0.0:*               LISTEN      9482/nginx: master

#安全相关
systemctl disable firewalld --now
sed -i 's/^SELINUX=.*/SELINUX=disabled/' /etc/selinux/config
?nginx服务配置
#nginx服务配置

#备份,并且清除注释
cp /etc/nginx/nginx.conf /etc/nginx/nginx.conf.bak
sed -i 's/.*#.*//' /etc/nginx/nginx.conf
vim /etc/nginx/nginx.conf

###配置文件含义
user nginx;
worker_processes auto;
error_log /var/log/nginx/error.log;
pid /run/nginx.pid;
include /usr/share/nginx/modules/*.conf;

events {
    worker_connections 1024; #worker进程上限
}

http { #自身http服务的配置
    log_format  main  '$remote_addr - $remote_user [$time_local] "$request" '
                      '$status $body_bytes_sent "$http_referer" '
                      '"$http_user_agent" "$http_x_forwarded_for"';
    access_log  /var/log/nginx/access.log  main;
    sendfile            on;
    tcp_nopush          on;
		keepalive_timeout   65;
    types_hash_max_size 4096;
    include             /etc/nginx/mime.types;
    default_type        application/octet-stream;
    include /etc/nginx/conf.d/*.conf;

    server { #自己作为http服务器时的配置
        listen       80;
        listen       [::]:80; #监听的ipv6的地址与端口
        server_name  _;
        root         /usr/share/nginx/html;
        include /etc/nginx/default.d/*.conf;
        error_page 404 /404.html; #出错之后的提示页面等
        location = /404.html {
        }
				error_page 500 502 503 504 /50x.html;
        location = /50x.html {
        }
    }
}

###修改完成之后如下
#内含变量,建议vim,使用cat <<END或echo都会出错
user nginx;
worker_processes auto;
error_log /var/log/nginx/error.log;
pid /run/nginx.pid;
include /usr/share/nginx/modules/*.conf;

events {
    worker_connections 1024;
}

stream {
log_format main '$remote_addr $upstream_addr - [$time_local] $status
$upstream_bytes_sent';
access_log /var/log/nginx/web_cluster.log main;
 upstream web_LB { #负载均衡设置
 server 192.168.8.162:80;  #添加要转发的地址与端口
 server 192.168.8.163:80;
 server 192.168.8.164:80;
 }
 server {
 listen 80; #本地监听的端口,可以修改
 proxy_pass web_LB; # 设置为通过负载均衡web_LB的方式进行代理
 }
}

#检查
nginx -t
#nginx: the configuration file /etc/nginx/nginx.conf syntax is ok
#nginx: configuration file /etc/nginx/nginx.conf test is successful
nginx -s reload #重载配置文件
此时重新访问,发现访问160和161能访问到后端的web服务器,清除缓存后会变化
?
最小连接
通过判断哪一个服务器的负载最小,选择负载最小的服务器进行连接
vim /etc/nginx/nginx.conf

upstream web_LB {
least_conn;
server 192.168.8.162:80;
server 192.168.8.163:80;
server 192.168.8.164:80;
}
nginx -t
nginx -s reload
权重轮询
通过修改weight值,根据权重进行负载的分配
vim /etc/nginx/nginx.conf

upstream web_LB { #负载均衡设置
server 192.168.8.162:80 weight=1;  #添加地址与端口
server 192.168.8.163:80 weight=2;
server 192.168.8.164:80 weight=3;
}
nginx -t
nginx -s reload
IPhash
根据源ip地址进行hash计算,根据计算值自动匹配到后端服务器
同个ip固定匹配一个服务器
适合流量大的时候使用,流量越多越均衡
vim /etc/nginx/nginx.conf

upstream web_LB {
hash $remote_addr consistent;
server 192.168.8.162:80;
server 192.168.8.163:80;
server 192.168.8.164:80;
}
nginx -t
nginx -s reload
?HA节点搭建
#部署
yum install -y keepalived
cp /etc/keepalived/keepalived.conf /etc/keepalived/keepalived.conf.bak

vim /etc/keepalived/keepalived.conf
根据实际情况修改
###配置文件解析,并修改配置文件
! Configuration File for keepalived

global_defs {
   notification_email {
     acassen@firewall.loc
     failover@firewall.loc
     sysadmin@firewall.loc
   }
	 notification_email_from Alexandre.Cassen@firewall.loc
   smtp_server 127.0.0.1 #通过SMTP来发送邮件的地址
   smtp_connect_timeout 30
   router_id ha1 #路由器代号,挂了之后邮件提升的内容,主备节点需要不同,我写本机
   vrrp_skip_check_adv_addr
   #vrrp_strict
   vrrp_garp_interval 0
   vrrp_gna_interval 0
}
vrrp_instance VI_1 { #实例1,instance的概念与网络中的一致,可以设置多实例来允许多网段的访问
    state MASTER   #状态
    interface ens33 #keepalived的接口地址,我的虚机网卡是ens33
    virtual_router_id 100 #虚拟地址路由器routerid,主备节点需要相同,建议自定义1-255
    priority 100 #优先级,主节点的需要比备节点高
    advert_int 1 #心跳间隔1s
    authentication {  #认证配置
        auth_type PASS #开启认证
        auth_pass 1111 #密钥
    }
    virtual_ipaddress { #虚拟的floating ip,支持多个
        192.168.8.200
    }
}

#启动服务
systemctl enable keepalived --now
systemctl restart keepalived

主节点的网卡会附带集群的地址,如下图


?主备倒换测试
ha1停止keepalived,查看ha2的keepalived状态
systemctl stop keepalived

添加定时执行脚本自动拉活nginx
在keepalive的配置文件中添加脚本,用以检测nginx服务是否正常开启
通过脚本自动拉活nginx服务
vim /etc/keepalived/check_nginx_port.sh

#!/bin/bash
if [ "$(netstat -ntlp | grep "nginx: master" | wc -l)" == "0" ]
 then
 systemctl restart nginx
 sleep 2
 if [ "$(netstat -ntlp | grep "nginx: master" | wc -l)" == "0" ]
 then
 systemctl stop keepalived
 fi
fi
编辑配置文件
vim /etc/keepalived/keepalived.conf

...
vrrp_script check_nginx_port {
 script "/etc/keepalived/check_nginx_port.sh"
 interval 2  #间隔2秒
}

...

vrrp_instance VI_1 {
 ...
 track_script {
 check_nginx_port
 }
}
文章来源:https://blog.csdn.net/qq_72569959/article/details/135006562
本文来自互联网用户投稿,该文观点仅代表作者本人,不代表本站立场。本站仅提供信息存储空间服务,不拥有所有权,不承担相关法律责任。 如若内容造成侵权/违法违规/事实不符,请联系我的编程经验分享网邮箱:veading@qq.com进行投诉反馈,一经查实,立即删除!
本文来自互联网用户投稿,该文观点仅代表作者本人,不代表本站立场。本站仅提供信息存储空间服务,不拥有所有权,不承担相关法律责任。 如若内容造成侵权/违法违规/事实不符,请联系我的编程经验分享网邮箱:veading@qq.com进行投诉反馈,一经查实,立即删除!