基于 WebSocket 打造聊天室
一、什么是 WebSocket?
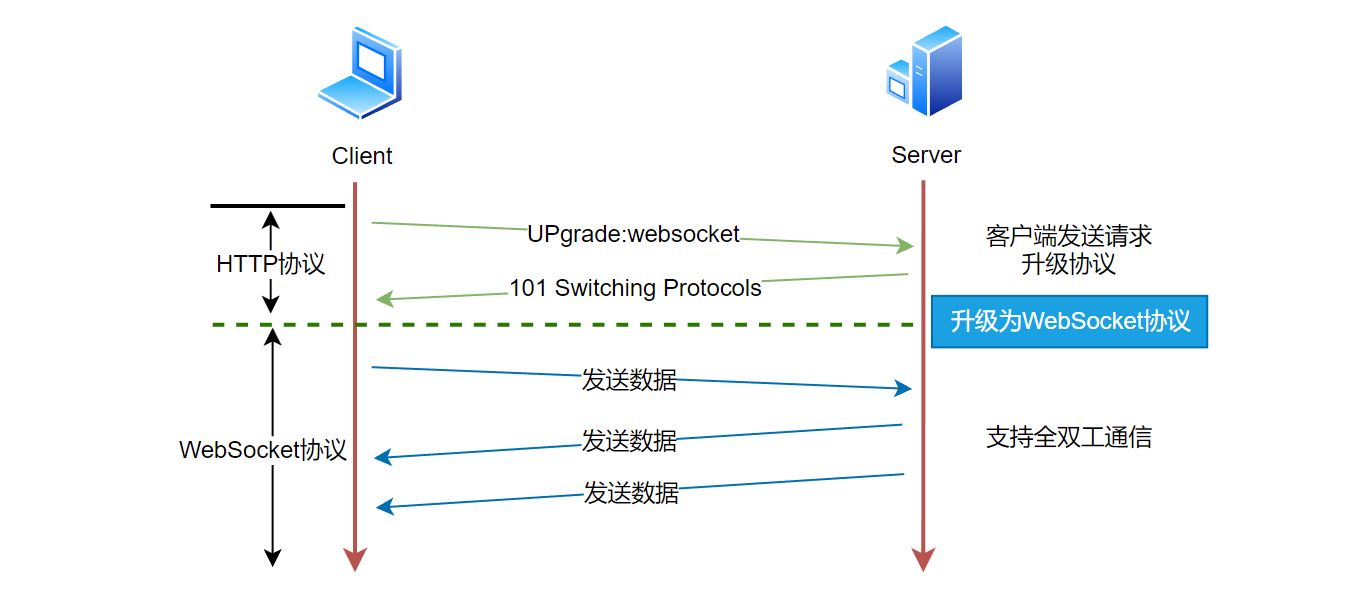
WebSocket 是一种基于TCP连接上进行 全双工 通信的协议。WebSocket使得客户端和服务器之间的数据交换变得更加简单,允许服务端主动向客户端推送数据。在WebSocket API中,浏览器和服务器只需要完成一次握手,两者之间就直接可以创建持久性的连接,并进行双向数据传输。

二、WebSocket 的应用场景
WebSocket 的特点,决定了他在一些 实时双向通信、低延迟、推送等功能的应用场景下的独特优势。
在WebSocket 出现之前,Web 程序想要进行实时通信是非常麻烦的,因为 HTTP 是一种无状态、无连接、单向的应用层协议,它无法实现服务器主动向客户端推送消息,并且这种单向请求的特点,注定了客户端实时获取服务端的变化就非常麻烦,通常情况下,需要客户端频繁的对服务器进行轮询,这种方式不仅效率低,实时性不好,而且这种频繁的请求和响应对服务器来说也是一种负担。

三、WebSocket API
1、客户端/浏览器 API
由于 WebSocket 协议是 HTML5开始支持的,所以想要使用 WebSocket 协议,首先保证浏览器支持 HTML5.
websocket 对象创建
let ws = new WebSocket(URL);
注:这里的 url 格式为 协议://ip地址:端口号/访问路径。协议名称固定为 ws
websocket 事件
| 事件 | 事件处理程序 | 描述 |
|---|---|---|
| open | ws.onopen | 连接建立时触发 |
| message | ws.onmessage | 客户端接收服务端数据时触发 |
| error | ws.onerror | 通信发生错误时触发 |
| close | ws.onclose | 连接关闭时触发 |
websocket 方法
| 方法 | 描述 |
|---|---|
| ws.send() | 使用连接发送数据到服务器 |
| ws.close() | 关闭连接 |
2、服务端 API
Tomcat 从 7.0.5 版本开始支持 WebSocket,所以使用时注意 Tomcat 版本不能低于 7.0.5。在Java中,Endpoint 表示服务器 Websocket 连接的一端,可以视之为处理WebSocket消息的接口。Java 中可以通过两种方式定义Endpoint:
- 编程式:通过继承 javax.websocket.Endpoint并实现其方法。
- 注解式:通过添加 @ServerEndpoint 等相关注解。
Endpoint 实例在 WebSocket 握手时创建,并在客户端与服务端连接过程中有效,在连接关闭时结束,在Endpoint接口中就定义了其生命周期的相关方法:
| 方法 | 注解 | 描述 |
|---|---|---|
| onOpen | @OnOpen注解所标识的方法 | 连接建立时触发 |
| onError | @OnError注解所标识的方法 | 通信发生错误时触发 |
| onClose | @OnClose注解所标识的方法 | 连接关闭时触发 |
在 onOpen 方法中,将创建一个 Session 对象,表示当前 WebSocket 连接的会话,Session对象提供了一组方法,用于管理WebSocket连接和事件。例如:
服务端向客户端发送数据:
如果使用编程式的话,可以通过 Session 添加 MessageHandler 消息处理器来接收消息;如果采用注解式,可以在定义的 Endpoint 类中添加 @OnMessage 注解指定接收消息的方法。
服务端将数据推送给客户端:
在 Session 中维护了一个 RemoteEndpoint 实例,用来向客户端推送数据,我们可以通过 Session.getBasicRemote 获取同步消息发送实例,通过 Session.getAsyncRemote 获取异步消息发送实例,然后调用实例中的 sendXXX() 方法即可发送消息。
四、使用 webSocket 实现在线聊天室
上面说了那么多理论知识,主要是为了让大家对Websocket有个最基本的认识,下面就通过一个具体的场景《在线聊天室》来体会一下 Websocket 在实际中如何使用。
1、需求分析
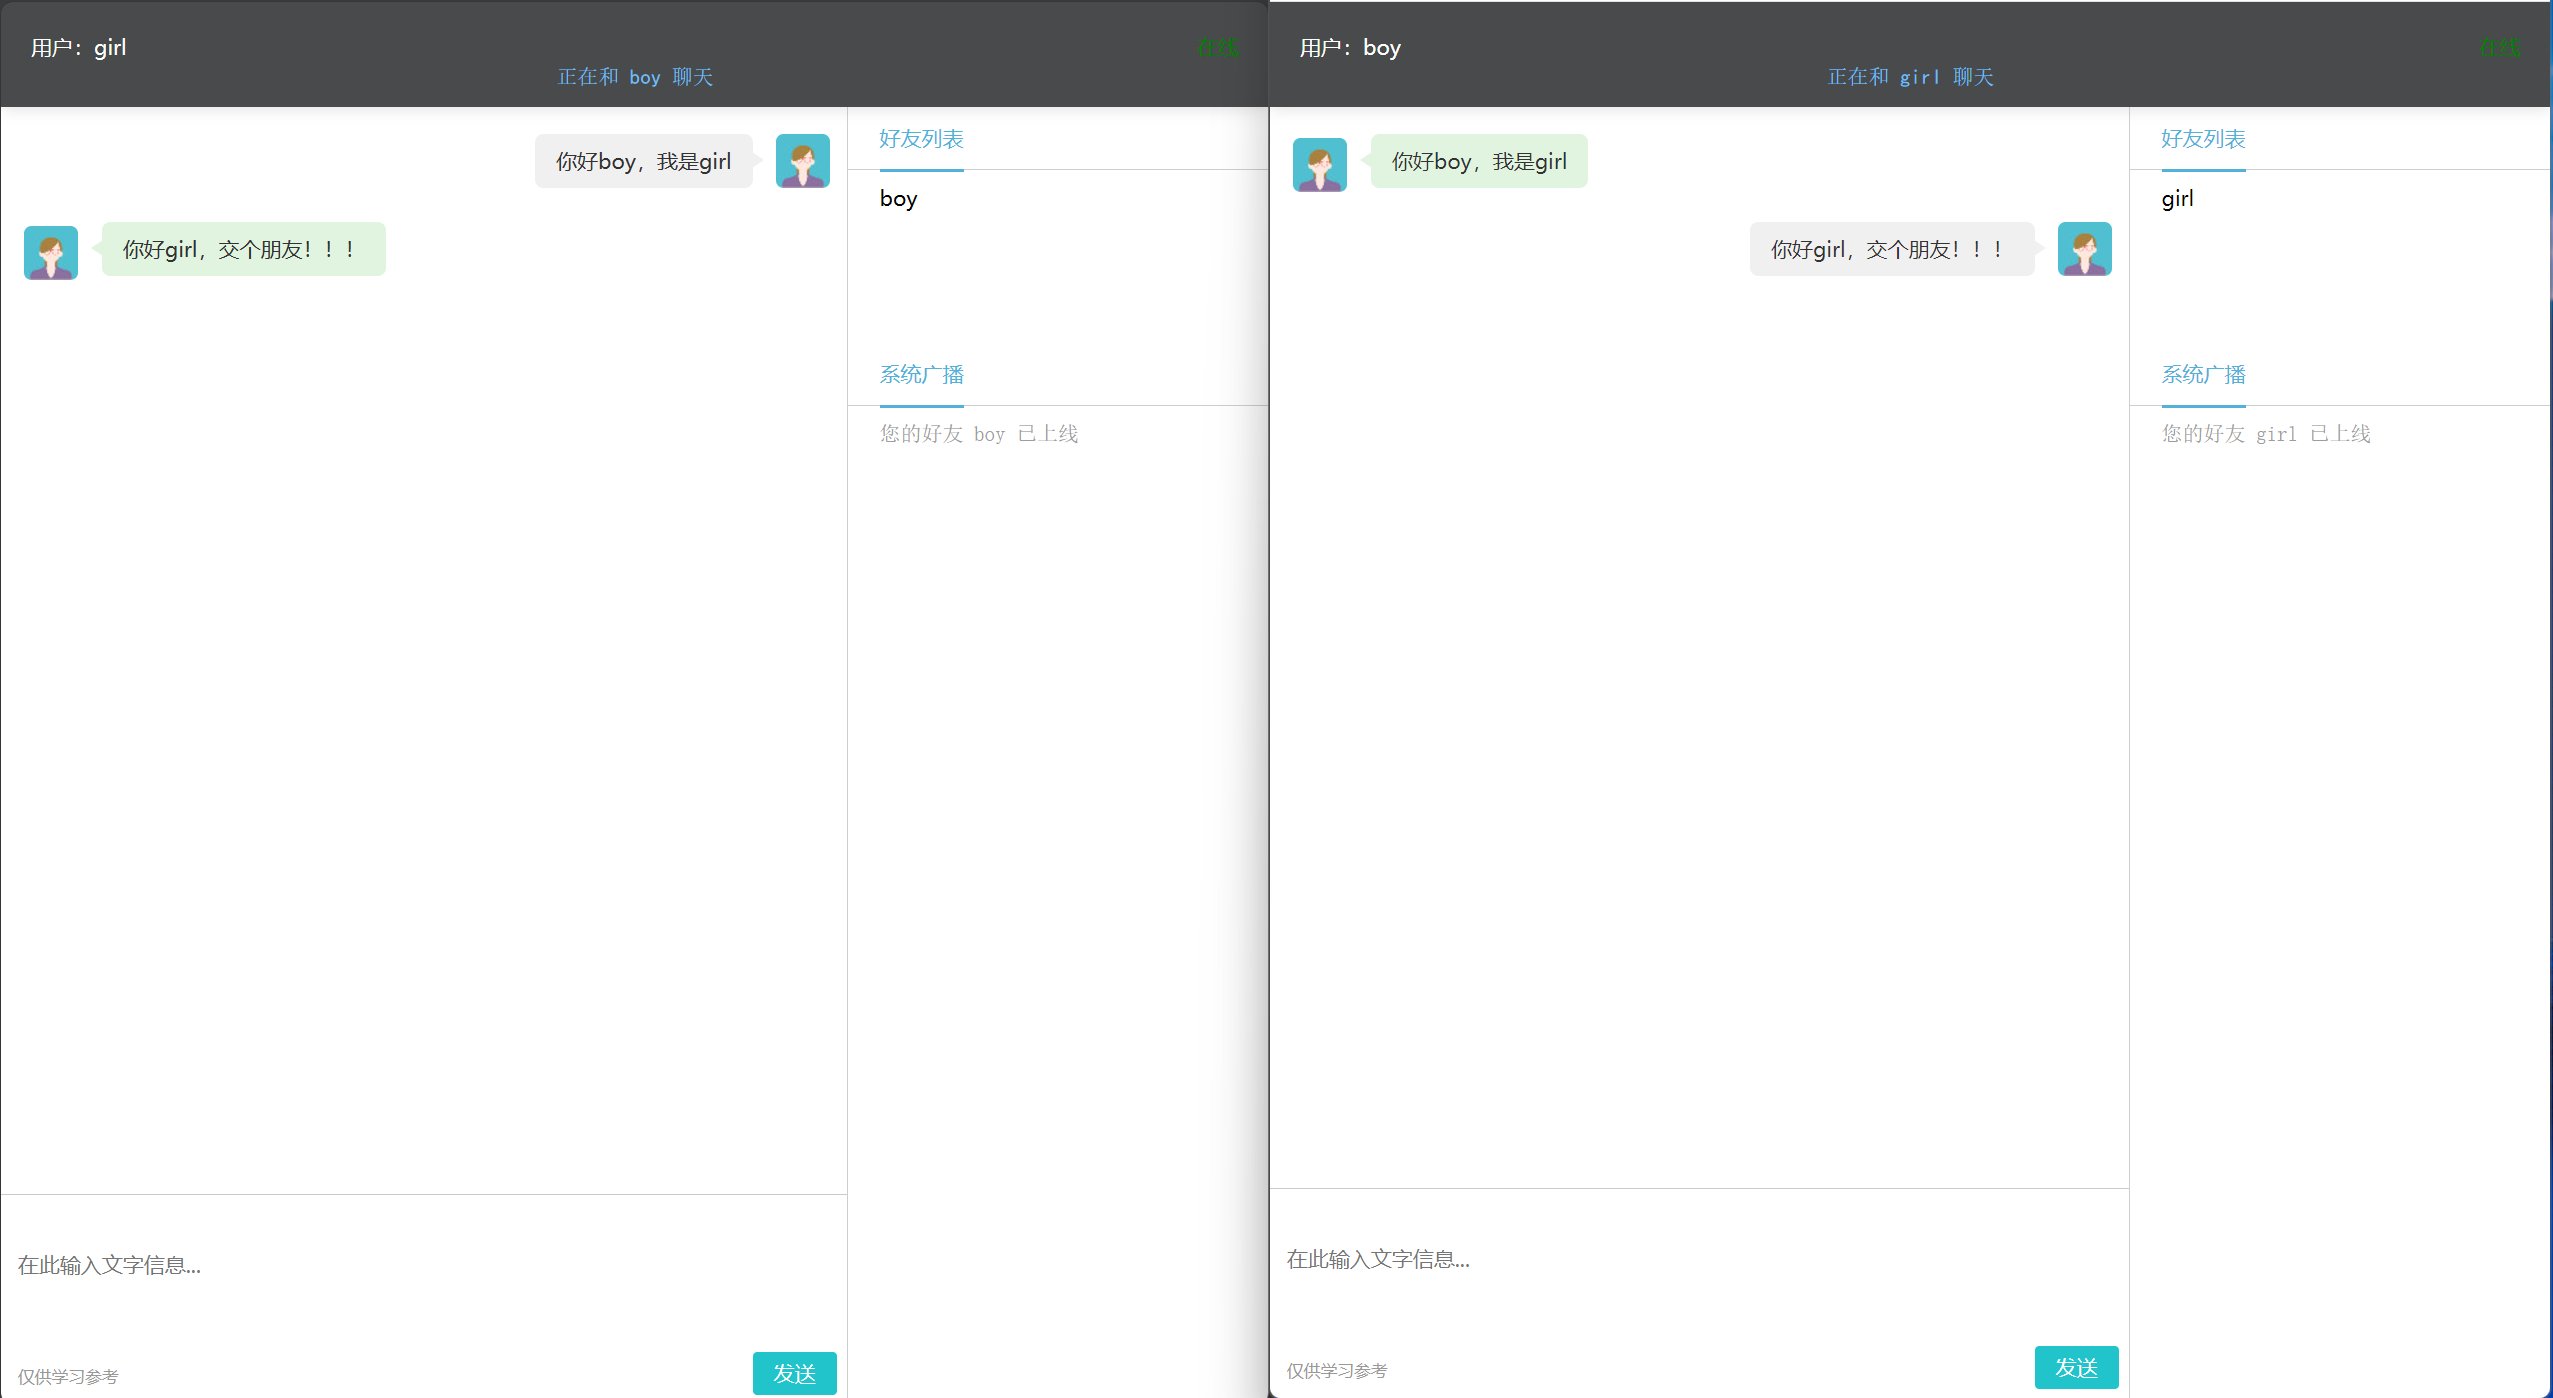
这里我们实现的聊天室是比较简单的,主要功能就是能够实现实时消息的发送和接收,能够实时显示用户在线状态和在线人数。下面简单演示一下成品效果:

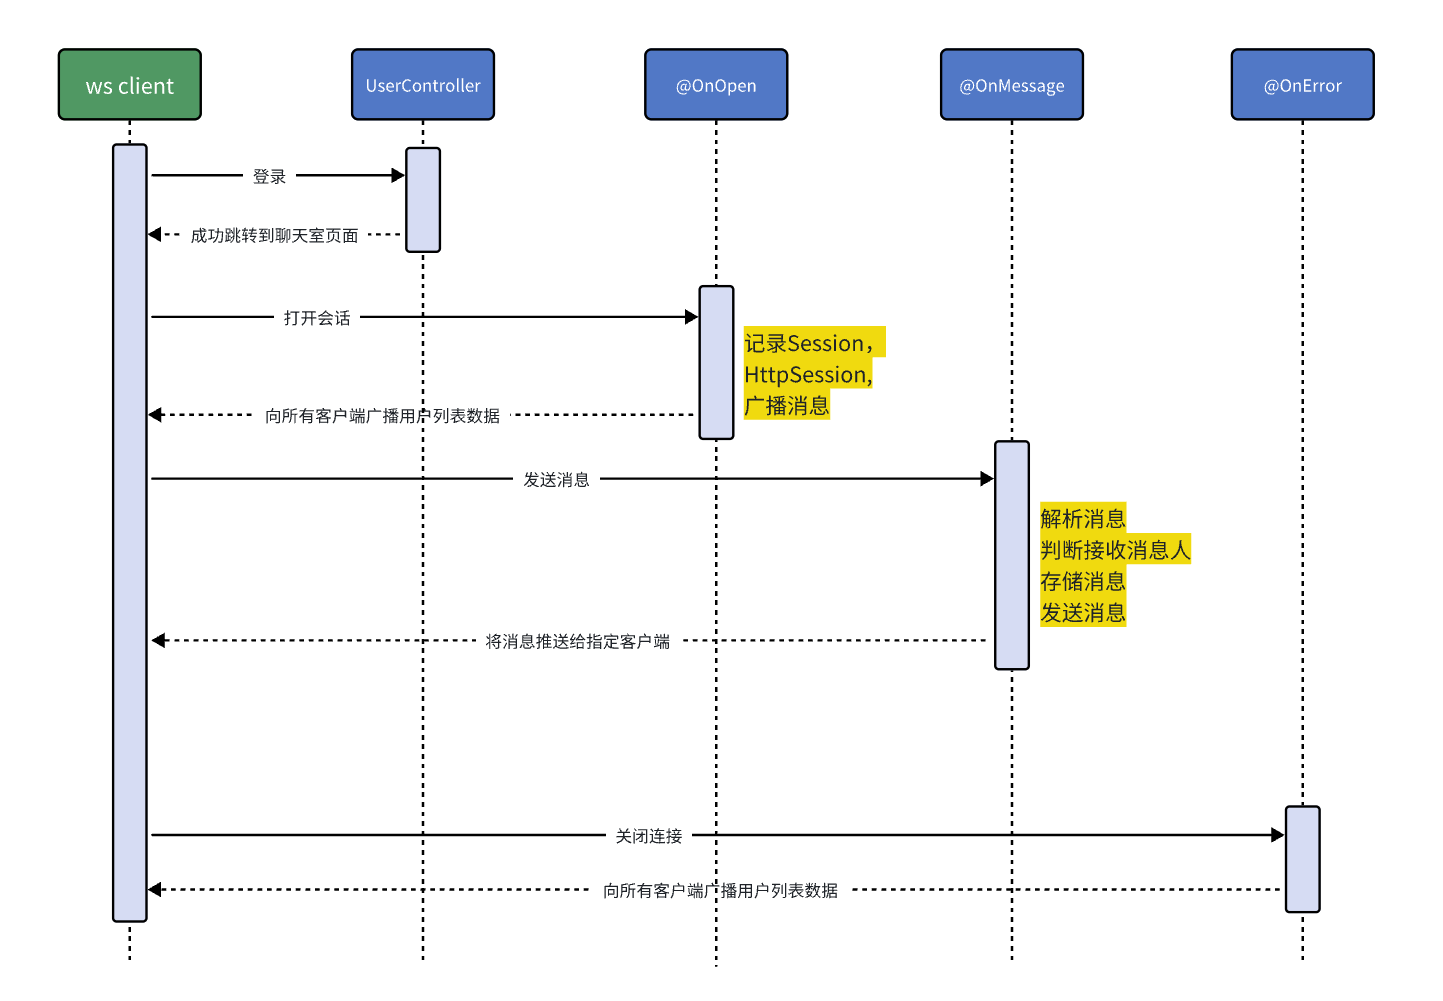
2、实现流程

3、消息格式
这里约定前后端的消息数据格式采用 json 格式进行传输。主要分为两大类消息:
- 客户端–>服务器:
{"toName":"张三","message":"你好"}
- 服务器–>客户端:
{"isSystem":true,"fromName":null,"message":["张三","李四"] }
{"isSystem":false,"fromName":"张三","message":"你好" }
4、服务端功能实现
这部分我会详细介绍一下使用 websocket,后端如何进行api编写,至于登录功能,可以说是千篇一律,这里直接给出代码,不作为重点,也就不在展开介绍了。
(1)导入依赖
首先我们需要创建 SpringBoot 项目并导入 websocket 相关依赖:
<dependency>
	<groupId>org.springframework.boot</groupId>
	<artifactId>spring-boot-starter-websocket</artifactId>
</dependency>
(2)登录模块实现
登录功能不是本次实现的重点,所以这里只是对密码进行了一个简单的校验,不涉及到数据库交互操作。
@RestController
@RequestMapping("/user")
public class UserController {
    /**
     * 登录
     * @param user 提交的用户名和密码
     * @param httpSession 提交的
     * @return 成功信息
     */
    @PostMapping("/login")
    public Result login(User user, HttpSession httpSession) {
        if (user != null && (user.getPassword()).equals("123")) {
            // 将用户数据存储到session中
            httpSession.setAttribute("user",user.getUsername());
            System.out.println(httpSession);
            return Result.success("登录成功");
        } else {
            return Result.failed();
        }
    }

    /**
     * 获取当前登录的用户名
     * @return 用户名
     */
    @GetMapping("/getusername")
    public Result login(HttpSession httpSession) {
        String username = (String) httpSession.getAttribute("user");
        return Result.success(username);
    }

}
(3)聊天室功能实现
@Component
@ServerEndpoint(value = "/chat",configurator = GetHttpSessionConfigurator.class)
public class ChatEndpoint {
    // 用来存储每一个客户端对象对应的ChatEndpoint对象
    private static ConcurrentHashMap<String,ChatEndpoint> onlineClient = new ConcurrentHashMap<>();
    // 声明session对象,通过该对象可以发生消息给指定的客户端
    private Session session;
    // 声明Httpsession对象,里面记录了用户相关信息
    private HttpSession httpSession;

    /**
     * 连接建立时调用
     * @param session 当前连接的会话
     * @param config Endpoint的配置对象
     */
    @OnOpen
    public void onOpen(Session session,EndpointConfig config) {
        try {
            // 初始化当前Endpoint的链接会话
            this.session = session;
            // 初始化httpSession
            HttpSession httpSession = (HttpSession) config.getUserProperties().get(HttpSession.class.getName());
            this.httpSession = httpSession;
            // 将当前连接的ChatEndpoint对象存储到onlineClient容器中
            String username = (String) httpSession.getAttribute("user");
            onlineClient.put(username,this);
            // 将在线用户推送给所有客户端
            // 1.获取消息
            String message = MessageUtils.getMessage(true, null, getNames());
            // 2.将消息广播给所有用户
            broadcastAllUsers(message);
        } catch (Exception e) {
            e.printStackTrace();
        }
    }

    private void broadcastAllUsers(String message) {
        Set<String> names = getNames();
        try {
            for (String name : names) {
                // 获取当前用户的ChatEndpoint对象
                ChatEndpoint client = onlineClient.get(name);
                // 使用session发送信息
                client.session.getBasicRemote().sendText(message);
            }
        } catch (Exception e) {
            e.printStackTrace();
        }
    }

    private Set<String> getNames() {
        return onlineClient.keySet();
    }

    /**
     * 接收到客户端数据后调用
     * @param message 消息信息
     * @param session 当前连接的会话
     */
    @OnMessage
    public void onMessage(String message,Session session) {
        try {
            // 导入jackson核心类
            ObjectMapper objectMapper = new ObjectMapper();
            // 将JSON字符串序列化为Message对象
            Message mess = objectMapper.readValue(message, Message.class);
            // 取出接收人
            String toName = mess.getToName();
            // 取出信息
            String sendMess = mess.getMessage();
            // 找到发送人姓名
            String fromName = (String) httpSession.getAttribute("user");
            // 进行消息构造
            String finalMess = MessageUtils.getMessage(false, fromName, sendMess);
            // 根据接收人找到对应的连接
            ChatEndpoint chatEndpoint = onlineClient.get(toName);
            if (chatEndpoint == null) {
                // 这里可以抛出异常
                // ...
                // 打印日志
                System.out.println("找不到对应的客户端!userName = "+toName);
                return;
            }
            // 使用对应的会话Session发送给对应的客户端
            chatEndpoint.session.getBasicRemote().sendText(finalMess);

        } catch (Exception e) {
            e.printStackTrace();
        }


    }

    /**
     * 连接过程中发生错误时调用
     */
    @OnError
    public void onError(Session session, Throwable error) {
        System.out.println("websocket连接出错,错误原因:"+error.getMessage());
    }

    /**
     * 关闭连接时调用
     */
    @OnClose
    public void onClose(Session session) {
        try {
            // 1.清除容器中的该ChatEndpoint对象
            String username = (String) httpSession.getAttribute("user");
            onlineClient.remove(username);
            // 2.向所有客户端广播下线通知
            Set<String> names = getNames();
            // 3.构造消息
            String message = MessageUtils.getMessage(true,null,getNames());
            // 4.广播给其他用户
            broadcastAllUsers(message);

        } catch (Exception e) {
            e.printStackTrace();
        }
    }
}
需要注意的是:
- 事实上当@Component注解和@ServerEndpoint(“/chat”)注解同时使用时,Spring并不会将ChatEndpoint这个类注册为服务器的端点,我们还需要需要注册一个 ServerEndpointExporter bean,它会自动扫描带有@ServerEndpoint注解的类,并将其注册为WebSocket端点,以便客户端可以连接和通信:
@Configuration
public class WebSocketConfig {
    @Bean
    public ServerEndpointExporter serverEndpointExporter() {
        return new ServerEndpointExporter();
    }
}
-
在WebSocket中,每次客户端与服务器建立连接时,都会创建一个新的ChatEndpoint实例来处理该连接。因此,每个WebSocket连接都有其自己的ChatEndpoint实例,this指向的是当前连接对应的实例,所以在ChatEndpoint类中使用了一个static类型的集合将所有的连接记录起来,便于之后的消息处理。
-
在客户端与服务端建立连接时,上述的静态集合中是以 键-值 方式存储每个客户端的ChatEndpoint实例的,为了区分,这里以登录的用户名作为键,所以需要获取到HttpSession,再从Httpsession中获取到用户名,但是在OnOpen方法中无法直接获取当前登录的 Httpsession,此时我们可以借助OnOpen中的另一个参数 EndpointConfig config,将Httpsession存储到EndpointConfig对象中,在从EndpointConfig对象中获取到Httpsession,因此我们需要进行如下配置:
public class GetHttpSessionConfigurator extends ServerEndpointConfig.Configurator {
    @Override
    public void modifyHandshake(ServerEndpointConfig sec,
     							HandshakeRequest request,
     							HandshakeResponse response) {
        // 获取到httpSession
        HttpSession httpSession = (HttpSession) request.getHttpSession();
        // 将httpSession存储到EndpointConfig中
        sec.getUserProperties().put(HttpSession.class.getName(),httpSession);
    }
}
5、客户端交互功能实现
客户端这里主要介绍一下前后端交互的逻辑,具体页面实现我们暂时不关心。
(1)登录页面前后端交互
登录页面的前后端交互主要采用 jQuery 发送 Ajax 请求完成,整体思路很简单,这里给出 js 代码:
<script>
    function login(){
        // 1.参数校验
        var username = jQuery("#username");
        var password = jQuery("#password");
        if (username.val().trim() == "") {
            username.focus();
            alert("请输入用户名!")
            return false;
        }
        if (password.val().trim() == "") {
            username.focus();
            alert("请输入密码!");
            return false;
        }
        // 2.将参数提交给后端
        jQuery.ajax({
            url:"/user/login",
            type:"POST",
            data:{
                "username":username.val().trim(),
                "password":password.val().trim()
            },
            success:function(res) {
            console.log(res);
                // 3.将结果返回给用户
                if (res.flag) {
                    // 登录成功!
                    // alert("登录成功!");
                    // 跳转到主页
                    location.href="main.html";
                } else {
                    // 登录失败!
                    alert("登录失败,用户名或密码错误!");
                }
            }
        });
    }
</script>
(2)聊天页面的前后端交互
在聊天页面这里,使用到 vue 进行处理,可能理解起来稍微有点复杂,大家可以自行参考:
<body>
<div class="abs cover contaniner" id="app">
    <div class="abs cover pnl">
        <div class="top pnl-head" style="padding: 20px ; color: white;">
            <div id="userName">
                用户:{{username}}
                <span style='float: right;color: green' v-if="isOnline">在线</span>
                <span style='float: right;color: red' v-else>离线</span>
            </div>
            <div id="chatMes" v-show="chatMes" style="text-align: center;color: #6fbdf3;font-family: 新宋体">
                正在和 <font face="楷体">{{toName}}</font> 聊天
            </div>
        </div>
        <!--聊天区开始-->
        <div class="abs cover pnl-body" id="pnlBody">
            <div class="abs cover pnl-left" id="initBackground" style="background-color: white; width: 100%">
                <div class="abs cover pnl-left" id="chatArea" v-show="isShowChat">
                    <div class="abs cover pnl-msgs scroll" id="show">
                        <div class="pnl-list" id="hists"><!-- 历史消息 --></div>
                        <div class="pnl-list" id="msgs" v-for="message in historyMessage">

                            <!-- 消息这展示区域 -->
                            <div class="msg guest" v-if="message.toName">
                                <div class="msg-right">
                                    <div class="msg-host headDefault"></div>
                                    <div class="msg-ball">{{message.message}}</div>
                                </div>
                            </div>
                            <div class="msg robot" v-else>
                                <div class="msg-left" worker="">
                                    <div class="msg-host photo"
                                         style="background-image: url(img/avatar/Member002.jpg)"></div>
                                    <div class="msg-ball">{{message.message}}</div>
                                </div>
                            </div>

                        </div>
                    </div>


                    <div class="abs bottom pnl-text">
                        <div class="abs cover pnl-input">
                            <textarea class="scroll" id="context_text" @keyup.enter="submit" wrap="hard" placeholder="在此输入文字信息..."
                                      v-model="sendMessage.message"></textarea>
                            <div class="abs atcom-pnl scroll hide" id="atcomPnl">
                                <ul class="atcom" id="atcom"></ul>
                            </div>
                        </div>

                        <div class="abs br pnl-btn" id="submit" @click="submit"
                             style="background-color: rgb(32, 196, 202); color: rgb(255, 255, 255);">
                            发送
                        </div>
                        <div class="pnl-support" id="copyright"><a href="https://blog.csdn.net/LEE180501?spm=1000.2115.3001.5343">仅供学习参考</a></div>
                    </div>
                </div>

                <!--聊天区 结束-->
                <div class="abs right pnl-right">
                    <div class="slider-container hide"></div>
                    <div class="pnl-right-content">
                        <div class="pnl-tabs">
                            <div class="tab-btn active" id="hot-tab">好友列表</div>
                        </div>
                        <div class="pnl-hot">
                            <ul class="rel-list unselect">
                                <li class="rel-item" v-for="friend in friendsList"><a @click='showChat(friend)'>{{friend}}</a>
                                </li>
                            </ul>
                        </div>
                    </div>

                    <div class="pnl-right-content">
                        <div class="pnl-tabs">
                            <div class="tab-btn active">系统广播</div>
                        </div>
                        <div class="pnl-hot">
                            <ul class="rel-list unselect" id="broadcastList">
                                <li class="rel-item" style="color: #9d9d9d;font-family: 宋体" v-for="name in systemMessages">您的好友
                                    {{name}} 已上线</li>
                            </ul>
                        </div>
                    </div>
                </div>
            </div>
        </div>
    </div>
</div>
<script src="js/vue.js"></script>
<script src="js/axios-0.18.0.js"></script>
<script>
    let ws;
    new Vue({
        el: "#app",
        data() {
            return {
                isShowChat: false,
                chatMes: false,
                isOnline: true,
                username:"",
                toName: "",
                sendMessage: {
                    toName: "",
                    message: ""
                },
                inputMessage: "",
                historyMessage: [

                ],
                friendsList: [

                ],
                systemMessages : [

                ]
            }
        },
        created() {
            this.init();
        },
        methods: {
            async init() {
                await axios.get("user/getusername").then(res => {
                    this.username = res.data.message;
                });

                //创建webSocket对象
                ws = new WebSocket("ws://127.0.0.1:8080/chat");

                //给ws绑定事件
                ws.onopen = this.onopen;
                //接收到服务端推送的消息后触发
                ws.onmessage = this.onMessage;

                ws.onclose = this.onClose;
            },
            showChat(name) {
                this.toName = name;
                //清除聊天区的数据
                let history = sessionStorage.getItem(this.toName);
                if (!history) {
                    this.historyMessage = [];
                } else {
                    this.historyMessage = JSON.parse(history);
                }
                //展示聊天对话框
                this.isShowChat = true;
                //显示“正在和谁聊天”
                this.chatMes = true;
            },
            submit() {
                this.sendMessage.toName = this.toName;
                this.historyMessage.push(JSON.parse(JSON.stringify(this.sendMessage)));
                sessionStorage.setItem(this.toName, JSON.stringify(this.historyMessage));
                ws.send(JSON.stringify(this.sendMessage));
                this.sendMessage.message = "";
            },
            onOpen() {
                this.isOnline = true;
            },
            onClose() {
                sessionStorage.clear();
                this.isOnline = false;
            },
            onMessage(evt) {
                //获取服务端推送过来的消息
                var dataStr = evt.data;
                //将dataStr 转换为json对象
                var res = JSON.parse(dataStr);

                //判断是否是系统消息
                if(res.system) {
                    //系统消息  好友列表展示
                    var names = res.message;
                    this.friendsList = [];
                    this.systemMessages = [];
                    for (let i = 0; i < names.length; i++) {
                        if(names[i] != this.username) {
                            this.friendsList.push(names[i]);
                            this.systemMessages.push(names[i]);
                        }
                    }
                }else {
                    //非系统消息
                    var history = sessionStorage.getItem(res.fromName);
                    if (res.fromName == this.toName) {
                        if (!history) {
                            this.historyMessage = [res];
                        } else {
                            this.historyMessage.push(res);
                        }
                        sessionStorage.setItem(res.fromName, JSON.stringify(this.historyMessage));
                    } else {
                        if (!history) {
                            sessionStorage.setItem(res.fromName, JSON.stringify([res]));
                        } else {
                            let messages = JSON.parse(history);
                            messages.push(res);
                            sessionStorage.setItem(res.fromName, JSON.stringify(messages));
                        }
                    }

                }
            }
        }
    });
</script>
6、聊天室完整资源
完整资源请点击: Gitee 在线聊天室
本文来自互联网用户投稿,该文观点仅代表作者本人,不代表本站立场。本站仅提供信息存储空间服务,不拥有所有权,不承担相关法律责任。 如若内容造成侵权/违法违规/事实不符,请联系我的编程经验分享网邮箱:veading@qq.com进行投诉反馈,一经查实,立即删除!