二、MyBatis 基本使用
本章概要
- 向
SQL语句传参 - 数据输入
Mybatis总体机制概括- 概念说明
- 单个简单类型参数
- 实体类类型参数
- 零散的简单类型数据
Map类型参数
- 数据输出
- 输出概述
- 单个简单类型
- 返回实体类对象
- 返回Map类型
- 返回
List类型 - 返回主键值
- 实体类属性和数据库字段对应关系
CRUD强化练习mapperXML标签总结
2.1 向 SQL 语句传参
2.1.1 mybatis 日志输出配置
mybatis配置文件设计标签和顶层结构如下:
- configuration(配置)
- properties(属性)
- settings(设置)
- typeAliases(类型别名)
- typeHandlers(类型处理器)
- objectFactory(对象工厂)
- plugins(插件)
- environments(环境配置)
- environment(环境变量)
- transactionManager(事务管理器)
- dataSource(数据源)
- environment(环境变量)
- databaseIdProvider(数据库厂商标识)
- mappers(映射器)
可以在
mybatis的配置文件使用settings标签设置,输出运过程SQL日志!通过查看日志,可以判定 #{} 和 ${} 的输出效果!
settings设置项:
| logImpl | 指定 MyBatis 所用日志的具体实现,未指定时将自动查找。 | SLF4J | LOG4J(3.5.9 起废弃) | LOG4J2 | JDK_LOGGING | COMMONS_LOGGING | STDOUT_LOGGING | NO_LOGGING | 未设置 |
|---|
日志配置:
<settings>
  <!-- SLF4J 选择slf4j输出! -->
  <setting name="logImpl" value="SLF4J"/>
</settings>
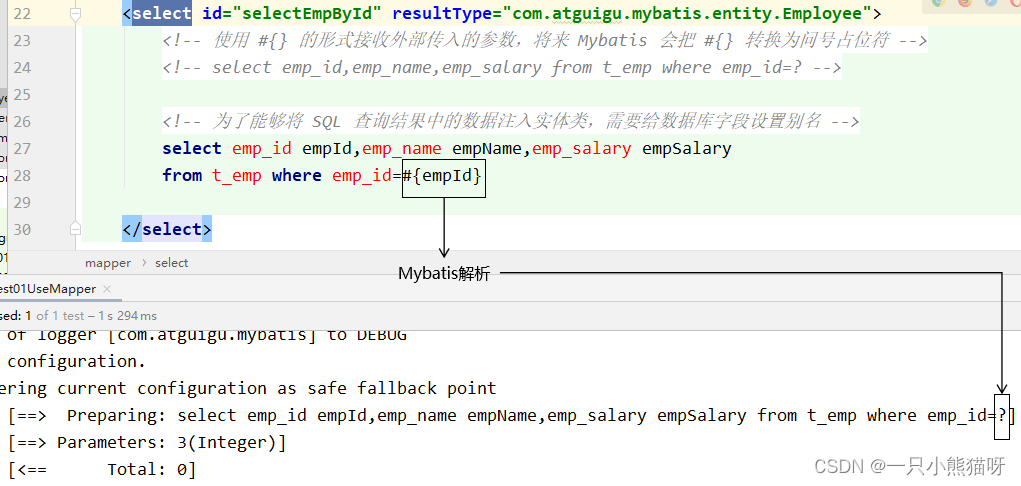
2.1.2 #{}形式
Mybatis 会将 SQL 语句中的 #{} 转换为问号占位符。
2.1.3 ${}形式
${} 形式传参,底层 Mybatis 做的是字符串拼接操作。
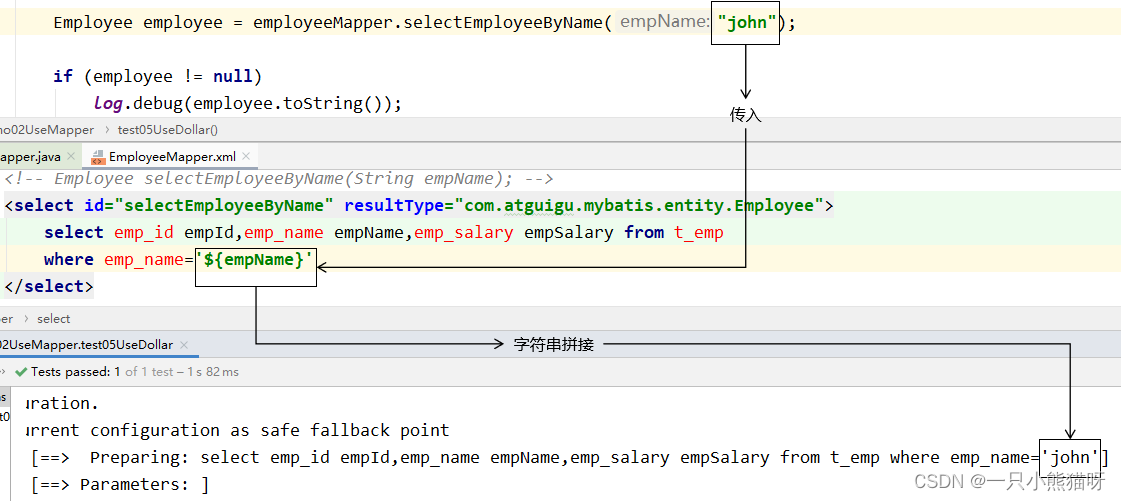
通常不会采用 ${} 的方式传值。一个特定的适用场景是:通过 Java 程序动态生成数据库表,表名部分需要 Java 程序通过参数传入;而JDBC对于表名部分是不能使用问号占位符的,此时只能使用
结论:实际开发中,能用 #{} 实现的,肯定不用 ${}。
特殊情况: 动态的不是值,是列名或者关键字,需要使用 ${} 拼接
//注解方式传入参数!!
@Select("select * from user where ${column} = #{value}")
User findByColumn(@Param("column") String column,
                  @Param("value") String value);
2.2 数据输入
2.2.1 Mybatis总体机制概括

2.2.2 概念说明
这里数据输入具体是指上层方法(例如
Service方法)调用Mapper接口时,数据传入的形式。
- 简单类型:只包含一个值的数据类型
- 基本数据类型:int、byte、short、double、……
- 基本数据类型的包装类型:Integer、Character、Double、……
- 字符串类型:String
- 复杂类型:包含多个值的数据类型
- 实体类类型:Employee、Department、……
- 集合类型:List、Set、Map、……
- 数组类型:int[]、String[]、……
- 复合类型:List、实体类中包含集合……
2.2.3 单个简单类型参数
Mapper接口中抽象方法的声明
Employee selectEmployee(Integer empId);
SQL语句
<select id="selectEmployee" resultType="com.atguigu.mybatis.entity.Employee">
  select emp_id empId,emp_name empName,emp_salary empSalary from t_emp where emp_id=#{empId}
</select>
单个简单类型参数,在 #{} 中可以随意命名,但是没有必要。通常还是使用和接口方法参数同名。
2.2.4 实体类类型参数
Mapper 接口中抽象方法的声明
int insertEmployee(Employee employee);
SQL 语句
<insert id="insertEmployee">
  insert into t_emp(emp_name,emp_salary) values(#{empName},#{empSalary})
</insert>
对应关系

结论:
Mybatis会根据#{}中传入的数据,加工成getXxx()方法,通过反射在实体类对象中调用这个方法,从而获取到对应的数据。填充到#{}解析后的问号占位符这个位置。
2.2.5 零散的简单类型数据
零散的多个简单类型参数,如果没有特殊处理,那么
Mybatis无法识别自定义名称:
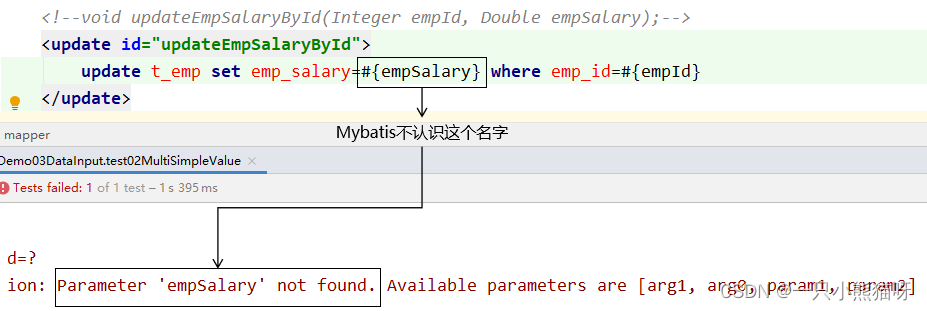
Mapper接口中抽象方法的声明
int updateEmployee(@Param("empId") Integer empId,@Param("empSalary") Double empSalary);
SQL语句
<update id="updateEmployee">
  update t_emp set emp_salary=#{empSalary} where emp_id=#{empId}
</update>
对应关系

2.2.6 Map类型参数
Mapper接口中抽象方法的声明
int updateEmployeeByMap(Map<String, Object> paramMap);
SQL语句
<update id="updateEmployeeByMap">

  update t_emp set emp_salary=#{empSalaryKey} where emp_id=#{empIdKey}

</update>
junit测试
private SqlSession session;
//junit5会在每一个@Test方法前执行@BeforeEach方法
@BeforeEach
public void init() throws IOException {
session = new SqlSessionFactoryBuilder()
.build(
    Resources.getResourceAsStream("mybatis-config.xml"))
.openSession();
}

@Test
public void testUpdateEmpNameByMap() {
    EmployeeMapper mapper = session.getMapper(EmployeeMapper.class);
    Map<String, Object> paramMap = new HashMap<>();
    paramMap.put("empSalaryKey", 999.99);
    paramMap.put("empIdKey", 5);
    int result = mapper.updateEmployeeByMap(paramMap);
    log.info("result = " + result);
}

//junit5会在每一个@Test方法后执行@@AfterEach方法
@AfterEach
public void clear() {
    session.commit();
    session.close();
}
对应关系
#{}中写Map中的key
使用场景
- 有很多零散的参数需要传递,但是没有对应的实体类类型可以使用。使用
@Param注解一个一个传入又太麻烦了。所以都封装到Map中。
2.3 数据输出
2.3.1 输出概述
数据输出总体上有两种形式:
- 增删改操作返回的受影响行数:直接使用
int或long类型接收即可 - 查询操作的查询结果
我们需要做的是,指定查询的输出数据类型即可!
并且插入场景下,实现主键数据回显示!
2.3.2 单个简单类型
Mapper接口中的抽象方法
int selectEmpCount();
SQL语句
<select id="selectEmpCount" resultType="int">
  select count(*) from t_emp
</select>
Mybatis 内部给常用的数据类型设定了很多别名。 以 int 类型为例,可以写的名称有:int、integer、Integer、java.lang.Integer、Int、INT、INTEGER 等等。
junit测试
@Test

public void testEmpCount() {

    EmployeeMapper employeeMapper = session.getMapper(EmployeeMapper.class);

    int count = employeeMapper.selectEmpCount();

    log.info("count = " + count);

}
细节解释:
select标签,通过resultType指定查询返回值类型!- resultType = “全限定符 | 别名 | 如果是返回集合类型,写范型类型即可”
别名问题:
https://mybatis.org/mybatis-3/zh/configuration.html#typeAliases
类型别名可为
Java类型设置一个缩写名字。 它仅用于XML配置,意在降低冗余的全限定类名书写。例如:
<typeAliases>
  <typeAlias alias="Author" type="domain.blog.Author"/>
  <typeAlias alias="Blog" type="domain.blog.Blog"/>
</typeAliases>
当这样配置时,Blog 可以用在任何使用 domain.blog.Blog 的地方。
也可以指定一个包名,
MyBatis会在包名下面搜索需要的Java Bean,比如:
<typeAliases> <package name="domain.blog"/> </typeAliases>
每一个在包
domain.blog中的Java Bean,在没有注解的情况下,会使用Bean的首字母小写的非限定类名来作为它的别名。 比如domain.blog.Author的别名为author;若有注解,则别名为其注解值。见下面的例子:
@Alias("author")
public class Author {
    ...
}
下面是
Mybatis为常见的Java类型内建的类型别名。它们都是不区分大小写的,注意,为了应对原始类型的命名重复,采取了特殊的命名风格。
| 别名 | 映射的类型 |
|---|---|
| _byte | byte |
| _char (since 3.5.10) | char |
| _character (since 3.5.10) | char |
| _long | long |
| _short | short |
| _int | int |
| _integer | int |
| _double | double |
| _float | float |
| _boolean | boolean |
| string | String |
| byte | Byte |
| char (since 3.5.10) | Character |
| character (since 3.5.10) | Character |
| long | Long |
| short | Short |
| int | Integer |
| integer | Integer |
| double | Double |
| float | Float |
| boolean | Boolean |
| date | Date |
| decimal | BigDecimal |
| bigdecimal | BigDecimal |
| biginteger | BigInteger |
| object | Object |
| object[] | Object[] |
| map | Map |
| hashmap | HashMap |
| list | List |
| arraylist | ArrayList |
| collection | Collection |
2.3.3 返回实体类对象
Mapper接口的抽象方法
Employee selectEmployee(Integer empId);
SQL语句
<!-- 编写具体的SQL语句,使用id属性唯一的标记一条SQL语句 -->
<!-- resultType属性:指定封装查询结果的Java实体类的全类名 -->
<select id="selectEmployee" resultType="com.atguigu.mybatis.entity.Employee">

  <!-- Mybatis负责把SQL语句中的#{}部分替换成“?”占位符 -->
  <!-- 给每一个字段设置一个别名,让别名和Java实体类中属性名一致 -->
  select emp_id empId,emp_name empName,emp_salary empSalary from t_emp where emp_id=#{maomi}

</select>
通过给数据库表字段加别名,让查询结果的每一列都和Java实体类中属性对应起来。
增加全局配置自动识别对应关系
在
Mybatis全局配置文件中,做了下面的配置,select语句中可以不给字段设置别名
<!-- 在全局范围内对Mybatis进行配置 -->
<settings>

  <!-- 具体配置 -->
  <!-- 从org.apache.ibatis.session.Configuration类中可以查看能使用的配置项 -->
  <!-- 将mapUnderscoreToCamelCase属性配置为true,表示开启自动映射驼峰式命名规则 -->
  <!-- 规则要求数据库表字段命名方式:单词_单词 -->
  <!-- 规则要求Java实体类属性名命名方式:首字母小写的驼峰式命名 -->
  <setting name="mapUnderscoreToCamelCase" value="true"/>

</settings>
2.3.4 返回Map类型
适用于
SQL查询返回的各个字段综合起来并不和任何一个现有的实体类对应,没法封装到实体类对象中。能够封装成实体类类型的,就不使用Map类型。
Mapper接口的抽象方法
Map<String,Object> selectEmpNameAndMaxSalary();
SQL语句
<!-- Map<String,Object> selectEmpNameAndMaxSalary(); -->
<!-- 返回工资最高的员工的姓名和他的工资 -->
<select id="selectEmpNameAndMaxSalary" resultType="map">
  SELECT
    emp_name 员工姓名,
    emp_salary 员工工资,
    (SELECT AVG(emp_salary) FROM t_emp) 部门平均工资
  FROM t_emp WHERE emp_salary=(
    SELECT MAX(emp_salary) FROM t_emp
  )
</select>
junit测试
@Test
public void testQueryEmpNameAndSalary() {

    EmployeeMapper employeeMapper = session.getMapper(EmployeeMapper.class);

    Map<String, Object> resultMap = employeeMapper.selectEmpNameAndMaxSalary();

    Set<Map.Entry<String, Object>> entrySet = resultMap.entrySet();

    for (Map.Entry<String, Object> entry : entrySet) {

        String key = entry.getKey();

        Object value = entry.getValue();

        log.info(key + "=" + value);

    }
}
2.3.5 返回List类型
查询结果返回多个实体类对象,希望把多个实体类对象放在List集合中返回。此时不需要任何特殊处理,在
resultType属性中还是设置实体类类型即可。
Mapper接口中抽象方法
List<Employee> selectAll();
SQL语句
<!-- List<Employee> selectAll(); -->
<select id="selectAll" resultType="com.atguigu.mybatis.entity.Employee">
  select emp_id empId,emp_name empName,emp_salary empSalary
  from t_emp
</select>
junit测试
@Test
public void testSelectAll() {
    EmployeeMapper employeeMapper = session.getMapper(EmployeeMapper.class);
    List<Employee> employeeList = employeeMapper.selectAll();
    for (Employee employee : employeeList) {
        log.info("employee = " + employee);
    }
}
2.3.6 返回主键值
- 自增长类型主键
Mapper接口中的抽象方法
int insertEmployee(Employee employee);
SQL语句
<!-- int insertEmployee(Employee employee); -->
<!-- useGeneratedKeys属性字面意思就是“使用生成的主键” -->
<!-- keyProperty属性可以指定主键在实体类对象中对应的属性名,Mybatis会将拿到的主键值存入这个属性 -->
<insert id="insertEmployee" useGeneratedKeys="true" keyProperty="empId">
  insert into t_emp(emp_name,emp_salary)
  values(#{empName},#{empSalary})
</insert>
junit测试
@Test
public void testSaveEmp() {
    EmployeeMapper employeeMapper = session.getMapper(EmployeeMapper.class);
    Employee employee = new Employee();
    employee.setEmpName("john");
    employee.setEmpSalary(666.66);
    employeeMapper.insertEmployee(employee);
    log.info("employee.getEmpId() = " + employee.getEmpId());
}
注意:
Mybatis是将自增主键的值设置到实体类对象中,而不是以Mapper接口方法返回值的形式返回。
- 非自增长类型主键
而对于不支持自增型主键的数据库(例如
Oracle)或者字符串类型主键,则可以使用selectKey子元素:selectKey元素将会首先运行,id会被设置,然后插入语句会被调用!
使用
selectKey帮助插入UUID作为字符串类型主键示例:
<insert id="insertUser" parameterType="User">
  <selectKey keyProperty="id" resultType="java.lang.String"
    order="BEFORE">
    SELECT UUID() as id
  </selectKey>
  INSERT INTO user (id, username, password)
  VALUES (
  #{id},
  #{username},
  #{password}
  )
</insert>
在上例中,我们定义了一个 insertUser 的插入语句来将 User 对象插入到 user 表中。我们使用 selectKey 来查询 UUID 并设置到 id 字段中。通过 keyProperty 属性来指定查询到的 UUID 赋值给对象中的 id 属性,而 resultType 属性指定了 UUID 的类型为 java.lang.String。
需要注意的是,我们将 selectKey 放在了插入语句的前面,这是因为 MySQL 在 insert 语句中只支持一个 select 子句,而 selectKey 中查询 UUID 的语句就是一个 select 子句,因此我们需要将其放在前面。
最后,在将 User 对象插入到 user 表中时,我们直接使用对象中的 id 属性来插入主键值。使用这种方式,我们可以方便地插入 UUID 作为字符串类型主键。当然,还有其他插入方式可以使用,如使用Java代码生成UUID并在类中显式设置值等。需要根据具体应用场景和需求选择合适的插入方式。
2.3.7 实体类属性和数据库字段对应关系
- 别名对应
将字段的别名设置成和实体类属性一致。
<!-- 编写具体的SQL语句,使用id属性唯一的标记一条SQL语句 -->
<!-- resultType属性:指定封装查询结果的Java实体类的全类名 -->
<select id="selectEmployee" resultType="com.atguigu.mybatis.entity.Employee">

  <!-- Mybatis负责把SQL语句中的#{}部分替换成“?”占位符 -->
  <!-- 给每一个字段设置一个别名,让别名和Java实体类中属性名一致 -->
  select emp_id empId,emp_name empName,emp_salary empSalary from t_emp where emp_id=#{maomi}

</select>
关于实体类属性的约定:getXxx()方法、setXxx()方法把方法名中的
get或set去掉,首字母小写。
- 全局配置自动识别驼峰式命名规则
在Mybatis全局配置文件加入如下配置:
<!-- 使用settings对Mybatis全局进行设置 -->
<settings>

  <!-- 将xxx_xxx这样的列名自动映射到xxXxx这样驼峰式命名的属性名 -->
  <setting name="mapUnderscoreToCamelCase" value="true"/>

</settings>
SQL语句中可以不使用别名
<!-- Employee selectEmployee(Integer empId); -->
<select id="selectEmployee" resultType="com.atguigu.mybatis.entity.Employee">

  select emp_id,emp_name,emp_salary from t_emp where emp_id=#{empId}

</select>
- 使用
resultMap
使用
resultMap标签定义对应关系,再在后面的SQL语句中引用这个对应关系
<!-- 专门声明一个resultMap设定column到property之间的对应关系 -->
<resultMap id="selectEmployeeByRMResultMap" type="com.atguigu.mybatis.entity.Employee">

  <!-- 使用id标签设置主键列和主键属性之间的对应关系 -->
  <!-- column属性用于指定字段名;property属性用于指定Java实体类属性名 -->
  <id column="emp_id" property="empId"/>

  <!-- 使用result标签设置普通字段和Java实体类属性之间的关系 -->
  <result column="emp_name" property="empName"/>

  <result column="emp_salary" property="empSalary"/>

</resultMap>

<!-- Employee selectEmployeeByRM(Integer empId); -->
<select id="selectEmployeeByRM" resultMap="selectEmployeeByRMResultMap">

  select emp_id,emp_name,emp_salary from t_emp where emp_id=#{empId}

</select>
2.4 CRUD强化练习
- 准备数据库数据
首先,需要准备一张名为
user的表。该表包含字段id(主键)、username、password。创建SQL如下:
CREATE TABLE `user` (
  `id` INT(11) NOT NULL AUTO_INCREMENT,
  `username` VARCHAR(50) NOT NULL,
  `password` VARCHAR(50) NOT NULL,
  PRIMARY KEY (`id`)
) ENGINE=INNODB AUTO_INCREMENT=1 DEFAULT CHARSET=utf8;
- 实体类准备
接下来,需要定义一个实体类
User,来对应user表的一行数据。
@Data //lombok
public class User {
    private Integer id;
    private String username;
    private String password;

    @Override
    public String toString() {
        return "User{" +
                "id=" + id +
                ", username='" + username + '\'' +
                ", password='" + password + '\'' +
                '}';
    }
}
lombok pom 依赖
<dependency>
    <groupId>org.projectlombok</groupId>
    <artifactId>lombok</artifactId>
    <version>1.18.28</version>
    <scope>compile</scope>
</dependency>
- Mapper接口定义
定义一个 Mapper 接口 UserMapper,并在其中添加 user 表的增、删、改、查方法。
public interface UserMapper {

    int insert(User user);

    int update(User user);

    int delete(Integer id);

    User selectById(Integer id);

    List<User> selectAll();
}
- MapperXML编写
在
resources/mappers目录下创建一个名为UserMapper.xml的XML文件,包含与Mapper接口中相同的五个SQL语句,并在其中,将查询结果映射到User实体中。
<?xml version="1.0" encoding="UTF-8" ?>
<!DOCTYPE mapper
PUBLIC "-//mybatis.org//DTD Mapper 3.0//EN"
"https://mybatis.org/dtd/mybatis-3-mapper.dtd">
<!-- namespace等于mapper接口类的全限定名,这样实现对应 -->
<mapper namespace="com.atguigu.mapper.UserMapper">
  <!-- 定义一个插入语句,并获取主键值 -->
  <insert id="insert" useGeneratedKeys="true" keyProperty="id">
    INSERT INTO user(username, password)
    VALUES(#{username}, #{password})
  </insert>

  <update id="update">
    UPDATE user SET username=#{username}, password=#{password}
    WHERE id=#{id}
  </update>

  <delete id="delete">
    DELETE FROM user WHERE id=#{id}
  </delete>
  <!-- resultType使用user别名,稍后需要配置!-->
  <select id="selectById" resultType="user">
    SELECT id, username, password FROM user WHERE id=#{id}
  </select>

  <!-- resultType返回值类型为集合,所以只写范型即可! -->
  <select id="selectAll" resultType="user">
    SELECT id, username, password FROM user
  </select>

</mapper>
- MyBatis配置文件
位置:resources: mybatis-config.xml
<?xml version="1.0" encoding="UTF-8" ?>
<!DOCTYPE configuration
        PUBLIC "-//mybatis.org//DTD Config 3.0//EN"
        "http://mybatis.org/dtd/mybatis-3-config.dtd">
<configuration>

    <settings>
        <!-- 开启驼峰式映射-->
        <setting name="mapUnderscoreToCamelCase" value="true"/>
        <!-- 开启logback日志输出-->
        <setting name="logImpl" value="SLF4J"/>
    </settings>

    <typeAliases>
        <!-- 给实体类起别名 -->
        <package name="com.atguigu.entity"/>
    </typeAliases>

    <!-- environments表示配置Mybatis的开发环境,可以配置多个环境,在众多具体环境中,使用default属性指定实际运行时使用的环境。default属性的取值是environment标签的id属性的值。 -->
    <environments default="development">
        <!-- environment表示配置Mybatis的一个具体的环境 -->
        <environment id="development">
            <!-- Mybatis的内置的事务管理器 -->
            <transactionManager type="JDBC"/>
            <!-- 配置数据源 -->
            <dataSource type="POOLED">
                <!-- 建立数据库连接的具体信息 -->
                <property name="driver" value="com.mysql.cj.jdbc.Driver"/>
                <property name="url" value="jdbc:mysql://localhost:3306/mybatis-example"/>
                <property name="username" value="root"/>
                <property name="password" value="root"/>
            </dataSource>
        </environment>
    </environments>

    <mappers>
        <!-- Mapper注册:指定Mybatis映射文件的具体位置 -->
        <!-- mapper标签:配置一个具体的Mapper映射文件 -->
        <!-- resource属性:指定Mapper映射文件的实际存储位置,这里需要使用一个以类路径根目录为基准的相对路径 -->
        <!--    对Maven工程的目录结构来说,resources目录下的内容会直接放入类路径,所以这里我们可以以resources目录为基准 -->
        <mapper resource="mappers/UserMapper.xml"/>
    </mappers>

</configuration>
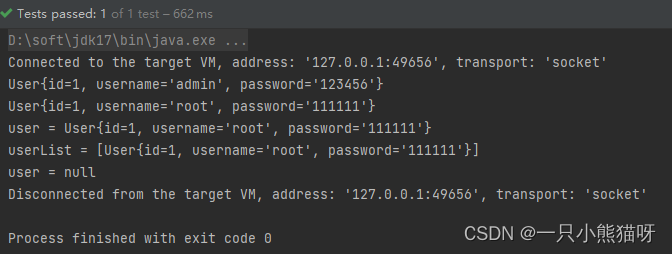
- 效果测试
package com.atguigu.test;

import com.atguigu.entity.User;
import com.atguigu.mapper.UserMapper;
import org.apache.ibatis.io.Resources;
import org.apache.ibatis.session.SqlSession;
import org.apache.ibatis.session.SqlSessionFactoryBuilder;
import org.junit.jupiter.api.AfterEach;
import org.junit.jupiter.api.BeforeEach;
import org.junit.jupiter.api.Test;

import java.io.IOException;
import java.util.List;

/**
 * projectName: com.atguigu.test
 */
public class MyBatisTest {

    private SqlSession session;
    // junit会在每一个@Test方法前执行@BeforeEach方法
    @BeforeEach
    public void init() throws IOException {
        session = new SqlSessionFactoryBuilder()
                .build(Resources.getResourceAsStream("mybatis-config.xml"))
                .openSession();
    }

    @Test
    public void testAll(){
        createTest();
        updateTest();
        selectByIdTest();
        selectAllTest();
        deleteTest();
    }

    @Test
    public void createTest() {
        User user = new User();
        user.setUsername("admin");
        user.setPassword("123456");
        UserMapper userMapper = session.getMapper(UserMapper.class);
        userMapper.insert(user);
        System.out.println(user);
    }

    @Test
    public void updateTest() {
        UserMapper userMapper = session.getMapper(UserMapper.class);
        User user = userMapper.selectById(1);
        user.setUsername("root");
        user.setPassword("111111");
        userMapper.update(user);
        user = userMapper.selectById(1);
        System.out.println(user);
    }

    @Test
    public void deleteTest() {
        UserMapper userMapper = session.getMapper(UserMapper.class);
        userMapper.delete(1);
        User user = userMapper.selectById(1);
        System.out.println("user = " + user);
    }

    @Test
    public void selectByIdTest() {
        UserMapper userMapper = session.getMapper(UserMapper.class);
        User user = userMapper.selectById(1);
        System.out.println("user = " + user);
    }

    @Test
    public void selectAllTest() {
        UserMapper userMapper = session.getMapper(UserMapper.class);
        List<User> userList = userMapper.selectAll();
        System.out.println("userList = " + userList);
    }

    // junit会在每一个@Test方法后执行@@AfterEach方法
    @AfterEach
    public void clear() {
        session.commit();
        session.close();
    }
}
2.5 mapperXML标签总结
MyBatis的真正强大在于它的语句映射,这是它的魔力所在。由于它的异常强大,映射器的XML文件就显得相对简单。如果拿它跟具有相同功能的JDBC代码进行对比,你会立即发现省掉了将近 95% 的代码。MyBatis致力于减少使用成本,让用户能更专注于SQL代码。
SQL 映射文件只有很少的几个顶级元素(按照应被定义的顺序列出):
- insert – 映射插入语句。
- update – 映射更新语句。
- delete – 映射删除语句。
- select – 映射查询语句。
**select**标签:
MyBatis 在查询和结果映射做了相当多的改进。一个简单查询的 select 元素是非常简单:
<select id="selectPerson"
  resultType="hashmap" resultMap="自定义结构"> SELECT * FROM PERSON WHERE ID = #{id}
</select>
这个语句名为 selectPerson,接受一个 int(或 Integer)类型的参数,并返回一个 HashMap 类型的对象,其中的键是列名,值便是结果行中的对应值。
注意参数符号:#{id} ${key}
MyBatis 创建一个预处理语句(PreparedStatement)参数,在 JDBC 中,这样的一个参数在 SQL 中会由一个“?”来标识,并被传递到一个新的预处理语句中,就像这样:
// 近似的 JDBC 代码,非 MyBatis 代码...
String selectPerson = "SELECT * FROM PERSON WHERE ID=?";
PreparedStatement ps = conn.prepareStatement(selectPerson);
ps.setInt(1,id);
select 元素允许你配置很多属性来配置每条语句的行为细节:
| 属性 | 描述 |
|---|---|
| id | 在命名空间中唯一的标识符,可以被用来引用这条语句。 |
| resultType | 期望从这条语句中返回结果的类全限定名或别名。 注意,如果返回的是集合,那应该设置为集合包含的类型,而不是集合本身的类型。 resultType 和 resultMap 之间只能同时使用一个。 |
| resultMap | 对外部 resultMap 的命名引用。结果映射是 MyBatis 最强大的特性,如果你对其理解透彻,许多复杂的映射问题都能迎刃而解。 resultType 和 resultMap 之间只能同时使用一个。 |
| timeout | 这个设置是在抛出异常之前,驱动程序等待数据库返回请求结果的秒数。默认值为未设置(unset)(依赖数据库驱动)。 |
| statementType | 可选 STATEMENT,PREPARED 或 CALLABLE。这会让 MyBatis 分别使用 Statement,PreparedStatement 或 CallableStatement,默认值:PREPARED。 |
**insert****,**update**和 ****delete**标签
数据变更语句 insert,update 和 delete 的实现非常接近:
<insert
  id="insertAuthor"
  statementType="PREPARED"
  keyProperty=""
  keyColumn=""
  useGeneratedKeys=""
  timeout="20">
  ...
</insert>
<update
  id="updateAuthor"
  statementType="PREPARED"
  timeout="20">
  ...
</update>
<delete
  id="deleteAuthor"
  statementType="PREPARED"
  timeout="20">
  ...
</delete>
| 属性 | 描述 |
|---|---|
| id | 在命名空间中唯一的标识符,可以被用来引用这条语句。 |
| timeout | 这个设置是在抛出异常之前,驱动程序等待数据库返回请求结果的秒数。默认值为未设置(unset)(依赖数据库驱动)。 |
| statementType | 可选 STATEMENT,PREPARED 或 CALLABLE。这会让 MyBatis 分别使用 Statement,PreparedStatement 或 CallableStatement,默认值:PREPARED。 |
| useGeneratedKeys | (仅适用于 insert 和 update)这会令 MyBatis 使用 JDBC 的 getGeneratedKeys 方法来取出由数据库内部生成的主键(比如:像 MySQL 和 SQL Server 这样的关系型数据库管理系统的自动递增字段),默认值:false。 |
| keyProperty | (仅适用于 insert 和 update)指定能够唯一识别对象的属性,MyBatis 会使用 getGeneratedKeys 的返回值或 insert 语句的 selectKey 子元素设置它的值,默认值:未设置(unset)。如果生成列不止一个,可以用逗号分隔多个属性名称。 |
| keyColumn | (仅适用于 insert 和 update)设置生成键值在表中的列名,在某些数据库(像 PostgreSQL)中,当主键列不是表中的第一列的时候,是必须设置的。如果生成列不止一个,可以用逗号分隔多个属性名称。 |
本文来自互联网用户投稿,该文观点仅代表作者本人,不代表本站立场。本站仅提供信息存储空间服务,不拥有所有权,不承担相关法律责任。 如若内容造成侵权/违法违规/事实不符,请联系我的编程经验分享网邮箱:veading@qq.com进行投诉反馈,一经查实,立即删除!