用模型预测测试数据
2023-12-21 23:43:40
Hi, I’m Shendi
在之前已经训练好了一个模型,可以通过 model.save("path") 来保存模型到硬盘,下次直接使用。
这个模型使用的 mnist 数据集训练,这个数据集包含6万训练样本和一万测试样本,28*28像素,是一个手写数字数据集,相当于在学习编程语言的hello,world
接下来就开始使用训练好的模型
使用测试数据测试
最开始我尝试直接用画图工具绘制一个数组,让其识别。但识别出来的压根不对,也不清楚什么原因,所以从最开始的弄起。
既然训练的模型评估的准确度达到90%多,那么使用测试数据就没有问题了吧,我将测试数据的图片保存依然识别不对。于是直接使用加载的测试数据
最开始,当然是加载数据集
# 加载 mnist 数据集
mnist = tf.keras.datasets.mnist
(x_train, y_train), (x_test, y_test) = mnist.load_data()
通过 tf.keras.models.load_model 加载保存的模型,我存储在 my_model 文件夹中
model = tf.keras.models.load_model('my_model')
# 选择一些测试集样本
selected_samples = x_test[:5]
true_labels = y_test[:5]
其中x_test是样本数据,y_test样本的正确标签
通过 predict 进行预测,在之前训练的模型有十个输出层,0-9,预测获得的结果就是这个样本对应输出层的可信度,最终结果选择可信度最高的那个
predictions = model.predict(selected_samples)
print(predictions)
# 选取可信度最高的打印
print(tf.argmax(predictions[0]).numpy())
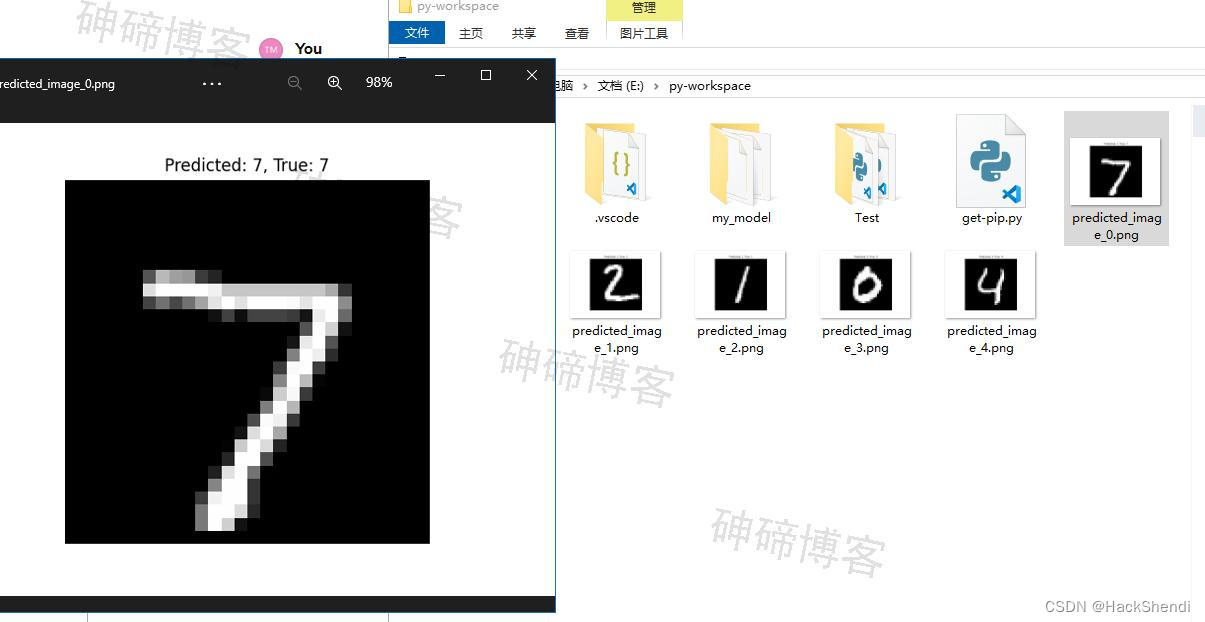
因为我使用vscode,所以没办法直接show,只能保存到本地文件夹查看结果,于是使用以下代码
# 保存图像和预测结果到文件
for i in range(len(selected_samples)):
    plt.imshow(selected_samples[i], cmap='gray')  # 显示灰度图像
    plt.title(f"Predicted: {tf.argmax(predictions[i]).numpy()}, True: {true_labels[i]}")
    plt.axis('off')
    plt.savefig(f"predicted_image_{i}.png")  # 保存图像
    plt.close()
这个结果是准确的,效果如下

其中上面的predicted是预测结果,true是正确结果
问题
就如上面所说,我将数据集的测试数据的某张图片保存到本地,然后加载,用模型预测加载的图片,是不准确的。
我的代码
import tensorflow as tf
import matplotlib.pyplot as plt

from PIL import Image
import numpy as np

# 加载 mnist 数据集
mnist = tf.keras.datasets.mnist
(x_train, y_train), (x_test, y_test) = mnist.load_data()

def initModel():
    model = tf.keras.models.Sequential([
        tf.keras.layers.Flatten(input_shape=(28, 28)),
        tf.keras.layers.Dense(128, activation='relu'),
        tf.keras.layers.Dropout(0.2),
        tf.keras.layers.Dense(10)
    ])

    predictions = model(x_train[:1]).numpy()
    tf.nn.softmax(predictions).numpy()

    loss_fn = tf.keras.losses.SparseCategoricalCrossentropy(from_logits=True)
    loss_fn(y_train[:1], predictions).numpy()

    model.compile(optimizer='adam',
                loss=loss_fn,
                metrics=['accuracy'])

    model.fit(x_train, y_train, epochs=5)

    r = model.evaluate(x_test,  y_test, verbose=2)
    print(r)

    model.save("my_model");

    # probability_model = tf.keras.Sequential([
    #   model,
    #   tf.keras.layers.Softmax()
    # ])
    # probability_model(x_test[:5])
# initModel();

def test():
    model = tf.keras.models.load_model('my_model')
    # 选择一些测试集样本
    selected_samples = x_test[:5]
    true_labels = y_test[:5]

    # 使用模型对样本进行预测
    predictions = model.predict(selected_samples)
    print(predictions)
    print(tf.argmax(predictions[0]).numpy())

    # 保存图像和预测结果到文件
    for i in range(len(selected_samples)):
        plt.imshow(selected_samples[i], cmap='gray')  # 显示灰度图像
        plt.title(f"Predicted: {tf.argmax(predictions[i]).numpy()}, True: {true_labels[i]}")
        plt.axis('off')
        plt.savefig(f"predicted_image_{i}.png")  # 保存图像
        plt.close()
# test();

def test2():
    model = tf.keras.models.load_model('my_model')

    # 准备图像
    img_path = 'test_img.png'  # 替换为你的图像文件路径
    image = Image.open(img_path)
    image = image.convert('L')  # 转换为灰度图像
    image = image.resize((28, 28))  # 调整图像大小
    image = np.array(image)  # 转换为 numpy 数组

    # 归一化处理(如果在训练模型时有进行归一化)
    image = image.astype('float32') / 255

    plt.imshow(image, cmap='gray')  # 显示灰度图像
    plt.axis('off')
    plt.savefig(f"my.png")  # 保存图像
    plt.close()

    # 对图像进行预测
    prediction = model.predict(np.expand_dims(image, axis=0))
    print(prediction)
    print(np.argmax(prediction, axis=1))
test2()

def saveImg(index):
    img = Image.fromarray(x_test[index])
    img.save('test_img.png')
saveImg(0)
我直接使用画图工具绘制数字,加载这个图片,预测,也是不准确的。对于这个,已经花了大把的时间搜索,但资料都特别少,于是准备跳过了,毕竟刚开始,一切都是未知。不应在一些非目标的事情浪费大把时间。
END
文章来源:https://blog.csdn.net/qq_41806966/article/details/135142127
本文来自互联网用户投稿,该文观点仅代表作者本人,不代表本站立场。本站仅提供信息存储空间服务,不拥有所有权,不承担相关法律责任。 如若内容造成侵权/违法违规/事实不符,请联系我的编程经验分享网邮箱:veading@qq.com进行投诉反馈,一经查实,立即删除!
本文来自互联网用户投稿,该文观点仅代表作者本人,不代表本站立场。本站仅提供信息存储空间服务,不拥有所有权,不承担相关法律责任。 如若内容造成侵权/违法违规/事实不符,请联系我的编程经验分享网邮箱:veading@qq.com进行投诉反馈,一经查实,立即删除!